Page is loading ...

Thank You For Choosing Kohler
We appreciate your commitment to Kohler quality. Please take a few minutes to review this manual before
you start installation. If you encounter any installation or performance problems, please don’t hesitate to
contact us. Our phone numbers and website are listed on the back cover. Thanks again for choosing Kohler
Company.
Tools and Materials
Before You Begin
Observe all local plumbing and building codes.
Shut off the main water supply.
Carefully inspect waste and supply tubing for any sign of damage.
Replace waste or supply tubing if necessary.
Install the faucet according to the instructions packed with the faucet.
Kohler Co. reserves the right to make revisions in the design of products without notice, as specified
within the Price Book.
Adjustable Wrench Plumbers Putty Sealant Tape
Assorted Screwdrivers
113776-2-AB 2 Kohler Co.

1. Rough-In Diagram
1-1/2" O.D.
27" (68.6 cm)
Cable
4-1/4"
(10.8 cm)
2-1/8" D.
(5.4 cm)
2-1/2"
(6.4 cm)
4-1/2" D.
(11.4 cm)
3-3/8" D.
(8.6 cm)
4"
(10.2 cm)
4-11/16"
(11.9 cm)
1-5/16" D.
(3.3 cm)
1-1/8"
(2.9 cm)
1-3/4"
(4.4 cm) Max.
3/4"
(1.9 cm)
Max.
Kohler Co. 3 113776-2-AB

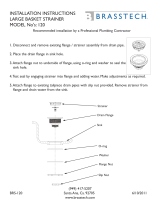
2. Disassemble the Strainer
Remove the strainer cup and stopper from the drain body.
Thread the screw out of the control body housing and remove the drain body.
3. Prepare the Drain Control
Look inside the control housing and position the actuator assembly with the outer flat toward the
front of the sink.
Control Flange
Gasket
Flange Nut
Strainer Cup
Stopper
Screw
Drain Body
Fiber Gasket
Cable
Control Knob
Indicator
Control Body
Housing
Control Body
Gasket
Control
Body
Rubber
Gasket
Plastic
Washer
Control
Housing
Control
Flange
Control
Housing
Inner
Flat
Outer Flat Toward
Front of Sink
113776-2-AB 4 Kohler Co.

4. Control Knob Indicator Positioning
Familiarize yourself with the actuator assembly and the various positions.
Insert and remove the control knob and compare the inside positions to those shown above.
Control Knob Indicator Positions
Control
Knob
Indicator
Control
Knob
Position #1
LR LR LR LR
Position #2 Position #3 Position #4
Single/Dual Control
Drain(s) Open
Dual Control
Right Drain Open;
Left Drain Closed
Single/Dual Control
Drain(s) Closed
Dual Control
Right Drain Closed;
Left Drain Open
Kohler Co. 5 113776-2-AB

5. Alternate Control Knob Positioning
NOTE: Installing the control housing in this manner will not affect the drain operation shown on the
previous page.
If you prefer to position the control knob indicator opposite of positions #1 and #3 shown on the
previous page, insert the control knob and rotate the control housing 180°.
The control knob indicator should now point toward the front of the sink when the drain is open
and the back of the sink when the drain is closed.
6. Connect the Drain Control to the Cable
CAUTION: Risk of product damage. Do not kink or loop the cable.
NOTE: The cable drain is assembled properly when the control knob indicator points toward the drain
that is closed.
Determine the preferred position of the control knob indicator.
Connect the cable(s) to the control housing by placing the cable ends into the sockets and pushing
the cable connectors over the cable sockets.
Hand tighten the cable connectors to the control housing.
Connect the right hand drain cable to the right hand control connection. Connect the left hand drain
cable to the left hand control connection.
Control
Flange
Control
Housing
Rotate Control
Housing 180˚
Outer Flat
Toward Back of
Sink
Control
Housing
Sockets
Cable Connector
(Part of Control Body)
Cable Ends
113776-2-AB 6 Kohler Co.

7. Install the Drain Control
CAUTION: Risk of poor product performance. Location of the cable drain control on the faucet deck
is critical to product performance. Make sure the 27″ (68.6 cm) control body will reach the sink drain
before the cable drain control is installed.
Remove the control flange from the control housing and apply a ring of plumbers putty or other
sealant around the bottom of the control flange according to the putty manufacturer’s instructions.
Assemble the flange nut, plastic washer and gasket to control housing. The distance between the top
of the control housing and gasket must be larger than the faucet deck thickness.
From under the sink, lift the control housing up to faucet deck and turn the control flange until
tight.
Align position of control housing as previously determined.
Push the control flange onto the sink.
Tighten the flange nut and remove excess putty or sealant.
8. Complete the Strainer Installation
Apply thread sealant tape to the control body.
Slide the nut onto the tailpiece and insert the small gasket.
Thread the tailpiece to the control body and tighten the nut securely with a wrench.
Apply
Plumbers
Putty.
Control
Flange
Control Knob
Indicator
Control Knob
Flange
Nut
Plastic
Washer
Control
Housing
Gasket
Control Body
Gasket
Tailpiece
Nut
Cable
(Assembled
to Control)
Kohler Co. 7 113776-2-AB

9. Adjust the Stopper
NOTE: The stopper may need to be adjusted to maximize water drainage.
Place the stopper and strainer cup into the drain body and open the drain.
Check the gap between the stopper and strainer cup.
Remove the strainer cup and stopper from the drain body.
Thread the adjustment screw out of the stopper until the stopper almost touches strainer cup.
Thread the knurled nut until it touches the stopper.
If necessary, repeat the process until the stopper is properly adjusted.
Strainer Cup
Stopper
Knurled
Nut
Drain
Body
Adjustment
Screw
Cable
(Assembled
to Control)
113776-2-AB 8 Kohler Co.
/