Operating Instructions
(Household)
Hair Clipper
Model No. ER‑GC20
Before operating this unit, please read these instructions completely and save them for future use.
English 2
Deutsch 7
Français 13
Italiano 18
Nederlands 23
Español 28
Dansk 33
Português 38
Norsk 43
Svenska 48
Suomi 53
Polski 58
Česky 63
Slovensky 68
Magyar 73
Română 79
Türkçe 84

2
English
Thank you for choosing a Panasonic Hair Clipper. Please
read all instructions before use.
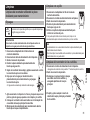
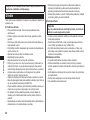
Important
This product is not rechargeable. Use it by connecting the AC
adaptor.
Using the clipper
Check that the blades are not damaged or deformed before
use.
Terminate the usage when there is an abnormality or failure.
Turn off the appliance before changing the trimming length or
removing the comb attachment.
Before each use, apply oil at the places marked with arrows.
(See page 6.)
The appliance should not be used on animals.
Do not press the blade against the skin.
Do not use the clipper for any purpose other than trimming.
This appliance is not intended for use by persons (including
children) with reduced physical, sensory or mental capabilities,
or lack of experience and knowledge, unless they have been
given supervision or instruction concerning use of the
appliance by a person responsible for their safety. Children
should be supervised to ensure that they do not play with the
appliance.
Never use the AC adaptor in the bathroom or shower room.
Do not use any power cord or AC adaptor other than the AC
adaptor (RE7‑59).
Plug in the AC adaptor into a household outlet where there is
no moisture and handle it with dry hands.
Hold the AC adaptor when disconnecting it from the household
outlet. If you tug on the power cord, you may damage it.
Do not damage or deform the power cord. Do not place heavy
objects on the power cord or trap it between objects.
►
•
•
•
•
•
•
•
•
•
•
•
•
•
Do not use the clipper if the power cord or the AC adaptor is
worn, or if the AC adaptor does not fit snugly in the outlet.
The power cord cannot be replaced. If the cord is damaged,
the AC adaptor should be scrapped.
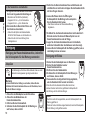
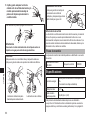
Cleaning the clipper
Warning
Disconnect the power cord from the clipper before
cleaning it in water to prevent electric shock.
The housing should not be taken apart as this can affect the
watertight construction of the appliance.
If you clean the clipper with water, do not use salt water or hot
water. Do not soak the clipper in water for a long period of
time.
Clean the housing only with a soft cloth slightly dampened
with tap water or soapy tap water. Do not use thinner, benzine,
alcohol or other chemicals.
Storing the clipper
Store the clipper in a place with low humidity after use.
Do not store the clipper where it will be exposed to direct
sunlight or other heat sources.
Store the AC adaptor in a dry area where it is protected from
damage.
Do not bend the power cord or wrap it around the clipper.
Keep the oil away from children.
•
•
►
•
•
•
►
•
•
•
•
•
English
3
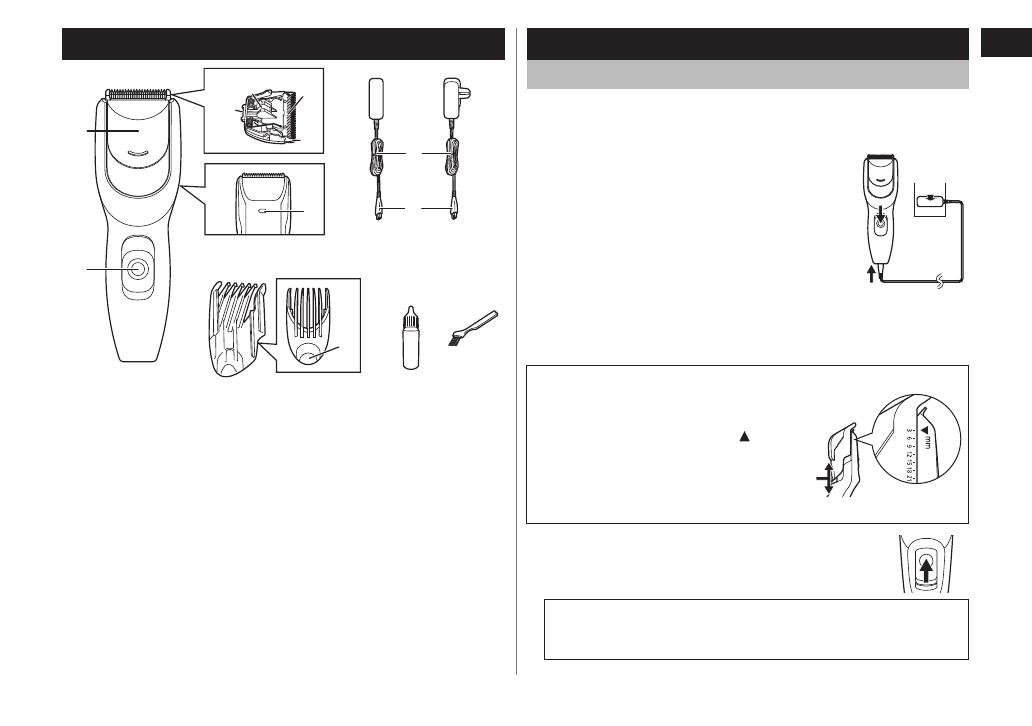
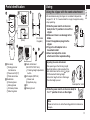
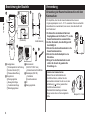
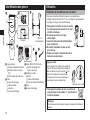
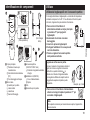
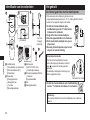
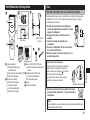
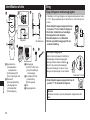
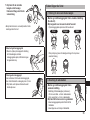
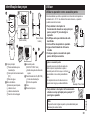
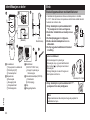
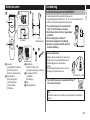
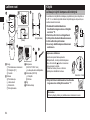
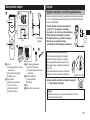
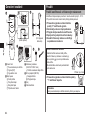
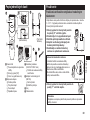
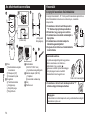
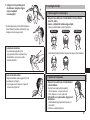
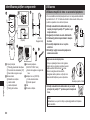
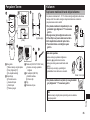
Parts identification
(Back)
(For United
Kingdom)
A Main body
1 Sliding plate f
or
maintenance
2 Power switch [0/1]
3 Water drain hole
B Blade block
4 Cleaning lever
5 Moving blade
6 Stationar
y blade
7 Mounting hook
C Comb attachment
(
3/6/9/12/15/18/21 mm)
8 Trimming height adjustment
button
D AC adaptor (RE7‑59)
9 Power cord
: Appliance plug
E Oil
F Cleaning br
ush
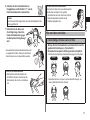
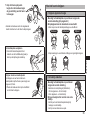
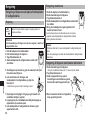
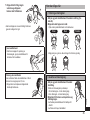
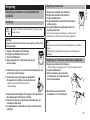
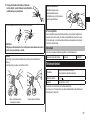
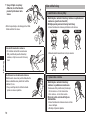
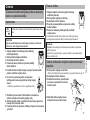
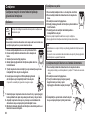
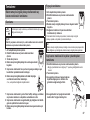
Using
Using the clipper with the comb attachment
We recommend using the clipper in an ambient temperature
range of 0 ‑ 35 °C. If used outside this range, the appliance may
stop operating.
1. Slide the power switch on the main
body to the “0” position to turn off the
clipper.
2. Make sure there is no damage to the
blade.
3. Insert the appliance plug into the
clipper.
4. Plug in the AC adaptor into a
household outlet.
5. Mount and adjust the comb
attachment to the required setting.
4
3
1
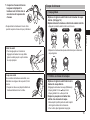
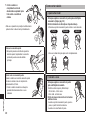
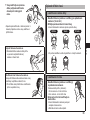
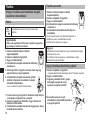
Adjusting the comb attachment
While pressing on the trimming height
adjustment button, slide and adjust the
comb attachment so the mark (
) aligns
with the desired trimming height.
Actual hair length will be a little longer
than the height you set.
•
Example: For 3 mm
6. Slide the power switch on the main body to
the “1” position to turn on the clipper.
Note
Power will not turn on while the sliding plate for maintenance
is open.
•
4
English
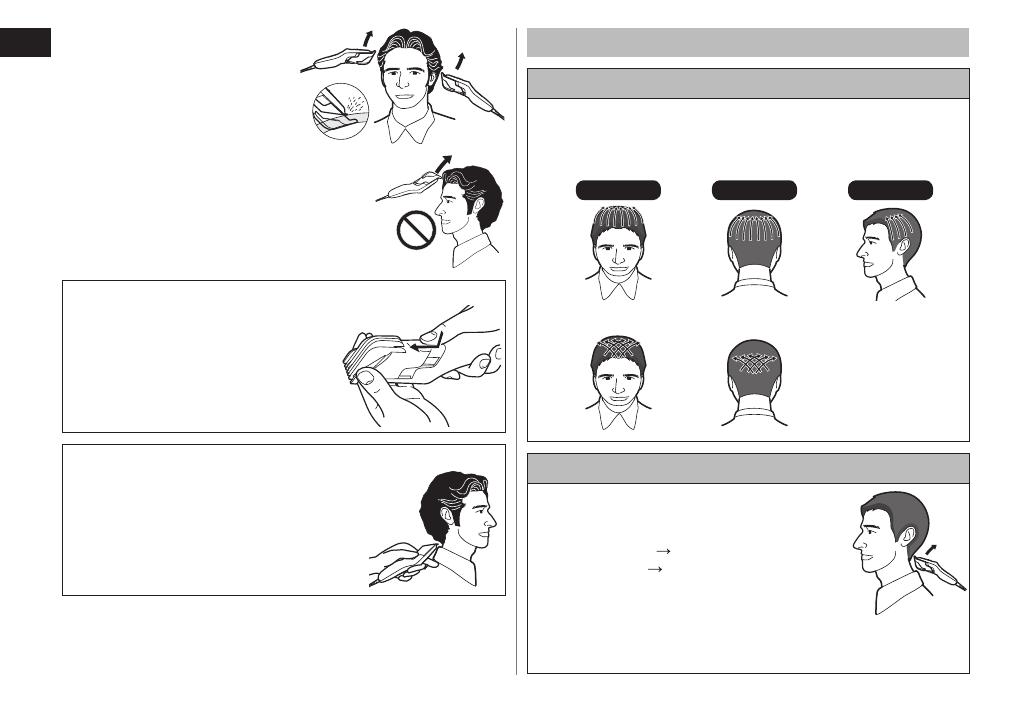
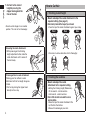
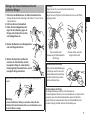
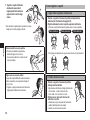
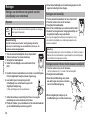
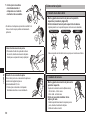
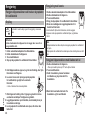
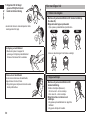
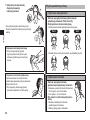
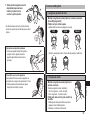
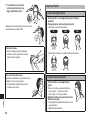
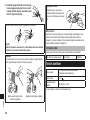
How to Cut Hair
1. Trimming overall height
1. Mount and adjust the comb attachment to the
required setting. (See page 3.)
2. Cut slowly toward the top of your head.
Press the tip of the comb attachment against your scalp.
Front Rear Side
Crisscross in various directions to trim thoroughly.
•
•
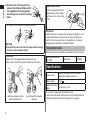
2. Finishing the neckline
1. Mount and adjust the comb
attachment to the required setting.
<Setting the trimming height (Reference)>
12 mm overall 9 mm neckline
9 mm overall 6 mm neckline
2. Cut a little shorter around the ears
and neckline.
Raise the tip of the comb attachment little
by little from the hairline.
Raise with a bending of your wrist.
•
•
•
•
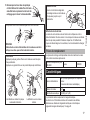
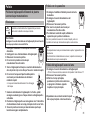
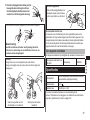
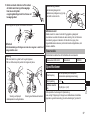
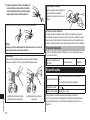
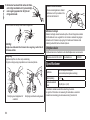
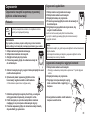
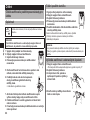
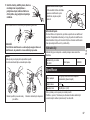
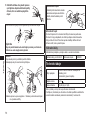
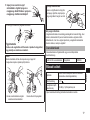
7. Cut hair to the correct
height by moving the
clipper back against the
flow of the hair.
Do not use the clipper in an inverted
position. This can cut hair too deeply.
•
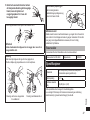
Removing the comb attachment
1. While pressing on the trimming
height adjustment button, slide the
comb attachment until it comes off
the main body.
Trimming without a comb attachment
Trimming your hair without a comb
attachment will trim hair length to approx.
0.5
mm.
1. Cut hair by placing the clipper head
directly on the scalp.
English
5
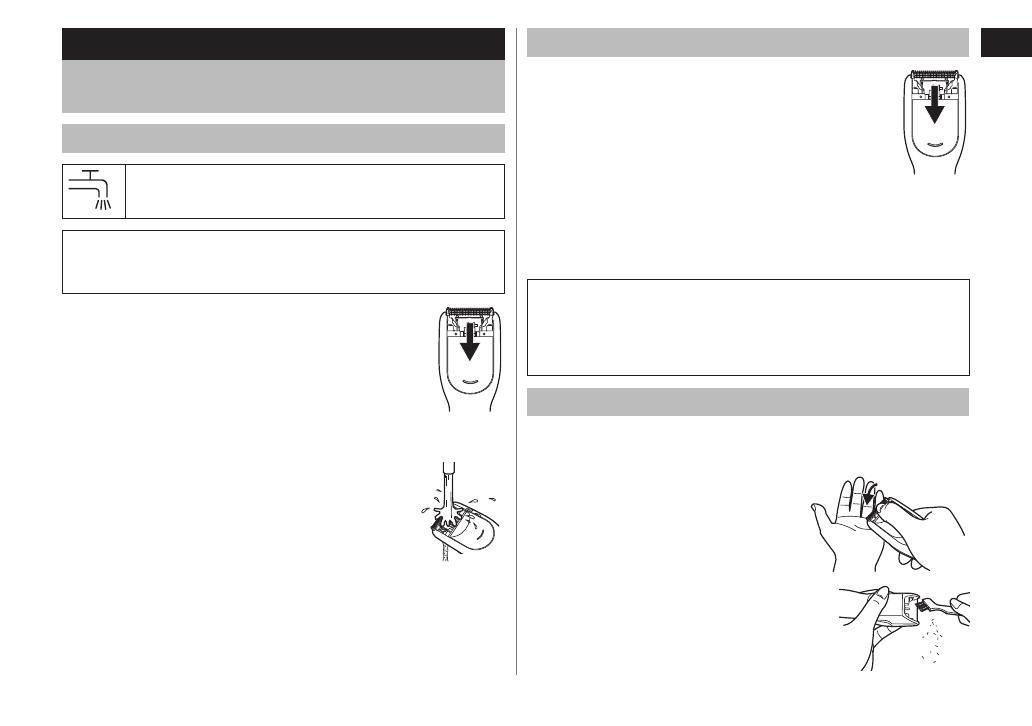
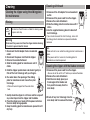
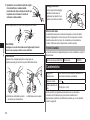
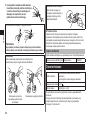
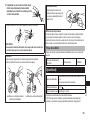
Cleaning
Cleaning the clipper using the sliding plate
for maintenance
Rinsing
The mark on the left means suitable for cleaning under
an open water tap.
Warning
Disconnect the power cord from the clipper before cleaning
it in water to prevent electric shock.
1. Disconnect the AC adaptor from a household
outlet.
2. Disconnect the power cord from the clipper.
3. Remove the comb attachment.
4. Slide the sliding plate for maintenance until it
clicks.
5. Hold the clipper upside down and shake it gently or
flick off the hair trimmings with your fingers.
6. Run water down the opening of the sliding
plate for maintenance and rinse off any hair
trimmings.
Water will be discharged from the water drain
hole.
•
7. Gently shake the clipper 4 or 5 times and then wipe off
any water drops from the clipper and the blade.
8. Place the clipper on a towel with the power switch on
the main body facing upwards.
9. Keep the sliding plate for maintenance opened to let it
dry fully.
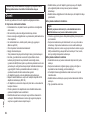
Cleaning with brush
1. Disconnect the AC adaptor from a household
outlet.
2. Disconnect the power cord from the clipper.
3. Remove the comb attachment.
4. Slide the sliding plate for maintenance until it
clicks.
5. Use the supplied cleaning brush to brush off
hair trimmings.
If you cannot remove all the hair trimmings, clean with
the sliding plate for maintenance opened and blades
removed.
•
Note
Power will not turn on while the sliding plate for maintenance is
open.
If the power switch is turned on, the sliding plate for
maintenance cannot be opened.
•
•
Cleaning the clipper with the blades removed
1. Disconnect the power cord from the clipper.
Be sure to set the switch to “0” before you remove the blade.
2. Remove the comb attachment.
3. Hold the main body, place your
thumb against the blades and
then push them away from the
main body.
4. Brush off any hair trimmings from the
main body and from around the blade.
•

6
English
5. Brush any hair trimmings out from
between the stationary blade and the
moving blade while pressing down
the cleaning lever to raise the moving
blade.
This clipper can be rinsed with the blades removed.
Warning
Disconnect the power cord from the clipper before cleaning
it in water to prevent electric shock.
Lubrication
Apply the oil to the clipper before and after each use.
Apply a drop of the oil to the points indicated by the arrows.
Lubricating using the sliding
plate for maintenance
Lubricating with the blades
removed
Remounting the blade
Fit the mounting hook into the
blade mounting on the clipper
and then push in until you hear
a click.
Blade life
Blade life will vary according to the frequency and length of use. It
is expected to be about 2 years when using the clipper twice a
month for 20 minutes each time. If cutting efficiency is reduced
despite proper maintenance, change the blades.
Replacement parts
Replacement parts are available at your dealer or Service Center.
Replacement parts for
ER‑GC20
Blade block WER9605
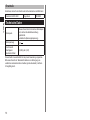
Specifications
Power source
See the name plate on the AC adaptor.
(Automatic voltage conversion)
Motor voltage
5.
4 V
Airborne Acoustical
Noise
60 (dB (A) re 1 pW)
This product is intended for household use only.
Please read “Information on Disposal for Users of Waste Electrical
& Electronic Equipment (private households)” on page 90.
►
Page is loading ...
Page is loading ...
Page is loading ...
Page is loading ...
Page is loading ...
Page is loading ...
Page is loading ...
Page is loading ...
Page is loading ...
Page is loading ...
Page is loading ...
Page is loading ...
Page is loading ...
Page is loading ...
Page is loading ...
Page is loading ...
Page is loading ...
Page is loading ...
Page is loading ...
Page is loading ...
Page is loading ...
Page is loading ...
Page is loading ...
Page is loading ...
Page is loading ...
Page is loading ...
Page is loading ...
Page is loading ...
Page is loading ...
Page is loading ...
Page is loading ...
Page is loading ...
Page is loading ...
Page is loading ...
Page is loading ...
Page is loading ...
Page is loading ...
Page is loading ...
Page is loading ...
Page is loading ...
Page is loading ...
Page is loading ...
Page is loading ...
Page is loading ...
Page is loading ...
Page is loading ...
Page is loading ...
Page is loading ...
Page is loading ...
Page is loading ...
Page is loading ...
Page is loading ...
Page is loading ...
Page is loading ...
Page is loading ...
Page is loading ...
Page is loading ...
Page is loading ...
Page is loading ...
Page is loading ...
Page is loading ...
Page is loading ...
Page is loading ...
Page is loading ...
Page is loading ...
Page is loading ...
Page is loading ...
Page is loading ...
Page is loading ...
Page is loading ...
Page is loading ...
Page is loading ...
Page is loading ...
Page is loading ...
Page is loading ...
Page is loading ...
Page is loading ...
Page is loading ...
Page is loading ...
Page is loading ...
Page is loading ...
Page is loading ...
Page is loading ...

90
English
InformationonDisposalforUsersofWasteElectrical&
ElectronicEquipment(privatehouseholds)
This symbol on the products and/or accompanying
documents means that used electrical and electronic
products should not be mixed with general household
waste.
For proper treatment, recovery and recycling, please
take these products to designated collection points,
where they will be accepted on a free of charge basis.
Alternatively, in some countries you may be able to
return your products to your local retailer upon the purchase of an
equivalent new product.
Disposing of this product correctly will help to save valuable
resources and prevent any potential negative effects on human
health and the environment which could otherwise arise from
inappropriate waste handling. Please contact your local authority for
further details of your nearest designated collection point.
Penalties may be applicable for incorrect disposal of this waste, in
accordance with national legislation.
ForbusinessusersintheEuropeanUnion
If you wish to discard electrical and electronic equipment, please
contact your dealer or supplier for further information.
InformationonDisposalinotherCountriesoutsidethe
EuropeanUnion
This symbol is only valid in the European Union.
If you wish to discard this product, please contact your local
authorities or dealer and ask for the correct method of disposal.
Deutsch
BenutzerinformationenzurEntsorgungvonelektrischen
undelektronischenGeräten(privateHaushalte)
Entsprechend der grundlegenden Firmengrundsätzen
der Panasonic‑Gruppe wurde Ihr Produkt aus hoch‑
wertigen Materialien und Komponenten entwickelt und
hergestellt, die recycelbar und wieder verwendbar sind.
Dieses Symbol auf Produkten und/oder begleitenden
Dokumenten bedeutet, dass elektrische und elektro‑
nische Produkte am Ende ihrer Lebensdauer vom
Hausmüll getrennt entsorgt werden müssen.
Bringen Sie bitte diese Produkte für die Behandlung, Rohstoffrück‑
gewinnung und Recycling zu den eingerichteten kommunalen
Sammelstellen bzw. Wertstoffsammelhöfen, die diese Geräte
kostenlos entgegennehmen.
Die ordnungsgemäße Entsorgung dieses Produkts dient dem
Umweltschutz und verhindert mögliche schädliche Auswirkungen
auf Mensch und Umwelt, die sich aus einer unsachgemäßen
Handhabung der Geräte am Ende Ihrer Lebensdauer ergeben
könnten.
Genauere Informationen zur nächstgelegenen Sammelstelle bzw.
Recyclinghof erhalten Sie bei Ihrer Gemeindeverwaltung.
FürGeschäftskundeninderEuropäischenUnion
Bitte treten Sie mit Ihrem Händler oder Lieferanten in Kontakt, wenn
Sie elektrische und elektronische Geräte entsorgen möchten. Er hält
weitere Informationen für Sie bereit.
InformationenzurEntsorgunginLändernaußerhalbder
EuropäischenUnion
Dieses Symbol ist nur in der Europäischen Union gültig.
Page is loading ...
Page is loading ...
Page is loading ...
Page is loading ...
Page is loading ...
Page is loading ...
Page is loading ...
Page is loading ...
Page is loading ...

F EN, GE, FR, IT, DU, SP, DA, PT, NW, SW, FI, PL, CZ, SK, HU, RO, TK
Printed in China
0000000000 X0000‑0
Panasonic Electric Works Wanbao (Guangzhou) Co., Ltd.
http://panasonic.net
-
 1
1
-
 2
2
-
 3
3
-
 4
4
-
 5
5
-
 6
6
-
 7
7
-
 8
8
-
 9
9
-
 10
10
-
 11
11
-
 12
12
-
 13
13
-
 14
14
-
 15
15
-
 16
16
-
 17
17
-
 18
18
-
 19
19
-
 20
20
-
 21
21
-
 22
22
-
 23
23
-
 24
24
-
 25
25
-
 26
26
-
 27
27
-
 28
28
-
 29
29
-
 30
30
-
 31
31
-
 32
32
-
 33
33
-
 34
34
-
 35
35
-
 36
36
-
 37
37
-
 38
38
-
 39
39
-
 40
40
-
 41
41
-
 42
42
-
 43
43
-
 44
44
-
 45
45
-
 46
46
-
 47
47
-
 48
48
-
 49
49
-
 50
50
-
 51
51
-
 52
52
-
 53
53
-
 54
54
-
 55
55
-
 56
56
-
 57
57
-
 58
58
-
 59
59
-
 60
60
-
 61
61
-
 62
62
-
 63
63
-
 64
64
-
 65
65
-
 66
66
-
 67
67
-
 68
68
-
 69
69
-
 70
70
-
 71
71
-
 72
72
-
 73
73
-
 74
74
-
 75
75
-
 76
76
-
 77
77
-
 78
78
-
 79
79
-
 80
80
-
 81
81
-
 82
82
-
 83
83
-
 84
84
-
 85
85
-
 86
86
-
 87
87
-
 88
88
-
 89
89
-
 90
90
-
 91
91
-
 92
92
-
 93
93
-
 94
94
-
 95
95
-
 96
96
-
 97
97
-
 98
98
-
 99
99
-
 100
100


Panasonic ER-GC20-K503 Owner's manual
- Category
- Hair trimmers & clippers
- Type
- Owner's manual
Ask a question and I''ll find the answer in the document
Finding information in a document is now easier with AI
in other languages
- italiano: Panasonic ER-GC20-K503 Manuale del proprietario
- français: Panasonic ER-GC20-K503 Le manuel du propriétaire
- español: Panasonic ER-GC20-K503 El manual del propietario
- Deutsch: Panasonic ER-GC20-K503 Bedienungsanleitung
- Nederlands: Panasonic ER-GC20-K503 de handleiding
- português: Panasonic ER-GC20-K503 Manual do proprietário
- slovenčina: Panasonic ER-GC20-K503 Návod na obsluhu
- dansk: Panasonic ER-GC20-K503 Brugervejledning
- polski: Panasonic ER-GC20-K503 Instrukcja obsługi
- čeština: Panasonic ER-GC20-K503 Návod k obsluze
- Türkçe: Panasonic ER-GC20-K503 El kitabı
- svenska: Panasonic ER-GC20-K503 Bruksanvisning
- suomi: Panasonic ER-GC20-K503 Omistajan opas
- română: Panasonic ER-GC20-K503 Manualul proprietarului
Related papers
-
Panasonic ER-GS60 Owner's manual
-
Panasonic MCCG485 Operating instructions
-
-
-
-
-
-
-
-
Other documents
-
Rowenta WET & DRY PRECISION Owner's manual
-
Joycare JC-504 Datasheet
-
Princess 535596 Operating instructions
-
 BaBylissPro FX69E User manual
-
-
Philips QC5340/80 User manual
-
Wahl HOMEPRO100 COMBO Owner's manual
-
FIRST FA-5676-5 User manual
-
Princess 535600 Operating instructions
-
Philips QC5170/01 User manual
