4 Vuelta el selector de longitud de corte
del pelo de Zoom Wheel y deslícelo hasta
la posición deseada (fig. 5). Consulte las
distintas posiciones de la tabla 1.
5 El número de seleccionado aparecerá en la
ventana del cortapelos.
Cuando corte por primera vez, seleccione la
posición máxima de longitud de corte (#6.5 del
peine guía pequeño o #13 con del peine guía
grande) para familiarizarse con el aparato y evitar
cortar demasiado el pelo por accidente. A medida
que se vaya familiarizando con las posiciones,
ajuste el selector de longitud de corte de Zoom
Wheel en la longitud de corte deseada.
6 Asegúrese de que la parte plana del peine
esté siempre completamente en contacto
con el cuero cabelludo para conseguir un
resultado uniforme (fig. 6).
7 Puesto que no todo el pelo crece en la
misma dirección, mueva el aparato despacio
sobre la coronilla en distintas direcciones (es
decir, hacia arriba, hacia abajo y en diagonal)
para conseguir un resultado uniforme (fig. 7).
8 Mueva siempre el cortapelos en dirección
contraria a la de crecimiento del pelo.
9 Haga pasadas que se solapen por toda la
cabeza para asegurarse de que ha cortado
todo el pelo que pretendía.
10 Para obtener resultados óptimos con el
pelo rizado, escaso o largo, utilice un peine
de peluquería para dirigir el pelo hacia el
cortapelos.
11 Apague el cortapelos regularmente durante
el corte y quite el peine de vez en cuando y
sople o sacuda el pelo que se haya
acumulado.
CONSEJO: Anote las posiciones de longitud de corte
que ha utilizado para crear un determinado estilo de
corte, como recordatorio para futuras ocasiones.
Perfilado sin peine-guía
wUso el cortapelos sin peine-quía para cortar
el pelo al ras (3/64 in./1mm) a para perfilar la
línea del cuello y la zona de alrededor de las
orejas.
1 Quite el peine del pelo tirando del
cortapelos (fig. 8).
Tenga cuidado cuando esté cortando sin el peine-
guía, ya que cuando el aparato está encendido
cortará todo el pelo que toque.
2 Antes de comenzar a perfilar la zona de
alrededor de las orejas, peine las puntas del
pelo sobre las orejas.
3 Incline el aparato de forma que sólo un
extremo de las cuchillas toque las puntas
del pelo cuando perfile el contorno de la
zonadelasorejas(fig.9).
Corte sólo las puntas del pelo. La línea del pelo
debe quedar próxima a la oreja.
4 Para definir la nuca o las patillas, dé la vuelta
al aparato y sosténgalo con las cuchillas hacia
abajo (fig. 10).
5 Mueva el cortapelos despacio y suavemente,
siguiendo la línea natural del pelo.
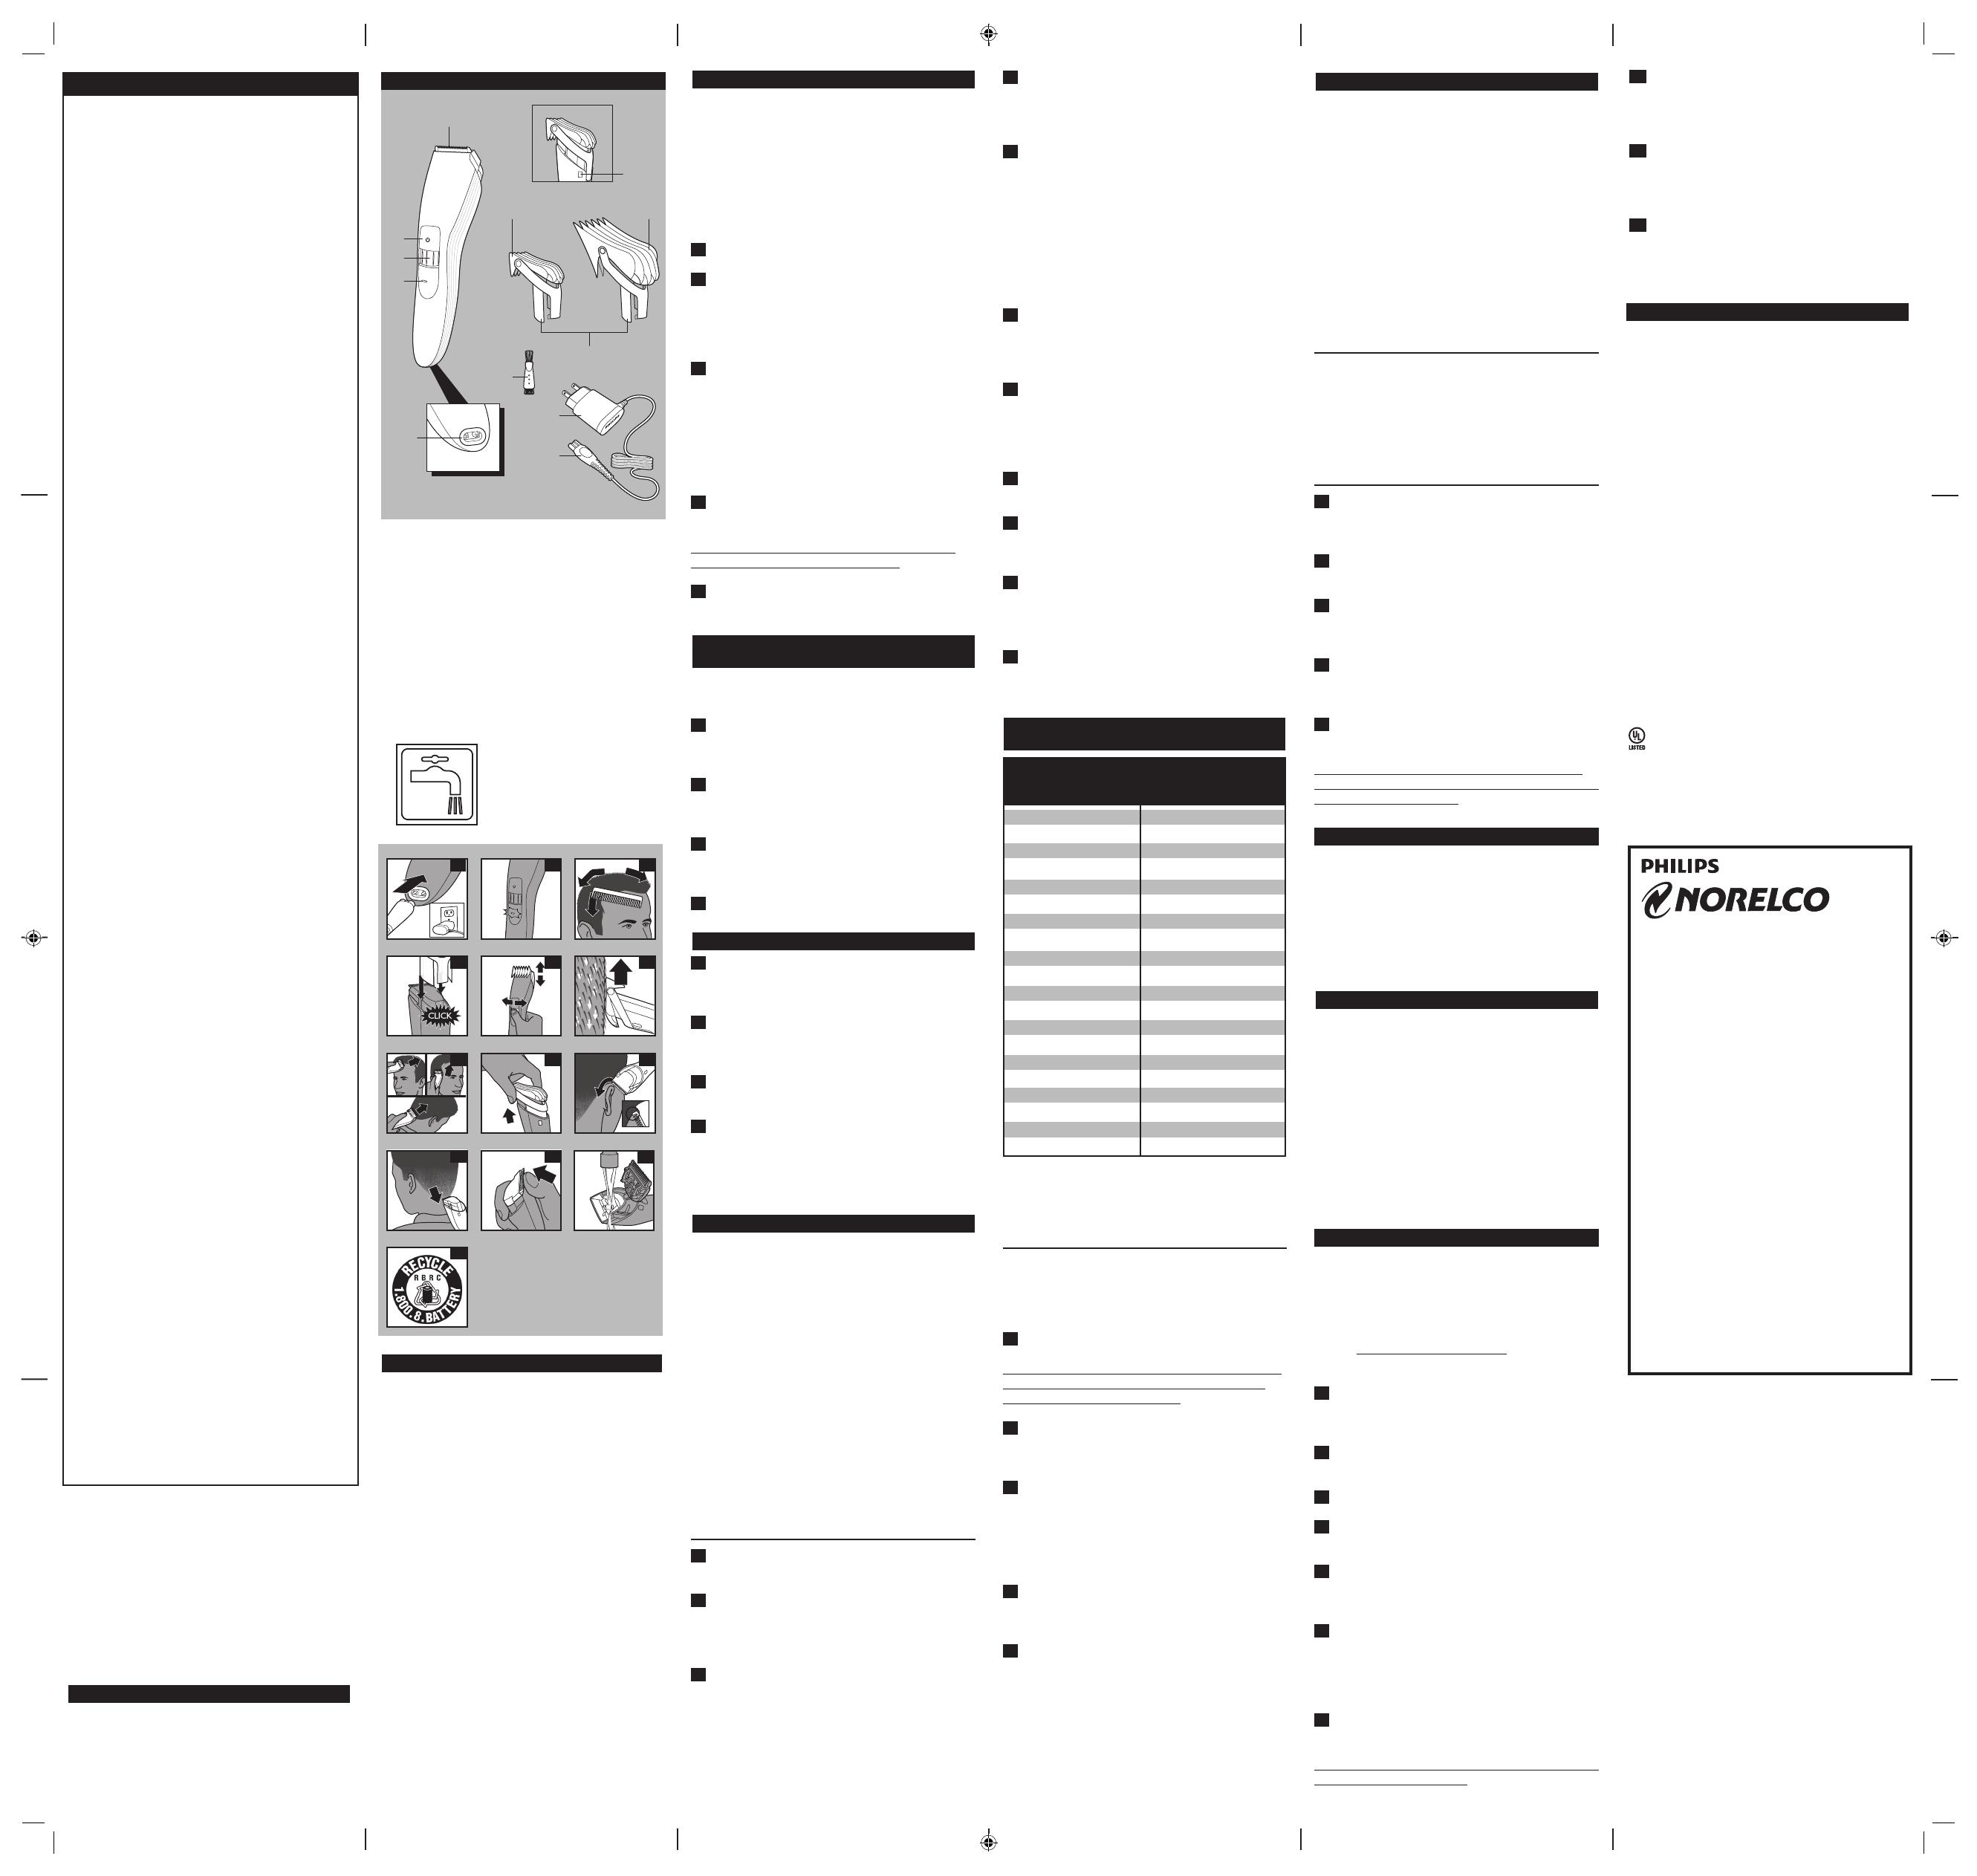
A Cuchillas de acero inoxidable
B Botón de encendido/apagado
C Selector de posición de pelo de Zoom Wheel
D Piloto de carga
E Toma para la clavija del aparato
F Indicador de posiciones de longitud del pelo
G Peine-guía pequeño
H Peine-guía grande
I Posiciónes de longitud de corte
J Cepillo de limpieza
K Adaptador
L Clavija del aparato
Garantía completa de dos años
45 días de garantía de devolución del dinero
El símbolo del golpecito el
cortapelos indica que el
cortapelos se puede aclarar
debajo del agua de
funcionamiento del golpecito.
Cómo Cargar y Recargar
w Cargue completamente el cortapelos antes de
usarlo por primera vez o tras un largo periodo
sin usarlo.
w Cargar o uso el cortapelos a temperaturas
inferioresa40ºFosuperioresa95ºFafecta
negativamente a la vida útil de la batería.
w No hace cargar/recarga o utilizar el cortapelos
con cable hasta que esté secada
completamente.
1 Asegúrese de que el cortapelos está apagado.
2 Introduzca la clavija del aparato directamente
en el cortapelos y enchufe el adaptador a
cualquier toma de corriente de 120 V de CA
(fig. 1). Use sólo el cable de red que se
suministra.
3 El piloto de carga del aparato se centelleo
verde para indicar que el cortapelos se está
cargando (fig. 2).
w Necesitará aproximadamente 1 hora para
cargar completamente el cortapelos y obtener
un tiempo de corte sin cable de hasta 60
minutos.
4 Cuando las pilas están completamente
cargadas, el piloto de carga se enciende en
verde de forma continua.
NOTA: El piloto de carga se apaga después de
unos 30 minutos para ahorra energía.
5 Desconecte el cable y desenchúfelo de la
toma de alimentación.
Corte de pelo con el aparato
enchufado a la red
wEl cortapelos no se recarga durante el corte de
pelo con el aparato enchufado a la red.
1 Conecte el cable suministrado al cortapelos
y enchufe el cortapelos a la toma de
corriente eléctrica (fig. 1).
2 Si la batería está completamente descargada,
espere unos minutos antes de encender el
cortapelos.
3 Deslice el interruptor de encendido/apagado
a la posición de encendido para empezar el
corte.
4 Apague el cortapelos y desenchúfelo.
Corte de pelo sin cable
1 Cargue según las instrucciones. Desenchufe
el cortapelos de la toma de corriente y saque
el cable.
2 Deslice el interruptor de encendido/apagado
a la posición de encendido para empezar a
utilizar el cortapelos.
3 Si la carga funciona bajo mientras que acorta,
la luz de la carga verde vuelta la naranja.
4 Si la batería se agota mientras está utilizando
el aparato, conecte el cable que se suministra
al cortapelos y a la corriente. Espere algunos
segundos y después gire el cortapelos para
continuar acortando.
Cómo cortar el pelo
wUse este cortapelos para uso doméstico tal y
como se describe en este manual.
wAsegúrese de que el aparato está totalmente
cargado antes de empezar a cortar el pelo.
w Antes de empezar a cortar, asegúrese de que la
cabeza de la persona a la que va a cortar el
pelo está a la altura de su pecho para que
pueda ver y acceder con facilidad a todas las
zonas de su cabeza.
w Utilice el aparato sólo sobre pelo limpio y seco.
w No lo utilice con el pelo recién lavado.
w Antes de comenzar a cortar el pelo, péinelo en
la dirección de crecimiento (fig. 3).
w Para conseguir resultados de corte óptimos,
mueva siempre el aparato lentamente por
la cabeza en dirección contraria a la del
crecimiento del pelo.
Corte de pelo con el peine-guía grande
o el pequeño
1 Asegúrese de que el cortapelos está en la
posición de apagado.
2 Elija el peine-guía. La tabla muestra la longitud
de pelo resultante tras el corte según las
distintas posiciones del peine-guía grande y
del peine-guía pequeño.
3 Deslice el peine-guía seleccionado por las
ranuras de guía situadas a ambos lados
del cortapelos y apriete hasta que oiga un
clic cuando éste encaje en su sitio (fig. 4).
Limpieza
w Limpie los accesorios después de cada uso.
w Apague siempre el cortapelos, desenchúfelo y
quite el cable de red del cortapelos antes de la
limpieza.
w No utilice aire comprimido, agentes de limpieza
abrasivos, ni agresivo líquidos tales como
gasolina, acetona o aceites etéreos para limpiar
el cortapelos y los accesorios.
wNunca limpie, coloque o retire los accesorios
del cortapelos con el motor en funcionamiento.
w No ejerza presión sobre las cuchillas.
w No toque las cuchillas con objetos duros, ya
que podría dañarlas.
w Limpie el mango del cortapelos con un paño
suave y seco.
Durante el uso:
w Si se han acumulado pelos en el peine-guía,
elimine los pelos sacudiéndolos, soplando o
utilizando el cepillo de limpieza proporcionado.
Recuerde volver a ajustar la longitud de corte
en su posición seleccionada cuando vuelva a
colocar el peine-guía en el cortapelos.
Después de cada uso:
1 Asegúrese de que el cortapelos está apagado
y desenchúfelo de la toma de corriente
eléctrica.
2 Quite cualquier peine-guía y aclárelo debajo
del agua caliente.
3 Presione con el pulgar el extremo superior
central de la cuchilla hacia arriba hasta que
se abra (fig. 11).
4 Lave el aparato bajo el grifo con agua
caliente para eliminar el pelo que se haya
acumulado en el accesorio (fig. 12).
5 Deje que el aparato y el accesorio para
cortar el pelo se sequen completamente.
Este cortapelos no tiene más piezas que pueda
reparar el usuario. Si desea obtener ayuda, llame al
teléfono: 1-800-243-3050.
Ayuda
Si desea obtener ayuda, visite nuestro sitio web:
www.philips.com/support
o llame gratuitamente al numero:
1-800-243-3050
La información está disponible 24 horas al día, los
7 días de la semana.
Almacenamiento
w Asegúrese de que el cortapelos está apagado.
Desenchufe el cable de la toma de corriente
y del cortapelos antes de guardarlo en un
lugar seguro y seco, donde no se pueda ser
aplastado, arañado o dañado.
w Al guardar el cortapelos, no enrolle el cable
alrededor del mismo.
w Guarde el cable en un lugar seguro donde no
se pueda cortar o dañar.
w No coloque ni guarde el cortapelos en un
lugar desde donde pueda caerse a una bañera, a
un lavabo, al agua o a otro líquido mientras está
enchufado.
Extracción de las baterías
w Este cortapelos Philips Norelco contiene una
batería de iones de litio recargable, que se
deben desechar de manera adecuada (fig. 16).
w Sólo debe extraer la batería cuando vaya a
desechar el cortapelos.
w Para obtener asistencia, visite nuestra página
Web: www.philips.com/support o llame
gratuitamente al número 1-800-243-3050.
1 Antes de desmontar el aparato, desenchufe el
cable de la toma de corriente y del
cortapelos.
2 Deje funcionar el cortapelos hasta agotar por
complete las baterías.
3 Apague el cortapelos.
4 Quite cualquier peine y accesorio del
recortes del cortapelos.
5 Compruebe si hay tornillos en la parte
posterior o frontal del aparato. Si es así,
quítelos.
6 Retire la parte posterior o el panel frontal
del aparato con un destornillador. Si es
necesario, quite también los tornillos o piezas
adicionales hasta que vea el circuito impreso
con las pilas recargables.
7 Si es necesario, corte los cables para separar
el circuito impreso y las pilas recargables del
aparato.
Tenga cuidado las tiras de la batería y las piezas de
la cubierta son muy agudas.
INSTRUCCIONES
IMPORTANTES DE
SEGURIDAD
Al utilizar un aparato eléctrico, se deben tomar
siempre medidas de seguridad básicas, incluyendo
las siguientes:
Lea todas las instrucciones antes de
utilizar el aparato.
PELIGRO
Para reducir el riesgo de descarga
eléctrica:
1. No intente coger un cortapelos que se haya
caído al agua. Desenchúfelo inmediatamente.
2. Utilice el cortapelos solamente en
condiciones secas. No lo utilice mientras
se baña o se ducha.
3. No sumerja el cortapelos en agua.
4. No coloque ni guarde el cortapelos en un
lugar desde donde pueda caerse a una bañera
o fregadero. No deje caer el cargador al agua
ni a ningún otro líquido.
5. Desenchufe siempre el cortapelos de la toma
de corriente inmediatamente después de
usarlo, excepto cuando lo esté cargando.
6. Desenchufe y desconecte el cable de
alimentación del cortapelos antes de
limpiarlo.
7. Las baterías de este dispositivo pueden
representar un peligro de incendio o
quemaduras químicas si no se utilizan de
forma adecuada. No desarme ni incinere
la unidad ni la exponga a temperaturas que
superen los 100°C (212°F).
ADVERTENCIA
Para reducir el riesgo de quemaduras,
incendio, descarga eléctrica o lesiones:
1. Es necesaria una estricta supervisión cuando
el aparato sea utilizado por, en, o cerca de
niños o personas con discapacidad.
2. Use este cortapelos para uso doméstico tal y
como se describe en este manual. No utilice
accesorios no recomendados por Philips
Electronics North America Corporation.
3. No utilice nunca el cortapelos si tiene
algún cable o clavija dañados, si no funciona
correctamente, si se ha caído o dañado, o si
se ha caído al agua. Para obtener ayuda, llame
al 1-800-243-3050.
4. El cortapelos se pueden aclarar debajo
del agua de golpecio corriente. No
funcione el cortapelos hasta que esté secado
completamente.
5. Mantenga el cortapelos, el cable y cualquier
otro accesorio lejos de superficies calientes.
6. No deje caer ni introduzca ningún objeto en
ninguna abertura.
7. No utilice, cargue o enchufe el cortapelos
al aire libre, ni en lugares donde se usen
aerosoles (spray) o donde se administre
oxígeno.
8. Antes de usar el cortapelos compruebe el
estado de las cuchillas, la unidad de corte y
los peines. No utilice el cortapelos si las
cuchillas, la unidad de corte o los peines
están dañados, ya que podría producir
lesiones.
9. Insertesiempreprimerolaclavijaenel
cortapelos y luego conéctela a la toma
de corriente. Para desconectarlo, coloque el
interruptor de encendido/apagado en la
posición de apagado y, a continuación,
extraiga el enchufe de la toma de corriente.
10. Para evitar dañar el cable de red, no lo
enrolle alrededor del cortapelos.
11. Nunca coloque el cortapelos en contacto
directo con la luz del sol ni lo guarde en un
lugar con una temperatura superior a 140ºF.
12. Este cortapelos está indicado para su uso
exclusivo en cabello humano. No utilice este
cortapelos con otro fin distinto.
13. Guarde siempre el cortapelos, los accesorios
y la clavija de alimentación en un lugar seco.
Asegúrese de que el cable está desconectado
del cortapelos.
14. Utilice sólo el conector de alimentación que
se suministra con el producto.
CONSERVE ESTAS
INSTRUCCIONES
IMPORTANTE: La clavija adaptadora
tiene un transformador. No corte la clavija
adaptadora para sustituirla por otra clavija,
ya que ello podría provocar situaciones de
peligro.
IMPORTANTE: SU CORTAPELOS
CONTIENE UNA BATERIA
RECARGABLE DEL LITHIUM-ION.
Consulte las instrucciones sobre extracción de
las baterias.
Registro
Enhorabuena por su adquisición y bienvenido a
Philips Norelco!
Para sacar el mayor partido a la asistencia que
Philips Norelco le ofrece, registre el producto en
www.philips.com/norelco
DEVOLUCIÓN
DEL DINERO
GARANTÍA
Si no está satisfecho del todo con el
cortapelos de Philips Norelco, devuélvanos el
producto detrás junto con recibo anticuado
de las ventas y le reembolsaremos el importe
completo de su compra. El cortapelos debe
enviarse por correo certificado en sobre
franqueado y asegurado; además, debe
adjuntarse el recibo de compra original
(con el precio y fecha de compra). No
nos hacemos responsables de pérdidas
en los envíos. El cortapelos debe tener
timbre postal con un período no superior
a 45 días después de la fecha de compra.
Philips Norelco se reserva el derecho de
revisar el precio de compra del cortapelos
y limitar las devoluciones para no exceder
el precio de compra recomendado.
Para obtener el formulario de autorización
de devolución del importe, llame al
1-800-243-3050 para obtener ayuda.
Transcurrirán de 4 a 6 semanas hasta que
reciba el cheque.
Garantía completa de dos años
Philips Electronics North America Corporation garantiza todos los
productos nuevos Philips Norelco, modelo QC5340 (excepto cuchillas
y peines), frente a defectos de materiales o de fabricación durante un
periodo de dos años desde la fecha de adquisición, y accede a reparar o
sustituir sin cargo cualquier producto defectuoso.
IMPORTANTE: Esta garantía no cubre los daños resultantes de
accidentes, del uso inapropiado o de abusos, la falta razonable de
mantenimiento, el uso de accesorios no suministrados con el producto,
la pérdida de piezas o el uso del aparato con un voltaje distinto al
especificado*.El uso de piezas de repuesto no autorizadas anulará esta
garantía.
PHILIPS ELECTRONICS NORTH AMERICA CORPORATION
NO PAGARÁ SERVICIOS DE GARANTÍA LLEVADOS A CABO
POR UN SERVICIO DE REPARACIÓN NO AUTORIZADO,
Y NO REEMBOLSARÁ AL CONSUMIDOR POR DETERIOROS
RESULTANTES DE LOS SERVICIOS DE GARANTÍA
LLEVADOS A CABO POR UN SERVICIO DE REPARACIÓN NO
AUTORIZADO.
NO SE ASUME LA RESPONSABILIDAD POR NINGÚN DAÑO
ESPECIAL, ACCIDENTAL O RESULTANTE.
Para disfrutar del servicio de garantía, sólo tiene que visitar www.philips.
com/norelco o llamar al 1-800-243-3050 para obtener ayuda. Por su
seguridad, recomendamos realizar la devolución de productos por correo
certificado, y pagado por adelantado. La garantía no cubre los daños
producidos durante el envío. NOTA: Ninguna otra garantía, ya sea escrita
u oral, está autorizada por Philips Electronics North America Corporation.
Esta garantía le otorga derechos específicos y además puede tener
otros derechos que varían entre estados. Algunos países no permiten la
exclusión o limitación de los daños accidentales o indirectos, por lo que la
exclusión y las limitaciones anteriores no se aplicarían en este caso.
*Lea atentamente las instrucciones adjuntas.
Fabricado parar :
Philips Consumer Lifestyle
A Division of Philips Electronics North America Corporation
P.O. Box 10313, Stamford, CT 06904
Este símbolo colocado en la placa de características del producto significa
que está registrado por Underwriters’ Laboratories, Inc.
Norelco es una marca registrada de Philips Electronics North America Corporation.
PHILIPS es una marca registrada de Koninklijke Philips Electronics N.V.
© 2011 Philips Electronics North America Corporation. Todos los derechos
reservados.
Póngalo a prueba
Al igual que con la mayoría de productos nuevos,
debe acostumbrase a utilizar el cortapelos Philips
Norelco. Si es la primera vez que utiliza un
cortapelos eléctrico o si ha estado utilizando uno
de otra marca, tómese su tiempo para familiarizarse
con su nuevo cortapelos.
El cortapelos dispone de un potente motor y
cuchillas de acero inoxidable que permiten un
corte cómodo incluso con el pelo más resistente.
Olvídese de las tijeras y pruebe su nuevo cortapelos.
Le garantizamos un resultado preciso y profesional
o, de lo contrario, Philips Norelco le garantiza
la devolución completa del precio de compra
siempre que la petición se reciba dentro de los 45
días posteriores a la compra.
ESPAÑOL
E
A
B
C
1
1.5
2
3
3.5
4
5
5.5
6
6.5
D
1
1.5
2
3
3.5
4
5
5.5
6
6.5
7
8
8.5
9
10
10.5
11
12
12.5
13
J
I
F
H
G
K
L
Características
13
1 2 3
1
1.5
2
3
3.5
4
5
5.5
6
6.5
4 5 6
7
8 9
10 11
12
8 No intente sustituir la batería. Aísle los
extremos de las baterías cubriéndolos con
cinta aislante o coloque la batería en una
bolsa de plastic pequeña.
9 Deseche el cortapelos. No enchufe el cable
a la toma de corriente ni recargue el
cortapelos después de haber extraído la
batería.10
10 Para obtener información sobre cómo
desechar las baterías, póngase en contacto
con la administración local, llame al número
1-800-8-BATTERY o visite www.rbrc.com.
Tabla 1. Peines-guía grande y
pequeño
Largo restante
del cabello
Inches MM
#7
#8
#8.5
#9
#10
#10.5
#11
#12
#12.5
#13
#1
#1.5
#2
#3
#3.5
#4
#5
#5.5
#6
#6.5
1/8
3/16
9/32
3/8
7/16
1/2
5/8
11/16
3/4
13/16
3
4
5
6
7
8
9
10
11
12
13
14
15
16
17
18
19
20
21
22
Largo restante
del cabello
Inches MM
7/8
1
1 1/16
1 1/8
1 1/4
1 5/16
1 3/8
1 1/2
1 5/8
1 11/16
23
24
25
26
27
28
29
30
31
32
33
34
35
36
37
38
39
40
41
42
Peine
Pequeño
Ajuste de
Barbero
Peine
Grande
Ajuste de
Barbero
11_QC5340.indd 2 1/20/11 11:06 AM

