Page is loading ...

BC 509
www.sigmasport.com
BIKE COMPUTER TOPLINE
PAGE 3-44
Deutsch
·
English
Français
·
Italiano
Español
·
Nederlands
PAGE 45-70
Português
·
Polski
Magyar
·
Česky

2 Die Montage / Assembly
Die Abbildungen zu diesen Montagetexten befinden sich auf dem beiliegenden Faltblatt!
Die Halterung kann entweder mit Kabelbinder (dauerhafte Anbringung) oder mit den
O-Ringen montiert werden.
Lenker oder Vorbau?
Montage am Vorbau: Die im Lieferumfang enthaltene Halterung ist für die Lenkermon-
tage vorgesehen. Für die Vorbaumontage lösen Sie die 4 Schrauben auf der Rückseite,
drehen die Platte um 90° und befestigen Sie wieder.
Gelbe Folie entfernen.
Illustrations belonging to these assembly notes can be found in the enclosed folded
sheet! The bracket can either be fitted with cable ties (permanent attachment) or with
the O-rings.
Handlebars or front end?
Assembly to the front end: The bracket supplied is designed to be fitted to the handle-
bars. To assemble it to the front end, undo the 4 screws on the back, turn the plate by
90° and tighten them back up.
Remove yellow film.
D
GB
US
3

o
p
e
n
-
c
l
o
s
e
o
p
e
n
-
c
l
o
s
e
3 Inbetriebnahme / Start-up / Mise en service
Aus Stromverbrauchsgründen, wird der BC 509 ohne Batterie ausgelie-
fert. Setzen Sie bitte die Batterie ein, indem Sie den Batteriefachdeckel
mit einer Münze öffnen. Nachdem Sie die Batterie eingelegt haben,
schließen Sie den Deckel mit Hilfe einer Münze. Die Anzeige springt
automatisch in den Einstellungsmodus.
For reasons of energy consumption, the BC 509 is supplied without a
battery. Please insert the battery by opening the battery compartment
with a coin. Once you have inserted the battery, close the cover with
the aid of the coin. The display automatically jumps to setting mode.
Le BC 509 est fourni sans pile afin de limiter la consommation
d‘énergie. Mettre la pile en place en ouvrant le couvercle du
compartiment à piles au moyen d‘une pièce de monnaie. Après avoir
mis la pile en place, refermer le couvercle au moyen d‘une pièce de
monnaie. L‘affichage passe automatiquement en mode de réglage.
F
D
GB
US
6

5.1 Radumfang berrechnen / Measure wheel size / Mesurer la roue
D
kDetermine the correct value for your wheel size from
Table
C
„Wheel Size Chart“ (refer to next page).
k Enter this value.
k Alternatively: calculate/determine WS (Tab.
A
or Tab.
B
).
kDéterminer la valeur correspondant à votre circonférence de roue
à partir du tableau
C
„Wheel Size Chart“ (voir page suivante).
k Entrer cette valeur.
k Alternative: calculer/déterminer WS (Tab.
A
ou tab.
B
).
F
GB
US
kAus Tabelle
C
„Wheel Size Chart“ (nächste Seite) den Ihrer Reifengröße
entsprechenden Wert ermitteln.
kDiesen Wert eingeben.
kAlternativ: WS berechnen, ermitteln (Tab.
A
oder Tab.
B
).
12

5.2 Wheel size chart (Radgröße / Wheel size / Circonference de Roue)
mm x 3,14
km/h:
WS = mm x 3,14
mph:
WS = mm x 3,14
1x
= WS (mm)
km/h:
WS = mm
mph:
WS = mm
A
B
14

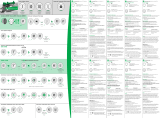
5.3 Eingabe Radumfang / Set wheel size / Reglage de la circonference de la roue
kMit MODE-Taste zur SIZE-Anzeige wechseln.
kSET-Taste kurz drücken, die erste Ziffer der Eingabe blinkt.
kMit MODE-Taste Wert einstellen.
kMit SET-Taste zur nächsten Stelle wechseln.
kNach dem Einstellen der letzten Ziffer mit SET-Taste bestätigen.
kSET OK erscheint im Display.
kChange the display to SIZE using the MODE button.
kPress the SET button briefly. The first input figure is flashing.
kSet the value using the MODE button.
kMove to the next figure using the SET button.
kAfter setting the last digit, confirm with SET button.
kSET OK appears on the display.
kAvec la touche MODE, sélectionnez la fonction SIZE.
kAppuyer brièvement sur la touche SET. Le premier chiffre à
régler clignote.
kAvec la touche MODE, régler le chiffre.
kAvec la touche SET, passer au chiffre suivant.
kConfirmer avec la touche SET après avoir réglé la dernière valeur.
k SET OK apparaît à l‘écran.
F
D
n
MODE
n
MODE
GB
US
509
509
509
SET
!
16

5.4 Eingabe KMH/MPH / KMH/MPH Entry / Reglage KMH/MPH
kChange the display to UNIT using the MODE button.
k Press the SET button briefly.
kKMH appears on the display and flashes.
kSelect MPH or KMH using MODE.
kConfirm by pressing the SET button. SET OK appears on the display.
Switching from KMH to MPH automatically changes the format of the distance
from km to mi and the clock from 24h mode to 12h mode.
kAvec la touche MODE, sélectionnez la fonction UNIT.
k Appuyer brièvement sur la touche SET.
kKMH apparaît dans l‘affichage et clignote.
kRégler MPH ou KMH à l‘aide de la touche MODE.
kConfirmer par la touche SET. SET OK apparaît à l‘écran.
Le format utilisé pour la mesure de la distance passe de km à mi et l‘heure
du mode 24h au mode 12h lorsque vous passez de KMH à MPH.
D
kMit MODE-Taste zur UNIT-Anzeige wechseln.
k SET-Taste kurz drücken.
kIn der Anzeige erscheint KMH und blinkt.
kMit MODE-Taste MPH oder KMH einstellen.
kMit SET-Taste bestätigen. SET OK erscheint im Display.
Mit der Umstellung von KMH auf MPH ändert sich automatisch das Format der
Strecke von km auf mi und der Uhrzeit von 24h-Modus auf 12h-Modus.
F
GB
US
n
MODE
509
509
SET
!
18

5.5 Eingabe Gesamtstrecke / Total distance Entry / Reglage Distance totale
D
kChange the display to DIST using the MODE button.
kPress the SET button briefly. The first input figure is flashing.
kSet the value using the MODE button.
kMove to the next figure using the SET button.
kAfter setting the last digit, confirm with SET button.
kSET OK appears on the display.
kAvec la touche MODE, sélectionnez la fonction DIST.
kAppuyer brièvement sur la touche SET. Le premier chiffre à
régler clignote.
kAvec la touche MODE, régler le chiffre.
kAvec la touche SET, passer au chiffre suivant.
kConfirmer avec la touche SET après avoir réglé la dernière valeur.
k SET OK apparaît à l‘écran.
F
kMit MODE-Taste zur DIST-Anzeige wechseln.
kSET-Taste kurz drücken, die erste Ziffer der Eingabe blinkt.
kMit MODE-Taste Wert einstellen,
mit SET-Taste zur nächsten Stelle wechseln.
kNach dem Einstellen der letzten Ziffer mit SET-Taste bestätigen.
kSET OK erscheint im Display.
GB
US
n
MODE
n
MODE
509
509
509
SET
!
20

5.6 Eingabe Uhrzeit / Time entry / Reglage heure
kMit MODE-Taste zur TIME-Anzeige wechseln.
kSET-Taste kurz drücken, die Ziffern der Stunden blinken.
kMit MODE-Taste Stunden einstellen.
kMit SET-Taste zur Minuteneingabe wechseln.
kMit MODE-Taste Minuten einstellen.
kMit SET-Taste bestätigen. SET OK erscheint im Display.
D
kChange the display to TIME using the MODE button.
kPress SET button briefly, the digits for the hours flash.
k Set the hours with the MODE button.
k Change to the minute entry by pressing SET.
k Set the minutes with the MODE button.
kConfirm by pressing the SET button. SET OK appears on the display.
kAvec la touche MODE, sélectionnez la fonction TIME (HEURE).
kEnfoncer brièvement la touche SET ; le chiffre des heures clignote.
kRégler l‘heure à l‘aide de la touche MODE.
kA l‘aide de la touche SET passer au réglage des minutes.
kRégler l‘heure à l‘aide des minutes MODE.
kRégler les minutes à l‘aide de la touche SET.
F
GB
US
n
MODE
n
MODE
509
509
509
SET
!
22

5.7 Einstellung des auto Modus / Setting auto mode / Réglage du mode automatique
kMit MODE-Taste zur SCAN-Anzeige wechseln.
kSET-Taste kurz drücken. OFF in der Anzeige blinkt.
kMit MODE-Taste OFF oder ON einstellen.
kMit SET-Taste bestätigen. SET OK erscheint im Display.
Mit SCAN ON, wechselt die Anzeige automatisch alle 3 Sekunden.
D
k Change the display to SCAN using the MODE button.
k Press the SET button briefly. OFF flashes on the display.
k Use MODE button to set OFF or ON.
kConfirm by pressing the SET button. SET OK appears on the display.
SCAN ON is used to change the display automatically every 3 seconds.
kAvec la touche MODE, sélectionnez la fonction SCAN.
k Appuyer brièvement sur la touche SET.
OFF clignote dans l‘affichage.
k Régler sur OFF ou ON au moyen de la touche MODE.
kConfirmer par la touche SET. SET OK apparaît à l‘écran.
SCAN ON permet de modifier l‘affichage automatiquement toutes les 3 secondes.
F
GB
US
n
MODE
n
MODE
509
509
509
SET
!
24

5.8 Grundeinstellungen verlassen / Exiting basic settings / Quitter les reglages de base
Um die Grundeinstellungen zu verlassen, SET-Taste 3 Sekunden
gedrückt halten (SET CLOSE blinkt).
Press the SET button down for 3 seconds in order to stop entering
settings (SET CLOSE flashes).
Pour terminer les réglages, maintenir la touche SET 3 secondes
appuyée (SET CLOSE clignote).
F
D
SET
> 3 sec.
!
GB
US
509
26

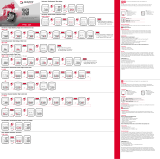
6 Löschen / Reset / Remise a zero
D
k Press MODE until the desired function is displayed.
k Hold down the MODE button. Display flashes.
After 4 seconds the displays for trip odo (
)
and trip time (
) are set to zero.
kAppuyer sur la touche MODE jusqu‘à ce que la fonction
souhaitée apparaisse.
k A appuyer sur la touche MODE. L‘affichage clignote.
Les affichages de la distance journalière (
) et de
la durée de la course (
) sont remis à zéro après 4 secondes.
F
kMODE-Taste drücken bis gewünschte Funktion erscheint.
kMODE-Taste gedrückt halten. Anzeige blinkt.
Nach 4 Sekunden werden die Anzeigen von
Tageskilometer (
), Fahrzeit ( ) auf Null gesetzt.
GB
US
n
MODE 4 sec.
n
MODE
509
509
28

6.1 PC interface / PC interface / Interface PC
D
The BC 509 is PC-compatible. After purchasing the
SIGMA DATA CENTER Software and its Docking Station
(Ref. No.: 00431), you can quickly and easily download the total
and daily values onto your PC. Furthermore, you can quickly and
easily set your BC 509.
Le BC 509 est compatible PC. Les valeurs totales et
quotidiennes peuvent être rapidement et aisément chargées
sur votre PC après l‘achat du Logiciel SIGMA DATA CENTER et
de sa station de connexion (n° art.: 00431). Votre BC 509 peut
en outre être réglé rapidement et aisément.
F
Der BC 509 ist PC-fähig. Nach Kauf der
SIGMA DATA CENTER Software und seiner Docking Station
(Art.-Nr.: 00431) können Sie die Gesamt- und die Tageswerte auf
Ihren PC mühelos und schnell übertragen. Darüber hinaus können
Sie leicht und schnell Ihren BC 509 am PC einstellen.
GB
US
30
509
509
30

7.1 Batteriewechsel / Change battery
D
kDeckel mit Münze öffnen.
kPolarität beachten! Bei geöffnetem Batteriefach müssen Sie
die Plus-Seite der Batterie sehen.
kFalls Dichtungsring lose, wieder einlegen.
kDeckel mit Münze schließen.
Batterie: Lithium Knopfzelle CR 2032, 3V. Batterielebensdauer: ca. 2 Jahre*
* Bei einer Nutzung von einer Stunde am Tag.
kOpen cover with a coin.
kTake note of polarity. When the battery compartment is open you must be able
to see the plus side of the battery.
kIf the sealing ring is loose, put it back in place.
kClose cover with a coin.
Battery: Lithium button cell 2032, 3V. Battery lifespan: approx. 2 years*
* if used one hour a day.
GB
US
34

7.2 Trouble Shooting
KMH no display
kOld handlebar bracket with wireless
transmission (RDS) used?
kSleeve pushed over magnet?
kComputer correctly slotted into
mounting bracket?
kCables checked for breaks?
kContacts checked for oxidation/
corrosion?
kDistance between magnet and
sensor (max. 5 mm)
kChecked whether magnet is
magnetised?
No Display (screen blank)
kCheck Battery
k Battery inserted correctly
(plus and minus)?
k Battery contact ok? (bend carefully!)
KMH wrong display
k2 magnets installed?
k Magnet positioned correctly?
k Wheel size set wrongly?
k Correct handlebar bracket fitted if
changing bikes?
Display black/changes slowly?
kTemperature too high (>60°C)
or too low (<0°C).
GB
US
38

www.sigmasport.com
BIKE COMPUTER TOPLINE
SIGMA Elektro GmbH
Dr.-Julius-Leber-Straße 15
D-67433 Neustadt/Wstr.
SIGMA SPORT ASIA
7F -1, No. 193, Ta-Tun 6
th
Street,
Taichung City 408, Taiwan
SIGMA SPORT USA
1067 Kingsland Drive
Batavia, IL 60510, U.S.A.
085190/1
/