Page is loading ...

POR FAVOR LEA ESTE INSTRUCTIVO ANTES DE USAR EL PRODUCTO.
PLEASE READ AND SAVE THIS USE AND CARE BOOK.
Modelo/Model VC3000
Accesorios/Partes (EE.UU/Canadá)
Accessories/Parts (USA/Canada)
1-800-738-0245
Aspiradora
Vacuum Cleaner
USA/Canada 1-800-231-9786
www.blackanddecker.com
VC3000Pub1000001155RV2 6/20/05 2:16 PM Page 1

12
11
IMPORTANT SAFETY
INSTRUCTIONS
When using electrical appliances, basic safety precautions should always be
followed, including the following:
Read all instructions before using this appliance.
WARNING – To reduce the risk of fire, electric shock or injury:
❑
Do not leave appliance plugged in. Unplug from outlet when not in use and
before servicing.
❑
Do not use outdoor or in wet surfaces.
❑
Do not allow to be used as a toy. Close attention is necessary when used by
or near children.
❑
Use only as described in this manual. Use only manufacturer's recommended
attachments.
❑
Do not use with damaged cord or plug. If appliance is not working as it should,
has been dropped, damaged, left outdoors, or dropped into water, return it to a
service center.
❑
Do not pull or carry by cord, use cord as a handle, close a door on cord, or pull
cord around sharp edges or corners. Do not run appliance over cord. Keep cord
away from heated surfaces.
❑
Do not unplug by pulling on cord. To unplug, grasp the plug, not the cord.
❑
Do not handle plug or appliance with wet hands.
❑
Do not put any object into openings. Do not use with any opening blocked; keep
free of dust, lint, hair, and anything that may reduce air flow.
❑
Keep hair, loose clothing, fingers, and all parts of body away from openings and
moving parts.
❑
Turn off all controls before unplugging.
❑
Use extra care when cleaning on stairs.
❑
Do not use to pick up flammable or combustible liquids, such as gasoline, or use
in areas where they may be present.
❑
Do not pick up anything that is burning or smoking, such as cigarettes, matches,
or hot ashes.
❑
Do not use without dust bag and/or filters in place.
❑
Hold plug when rewinding onto cord reel. Do not allow plug to whip when
rewinding.
SAVE THESE INSTRUCTIONS.
POLARIZED PLUG (120V Models Only)
This appliance has a polarized plug (one blade is wider than the other). To reduce the risk of
electric shock, this plug is intended to fit into a polarized outlet only one way. If the plug does not
fit fully into the outlet, reverse the plug. If it still does not fit, contact a qualified electrician. Do
not attempt to modify the plug in any way.
Note: If the power supply cord is damaged, it should be replaced by qualified personnel
or in Latin America by an authorized service center.
VC3000Pub1000001155RV2 6/20/05 2:16 PM Page 12

14
13
Thank you for purchasing this Black&Decker
®
Vacuum Cleaner.
Your new vacuum cleaner comes with a high-efficiency HEPA filter that traps
allergens, pollen, dust particles, and dirt as you vacuum and keeps it all inside the
dust collector, releasing only clean air into your home. The innovative design of the
easy-to-empty, large capacity dust collector makes dirt disposal simple and
convenient—no more bags to replace.
UNPACKING BOX CONTENTS
After you unpack your unit, identify the following parts (A):
1. Sweeper
2. Extension telescopic tube
3. Dusting brush
4. Crevice tool
5. Flexible swivel hose
6. Vacuum canister
A
Product may vary slightly from what is illustrated.
GETTING FAMILIAR WITH YOUR UNIT
B
†1.Extension telescopic tube
(Part# VC3000-11)
2. Vacuum suction control
†3.Flexible swivel hose
(Part# VC3000-03)
4. On/Off push button
5. Carry handle/Retractable cord pedal
†6.Exhaust filter cover
(Part# VC3000-07)
†7.Exhaust filter (inside)
(Part# VC3000-06)
8. Retractable cord
9. Large easy-glide wheels
10. Dust collector compartment
release button
11. Accessory holder with storage clip
†12. Dusting brush
(Part# VC3000-04)
†13. Crevice tool (Part# VC3000-05)
14. Telescopic extension tube release
†15. Sweeper
(Part# VC3000-10)
†16. Motor (not shown) (Part# VC3000-12)
†17. Internal switch (not shown)
(Part# VC3000-13)
18. Easy-glide wheels
19. Lint strips
20. Sweeping flaps
† Consumer replaceable
VC3000Pub1000001155RV2 6/20/05 2:16 PM Page 14
16
15
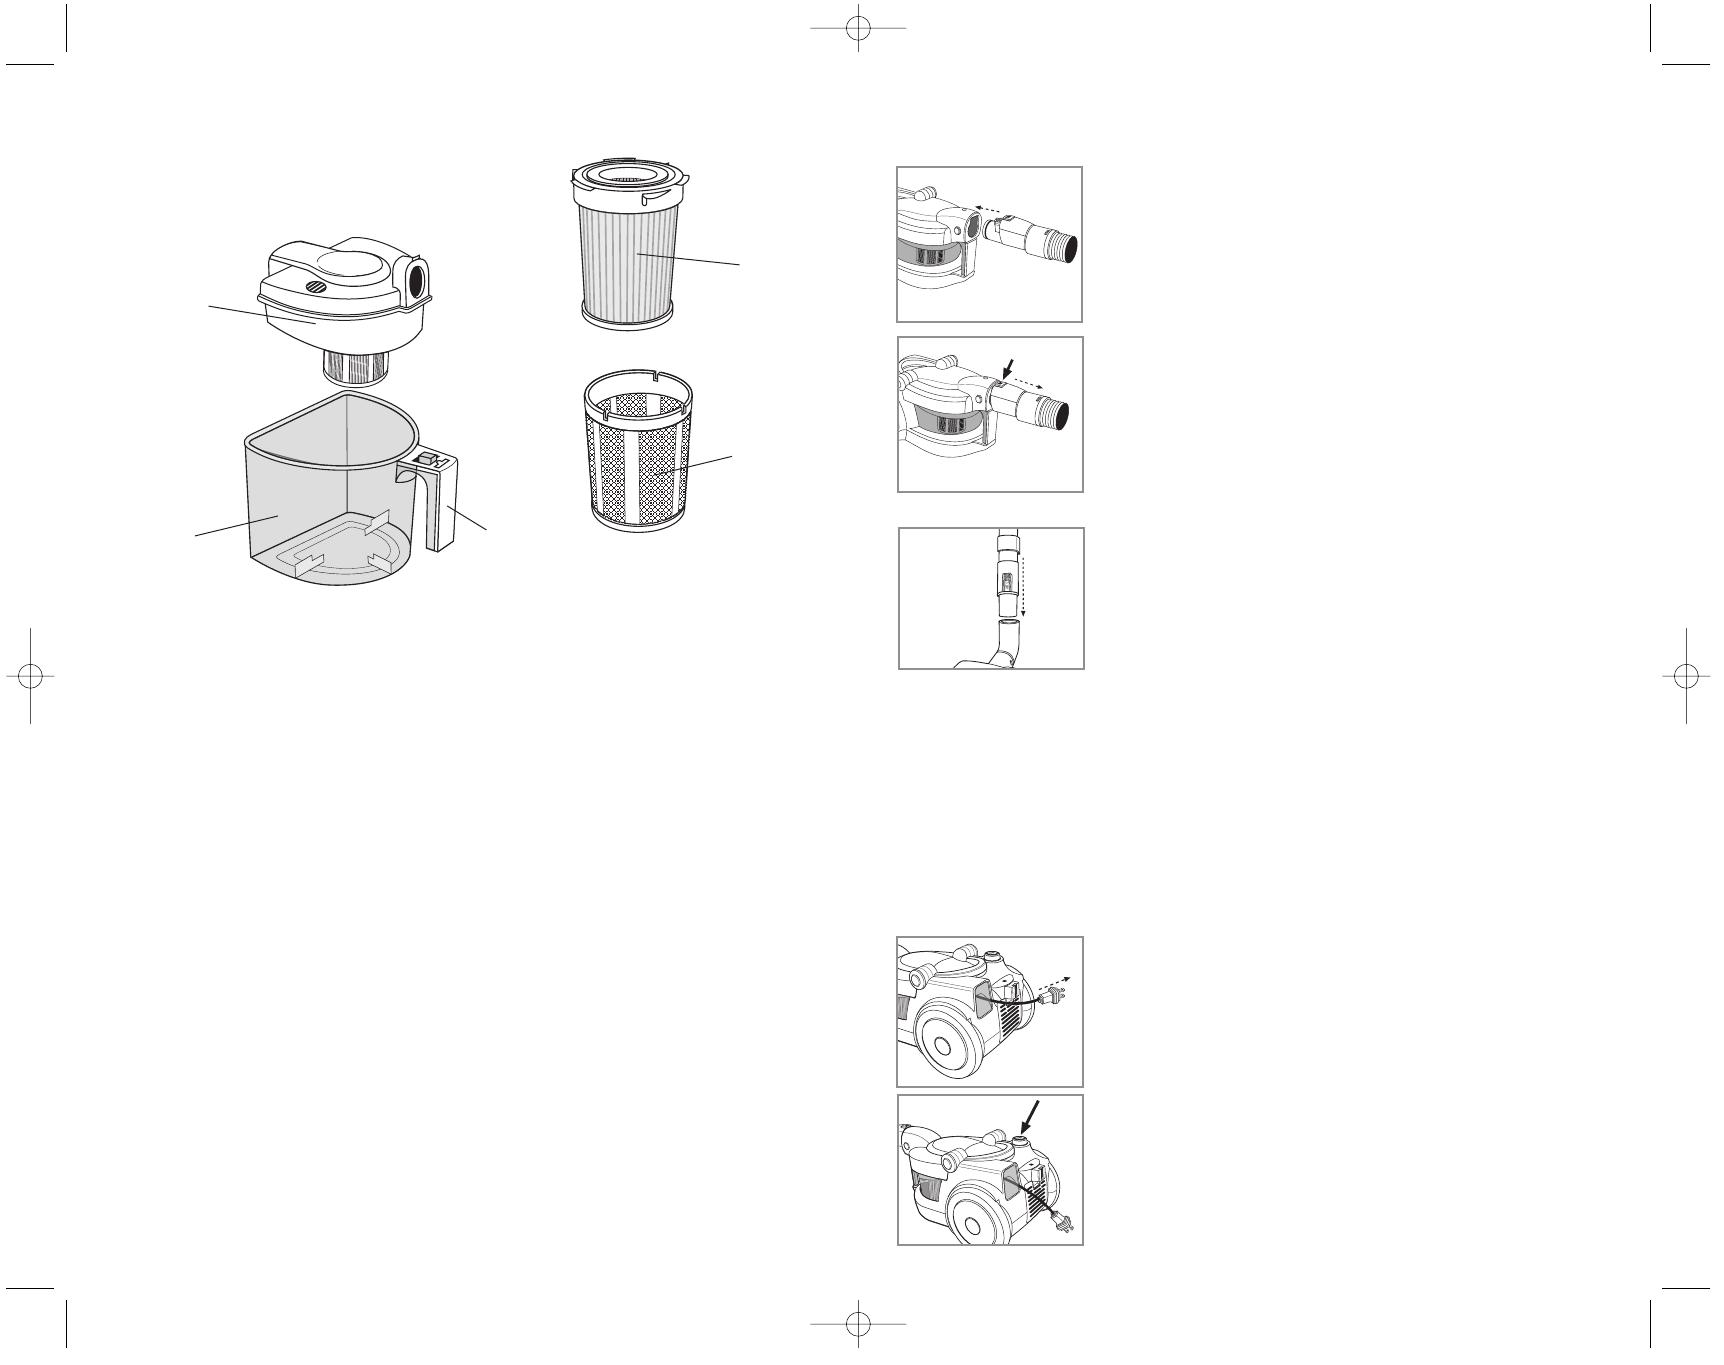
†1.1.5L plastic dust collector (Part# VC3000-09)
†2.Dust collector cover/HEPA filter holder (Part# VC3000-08)
3. Dust collector handle/Carry handle
†4.HEPA filter
(Part# VC3000-02)
†5.HEPA filter screen (Part# VC3000-01)
† Consumer replaceable
C
ASSEMBLING/DISASSEMBLING YOUR VACUUM CLEANER
Flexible Swivel Hose
1. To connect hose, push connector end into the opening
on the front of the vacuum canister until it clicks into
place (D).
2.To remove, press the release button on the hose connector
and pull out (E).
Extension Telescopic Tube
1.To connect extension telescopic tube to sweeper, push thin
end of tube into sweeper (F).
Tip: Rotate the tube until the accessory holder clip faces
the back side of the tube. This will make it easier to store
the unit.
2. To connect tube to flexible hose, fit the thin end of the hose into the other end of
the tube. You might have to twist the tube slightly for a firm fit.
3. To remove extension telescopic tube, just pull out either end.
How to Use
This appliance is intended for household use. It is for indoor use only.
Important: For warranty verification, do not remove line cord sticker.
120 V Models Only - Your unit has a motor overheating protection system that
automatically shuts off the motor.
Important: The power cord has a yellow marking and a red
marking to help you determine the maximum length to use.
Up to the yellow mark is the recommended length. Never
pull cord beyond the red marking.
1. Holding the power cord by the plug, pull out the required
length and plug into a standard electric outlet (G).
2. With your foot or hand, press the on push button to start
the vacuum cleaner (H).
D
E
G
H
F
VC3000Pub1000001155RV2 6/20/05 2:16 PM Page 16
18
17
3. Adjust the suction power by sliding the vacuum suction
control (J).
Note: The sweeper adjusts automatically to clean floors and
carpets.
4. When finished vacuuming, press the On/Off push button
to turn off the unit.
5. Unplug unit.
6. Press the retractable cord pedal with your foot or hand.
The cord winds back into the unit (K).
Caution:
• The cord moves fast when retracting. Stand clear of the
cord as it rewinds so it does not swing into you.
•To prevent cord from whipping when rewinding,
hold plug when rewinding onto cord reel.
USING EXTENSION TELESCOPIC TUBE
Use the telescopic tube for a longer reach.
1. To adjust the telescopic tube to the desired length,
release it by pressing the release button forward as you
pull up the tube (L). The telescopic tube will stay at the
set length.
2. Press the release button forward again to bring the tube
down.
USING CLEANING TOOLS
Dusting Brush and Crevice Tool
• Use dusting brush to dust furniture, draperies, lamps and shelves.
• Use crevice tool for tight narrow spaces.
Tip: You can keep either tool in the extension telescopic tube holder for easy
access.
Both cleaning tools can be attached to either the end of the
extension telescopic tube or the flexible hose (M).
Care and Cleaning
Important: Always turn off and unplug the unit before cleaning.
CLEANING
Note: To maintain maximum cleaning performance, empty the dust collector and
clean HEPA filter often.
Dust Collector
1. Press the side release buttons on each side of the canister
and lift up (N).
2. To remove dust collector, press release button on the
handle and pull out (P).
3. Remove lid and empty the dust collector.
4. Wash in warm sudsy water with a mild detergent.
Dry completely with a soft cloth.
HEPA Filter
The HEPA filter is located under the dust collector lid inside
the screen.
To remove HEPA filter
1. Turn dust collector lid upside down.
2. Grasp HEPA filter/screen, turn it counterclockwise
(UNLOCK ) and pull out (Q).
3. Grip HEPA filter tabs and pull out screen (R).
4. Clean HEPA filter and screen using a small brush. If
needed, wash with mild soap and rinse with cold tap
water. Do not use any abrasive cleaners.
5. Shake excess water from HEPA filter and let it dry
completely before inserting back into the unit. Also dry
protective filter.
To replace HEPA filter
1. Align notches on the screen with tabs on HEPA filter and
push filter into the screen.
2. Slide filter tabs into grooves of dust collector lid so that
filter locking tabis positioned in front of lid locking
mechanism (S ).
3. Turn filter clockwise (LOCK ) until it locks in place.
4. Replace lid on the dust collector.
5. Insert dust collector back in canister compartment. Push
it down until it locks securely.
Tip: Pull on the handle to verify that it is secured in place.
Exhaust Filter
The exhaust filter is located at the back of the canister. Replace it at least once a
year. It is not washable.
1. Push down the locking clip on the filter cover and
pull out.
2. Grasp the filter and pull out (T).
3. Insert a new filter and snap cover back in place.
J
K
L
M
N
P
Q
R
T
VC3000Pub1000001155RV2 6/20/05 2:16 PM Page 18

20
19
STORAGE
For convenience, you can store your unit in two different positions to accommodate
storage space.
• For compact areas, you can store the unit vertically. Just
insert accessory holder clip into the slot located on the
bottom of the unit (U).
• For more spacious areas, store the unit horizontally.
Just insert the sweeper clip into the slot above the exhaust
filter (V).
V
U
TROUBLESHOOTING
Problem Solution
Vacuum won’t start. Plug in firmly; press the
on/off push button.
Low suction or poor pickup. Empty dust collector.
Clean HEPA filter.
Check for a clog in the flexible
hose or extension tube.
Adjust the suction.
Visible dirt escaping from cleaner. Empty dust collector.
Clean HEPA filter or replace
exhaust filter.
Cord won’t rewind. It might be dirty or twisted. Clean the power cord.
Pull out cord, straighten and
press retractable cord pedal.
Motor shuts off. Wait for the unit to cool down,
unplug the unit them plug
again to restart.
VC3000Pub1000001155RV2 6/20/05 2:16 PM Page 20

¿NECESITA AYUDA?
Para servicio, reparaciones o preguntas relacionadas al producto, por favor llame al
número del centro de servicio en el país donde usted compró su producto. NO
devuelva el producto al fabricante. Llame o lleve el producto a un centro de
servicio autorizado.
DOS AÑOS DE GARANTÍA LIMITADA
(No aplica en México, Estados Unidos o Canadá)
¿Qué cubre la garantía?
• La garantía cubre cualquier defecto de materiales o de mano de obra. Applica no
se responsabiliza por ningún costo que exceda el valor de compra del producto.
¿Por cuánto tiempo es válida la garantía?
• Por dos años a partir de la fecha original de compra.
¿Cómo se puede obtener servicio?
• Conserve el recibo original de compra.
• Por favor llame al número del centro de servicio autorizado.
Esta garantía no cubre:
• Los productos que han sido utilizados en condiciones distintas a las normales
• Los daños ocasionados por el mal uso, el abuso o negligencia.
• Los productos que han sido alterados de alguna manera
• Los daños ocasionados por el uso comercial del producto
• Los productos utilizados o reparados fuera del país original de compra
• Las piezas de vidrio y demás accesorios empacados con el aparato
• Los gastos de tramitación y embarque asociados al reemplazo del producto
• Los daños y perjuicios indirectos o incidentales
NEED HELP?
For service, repair or any questions regarding your appliance, call the appropriate
"800" number on the cover of this book. Do not return the product to the place of
purchase. Do not mail the product back to the manufacturer nor bring it to a service
center. You may also want to consult the website listed on the cover of this manual.
One-Year Limited Warranty
(Applies only in the United States and Canada)
What does it cover?
• Any defect in material or workmanship; provided; however, Applica’s liability will
not exceed the purchase price of the product
For how long?
• One year after the date of original purchase
What will we do to help you?
• Provide you with a reasonably similar replacement product that is either new or
factory refurbished
How do you get service?
• Save your receipt as proof of the date of sale.
• Check our on-line service site at www.prodprotect.com/applica, or call our toll-
free number, 1-800-231-9786, for general warranty service
• If you need parts or accessories, please call 1-800-738-0245.
What does your warranty not cover?
•Damage from commercial use
• Damage from misuse, abuse or neglect
• Products that have been modified in any way
• Products used or serviced outside the country of purchase
• Glass parts and other accessory items that are packed with the unit
• Shipping and handling costs associated with the replacement of the unit
• Consequential or incidental damages (Please note, however, that some states
do not allow the exclusion or limitation of consequential or incidental damages,
so this limitation may not apply to you.)
How does state law relate to this warranty?
• This warranty gives you specific legal rights, and you may also have other rights
that vary from state to state or province to province.
22
21
VC3000Pub1000001155RV2 6/20/05 2:16 PM Page 22

is a trademark of The Black & Decker Corporation, Towson, Maryland, USA
Marca registrada de The Black & Decker Corporation, Towson, Maryland, E.U.
R22004/3-24-116E/S
Copyright © 2004-2005 Applica Consumer Products, Inc.
Pub. No.1000001155-00-RV02
Made in People’s Republic of China
Printed in People’s Republic of China
Fabricado en la República Popular de China
Impreso en la República Popular de China
1200 W 120 V
~
60 Hz
1400 W (nom), 1600 W (max) 220 V
~
50 Hz
1400 W (nom), 1600 W (max) 220 V
~
60 Hz
VC3000Pub1000001155RV2 6/20/05 2:16 PM Page 24
/