Page is loading ...

STORM PRO
INSTALLATION AND OPERATIONS MANUAL
- READ AND SAVE THESE INSTRUCTIONS -
User’s Manual
AlorAir SolutionslNC.
Add: 2048 E.Francis st Ontario Ca91761
Tel: 1-888-990-7469
E-mail: sales@alorair.com
STORM ULTRA
DEHUMIDIFIER
Note: as we keep upgrading our product, we reserve the right to modify the product without notice in advance.


Safety Notes
The Storm Pro / Storm Ultra dehumidifier must always be connected using a grounded elect-
rical connection as required for all electrical appliances. The warranty is voided and all respon-
sibility for the operation transfers to the owner if non-grounded wiring is utilized.
Your Storm Series dehumidifier must be maintained and serviced by qualified technicians.
Storm dehumidifiers are intended for use only when the unit is installed in a level and
upright position. Operating the unit in any other position could cause water to come in
contact with the electrical components.
Before moving the dehumidifier, turn off the unit and allow the pump reservoir to empty (if
unit is already o ff, press "PURGE" button to confirm drain reservoir is empty). After the pump
has
finished operation, unplug the power cord and relocate the unit to the desired position.
If the inside of the machine has gotten wet for any reason, the unit should be opened and
allowed to dry thoroughly before reconnecting it to electric and restarting.
For proper operation, neither the inlet or discharge should be positioned against a wall. A
minimum of 8" clearance between the Storm and any obstruction is required.
Do not insert any objects or fingers into the inlet or discharge.
All work on the machine should be done with the unit off and unplugged.
Do not spray water or cleaner directly on the exterior of the unit. Only use a damp cloth
to clean the exterior and always unplug the unit first.
Do not use unit as shelf or device to hang clothes as this could cause damage to unit.
Do not stand on the machine.

Table of Contents
Introduction.....................................................................................
..................................................................................
.......................................................................
.................................................................
.......................................................................
..................................................................
...............................................................................
.........................................................................................
Unit Overview
LCD Display Introduction
Preparing the Unit for Use
Maintenance & Repair
Storing Your Dehumidifier
Troubleshooting
Warranty
01
03
04
09
12
14
16
14

sales@alorair.com
Introduction
Identification
Congratulations on purchasing a Storm Pro / Storm Ultra dehumidifier! The Storm Pro / Storm
Ultra comes with an extensive warranty plan. To ensure you are eligible, be sure to note the
serial number and date of purchase. The serial number can be found on the data on the back
of the unit.
Model Name: Storm Pro
Serial Number:
Date of Purchase:
Customer Service
For additional questions concerning the operation fo your dehumidifier, please
Contact your installing contractor.
Contact AlorAir Solutions: 1-888-990-7469
Features
● Storm Pro:85 pints per day at AHAM
● Storm Ultra:90 pints per day at AHAM
● Only 58 dBA
● Automatic Humidistat
● Built-in Pump with Overflow Protection
● Self Monitoring System
● Eco-Friendly R410A Refrigerant
● Easy Access to Internal Components
● Auto Restart After a Power Outage.
● The Unit can be Ducted on the Supply/Outlet, if Necessary
Storm Ultra

240
How Your Storm Dehumidifier Works
Electrical Supply
WARNING Volts may cause serious injury from electric shock.
Power Supply:
Outlet Requirement:
Circuit Protector:
115V, 60 Hz AC Only 1 Phase
3-Prong, GFI
15 Amp Time D elay F use o r Circuit Breaker
1. Disconnect electrical power before servicing 3. Do not use an extension cord
2. Only plug unit into grounded electrical outlet 4. Do not use a plug adapter
WARNING
Installation
Place the Pro in your desired location. The inlet of the machine should be at least 8"
from any obstructions. If the unit has been transported in a horizontal position, allow it to
sit in an upright position for at least 30 minutes before operating.
Do not use dehumidifier in an environment where corrosive or high VOC materials are applied.
The Storm Pro dehumidifier /The Storm Ultra dehumidifier utilize its integral humidistat to
monitor the conditioned space. Once conditions are outside the desired setpoint, the
compressor energizes and air is drawn across an evaporator coil. The evaporator coil is cooler
than the dew point of the air so water vapor will turns into liquid condensation. The air is then
reheated through the condenser coil and distributed back into the room.

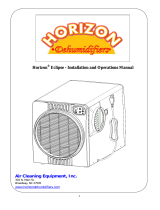
Unit Overview
Front View Rear View
Front View Rear View
Storm Pro Dehumidifier
Storm Ultra Dehumidifier
Air Inlet
Air Filter
Handle
Wheel
Front Cover
Air Outlet LCD Display
Air Inlet
Air Filter
Handle
Wheel
Front Cover
Air Outlet
Drain Tube
Connection
LCD Display
Tubing &
Cord Rack
Power Cord

LCD Display Instructions
1. When the machine is powered on but not working:
Boot display: The LOGO interface
will disappear after 2 seconds. Enter
the following interface
The machine displays when it is not
working. (Power off state but have
electricity)
2. Main interface display of dehumidification state:
The following information is displayed when the machine is working:
Refers to the working time, which is defined as the time from
starting up to shutting down, including the defrost time during
the period, and the standby time after the humidity. The
submenu has a reset function. If not, the working time shall
be accumulated.
Total time 9999 hours, the largest cumulative to the largest
automatically reset after restart, and display units for hours.
(round off).
000 JOB HRS:
(After power on, the buzzer makes a sound)
PURGE
PURGE
PURGE
PURGE
PURGE
PURGE

000 LIFE HRS:
Refers to the total working time, i.e. the total working time (hours), which is in hours. (Press the mode key +
select the confirmation key, and the total working time will be cleaned after 3 seconds.)
IN/OUT 00℉ 00% 00 gr / lb:
Indicates the temperature, humidity and moisture content of the air inlet and outlet
{GPP - grain per pound (gr/lb)}.
Indicates set humidity.
Set 00%:
If the main interface does not operate for 10 minutes, the screen will go out.Press any key to
wake up.
Other icons light up or flicker when opened
The total working time is the accumulation of each working time (hours) in hours. (Press the
mode key + select to confirmation key, and the total working time will be cleaned after 3 seconds.
3.Dehumidification status submenu interface display
3.1
Device name displayed on the screen:
You can change the device name on the APP
application
“Indicates”:Do I need to clear out this time?",
press ">"if you need to clear. When the operation
is completed, the working time of the main
interface and the working time of this interface
will be reset and started to be instant again.
After accumulation (9999), clean up and round.
3.2
3.3
“Coil Temp 000℃ ”: Used to display the current
temperature of the coil.When it is below zero,
the "-" symbol is displayed in front. "-" is not
required on zero.
5

6


Quick Connection to Drain Tube Quick Connection

15'

Maintenance and Repair
Cleaning the Machine Body
Use a soft, damp cloth to clean the exterior parts of the unit. Do not use any soap or solvents.
Procedure for filter maintenance
The dust and obstacles on the filter should be removed regularly. You may need to clean and
replace the filter.
Step:
3. Check for dirt and build-up.
4. For MERV-8 or Pre-filter, wash it in warm water or vacuum it. Do not use soap or cleaners. Also,
shake it gently and ensure the filters are dry before reinserting it.
1. Unplug the unit.
2. Remove the filter by sliding it upward from the bottom byhand to remove it.

Accessing Internal Components
WARNING Always unplug unit prior to performing any maintenance.
1. Remove the bottom two screws on the front of the machine.
Remove the bottom two screws
on the front of the machine.
2. Remove the upper two screws on the back of the machine.
3. Take off the casing/Remove the outer shell of the machine.
Remove the upper two screws
on the back of the machine.

Integral Pump Maintenance
NOTE: This pump requires routine maintenance that is not covered by your 1 year parts
warranty. Only a defective pump will be repaired or replaced under the warranty.
As with all pumps, preventative maintenance is necessary to prevent issues from dirt
and slime that may accumulate in the drain system. This includes the drain pan, hose
to the condensate pump, pump reservoir, pump head, float assembly, and discharge
tubing
The pump is designed with quick connection construction, making it easy to access the
pump and components for service and maintenance.
To Remove Pump from Reservoir:
1. Unplug the unit.
2. Open the back housing as shown on page 12.
3. Remove the condensate tube from the pump.
4. Use the quick connect fittings to disconnect the main power and float switch electrical cables.
5. Use a flathead screw driver to gently pry the the pump off the reservoir.
At least once per year, clean your pump system.
Basic Pump Cleaning:
1. Press the pump button (PURGE) to drain any water from reservoir.
2. Disconnect power to the dehumidifier.
3. Mix a 16 oz cleaning solution of one of the following: 1 oz bleach / 15 oz water or 4 oz
white vinegar / 12 oz water. Pour the solution into the drain tray at the base of the coils.
NOTE: If you get any cleaning solution on the coils, flush with water
4. Allow cleaning solution to soak for 15 minutes.
5. Reconnect power to dehumidifier.
6. Pour clean water into reservoir so the pump activates twice (about 16-32 oz. water).
7. Repeat if needed or refer to Advanced instructions.
.
Access screws for electrical
compartment
Cover
Pump

Advanced Pump Cleaning:
1. a. Use the manual pump button (PURGE), to drain any water from reservoir.
b. Unplug the unit, and remove pump from reservoir (see page 13).
c. Use a wet dry vac or paper towels to remove any remaining water from the
pump reservoir.
2.
3.
4.
5.
6.
Fill the pump reservoir with cleaning solution (15 oz water / 1 oz bleach or 12 oz
water /4 oz white vinegar).
Reassemble the pump and use the manual pump button to flush the mixture
through the discharge tubing.
Mix another batch of cleaning solution then pour it slowly into drain pan under
evaporator coil and allow it to clean the hose from pan to pump. This process
can be stopped when the pump energizes 1 time.
NOTE: If you get any bleach/water mixture on coils, flush with water.
Pour sufficient clean water through the drain pan so that the pump activates
twice (16-32 ounces).
Reassemble the unit and return it to operational status.
Cleaning the Coils
The coils on your dehumidifier also need to be cleaned once per year. To clean,
simply spray with a self-rinsing, foaming coil cleaner (such as WEB Coil Cleaner).

o
o
o
o
Storing Your Dehumidifier
Troubleshooting
If you plan on storing your dehumidfier for an extended period of time:
1. Turn unit off and allow to dry. 4. Clean the filter.
2. Manually drain pump reservoir. 5. Store in clean,dry environment.
3. Wrap and secure the power cord.
Symptom Cause Solution
Display is Blank
No Airflow
Error Code: E1
Error Code: E4
Error Code: LO
Error Code: HI
E5 Error Code
Poor Connection
Power Outage
Filter is Dirty
Air lnlet or Outlet is Blocked
HumiditySensoror
Communication Error
Problem with Pump
Room Temperature is below
33.8
Room Temperature is above
105
Refrigerant Leak
Verify that both ends of the
Power cord are plugged in
Reset power
Clean the filter
Clear the blockage
Check to ensure that the sensor
wire is connected at both ends.
if no issues are visible, the
sensor may be faulty.
Verify that the pump is properly
installed and functioning. If so,
unplug the unit for two minutes,
then restart.
Increase the room temperature
so it is within operating range
(above 33.8 ). If error still
displays, check sensor.
Decrease the room temperature
so it is within operating range
(below 105 ). If error still
displays, check the sensor.
Contact Your Installer for
Assistance

..
If an E4 code appears on the display:
1. Reset the unit by disconnecting the power cord and then reconnecting it.
NOTE: The unit will not function until the code has been cleared.
2. Manually check to see if pump is operational by pressing the drain button. Verify
that the pump energizes and de-energizes properly. Additionally, check to see if any
water purged from the system.
3. If you haven't cleaned the system recently, check the discharge line for an obstruc-
tion, then clean the balance of the pump system (see "Maintenance" section for
details).
4. Replace the hoses and/or pump, if maintenance alone isn't sufficient.
/