Page is loading ...

www.lnchome.comPage: ‐1‐/4
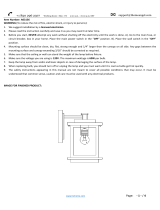
ItemNumber:A03343
WARNING(Toreducetheriskoffire,electricshock,orinjurytopersons):
1. Wesuggestinstallationbyalicensedelectrician.
2. Pleasereadtheinstructioncarefullyandsaveitasyoumayneeditatlatertime.
3. Beforeyoustart,NEVERattemptanyworkwithoutshuttingofftheelectricityuntiltheworkisdone.A).Gotothemain
fuse,orcircuitbreaker,boxinyourhome.Placethemainpowerswitchinthe“OFF”position.B).Placethewallswitch
inthe“OFF”position.
4. Mountingsurfaceshouldbeclean,dry,flat,strongenoughand1/4”largerthanthecanopyonallside.Anygapsbetween
themountingsurfaceandcanopyexceeding3/16”shouldbecorrectedasrequired.
5. Makesurethattheceilingorwallcanstandtheweightofthelampbeforefixture.
6. Makesurethevoltageyouareusingis120V.Themaximumwattageis60Wperbulb.
7. Keepthelampawayfromacidicandbasicobjectsincaseofdamagingthesurfaceofthelamp.
8. Whenreplacingbulb,youshouldturnofforunplugthelampandyoumustwaituntilitiscoolasbulbsgethotquickly.
9. Thesafetyinstructionsappearinginthismanualarenotmeanttocoverallpossibleconditionsthatmayoccur.Itmust
beunderstoodthatcommonsense,cautionandcaremustbeusedwithanyelectricalproducts.
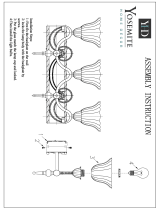
IMAGEFORFINISHEDPRODUCT:

www.lnchome.comPage: ‐2‐/4
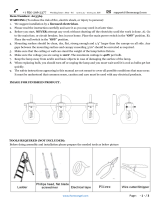
TOOLSREQUIRED(NOTINCLUDED):
Beforedoingassemblyandinstallationpleasepreparetheneededtoolsasbelowpicture
PARTSTYPE&QTYINCLUDING:
(B) Mounting plate (1)
(C)Green ground screw (1)
(E) Screw (2)
(F) Stud (3)
(G) Glass shade (1)
ACCESSORIES&QTYENCLOSED:
(A)Plastic wire connector (3)
(D) Mounting screw (2)
ASSEMBLY&INSTALLATIONINSTRUCTIONS:
1. Carefullyremovethefixturefromthecartonandcheckthatallpartsand
accessoriesareincludedasshownintheaboveillustration
2. Turnoffpower
3.1)Unscrewthestud(F)fromsocketcap
2)Installbulb(Notincluded.Pleasedonotexceedthemaximumcapacity
recommendedonthesocket.)
3)Putglassontoscocketcap,thenromotetheglasstomaketheholesaretobe
aligned,carefullythreadthestudstosecuretheglassinplace

www.lnchome.comPage: ‐3‐/4
4. Unscrewthescrews(E)frombackplateoffixture,
andgentlyremovethemountingplate(B)frombackplate
5.Attachthemountingplate(B)tooutletboxwithmountingscrews(D)
6.Makewireconnections
Connectwiresasbelowwiresconnectingshown.TAKENOTEOFYOURWIRECOLOROFFIXTURE,NEVERCONNECT
WIRETOGROUNDWIRE
ConnectgroundwireaccordingtobelowchartConnectwiresaccordingtobelowchart
Twistplasticwireconnectoruntilwiresaretightlyjoinedtogether,wrapeachconnectorwithapprovedelectricaltapeand
carefullytuckallwiresintotheoutletbox

www.lnchome.comPage: ‐4‐/4
7.Gently push the fixture to wall, and carefully rotate the fixture
to make the holes on back plate and mounting plate (B)are to be
aligned ,then thread the screws (E)to secure the fixture in place
8.
Checkeverythinginstalledproperly,thenyoucouldturnonthelight.
CLEANING
To clean, wipe fixture with a soft cloth. Clean glass with a mild soap. Do not use abrasive materials such as
scouring pads or powders, steel wool or abrasive paper.
ORDERINGPARTS
Keep this sheet for future reference, and in case you need to order replacement parts. All parts for this fixture
can be ordered from place of purchase. Be sure to use exact wording from illustration when ordering parts.
/