Page is loading ...


2
Table of Contents
Topic Page #
Introduction…………………………………………………………………………………………………... 2
Parts List…………………………………………………………………………………………………..…. 3
Manufacturer’s Placement Instructions…………………….…………………………………………..…. 4
Installation, Removal and Product Care………………………………………………………..…….……5
INTRODUCTION
The Legacy IITM Starting Platforms are designed for use on competitive or municipal
pools. Proper installation, use, and maintenance are essential for proper operation and
to reduce the risk of accident or injury.
**IMPORTANT**
Check entire box and inside all packing materials for parts. Before beginning assembly, read
the instructions and identify parts using the figures and parts listed in this document. It is
critical that all parts be carefully inspected by the installer prior to installation to ensure that no
damage occurred in transit and that a damaged part is not used. Proper installation cannot
be overstressed, as an improper installation voids S.R. Smith’s warranty and may affect the
safety of the user.
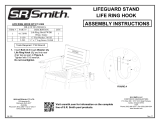
20.00
24.00
Ø1.90
20.00
FIGURE 1

3
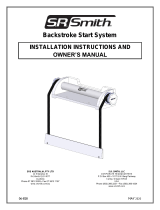
LEGACY IITM STARTING PLATFORM PARTS LIST
ITEM # PART # DESCRIPTION QTY.
1 20-700-1EP Legacy IITM Starting Platform Frame 1 ea.
2 8-616B Legacy IITM Starting Platform Footboard 1 ea.
3 LTDF-106 Tread, Heavy Duty Plastic 1 ea.
4 8-104 Plastic End Plug 4 ea.
5 5-167 3/8”-16 X 3-1/2” Cradle Head Bolt 2 ea.
6 5-151 3/8" Lock Washer, Split S/S 4 ea.
7 5-139 3/8” Hex Nut, S/S 6 ea.
8 27-105 Anchor Assembly 1 ea.
9 5-145 3/8” Flat Washer 2 ea.
1
5
3
4
2
9
7
2
6
7
FIGURE 2

4
18" SETBACK
WATERLINE
LEGACY IITM PLACEMENT INSTRUCTIONS
NOTE: POSITION CENTER OF ANCHOR 18” BACK FROM THE POOL WALL.
HEIGHT OVER DECK IS DETERMINED BY WHICH LEGACY IITM STARTING
PLATFORM WAS ORDERED.
The Legacy IITM Starting Platform is to be anchored to the deck using one (27-105)
anchor assembly. Properly ground the anchor using attached grounding screw and
appropriate grounding wire per local codes. Allow concrete to fully cure before installing
the Legacy IITM Starting Platform.
FIGURE 3

5
LEGACY IITM ANCHOR INSTALLATION
The Legacy IITM Starting Platform anchor can be installed in an existing pool deck or set when pouring a
new concrete deck. The 27-105 dual post anchor is used in either situation.
1. For installation in a new pool deck use the orientation shown in Figure 3.
2. The setback for the anchor must be set using the correct distance from the pool wall, leaving at
least 6” from any control joint or edge of concrete slab. The correct distance for the Legacy IITM is
18” as measured from the center of the anchor to the face of the pool wall. With the starting block
installed, the backstroke handles and leading edge of the footboard shall be vertically flush with
the pool wall. Refer to Figure 3.
3. For installing the anchor in an existing pool deck, use a concrete cutting core drill of at least 6
inches in diameter. Drill two (2) holes a minimum of 7-1/4” deep and apart 19-1/2” on-center. Cut
out remaining concrete using a concrete saw, making two (2) straight cuts parallel to the pool wall
and tangent to the 6” diameter holes as shown in phantom line in Figure 4. For either new or an
existing pool deck, the anchor shall be braced so it is not moved from its proper position during
pouring of the deck.
4. Properly ground the anchor socket using the attached grounding lug and the appropriate
grounding wire per local codes. If electrical bonding is required by the local governmental
regulations, it shall be done in accordance with Article No. 680 of the current National Electrical
Code or the local code whichever is greater.
5. With the anchor completely checked for level and plumb in the selected position, pour hydraulic
cement or high strength epoxy into the hole making sure there are no void spaces if installing in
an existing deck. If installation is new construction, ensure anchor is in its proper location and
square to the pool wall before pouring concrete. Let cement/concrete cure for 24 hours (or
minimum manufacture’s recommendations) before using starting platform.
27-105
ANCHOR
R3.00
(18.00)
25-26
15.00
POOL WALL
6.00
(2.75)
Figure 4 PlanView

6
STARTING PLATFORM INSTALLATION AND REMOVAL:
When placing a starting platform into an anchor it’s important to follow these simple instructions.
1. Ensure that the tube ends are parallel to the pool deck while inserting the lower legs of the staring
platform into the anchor.
2. Make sure that both anchor sockets are free of debris. Place starting platform into anchor making
sure that the platform frame rests completely on the bottom of the anchor and the forward edge of
the staring platform faces the pool edge.
3. To remove staring platform, lift frame vertically keeping step parallel to the pool deck.
SAFETY & MAINTENANCE INSTRUCTIONS
• Execute shallow racing dives only.
• For use by trained competitive swimmers only.
• Periodically inspect the Legacy Starting Platform to assure
there are no worn parts and that all hardware is properly
tightened.
• All stainless steel parts require periodic maintenance.
Polishing with a cotton cloth and a Windex-type product
maintains the finish and restores luster.
• Use non-abrasive soap and water. Avoid harsh chemicals
and disinfectants. Always read the label instructions on
any cleaner carefully before applying it to a surface.
/