Page is loading ...

ASTRO-PHYSICS MODEL 600 MOUNT WITH
DUAL AXIS STEPPER MOTORS AND TANGENT ARM
Model 600 Parts List
1 Polar Axis Assembly (Right Ascension – R.A.) with Stepper Drive
1 Declination (Dec.) Axis Assembly with Cradle Plate / Tangent Arm with Declination Stepper Drive
1 Stainless Counterweight Shaft with washer stop and knob
1 Dual Axis Controller
1 Power Cord (cigar lighter adapter)
2 Interconnect cords (connect to the motors)
2 Hex bolts / washers for Dec. axis
1 3/8” Long Arm Allen Wrench
1 3/16” Short Arm Allen Wrench
Operating and Maintenance Instructions for Model 600
The Model 600 mounting is very rugged, but like any precision instrument, it can be damaged by improper use. Please
read all instructions before attempting to set it up for use.
Assembly of the parts
1. Begin by assembling the pier or tripod at the desired observing location.
Pier: a. Slide the three legs onto the nubs and attach the tension rods. The turnbuckles should be drawn tight until
the whole assembly is stiff enough to support your weight without movement.
b. Place the mount assembly into the pier. Line up the holes and screw in the three hand knobs to hold it in
place.
Tripod: a. Slide a threaded rod into the holes located approximately 1/3 down on each leg. Attach a knob to each
end of the rod, but do not tighten at this point.
b. Assemble the legs to the casting with the remaining threaded rods and knobs.
c. Adjust the position of the legs in such a way that the groove on the bottom surface of the shelf rests on
the threaded rods on each leg.
d. Tighten the knobs so the shelf remains firmly in place. Tighten the knobs at the top of the leg so that the
casting is firmly attached.
e. Place the mount assembly onto the tripod and attach the three bolts from underneath to hold it in place.
2. If your mount is disassembled, complete assembly at this point. Attach the Dec. assembly to the R.A. axis with the
two bolts provided. The declination motor should be positioned at the front of the mount, in the direction the telescope
is pointing. Attach the counterweight shaft to the Dec. axis. You are now ready to polar align the mounting.
NOTE: During disassembly, the cradle plate may be left on the Dec. axis or removed, as desired.
Polar Alignment
IMPORTANT: Do not attempt to polar align with the telescope and counterweights attached to the
mounting. Permanent damage may result!
1. With no weight on the mounting, loosen the two side bolts that lock the polar axis to the pier top. The elevation of this
axis can now be adjusted by turning the adjusting knob so that the R.A. axis moves up or down to point at the pole.

2. With the pier oriented approximately towards the pole, use the two thumbscrews at the side of the pier to make the
final fine adjustment of azimuth.
3. The pole can be viewed through the polar axis with our optional pole scope. Conversely, you may clamp a small pole
scope of your own onto the cradle plate to view the pole.
4. When the proper alignment has been achieved, snug the two side bolts lightly to secure the polar axis and recheck
alignment. If no movement has occurred, finish tightening the two bolts as much as possible to prevent movement
when the telescope and counterweights are attached.
5. Remove the hand knob and washer from the base of the counterweight shaft. Add sufficient counterweights to the
Dec. shaft to balance the telescope you intend to use. Always attach the counterweights before mounting the
telescope to prevent sudden movement of an unbalanced tube assembly, which may cause damage or injury.
Remember, counterweights are heavy and hurt like hell when they fall on your toe. Always use two hands to attach or
move them on the shaft. Reattach the hand knob and washer to the end of the declination shaft. This will help to
prevent injury if someone accidentally loosens the counterweight hand knob.
Operation of the Mounting
The mounting has a set of clutches on both axes. The large knurled knob on the back of the polar axis is the clutch for
that axis. It can be adjusted so that light pressure at the telescope will move the assembly easily, or it can be tightened
fully to prevent motion during a photographic exposure. This clutch should not be set too loose, since the motor then will
not drive the scope. The declination clutch is built into the tangent arm assembly. The thumb screws on the side of the
tangent arm engages the clutch. The Dec. motor will not drive the Dec. axis unless the declination hand knob is locked
tight. You can safely move both axes to new positions without loosening the clutches. If the scope moves by itself, even
when the clutches are tight, the scope is not counterweighted properly.
For proper operation, the telescope must be adequately counterbalanced. Start with the tube assembly balance. Loosen
the declination axis so that the tube swings freely about Dec. Slide the tube up or down in the cradle rings until it stays
put with no clutch drag. Now tighten the Dec. axis and loosen the R.A. axis. Move the counterweights up or down to
achieve balance. Remember to allow for the extra weight of diagonals, eyepieces, and finder scopes. If you find it difficult
to maintain adequate balance while changing accessories (especially with long refractors) you may want to consider
adding a sliding counterweight set to your telescope tube. Please consult the factory.
Operation of the Controller
The push button controller contains all the circuitry for driving the two motors. The four red buttons are arranged so that
left and right controls R.A., and up and down controls Dec. This is the normal orientation of objects in the eyepiece. The
buttons may be used to move an object to the desired location in the field, or to keep a guide star on a crosshair by
making tiny guiding corrections. There are two guiding modes (rates): 2x guide and 8x slew. The slew rate is for
positioning objects in the field; the guide rate is for fine guiding at high powers during astrophotography. Move the switch
to select the mode that you prefer.
Attach the power cord to the mount and plug the other end into your car’s cigar lighter or into the portable battery pack.
Plug the R.A. control cable into the controller’s right hand jack (as seen from above). Plug the Dec. cable into the left
hand jack. No damage will result from reversing the cables; the controller simply will not operate. With the cables in
place, one of the lamps will light to indicate operation. It is not necessary to attach the Dec. cable to the controller to run
the R.A. axis.
The controller has as SELECT button with 4 LED indicators that allow you to choose the driving rate. Three of them are
internally set for SID (sidereal), SOL (solar), and LUN (lunar). The VAR (variable) is adjustable with the right hand knob.
The other four red buttons are used to position the object in the eyepiece. Pushing the upper button will cause the object
to move “up” in the eyepiece field. If the star moves down when you push the “up” button, reverse the DEC. switch.
Pushing the right hand button will cause the star to move to the right. If it moves to the left, reverse the R.A. switch.
When properly set up, the controller buttons will cause the object to move according to your commands.
There is an LED output available in this hand controller. The output is located at the declination axis in the form of a 2-
wire phono connection. You may wire your illuminated LED reticle to this plug. Brightness is controlled with the left hand
knob on the controller labeled LED.

Mount Maintenance and Alignment
Under normal operating conditions, no maintenance is required. For customer convenience, we have added certain
adjustments that will keep the mounting in top shape, but only if the adjustment procedures are understood. Do not
attempt any adjustments to the drive gear with telescopes or counterweights attached to the mounting.
The heart of the mounting is the worm gear drive. For highest accuracy, the alignment of the stainless steel worm against
the wheel is critical. This alignment should not be disturbed: do not loosen the four screws on the side of the worm
housing. There is provision for adjusting the tension of the worm against the worm wheel. It is advised that you do not
make any adjustment unless you are thoroughly familiar with worm gears. Adjustments of the worm should be made with
the motor assembly removed from the mount. Tighten the gear engagement only enough to just eliminate backlash. The
small worm gear must move freely. If the gear is too tight, it will not drive accurately.
The declination axis uses a tangent arm slow motion system. If backlash develops in this axis, the small stainless steel
captive nut requires tightening. This is accomplished with the set screw on the nut. Tighten the set screw just enough to
eliminate the backlash.
Both the R.A. and Dec. have manual slow motion knobs. These allow you to manually move the axes by a small amount.
These knobs have friction pads that may in time loosen. If this happens, the motors will slip and not drive properly,
especially if the telescope is unbalanced. To remedy this, loosen the set screws on the knob and tighten the knob against
the friction pad. The knobs are internally threaded – rotate them clockwise to tighten, counterclockwise to loosen.
Tighten the set screws again to lock the knobs to the shaft.
If any problems occur, please don’t hesitate to contact Astro-Physics for assistance.
Possible Modifications for your 600 Mount:
ST-4 Modification: The 8010 controller can be modified to accept the ST-4 autoguider. If this modification has already
been made, you will see an on-off switch and male 15-pin D-sub connector on the lower side of the box. Please call
Astro-Physics if you need modification #ST4MOD.
Astro-Physics, Inc.
11250 Forest Hills Road
Machesney Park, IL 61115
Telephone: (815) 282-1513
Fax: (815) 282-9847
www.astro-physics.com
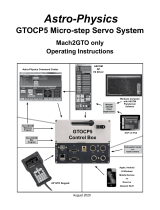
DUAL AXIS HAND CONTROLLER FOR MODEL 600 AND 800 MOUNTS
Select your driving rate
SID = Sidereal rate
SOL = Solar rate
LUN = Lunar rate
VAR = Variable rate. Push this button, then turn
Var.Rate knob
DEC = Declination
R.A. = Right Ascension
MODE = You can adjust the rate for slewing (8X) or guiding
(2X).
/