Page is loading ...
Page is loading ...
Page is loading ...
Page is loading ...
Page is loading ...
Page is loading ...
Page is loading ...
Page is loading ...
Page is loading ...
Page is loading ...
Page is loading ...
Page is loading ...
Page is loading ...
Page is loading ...
Page is loading ...
Page is loading ...
Page is loading ...
Page is loading ...
Page is loading ...
Page is loading ...
Page is loading ...
Page is loading ...
Page is loading ...
Page is loading ...
Page is loading ...
Page is loading ...
Page is loading ...
Page is loading ...
Page is loading ...
Page is loading ...
Page is loading ...
Page is loading ...
Page is loading ...
Page is loading ...
Page is loading ...
Page is loading ...
Page is loading ...
Page is loading ...
Page is loading ...
Page is loading ...
Page is loading ...
Page is loading ...
Page is loading ...
Page is loading ...
Page is loading ...
Page is loading ...
Page is loading ...
Page is loading ...
Page is loading ...
Page is loading ...
Page is loading ...
Page is loading ...
Page is loading ...
Page is loading ...
Page is loading ...
Page is loading ...

EN
57
ASC2500
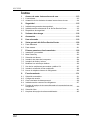
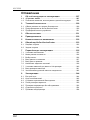
Contents
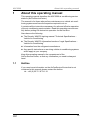
1 About this operating manual. . . . . . . . . . . . . . . . . . . . . . . . . . .59
1.1 Hotline . . . . . . . . . . . . . . . . . . . . . . . . . . . . . . . . . . . . . . . . . . . . . . . . . . 59
1.2 Explanation of symbols in this operating manual. . . . . . . . . . . . . . . . . . 60
2 Safety. . . . . . . . . . . . . . . . . . . . . . . . . . . . . . . . . . . . . . . . . . . . . .61
2.1 General safety instructions . . . . . . . . . . . . . . . . . . . . . . . . . . . . . . . . . . 61
2.2 Warnings on the AirConServiceCenter . . . . . . . . . . . . . . . . . . . . . . . . . 62
2.3 Safety devices . . . . . . . . . . . . . . . . . . . . . . . . . . . . . . . . . . . . . . . . . . . . 63
3 Scope of delivery . . . . . . . . . . . . . . . . . . . . . . . . . . . . . . . . . . . .63
4 Optional extras . . . . . . . . . . . . . . . . . . . . . . . . . . . . . . . . . . . . . .64
5 Proper use. . . . . . . . . . . . . . . . . . . . . . . . . . . . . . . . . . . . . . . . . .64
6 Overview of the AirConServiceCenter. . . . . . . . . . . . . . . . . . .65
6.1 Front . . . . . . . . . . . . . . . . . . . . . . . . . . . . . . . . . . . . . . . . . . . . . . . . . . . 65
6.2 Rear . . . . . . . . . . . . . . . . . . . . . . . . . . . . . . . . . . . . . . . . . . . . . . . . . . . . 66
7 Initial start-up . . . . . . . . . . . . . . . . . . . . . . . . . . . . . . . . . . . . . . .67
7.1 Setting up and switching on. . . . . . . . . . . . . . . . . . . . . . . . . . . . . . . . . . 67
7.2 Standby menu . . . . . . . . . . . . . . . . . . . . . . . . . . . . . . . . . . . . . . . . . . . . 68
7.3 Language selection . . . . . . . . . . . . . . . . . . . . . . . . . . . . . . . . . . . . . . . . 68
7.4 Entering company data . . . . . . . . . . . . . . . . . . . . . . . . . . . . . . . . . . . . . 69
7.5 Entering the date and time. . . . . . . . . . . . . . . . . . . . . . . . . . . . . . . . . . . 70
7.6 Editing default values. . . . . . . . . . . . . . . . . . . . . . . . . . . . . . . . . . . . . . . 71
7.7 Inserting the containers for oil and UV additive . . . . . . . . . . . . . . . . . . . 72
7.8 Entering the container size . . . . . . . . . . . . . . . . . . . . . . . . . . . . . . . . . . 73
7.9 Filling up the internal refrigerant container . . . . . . . . . . . . . . . . . . . . . . 74
8 Operation . . . . . . . . . . . . . . . . . . . . . . . . . . . . . . . . . . . . . . . . . .76
8.1 Short selection. . . . . . . . . . . . . . . . . . . . . . . . . . . . . . . . . . . . . . . . . . . . 76
8.2 User codes. . . . . . . . . . . . . . . . . . . . . . . . . . . . . . . . . . . . . . . . . . . . . . . 78
8.3 Creating a personal database . . . . . . . . . . . . . . . . . . . . . . . . . . . . . . . . 81
8.4 Refrigerant consumption display . . . . . . . . . . . . . . . . . . . . . . . . . . . . . . 82
8.5 Air conditioning system test without refrigerant service. . . . . . . . . . . . . 84
8.6 Free selection . . . . . . . . . . . . . . . . . . . . . . . . . . . . . . . . . . . . . . . . . . . . 86
8.7 Flushing the air conditioning system . . . . . . . . . . . . . . . . . . . . . . . . . . . 90

EN
ASC2500
58
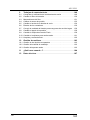
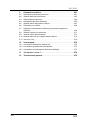
9 Service tasks. . . . . . . . . . . . . . . . . . . . . . . . . . . . . . . . . . . . . . . .93
9.1 Calibrating the oil scales . . . . . . . . . . . . . . . . . . . . . . . . . . . . . . . . . . . .93
9.2 Changing the dryer filter . . . . . . . . . . . . . . . . . . . . . . . . . . . . . . . . . . . . .95
9.3 Filter maintenance . . . . . . . . . . . . . . . . . . . . . . . . . . . . . . . . . . . . . . . . .96
9.4 Calibrating the pressure transducer . . . . . . . . . . . . . . . . . . . . . . . . . . . .97
9.5 Changing the vacuum pump oil . . . . . . . . . . . . . . . . . . . . . . . . . . . . . . .99
9.6 Meter readings . . . . . . . . . . . . . . . . . . . . . . . . . . . . . . . . . . . . . . . . . . .101
9.7 Correcting the filling quantity for long service hoses . . . . . . . . . . . . . .102
9.8 Replacing the printer paper . . . . . . . . . . . . . . . . . . . . . . . . . . . . . . . . .103
9.9 Changing the flash memory card . . . . . . . . . . . . . . . . . . . . . . . . . . . . .103
9.10 Changing the drained oil glass . . . . . . . . . . . . . . . . . . . . . . . . . . . . . . .105
9.11 Cleaning and maintenance. . . . . . . . . . . . . . . . . . . . . . . . . . . . . . . . . .106
10 Disposal. . . . . . . . . . . . . . . . . . . . . . . . . . . . . . . . . . . . . . . . . . .107
10.1 Disposing of used fluids . . . . . . . . . . . . . . . . . . . . . . . . . . . . . . . . . . . .107
10.2 Disposing of packaging material . . . . . . . . . . . . . . . . . . . . . . . . . . . . .107
10.3 Scrapping the old unit. . . . . . . . . . . . . . . . . . . . . . . . . . . . . . . . . . . . . .107
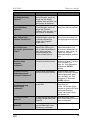
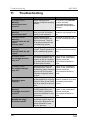
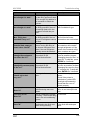
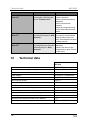
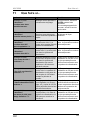
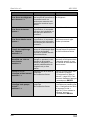
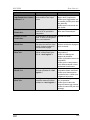
11 Troubleshooting . . . . . . . . . . . . . . . . . . . . . . . . . . . . . . . . . . . .108
12 Technical data. . . . . . . . . . . . . . . . . . . . . . . . . . . . . . . . . . . . . .110

EN
59
ASC2500 About this operating manual
1 About this operating manual
This operating manual describes the ASC2500 air conditioning service
stations (AirConServiceCenter).
The manual is for those who perform maintenance on vehicle air condi-
tioning systems and have the expertise required to do so.
It contains all the instructions necessary for safe and effective operation
of the air conditioning service station. Read this operating manual care-
fully before putting the device into operation for the first time.
Also observe the following:
The Dometic WAECO training manual “Technical Specifications –
Vehicle Air Conditioning”
The Dometic WAECO information brochure “Legal Specifications –
Vehicle Air Conditioning”
Information from the refrigerant manufacturer
Any specific instructions on servicing vehicle air conditioning systems
which apply at your company
Keep this operating manual in the compartment of the
AirConServiceCenter, so that any information you need is always at
hand.
1.1 Hotline
If you need more information on the AirConServiceCenter that is not
contained in this manual, please contact the hotline
tel.: +49 (0) 25 72 / 8 79-1 91

EN
About this operating manual ASC2500
60
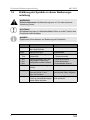
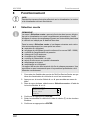
1.2 Explanation of symbols in this operating manual
!
A
I
WARNING!
Safety instructions Failure to observe this instruction can cause fatal
or serious injury.
NOTICE!
Failure to observe this instruction can cause material damage and
impair the function of the device.
NOTE
Supplementary information for operating the product.
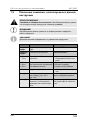
Format Meaning Example
Bold Designations used on the
device
Press ENTER to confirm.
“Bold” Display messages “Short selection”
Text
Text
List in any order
Pressure monitor
Pressure relief valves
1. Text
2. Text
3. Text
Actions to be carried out in the
order shown
1. Connect the device.
2. Switch on the device.
3. Press the selection button.
✓ Text
Result of an action
✓ Device is ready for
operation.
Text (1) Part numbers referring to the
overview (page 65 and
page 66)
Use the keypad (7) to enter the
data.
Text (A) Part designations which refer to
the diagrams shown in the sec-
tion describing the work step
Remove the filter cartridge (E)
on the left side.

EN
61
ASC2500 Safety
2 Safety
The manufacturer will not be held liable for damage claims resulting from
the following:
Damage to the product resulting from mechanical influences and
excess voltage
Alterations to the product without the express permission of the
manufacturer
Usage for purposes other than those described in the instruction
manual
2.1 General safety instructions
Read this operating manual carefully before starting up the
AirConServiceCentre for the first time.
Only use the device for its intended purpose.
Only use R-134a refrigerant. If other refrigerants are mixed in, this can
damage the AirConServiceCenter and the vehicle air conditioning
system.
Only use WAECO UV additive. If you use other UV additives, it could
cause damage to the AirConServiceCenter.
Wear personal safety equipment (safety goggles and protective gloves)
and avoid coming into contact with the refrigerant. Contact with the refrig-
erant draws out body heat and the affected areas can freeze.
Do not inhale refrigerant vapour. Although the vapour is non-toxic, it dis-
places the oxygen you need to breathe.
Do not make modifications to the AirConServiceCenter.

EN
Safety ASC2500
62
Each time you start up the device or top up the AirConServiceCenter, first
check whether the device and all the service hoses are undamaged and
that all valves are closed.
Do not start up the AirConServiceCenter if it is damaged.
Only use approved refrigerant bottles with safety valves to refill the
AirConServiceCenter.
Drain the service hoses before you undo the connections.
Do not operate the AirConServiceCenter in areas where there is a risk of
explosions (for example battery charging rooms or spraying booths).
Always use the main switch of the AirConServiceCenter to switch the sta-
tion on and off. Do not leave the device unattended when it is switched
on.
Before you shut down the AirConServiceCenter, make sure that the
selected programme has ended and that all valves are shut. Otherwise
refrigerant can leak.
Do not pump compressed air into the refrigerant lines of the
AirConServiceCenter or the vehicle air conditioning system. A mixture of
compressed air and refrigerant can be flammable or explosive.
2.2 Warnings on the AirConServiceCenter
Warning!
Observe the operating manual!
Only connect the device to a 230 V / 50 Hz AC socket!
Protect the device against rain!
Wear gloves when handling refrigerants!
Wear goggles when handling refrigerants!

EN
63
ASC2500 Scope of delivery
2.3 Safety devices
Pressure monitor: switches the compressor off if the normal operating
pressure is exceeded.
Pressure relief valves: additional safety mechanism to protect lines or
vessels from bursting if the pressure continues to rise despite the
safety pressure monitor.
3 Scope of delivery
The AirConServiceCenter and its accessories are carefully checked
before shipping.
After delivery, check that all the parts listed below are present and
undamaged.
If any parts are missing or damaged, notify the company responsible for
transport immediately.
Designation
Bottle valve adapter for refrigerant bottles
Adapter for 500 ml fresh oil and UV contrast agent bottle
Closed, patented drained oil receptacle
Professional oil can, viscosity 100
Contrast agent test bottle (for approx. 10 applications)
Professional oil can, viscosity 46
Protective device cover
Goggles/gloves
Operating manual

EN
Optional extras ASC2500
64
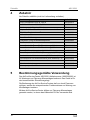
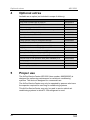
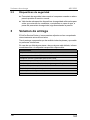
4 Optional extras
Available as an option (not included in scope of delivery):
5 Proper use
The AirConServiceCenter ASC2500 (item number: 8885200095) is
designed for performing maintenance on vehicle air conditioning
systems. The device is designed for commercial use.
The AirConServiceCenter may only be operated by persons who have
the expertise required for servicing air conditioning systems.
This AirConServiceCenter may only be used to service vehicle air
conditioning systems in which R-134a refrigerant is used.
Designation Item no.
PAG fresh oil bottle ISO 46, 500 ml 8887200013
PAG fresh oil bottle ISO 100, 500 ml 8887200014
UV contrast agent bottle, 500 ml TP-3820-500
Adapter for 500 ml fresh oil and UV contrast agent bottle 4440600026
Container for additional oil type 4440600034
Used oil container, 500 ml 4440600131
Spare filter for maintenance 4440400009
Filling cylinder 4.4 kg for refrigerant storage 8885200003
Protective device cover 4445900081
Supply bottle for tracer filling apparatus, 236 ml TP-3820-0008
Supply bottle for tracer filling apparatus, 475 ml TP-3820-0016
Tracer filling apparatus (separate additive vessel) 4440600034
Spare printer roll (thermal paper) (VPE 4) 4445900088
Service hose for high pressure side (SAE standard) 5 m 8885100026
Service hose for low pressure side (SAE standard) 5 m 8885100025
Safety goggles 8885400066
Protective gloves 8885400065
Vacuum pump oil, 1000 ml 8887200018

EN
65
ASC2500 Overview of the AirConServiceCenter
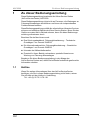
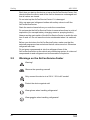
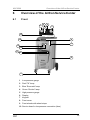
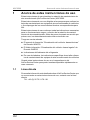
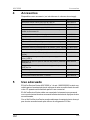
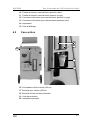
6 Overview of the AirConServiceCenter
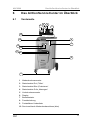
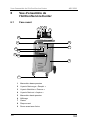
6.1 Front
1 Low pressure gauge
2 Red “Fill” lamp
3 Blue “Evacuate” lamp
4 Green “Suction” lamp
5 High pressure gauge
6 Display
7 Keypad
8 Front cover
9 Front wheels with wheel stops
10 Service hose for low pressure connection (blue)
14
12
2
3
4
6
9
15
1
5
11
10
7
13
8

EN
Overview of the AirConServiceCenter ASC2500
66
11 Service hose for high pressure connection (red)
12 Service coupling for high pressure connection (red)
13 Service coupling for low pressure connection (blue)
14 Printer
15 Display unit
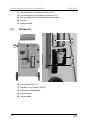
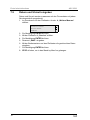
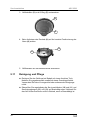
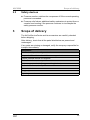
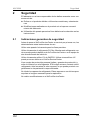
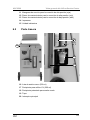
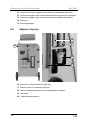
6.2 Rear
16 Fresh oil can (500 ml)
17 Container for UV additive (500 ml)
18 Patented drained oil receptacle
19 Cover flap
20 Main switch
20
16
17
18
19

EN
67
ASC2500 Initial start-up
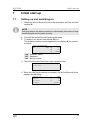
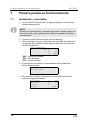
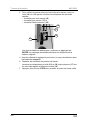
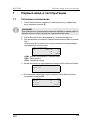
7 Initial start-up
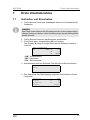
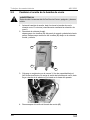
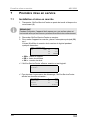
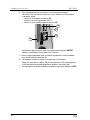
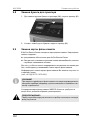
7.1 Setting up and switching on
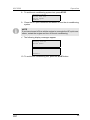
1. Wheel the AirConServiceCenter to the workplace and lock the front
wheels (9).
I
2. Connect the AirConServiceCenter to the mains.
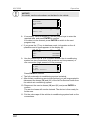
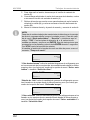
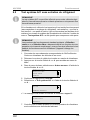
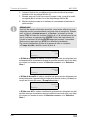
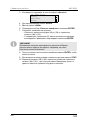
3. To switch it on, set the main switch (20) to I.
The software version number appears in the display (6) for several
seconds:
“SW”: Software status
“DB”: Database
“SN”: Series number
✓ The AirConServiceCenter then runs a software test.
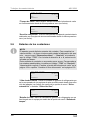
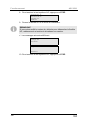
✓ When the start-up procedure is complete, the AirConServiceCenter
displays the following:
NOTE
During operation, the device must be on a horizontal, flat surface so that
measurements can be made correctly.
WAECO INTERNATIONAL
ASC 2500 SW x.xx
DB x.xx
SN 000000
Software test.
Please wait
Refrigerant g. 4820
PAG oil ml 375
UV tracer ml 313
11:56:35 10/03/11

EN
Initial start-up ASC2500
68
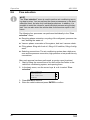
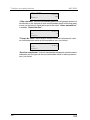
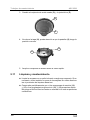
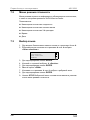
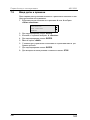
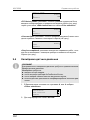
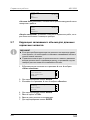
7.2 Standby menu
The standby menu shows you the current supply quantities and the time
settings of the AirConServiceCenter.
The following information is shown:
Refrigerant quantity
Fresh oil quantity
UV-additive quantity
Time
Date
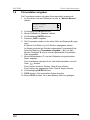
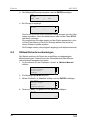
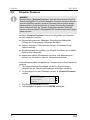
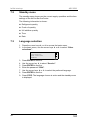
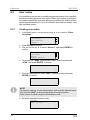
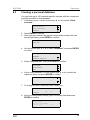
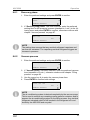
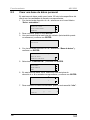
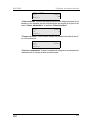
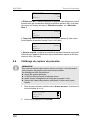
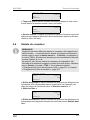
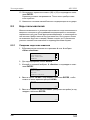
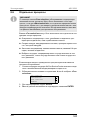
7.3 Language selection
1. Press the cursor keys or to access the basic menu.
2. In the basic menu, use the cursor keys or to select “Other
selections”:
3. Press ENTER to confirm.
4. Use the cursor key to select “Service”.
5. Press ENTER to confirm.
6. Enter the password “5264”.
7. Use the cursor keys or to select the preferred language.
8. Press ENTER to confirm.
9. Press STOP. The language chosen is active and the standby menu
is displayed.
Short selection
Free selection
Other selections
ENTER-OK

EN
69
ASC2500 Initial start-up
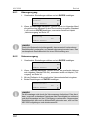
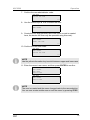
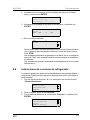
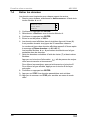
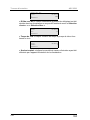
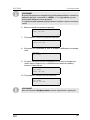
7.4 Entering company data
The company data is printed out with every service log.
1. In the basic menu, use the cursor keys or to select “Other
selections”:
2. Press ENTER to confirm.
3. Use the cursor key to select “Service”.
4. Press ENTER to confirm.
5. Enter the password “3282”.
6. The company data is shown in the third line of the display (6).
You can enter five lines, each with up to 20 characters.
The display shows the number of lines of company data after the
message “Enter company data” (“01” to “05”).
Use the cursor keys or to select the line of company data you
want.
7. Use the keypad (7) and the cursor keys to enter the data.
To switch between upper and lower case, press the Info key .
To delete a character, briefly press the C key.
To delete the current line, press and hold down the C key.
8. Press ENTER to confirm.
9. Press STOP. The set data is activated.
10. Press STOP again to access the standby menu.
Short selection
Free selection
Other selections
ENTER-OK

EN
Initial start-up ASC2500
70
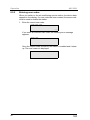
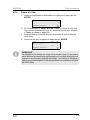
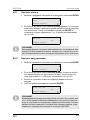
7.5 Entering the date and time
The date and the time are printed along with the company data on every
service log.
1. In the basic menu, use the cursor keys or to select “Other
selections”:
2. Press ENTER to confirm.
3. Use the cursor key to select “Service”.
4. Press ENTER to confirm.
5. Enter the password “8463”.
6. Use the keypad and the cursor keys to enter the information.
7. Press ENTER to confirm.
8. Press STOP to access the standby menu.
Short selection
Free selection
Other selections
ENTER-OK

EN
71
ASC2500 Initial start-up
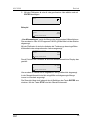
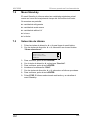
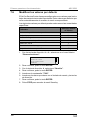
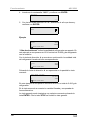
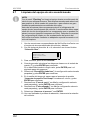
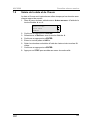
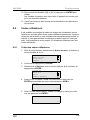
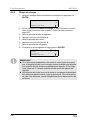
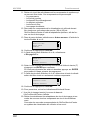
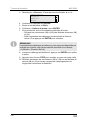
7.6 Editing default values
The AirConServiceCenter has preset values for the most important
service tasks. The default values appear automatically when you select
the respective menu.
You can alter the following default values if necessary:
1. In the basic menu, use the cursor keys or to select “Other
selections”:
2. Press ENTER to confirm.
3. Use the cursor key to select “Service”.
4. Press ENTER to confirm.
5. Enter the password “7388”.
6. Use the keypad and the cursor keys to enter the information.
7. Press ENTER to confirm.
8. Press STOP to access the standby menu.
Parameter Default value
Pressure increase test time min. 1
Vacuum time min. 20
Leak test min. 4
PAG oil ml. (additional quantity) 0
UV tracer ml. 7
Filling Qt. g. 500
Print recovery value? Yes
Short selection
Free selection
Other selections
ENTER-OK

EN
Initial start-up ASC2500
72
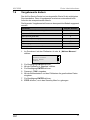
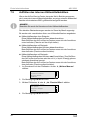
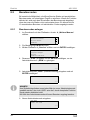
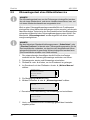
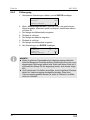
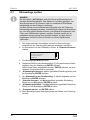
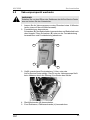
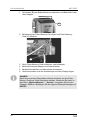
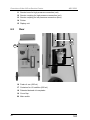
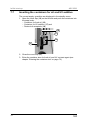
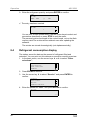
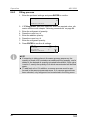
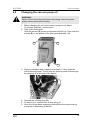
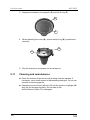
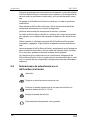
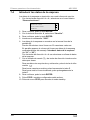
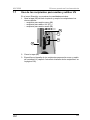
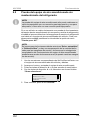
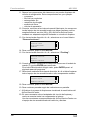
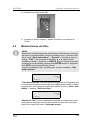
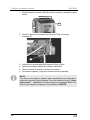
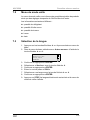
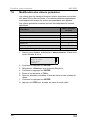
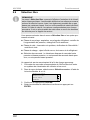
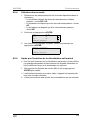
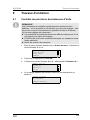
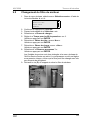
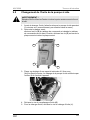
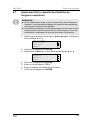
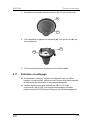
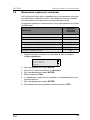
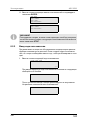
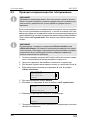
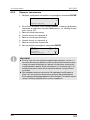
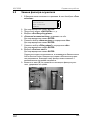
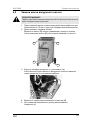
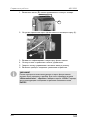
7.7 Inserting the containers for oil and UV additive
The current supply quantities are displayed in the standby menu.
1. Open the cover flap (19) on the left side and push the containers into
the snap locks:
– Container for fresh oil (16)
– Container for UV additive (17) and
– Drained oil receptacle (18)
2. Close the cover flap (19).
3. Enter the container size for fresh oil and UV contrast agent (see
chapter “Entering the container size” on page 73).
19
16
18
17

EN
73
ASC2500 Initial start-up
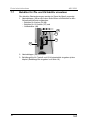
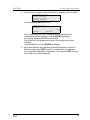
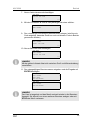
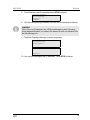
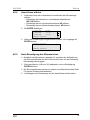
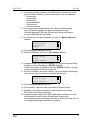
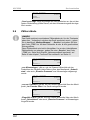
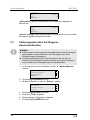
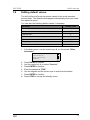
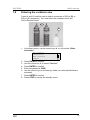
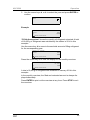
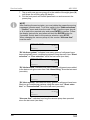
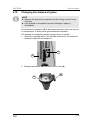
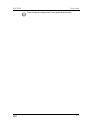
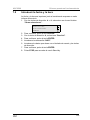
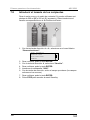
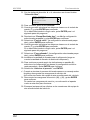
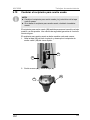
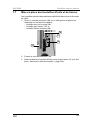
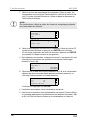
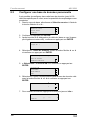
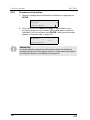
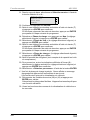
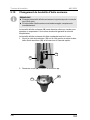
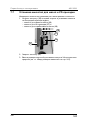
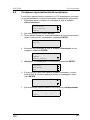
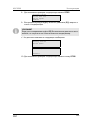
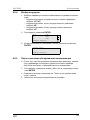
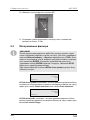
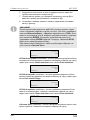
7.8 Entering the container size
Fresh oil and UV additive can be kept in containers of 500 ml (B) or
250 ml (C) (accessory). You must enter the container size in the
AirConServiceCenter.
1. In the basic menu, use the cursor keys or to select “Other
selections”:
2. Press ENTER to confirm.
3. Use the cursor key to select “Service”.
4. Press ENTER to confirm.
5. Enter the password “2688”.
6. Use the cursor keys to activate any fields you need (dark fields are
activated).
7. Press ENTER to confirm.
8. Press STOP to access the standby menu.
Short selection
Free selection
Other selections
ENTER-OK
C
B

EN
Initial start-up ASC2500
74
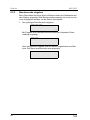
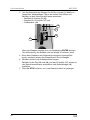
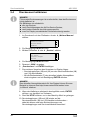
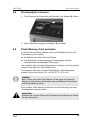
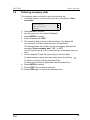
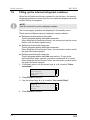
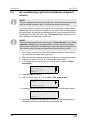
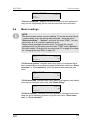
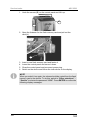
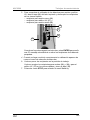
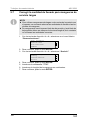
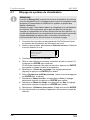
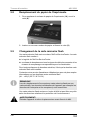
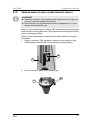
7.9 Filling up the internal refrigerant container
When the AirConServiceCenter is started for the first time, the internal
refrigerant container must be filled from an external refrigerant tank with
at least 5000 g of refrigerant.
I
The current supply quantities are displayed in the standby menu.
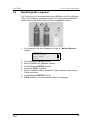
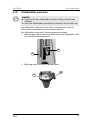
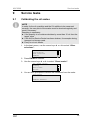
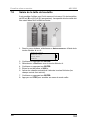
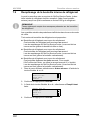
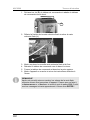
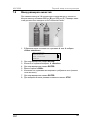
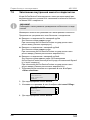
There are three different types of refrigerant vessel available:
Refrigerant bottles without rising pipe:
These refrigerant bottles have one connection.
When filling the AirConServiceCenter, the connection must be on the
bottom (turn the bottle upside down).
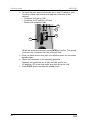
Refrigerant bottles with rising pipe:
These refrigerant bottles have one connection.
When filling the AirConServiceCenter, the connection must be at the
top (place the bottle upright).
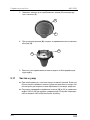
Refrigerant bottles with rising pipe:
These refrigerant bottles have two connections. To top up the
AirConServiceCenter, use the connection marked with L (= liquid).
When filling the AirConServiceCenter, the connection must be at the
top (place the bottle upright).
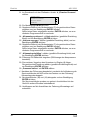
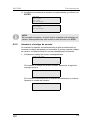
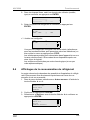
1. In the basic menu, use the cursor keys or to select “Other
selections”:
2. Press ENTER to confirm.
3. Use the cursor keys or to select “Int. vessel filling”:
4. Press ENTER to confirm.
NOTE
Note the instructions on the refrigerant vessels.
Short selection
Free selection
Other selections
ENTER-OK
Int. vessel filling
Flushing
Reset scales.
Service

EN
75
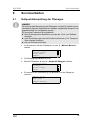
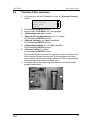
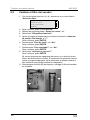
ASC2500 Initial start-up
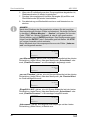
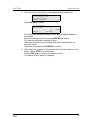
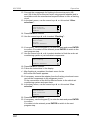
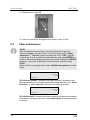
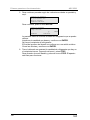
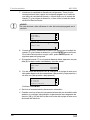
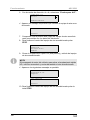
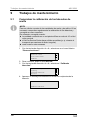
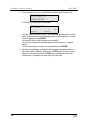
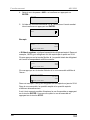
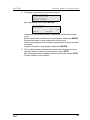
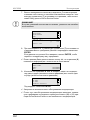
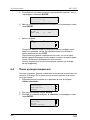
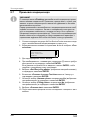
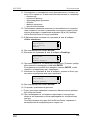
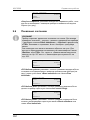
5. Then follow the instructions in the display and provided here:
Press ENTER to confirm.
The maximum refrigerant quantity which can be added appears in
the display.
Enter the required amount and press ENTER to confirm.
The internal refrigerant container is filled.
When the filling process is finished, this will be confirmed by an
acoustic signal.
Close the valves and press ENTER to confirm.
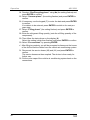
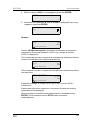
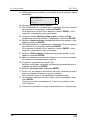
6. After filling, the quantity of refrigerant in the internal container is dis-
played. Press STOP to exit the menu.
Press STOP again to access the standby menu.
The device is now ready for operation.
Connect the HP hose
to the external tank
then open the valve
ENTER-OK STOP-EXIT
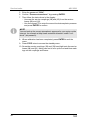
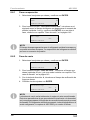
Set the quantity
then confirm!
g. 13620
ENTER-OK STOP-EXIT

EN
Operation ASC2500
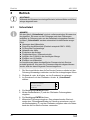
76
8 Operation
A
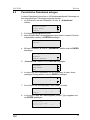
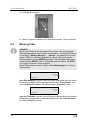
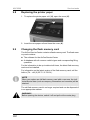
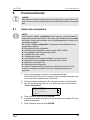
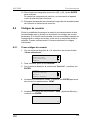
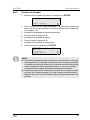
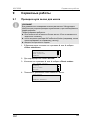
8.1 Short selection
I
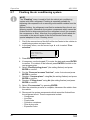
1. First fit the service hoses for the AirConServiceCenter to the vehicle
air conditioning system, and open the service couplings.
2. Press the cursor key or to access the basic menu.
3. In the basic menu, use the cursor keys or to select “Short
selection”:
4. Press ENTER to confirm.
5. Use the keypad (7) and the cursor keys to enter the vehicle data.
6. Press ENTER to confirm.
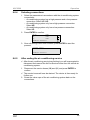
7. Enter the refrigerant filling quantity. Either use the value shown on
the filling quantities sticker in the vehicle and enter it using the key-
pad (7) and the cursor keys, or use the AirConServiceCenter data-
base.
NOTICE!
When the air conditioning is being serviced, the engine and the air
conditioning must be switched off.
NOTE
A fully automatic air conditioning service is started using the “Short
selection” menu. You only have to enter the filling quantity as shown
on the label in the vehicle, or as found in the database.
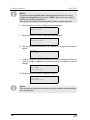
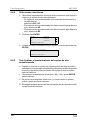
The following actions are performed automatically in succession in the
“Short selection” menu:
Extraction of the refrigerant
Recycling of the refrigerant (purity = SAE J 2099)
Pressure rise test
Draining the used oil
Evacuating the system
Leak test / vacuum check
Filling with new oil to the required quantity
Filling with UV additive
Filling of refrigerant
After each process has been performed, a service report is printed.
Subsequent actions are only initiated once the preceding action has
been completed successfully.
Short selection
Free selection
Other selections
ENTER-OK
Page is loading ...
Page is loading ...
Page is loading ...
Page is loading ...
Page is loading ...
Page is loading ...
Page is loading ...
Page is loading ...
Page is loading ...
Page is loading ...
Page is loading ...
Page is loading ...
Page is loading ...
Page is loading ...
Page is loading ...
Page is loading ...
Page is loading ...
Page is loading ...
Page is loading ...
Page is loading ...
Page is loading ...
Page is loading ...
Page is loading ...
Page is loading ...
Page is loading ...
Page is loading ...
Page is loading ...
Page is loading ...
Page is loading ...
Page is loading ...
Page is loading ...
Page is loading ...
Page is loading ...
Page is loading ...
Page is loading ...
Page is loading ...
Page is loading ...
Page is loading ...
Page is loading ...
Page is loading ...
Page is loading ...
Page is loading ...
Page is loading ...
Page is loading ...
Page is loading ...
Page is loading ...
Page is loading ...
Page is loading ...
Page is loading ...
Page is loading ...
Page is loading ...
Page is loading ...
Page is loading ...
Page is loading ...
Page is loading ...
Page is loading ...
Page is loading ...
Page is loading ...
Page is loading ...
Page is loading ...
Page is loading ...
Page is loading ...
Page is loading ...
Page is loading ...
Page is loading ...
Page is loading ...
Page is loading ...
Page is loading ...
Page is loading ...
Page is loading ...
Page is loading ...
Page is loading ...
Page is loading ...
Page is loading ...
Page is loading ...
Page is loading ...
Page is loading ...
Page is loading ...
Page is loading ...
Page is loading ...
Page is loading ...
Page is loading ...
Page is loading ...
Page is loading ...
Page is loading ...
Page is loading ...
Page is loading ...
Page is loading ...
Page is loading ...
Page is loading ...
Page is loading ...
Page is loading ...
Page is loading ...
Page is loading ...
Page is loading ...
Page is loading ...
Page is loading ...
Page is loading ...
Page is loading ...
Page is loading ...
Page is loading ...
Page is loading ...
Page is loading ...
Page is loading ...
Page is loading ...
Page is loading ...
Page is loading ...
Page is loading ...
Page is loading ...
Page is loading ...
Page is loading ...
Page is loading ...
Page is loading ...
Page is loading ...
Page is loading ...
Page is loading ...
Page is loading ...
Page is loading ...
Page is loading ...
Page is loading ...
Page is loading ...
Page is loading ...
Page is loading ...
Page is loading ...
Page is loading ...
Page is loading ...
Page is loading ...
Page is loading ...
Page is loading ...
Page is loading ...
Page is loading ...
Page is loading ...
Page is loading ...
Page is loading ...
Page is loading ...
Page is loading ...
Page is loading ...
Page is loading ...
Page is loading ...
Page is loading ...
Page is loading ...
Page is loading ...
Page is loading ...
Page is loading ...
Page is loading ...
Page is loading ...
Page is loading ...
Page is loading ...
Page is loading ...
Page is loading ...
Page is loading ...
Page is loading ...
Page is loading ...
Page is loading ...
Page is loading ...
Page is loading ...
Page is loading ...
Page is loading ...
Page is loading ...
Page is loading ...
Page is loading ...
Page is loading ...
Page is loading ...
Page is loading ...
Page is loading ...
Page is loading ...
Page is loading ...
Page is loading ...
Page is loading ...
Page is loading ...
Page is loading ...
Page is loading ...
Page is loading ...
Page is loading ...
Page is loading ...
Page is loading ...
Page is loading ...
Page is loading ...
Page is loading ...
Page is loading ...
Page is loading ...
Page is loading ...
Page is loading ...
Page is loading ...
Page is loading ...
Page is loading ...
Page is loading ...
Page is loading ...
Page is loading ...
Page is loading ...
Page is loading ...
Page is loading ...
Page is loading ...
Page is loading ...
Page is loading ...
Page is loading ...
Page is loading ...
Page is loading ...
Page is loading ...
Page is loading ...
Page is loading ...
Page is loading ...
Page is loading ...
Page is loading ...
-
 1
1
-
 2
2
-
 3
3
-
 4
4
-
 5
5
-
 6
6
-
 7
7
-
 8
8
-
 9
9
-
 10
10
-
 11
11
-
 12
12
-
 13
13
-
 14
14
-
 15
15
-
 16
16
-
 17
17
-
 18
18
-
 19
19
-
 20
20
-
 21
21
-
 22
22
-
 23
23
-
 24
24
-
 25
25
-
 26
26
-
 27
27
-
 28
28
-
 29
29
-
 30
30
-
 31
31
-
 32
32
-
 33
33
-
 34
34
-
 35
35
-
 36
36
-
 37
37
-
 38
38
-
 39
39
-
 40
40
-
 41
41
-
 42
42
-
 43
43
-
 44
44
-
 45
45
-
 46
46
-
 47
47
-
 48
48
-
 49
49
-
 50
50
-
 51
51
-
 52
52
-
 53
53
-
 54
54
-
 55
55
-
 56
56
-
 57
57
-
 58
58
-
 59
59
-
 60
60
-
 61
61
-
 62
62
-
 63
63
-
 64
64
-
 65
65
-
 66
66
-
 67
67
-
 68
68
-
 69
69
-
 70
70
-
 71
71
-
 72
72
-
 73
73
-
 74
74
-
 75
75
-
 76
76
-
 77
77
-
 78
78
-
 79
79
-
 80
80
-
 81
81
-
 82
82
-
 83
83
-
 84
84
-
 85
85
-
 86
86
-
 87
87
-
 88
88
-
 89
89
-
 90
90
-
 91
91
-
 92
92
-
 93
93
-
 94
94
-
 95
95
-
 96
96
-
 97
97
-
 98
98
-
 99
99
-
 100
100
-
 101
101
-
 102
102
-
 103
103
-
 104
104
-
 105
105
-
 106
106
-
 107
107
-
 108
108
-
 109
109
-
 110
110
-
 111
111
-
 112
112
-
 113
113
-
 114
114
-
 115
115
-
 116
116
-
 117
117
-
 118
118
-
 119
119
-
 120
120
-
 121
121
-
 122
122
-
 123
123
-
 124
124
-
 125
125
-
 126
126
-
 127
127
-
 128
128
-
 129
129
-
 130
130
-
 131
131
-
 132
132
-
 133
133
-
 134
134
-
 135
135
-
 136
136
-
 137
137
-
 138
138
-
 139
139
-
 140
140
-
 141
141
-
 142
142
-
 143
143
-
 144
144
-
 145
145
-
 146
146
-
 147
147
-
 148
148
-
 149
149
-
 150
150
-
 151
151
-
 152
152
-
 153
153
-
 154
154
-
 155
155
-
 156
156
-
 157
157
-
 158
158
-
 159
159
-
 160
160
-
 161
161
-
 162
162
-
 163
163
-
 164
164
-
 165
165
-
 166
166
-
 167
167
-
 168
168
-
 169
169
-
 170
170
-
 171
171
-
 172
172
-
 173
173
-
 174
174
-
 175
175
-
 176
176
-
 177
177
-
 178
178
-
 179
179
-
 180
180
-
 181
181
-
 182
182
-
 183
183
-
 184
184
-
 185
185
-
 186
186
-
 187
187
-
 188
188
-
 189
189
-
 190
190
-
 191
191
-
 192
192
-
 193
193
-
 194
194
-
 195
195
-
 196
196
-
 197
197
-
 198
198
-
 199
199
-
 200
200
-
 201
201
-
 202
202
-
 203
203
-
 204
204
-
 205
205
-
 206
206
-
 207
207
-
 208
208
-
 209
209
-
 210
210
-
 211
211
-
 212
212
-
 213
213
-
 214
214
-
 215
215
-
 216
216
-
 217
217
-
 218
218
-
 219
219
-
 220
220
-
 221
221
-
 222
222
-
 223
223
-
 224
224
-
 225
225
-
 226
226
-
 227
227
-
 228
228
-
 229
229
-
 230
230
-
 231
231
-
 232
232
-
 233
233
-
 234
234
-
 235
235
-
 236
236
-
 237
237
-
 238
238
-
 239
239
-
 240
240
-
 241
241
-
 242
242
-
 243
243
-
 244
244
-
 245
245
-
 246
246
-
 247
247
-
 248
248
-
 249
249
-
 250
250
-
 251
251
-
 252
252
-
 253
253
-
 254
254
-
 255
255
-
 256
256
-
 257
257
-
 258
258
-
 259
259
-
 260
260
-
 261
261
-
 262
262
-
 263
263
-
 264
264
-
 265
265
-
 266
266
-
 267
267
-
 268
268
-
 269
269
-
 270
270
-
 271
271
-
 272
272
-
 273
273
-
 274
274
-
 275
275
-
 276
276
-
 277
277
-
 278
278
-
 279
279
-
 280
280


Waeco Waeco ASC 2500 Operating instructions
- Type
- Operating instructions
- This manual is also suitable for
Ask a question and I''ll find the answer in the document
Finding information in a document is now easier with AI
in other languages
Related papers
-
Waeco BMW2500 Operating instructions
-
-
-
-
Waeco ASC 5500 G RPA Operating instructions
-
-
Waeco ASC5300G Operating instructions
-
Waeco ASC 1000, ASC 2000, ASC 2000 RPA, ASC 3000 Operating instructions
-
Waeco Waeco VAS6746B Operating instructions
-
Other documents
-
 Zell AC1000 Operating instructions
-
Protec AMC Series User manual
-
Snap-On POLARTEK HYBRID EEAC332 User manual
-
Cornwell Tools RAC34788 Owner's manual
-
Robinair Recovery, Recycling, Recharging Unit 34288 User manual
-
Rothenberger Universal ACR maintenance set ROKLIMA MULTI 4F User manual
-
-
-
Dometic Over Voltage Protection Operating instructions
-
Denso DNP-471-8162 Removal And Installation Instructions
