Page is loading ...

1
Gel Doc EZ System
Installation Guide
(The Chinese version of this document begins on page 11.)
Installing the Gel Doc EZ system requires
the following steps:
1. Install Image Lab™ software on the
PC or Macintosh computer you intend
to use with the imager.
2. Connect the imager to the computer.
3. Initialize the sample trays.
1 Install Image Lab Software
Windows
• Place the Image Lab software CD in your CD-ROM drive. The installation should
start automatically.
NOTE: If the installation does not start, open My Computer and click the CD drive
icon. Double-click setup.exe to start the installation manually.
The Image Lab software icon appears on your desktop. Follow the instructions in the next
section to connect the imager to your computer.

Gel Doc™ EZ System Installation Guide
2
Macintosh
1. Place the Image Lab software CD in your CD-ROM drive.
2. Double-click the CD icon on your desktop to see the folder contents.
3. Double-click the file Image Lab.dmg.
4. Drag the Image Lab application icon into the Applications folder.
Follow the instructions in the next section to connect the imager to your computer.
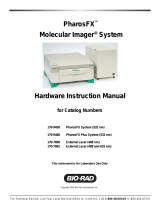
2 Connect the Imager to the Computer
NOTE: Install or upgrade Image Lab software before connecting the Gel Doc EZ
imager to a computer.
1. Connect the imager to the computer on which you installed Image Lab software using
the USB cable provided with the Gel Doc EZ system.
2. Connect the Gel Doc EZ imager to AC power using the power cord provided.
3. Turn on power to the imager using the switch on the side of the instrument.
USB cable
Rear of imager
PC
AC
cord
Power
switch

Gel Doc™ EZ System Installation Guide
3
IF YOUR COMPUTER IS RUNNING WINDOWS XP
After the power is turned on, the PC automatically recognizes the imager, and the software
prompts you to install the driver.
4. Select No, not this time, and then select Next. The following screen appears.
5. Install the software automatically is selected by default. Click Next. The following screen
appears:

Gel Doc™ EZ System Installation Guide
4
6. Click Continue Anyway. Windows installs the driver.
7. Click the Finish button when it appears. A message appears briefly in the lower right
corner of the screen: Your new hardware is ready to use.
NOTE: Windows XP may prompt you to go through the driver installation a second
time. If this happens, repeat steps 4 through 7 until you receive the message: Your
new hardware is ready to use.
IF YOUR COMPUTER IS RUNNING WINDOWS 7
During the installation process the following warning may appear. This warning can be ignored
because it appears even when the driver has been installed correctly.

Gel Doc™ EZ System Installation Guide
5
3 Configure the System
To use the Gel Doc EZ imager with Image Lab software, the imager must first be configured.
Configuration consists of initializing the sample trays and collecting the dark image.
The imager is configured in the setup wizard, which appears the first time the imager is
connected to a computer.
To configure the imager:
1. Turn on the imager and start Image Lab software. The setup wizard appears.
2. Complete the steps in the wizard as described in the following pages.
NOTE: You must go all the way through the wizard or the imager will not be
usable.
The first page of the setup wizard indicates that
a new instrument has been found on the system
and displays the instrument’s serial number.
1. Click Next.
The Dark Image Correction page appears.
Correcting the dark image reduces dark current
noise generated from the charge-coupled
device (CCD). Dark current noise is typical of all
CCDs and is a result of the accumulation of
charge in the absence of light.
2. If a tray is in the imager, remove it and close
the tray door.
3. Click Acquire Dark Image.
A progress indicator reports the acquisition of
the dark image.

Gel Doc™ EZ System Installation Guide
6
When the dark image has been acquired, the
wizard prompts you to initialize the UV tray.
4. If you do not have a UV tray, click Skip and
go to step 7.
5. Make sure the UV tray is clean. Then insert
the tray into the imager and close the door.
A progress indicator reports the initialization of
the tray.
When the tray has been initialized, the next
page confirms that the tray has been found and
initialized and lists the applications you can run
with this tray.
6. Remove the UV tray from the imager. Then
click Next.
The wizard prompts you to initialize the white
tray.
7. If you do not have a white tray, click Skip and
go to step 10.
8. Make sure the white tray is clean. Then insert
the tray into the imager and close the door.
A progress indicator reports the initialization of
the tray.

Gel Doc™ EZ System Installation Guide
7
When the tray has been initialized, the next
page confirms this and lists the applications
you can run with the tray.
9. Remove the white tray from the imager. Then
click Next.
The wizard prompts you to initialize the blue
tray.
10. If you do not have a blue tray, click Skip and
go to step 13.
11. Make sure the blue tray is clean. Then insert
the tray into the imager and close the door.
A progress indicator reports the initialization of
the tray.
When the tray has been initialized, the next
page confirms this and lists the applications
you can run with the tray.
12. Remove the blue tray from the imager. Then
click Next.

Gel Doc™ EZ System Installation Guide
8
See Chapter 4, Acquiring Images, in Using Image Lab Software with the Gel Doc™ EZ System,
on the software CD to configure the default protocols, which run when the green button is
pressed on the imager.
Initializing an Additional Tray
After you configure the imager, you can add another tray to the system when you need it.
To initialize an additional tray:
1. Insert a new type of tray in the imager. The New Tray Found wizard opens.
The wizard prompts you to initialize the stain-
free tray.
13. If you do not have a stain-free tray, click
Skip and go to step 16.
14. Make sure the stain-free tray is clean. Then
insert the tray into the imager and close the
door.
A progress indicator reports the initialization of
the tray.
When the tray has been initialized, the next
page confirms this and lists the applications
you can run with the tray.
15. Click Next.
A tray summary page lists all the trays and their
status. Trays you initialized appear as ready to
use.
16. Click Finish to exit the wizard.

Gel Doc™ EZ System Installation Guide
9
2. Complete the steps in the wizard as described in the following pages.
The wizard identifies the new tray.
1. Click Next.
The wizard begins initializing the tray.
A progress indicator reports the initialization of the
tray.
When the tray has been initialized, the wizard
displays a list of the applications you can run using
the tray.
2. Click Next.

Gel Doc™ EZ System Installation Guide
10
Refer to Using Image Lab Software with the Gel Doc™ EZ System on the software CD for
detailed instructions on working with the system.
Macintosh is a trademark of Apple, Inc. Windows is a trademark of Microsoft Corporation.
The wizard displays the Tray Summary, which
shows the highlighted, initialized new tray.
3. Do one of the following:
Click Finish to leave the wizard and display the
Default Protocol Setup dialog box, where you can
start creating a default protocol for the new tray.
OR
Clear the checkbox at the bottom of the wizard
page to skip setting up a default protocol. Then
click Finish to leave the wizard.
/