
Model No.
45-0510
OWNERS
MANUAL
PRINTED IN U.S.A. FORM NO. 41771 rev. (08/27/15)
CAUTION:
Read Rules for
Safe Operation
and Instructions
Carefully
• Safety
• Assembly
• Operation
• Maintenance
• Parts
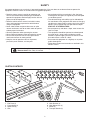
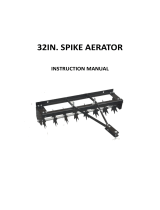
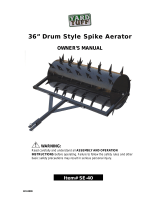
36" SPIKE AERATOR
the fastest way to purchase parts
www.speedepart.com

2
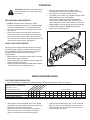
SAFETY
Anypowerequipmentcancauseinjuryifoperatedimproperlyoriftheuserdoesnotunderstandhowtooperatethe
equipment.Exercisecautionatalltimeswhenusingpowerequipment.
• Readtheownersmanualcarefullyforoperatingand
serviceinstructionsbeforeattemptingtoassembleor
operatethisequipment.Bethoroughlyfamiliarwiththe
properuseofthisequipment.
• Readthevehicleownersmanualandvehiclesafety
rules,andknowhowtooperatethevehiclebefore
usingthisequipment.
• Neverallowchildrentooperatethetractororspike
aeratorattachment,anddonotallowadultstooperate
withoutproperinstructions.
• Weareyeprotectionwhenoperatingtheaerator.
• Wearsubstantialfootwearwhenoperatingtheaerator.
• Do not allow anyone to ride or sit on spike aerator
attachmentframeorontowingvehicle.
• Keeptheareaofoperationclearofallpersons,
particularlysmallchildren,andalsopets.
• Alwaysbeginwiththetransmissioninrst(low)gear
andengineatlowspeed,andgraduallyincreasespeed
asconditionspermit.
• Thevehiclebrakingandstabilitymaybeaffectedwith
theattachmentofthisequipment.Beawareofchanging
conditionsonslopes.Refertosafetyrulesinthevehicle
owner'smanualconcerningsafeoperationonslopes.
STAY OFF OF STEEP SLOPES.
• Alwaysoperateupanddownaslope,neveracrossthe
face of a slope
• Thisequipmentshouldbeoperatedatreducedspeed
onroughterrain,alongcreeksandditchesandon
hillsides,topreventtippingandlossofcontrol. Do not
drivetooclosetoacreekoraditch.
• Donottowthisequipmentonahighwayoranyother
publicthoroughfare.
• Followthemaintenanceinstructionsasoutlinedinthis
ownersmanual.
Lookforthissymboltopointoutimportantsafetyprecautions.Itmeans–Attention!!
Become alert!! Your safety is involved.
1. End Plate (2)
2. FrameAngle(2)
3. Spike Disk (9)
4. Axle
5. HitchBracket(2)
6. HitchMountArm(2)
7. Wheel(2)
8. Transport Handle (2)
CARTON CONTENTS
1
2
3
4
7
8
5
6

3
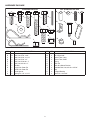
HARDWARE PACKAGE
REF QTY. DESCRIPTION
A 4 Bolt,Carriage,5/16"x1"
B 12 Bolt,Hex,5/16"x3/4"
C 2 Bolt,Hex,5/16"x1-1/4"
D 2 Bolt,Hex,5/16"x2"
E 2 Bolt,Hex,5/16-18x1"
F 2 Bolt,Hex,3/8-16x1"
G 2 Washer
H 1 LargeHairCotterPin
i 1 SmallHairCotterPin
J 2 SmallSpacer
K 2 SpringPin,1/4"x1-1/4"
REF QTY. DESCRIPTION
L 26 Nut,Nylock5/16"
M 4 Nut,Nylock3/8"
N 6 SpacerTube,Long
O 2 SpacerTube,Short
P 2 Spring
Q 1 HitchPin
R 4 HitchArmMountBracket
S 2 ShoulderBolt,Hex,3/8-16x2-5/16"
T 2 Grip
U 11 FlangedBearing
V 2 ClevisPin,3/8x3/4"
A B C D
E
F
H
J
L
K
I
M
N
O
Q
R
G
SHOWN ACUTAL SIZE
NOT SHOWN ACUTAL SIZE
S
T
P
V
U

4
ASSEMBLY
5/16" x 3/4"
HEX BOLTS (8)
5/16" NYLOCK NUTS (8)
FRAME ANGLE
(BEND UP)
FRAME ANGLE
(BEND DOWN)
END PLATE (2)
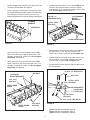
FIGURE 1
FIGURE 3
CAUTION: Thespikediskshavesharp
points.Toavoidinjury,useextracarewhen
handlingthedisksandwhenassembling
theaerator.
• Inserttheendoftheaxlethroughoneoftheend
plates.Seegure4.
• Assembleontotheaxle,inorder,ashortspacer,a
spikediskandaspring.Seegure4.
NOTE:Allspikedisksshouldfacethesamedirection.
• Next,startingwithaspikedisk,assemblesevenspike
disksandsixlongspacersontotheaxle.Seegure4.
• Finally,assembleaspring,aspikediskandashort
spacerontotheaxle.Pushtheendoftheaxlethrough
thesecondendplate.Seegure4.
TOOLS REQUIRED FOR ASSEMBLY
(2)1/2"openorboxedendwrench
(1)Hammer
Layoutandidentifyallpartsandhardwareasshownin
Carton Contents and Hardware Pack illustrations.
• Assemblethetwoframeangles(onewiththebend
upandtheotherwiththebenddown)tothetwoend
platesusingeight5/16"x3/4"hexboltsandeight
5/16"nylocknuts.Makesurethattheframeissquared
up,andthentighten.Seegure1.
• Usingahammer,driveaspringpinintoaholeinthe
axleuntilthepinjustslightlyextendsthroughtheother
sideoftheaxle.Next,assembleaangedbearing
ontotheaxleasshown.Seegure2.
FIGURE 4
SPRING PIN
FLANGED BEARING
FIGURE 2
(9) SPIKE DISKS
(2) SHORT
SPACERS
(2) SPRINGS
(6) LONG
SPACERS
FLANGED
BEARING
SPIKE DISK
• Carefullypressorhammeraangedbearingintoeach
spikediskfromthesideshowningure3.

5
• Attachtwohitcharmmountbracketstothemiddle
holesintherearframeangleusingtwo5/16"x3/4"
hexboltsandtwo5/16"nylocknuts.Do not tighten
completely.Seegure6.
• Attachtwohitcharmmountbracketstothemiddle
holesinthefrontframeangleusingtwo5/16"x3/4"
hexboltsandtwo5/16"nylocknuts.Do not tighten
completely.Seegure6
FIGURE 6
FIGURE 8
• Assemblethehitchmountarmstotheoutsideofthe
fourhitcharmmountbracketsasshowningure7.
Usefour5/16"x1"carriageboltsandfour5/16"nylock
nuts. Do not tighten yet. Seegure7.
FIGURE 7
FIGURE 5
• Assembletheendsofthehitchmountarmstogether
usingtwo5/16"x1-1/4"hexboltsandtwo5/16"
nylocknutsasshowningure8.Do not tighten yet.
• Assemblethehitchbracketstothehitchmountarms
usingtwo5/16"x2"hexboltsandtwo5/16"nylock
nutsasshowningure8.Do not tighten yet.
• Assemblethehitchpinandthelargehaircotterpinto
thehitchbrackets.
(4) HITCH ARM
MOUNT
BRACKETS
(4) 5/16" NUTS
(NYLOCK)
(4) 5/16" x 1"
CARRIAGE BOLTS
HITCH MOUNT ARMS
(2) 5/16" x 2" HEX BOLTS
(2) 5/16" x 1-1/4" HEX BOLTS
(2) 5/16" NUTS
(NYLOCK)
HITCH BRACKETS
(2) 5/16" NUTS
(NYLOCK)
HITCH PIN
LARGE HAIR
COTTER PIN
5/16" x 3/4"
HEX BOLT
5/16" x 3/4"
HEX BOLT
HITCH ARM
MOUNT BRACKETS
5/16" NUTS
(NYLOCK)
REAR FRAME
ANGLE
FRONT FRAME
ANGLE
• Slideaangedbearingontotheaxleandpushitinto
theholeintheendplate.Seegure5.
• Driveaspringpinintotheholeintheaxleuntilthepin
justslightlyextendsthroughtheothersideoftheaxle.
Thespringpinssecuretheaxleintheframeand
shouldalsopreventtheaxlefromrotating.Seegure5.
FLANGED
BEARING
SPRING PIN
• Tightentheboltsassembledingure6.
Tightentheboltsassembledingure7.
Tightentheboltsassembledingure8.

6
3/8 x 1"
HEX BOLT
3/8" NYLOCK NUT
WHEEL
HANDLE
3/8" NYLOCK
NUT
SHOULDER
BOLT
GRIP
FIGURE 11
FIGURE 10
FIGURE 9
• Assemblea5/16x1"hexbolt,washer,spacer,and
5/16"nylocknuttothefrontholeoneachendplate.
Seegure9.
5/16" NYLOCK NUT
5/16 x 1" HEX BOLT
WASHER
SPACER
• Assembleagripontoeachhandle.Seegure10.
• Attachawheeltobottomholeofeachhandleusinga
shoulderboltand3/8"nylocknut.Seegure10.
• Attacheachhandletothebottomholeintheendplate
usinga3/8"hexboltand3/8"nylocknut.Tightenso
thatthehandleissecurebutcanstillmovefreely.See
gure11.
• Assemblea3/8"x3/4"clevispinandasmallhair
cotterpintotheendplateandthehandleoneach
endoftheaeratortolockthehandlesinthetransport
position.Seegure12.
SMALL HAIR
COTTER PIN
3/8" x 3/4" CLEVIS PIN
FIGURE 12
• Attachtheaeratortoyourtractorusingthehitchpin
andthelargehaircotterpin.

OPERATION
CAUTION: Spikediskshavesharppoints.
Exercisecautionatalltimeswhenusing
theaerator.
BEFORE USING YOUR AERATOR
• DO NOTattempttoaerateifgroundismuddy.
• Ifgroundisextremelyhardordry,itisrecommended
thatitbewatereddownfor1or2hourspriortouse.
• Mowlawnandremovelooseclippingspriortouseof
lawn aerator.
• Attachtheaeratortothetractorhitchandcheckto
seethattheaeratorislevel.Adjustbylooseningthe
boltswhichfastenthehitchmountarmstothehitch
armmountbrackets.Raiseorlowerthepositionofthe
armsuntiltheaeratorislevel.Seegure9.
HOW TO USE YOUR AERATOR
Aeratingcutssmallholesinthesoiltocreatereservoirs
thatbringoxygen,fertilizerandwaterintotherootzone.
Forbestperformanceofthespikeaeratorattachment,
thefollowinglawnpreparationandoperationis
recommended.
• Moveclevispinsinhandlestoupperholesinhandles.
• Loweraeratorspikestoground.
• Starttractorenginewithcontrolsinneutralandplace
throttleatslowenginespeed.
• Engageshiftleverintolowestpossibleforwardspeed
andincreasespeedasconditionspermit.
• Aerateinthestraightestlinepossible,making
overlappingpassestoincreasespikepointpattern.
• Topreventlawndamage,avoidsharpturns.
• Onslopedlawnsaerateinupanddowndirection.DO
NOTaerateacrossthefaceofslopes.
• Toincreasethedepthofspikepointpenetration,
weightcanbeaddedtotheframe.Two35lb.patio
typeconcreteblockswillteasilyontotheframe.The
addedweightcanbesecuredtotheframewithstraps
orotherbindingmaterial.DO NOTexceed90lb.
weightcapacity.Seegure13.
Service Dates
Checkforloosefasteners X
Checkforwornordamagedparts X X
Cleaning X X
LubricateSpikeDiskHubs X
MAINTENANCE SCHEDULE
Fill in dates as you
completeregularservice.
Beforeeachuse
Aftereachuse
Every season
Beforestorage
CUSTOMER RESPONSIBILITIES
• Readandfollowthemaintenancescheduleandthemaintenanceprocedureslistedinthissection.
• Spikerpointscanbesharpenedwithasmallgrinder
periodicallytomaintaingoodpenetration.Spikedisks
shouldberemovedtosharpenpoints.
• Beforeeachusechecknutsandboltsfortightness.
• Cleanaftereachuse.Ifrustappearsonshieldor
spikes,sandlightlyandcoatwithenamelpaint.
• Lubricatethespikediskhubswithasmallamountof
lightoilorgreaseatthebeginningofeachseason.
• Alwaysstoreindryareawhennotinuse.Coatbare
metalwithlightoilorpaint.
MAINTENANCE/STORAGE
FIGURE 13

8
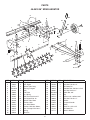
PARTS
45-0510 36" SPIKE AERATOR
A
B
C
D
17
18
11
11
12
12
10
5
3
2
4
A
B
D
C
8
8
1
1
6
6
13
13
13
13
8
8
14
9
9
7
25
22
22
27
28
23
20
21
26
24
9
7
16
9
9
9
9
9
9
9
15
16
19
29
30
REF. PART NO. QTY. DESCRIPTION
1 24012 2 AngleFrame
2 24332 9 Disc, Spike
3 45151 6 SpacerTube,Long
4 741-0249 11 Bearing,Flanged
5 26143 1 Axle
6 23903 2 End Plate
7 44665 2 Pin,Spring
8 43182 12 Bolt,Hex5/16-18x3/4"
9 47810 26 Nut,Nylock5/16-18
10 48130 2 SpacerTube,Short
11 23981 2 Bracket,Hitch
12 23914 2 Arm,HitchMount
13 23442 4 Bracket,HitchArmMount
14 44326 4 Bolt,Carriage5/16-18x1"
15 47777 2 Spring
16 47623 1 HitchPin
REF. PART NO. QTY. DESCRIPTION
17 43840 2 Bolt,Hex5/16-18x1-1/4"
18 44180 2 Bolt,Hex5/16-18x2"
19 43343 1 Hair Cotter Pin
20 43029 2 ShoulderBolt,3/8-16x2-5/16"
21 43001 2 Bolt,Hex3/8-16x1"
22 HA21362 4 NylockNut,3/8"
23 43943 2 Grip
24 23727 2 Spacer,0.31x0.56x0.36"
25 43063 2 Bolt,Hex5/16-18x1"
26 43088 2 Washer
27 27876 2 Transport Handle
28 43021 2 Wheel
29 44044 2 ClevisPin,3/8"x3/4"
30 47134 2 Hair Cotter Pin
41771 1 Owner's Manual
-
 1
1
-
 2
2
-
 3
3
-
 4
4
-
 5
5
-
 6
6
-
 7
7
-
 8
8


Ask a question and I''ll find the answer in the document
Finding information in a document is now easier with AI
Related papers
-
Agri-Fab 45-03012 User manual
-
-
-
-
-
-
-
-
-
Other documents
-
Craftsman 36 in. Spike Aerator Manufacturer's Warranty
-
-
 SENMAL FAAT2940 User manual
-
-
 Yard Tuff SE-40 Owner's manual
-
 John Deere 45-0453-JD User manual
-
Craftsman 48624372 Owner's manual
-
-
-


