Page is loading ...

QUICK START GUIDE
For a full explanation of all features and instructions, please refer to the User’s Guide.
1. How to register your Camera to Hubble account
MODELS:
FOCUS73,
FOCUS73-2
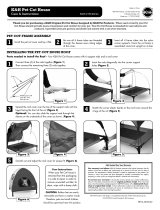
1. Connect the Camera round plug to the Y-shaped Power/LAN
cable connector.
2. Insert the power adapter plug into the Power Socket and
connect other end of the power adapter to a suitable mains
power socket.
3. The Camera turns ON, and the LED indicator will start flashing
slowly after booting finish.
A. Connect to power supply.
Download the Hubble for Motorola Monitors App from the App Store for iOS
®
devices or from the Google Play
TM
Store for Android
TM
devices.
B. Install Hubble for Motorola Monitors App.
WARNING:
STRANGULATION HAZARD – In case this unit is being used to monitor infants or children, keep the unit and adapter cord more than 1 metre from the cot
and out their reach.
Never place camera or cords within a cot or near a bed. Secure the cord away from children's reach. Never use extension cords with AC Adapters. Only use
the AC Adapters provided.
As with any electrical device, supervision of your pet’s usage should be exercised until your pet is acclimated to the product. If your pet is prone to chewing,
we strongly recommend you keep this and all other electrical devices out of its reach.

1. Run the Hubble for Motorola Monitors App on smartphones or tablets.
2. Follow the in-app instructions to create your Hubble for Motorola Monitors
account.
3. Log in to your account on your compatible smartphone, tablet or via
www.hubbleconnected.com/motorola/login on your PC to access your live
camera stream.
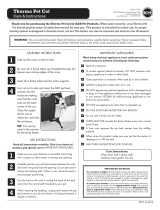
C. View on Compatible Smartphones, Tablets and Computers.
Wi-Fi
®
Camera
Connect to Internet
via Wi-Fi
®
Compatible
Viewing Devices
Please take note of the following minimum system requirements:
Smartphones/Tablets: iOS 7, Android™ 4.2
PC (if used for viewing): Windows
®
7, Mac OS
®
10.7, Chrome™ 24, Internet Explorer
®
9, Safari
®
6, Firefox
®
18, Adobe
®
Flash
®
15, Java™ 7
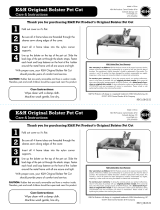
2. How to mount your Camera on the wall
1. Mark the position of the
screw holes on the wall.
2. Drill 4 holes and hammer
the drywall plugs
(included) into the holes
as needed.
3. Fasten the mounting
plate on the wall with the
4 Philips head screws
(provided).
A. Fixing Mounting Plate on the wall.
Place the 4 mounting slots of the camera
base on to 4 catches on the mounting
plate. Make sure the unit sits firmly on
the mounting plate with the center holes
of 2 parts lined up.
B. Hanging the Camera unit on the Mounting Plate.

3. Customer Support
If you are experiencing any issues with your Motorola Wi-Fi
®
Outdoor Pet Video Camera, please
visit the help section on our website www.motorola.com
.
You can also contact our customer support teams
+44 (0) 844 557 0890 (UK only)
+44 (0) 8187 62092 (ROI)
Manufactured, distributed or sold by Binatone Electronics International LTD., official licensee for this product.
MOTOROLA and the Stylized M logo are trademarks or registered trademarks of Motorola Trademark Holdings,
LLC. and are used under license. Apple logo and Safari are trademarks of Apple Inc., registered in the U.S. and
other countries. App Store is a service mark of Apple Inc. Google Play, Android, and Chrome are trademarks of
Google Inc. Wi-Fi is a trademark of the Wi-Fi Alliance. Internet Explorer and Windows are trademarks of the
Microsoft group of companies. Firefox is a registered trademark of the Mozilla Foundation. Adobe and Flash are
either registered trademarks or trademarks of Adobe Systems Incorporated. Java is a registered trademark of
Oracle and/or its affiliates. All other trademarks are the property of their respective owners. © 2014 Motorola
Mobility LLC. All rights reserved.
Printed in China
EN_UK Version 2.0
Fasten the unit to the
mounting plate at the
center hole with the
tamper-proof screw by the
wrench key provided.
C. Secure the Camera Unit
Insert the power adapter plug into the
Power Socket and connect other end of
the power adapter to a suitable mains
power socket.
D. Connecting Power Supply for the Camera Unit
/