Page is loading ...

User Manual
705iR
Portable Audio System
705iR
CHA
CHB
TREBLE
BASS
AUX
AUX
POWER
IN
OUT


TABLE OF CONTENTS
SECTION 1: 4 Important Safety Instructions
Overview 5 System Components and Unpacking
6 Optional Components
7 705iR Top Panel Controls
8 705iR Rear Panel Controls
9 REDMIKE Controls and Connections
10 Cradle Charger Controls and Connections
SECTION 2: 11 Step 1. Positioning the 705iR
Set-up & Use 12 Step 2. Charging the 705iR
13 Step 3. Charging the REDMIKE
14 Step 4. Operating the REDMIKE
15 Output to Personal FM Transmitter
16 Using the REDMIKE to Amplify External
Audio Equipment
SECTION 3: 17 REDMIKE VC: Controls and Connections
Optional Accessories 18 Charging
18 Initial Set-Up
19 LT-71: Controls and Connections
20 Charging
21 Initial Set-Up
22 REDMIKE Share: Controls and Connections
23 Charging
24 Initial Set-Up
25 705iR Battery-pack Installation
26 iR Media Connector: Initial Setup
27 Audio Integration
27 Components & Optional Accessories
SECTION 4: 28 Troubleshooting Guide
Troubleshooting 29 Tips to Maintain Optimal Audio Performance
SECTION 5: 30 Warranty Statement
Warranty &
Specifications
31 Safety Warnings & Certifications
33 System Specifications

1. Read these instructions.
2. Keep these instructions.
3. Heed all warnings.
4. Follow all instructions.
5. Do not use the apparatus near
water.
6. Clean only with dry cloth.
7. Do not block any ventilation
openings. Install in accordance
with the manufacturer’s
instructions.
8. Do not install near any heat
sources such as radiators,
heat registers, stoves, or other
apparatus (including amplifiers)
that produce heat.
9. Do not defeat the safety purpose
of the polarized or grounding-type
plug. A polarized plug has two
blades with one wider than the
other. A grounding- type plug has
two blades and a third grounding
prong. The wide blade or the third
prong is provided for your safety. If
the provided plug does not fit into
your outlet, consult an electrician
for replacement of the obsolete
outlet.
10. Protect the power cord from
being walked on or pinched
particularly at plugs, convenience
receptacles, and the point where
they exit from the apparatus.
11. Only use attachments/ accessories
specified by the manufacturer.
12. Use only with a cart, stand, tripod,
bracket or table specified by the
manufacturer, or sold with the
apparatus. When a cart is used,
use caution when moving the cart/
apparatus combination to avoid
injury from tip-over.
13. Unplug this apparatus during
lightning storms or when unused
for long periods of time.
14. Refer all servicing to qualified
service personnel. Servicing is
required when the apparatus has
been damaged in any way, such
as power-supply cord or plug is
damaged, liquid has been spilled
or objects have fallen into the
apparatus, the apparatus has been
exposed to rain or moisture, does
not operate normally, or has been
dropped.
15. When the mains plug or appliance
coupler is used as the disconnect
device, it shall remain readily
operable.
16. Please keep the unit in a good
ventilation environment.
17. WARNING: To reduce the risk
of fire or electric shock, do not
expose this apparatus to rain or
moisture.
18. Apparatus shall not be
exposed to dripping or
splashing and no objects
filled with liquids, such as
vases, shall be placed on the
apparatus.
IMPORTANT SAFETY INSTRUCTIONS
4

5
1. Overview 2. Setup & Use
3. Optional
Accessories
4. Troubleshooting
5. Warranty, Safety
& Specifications
SECTION 1:
OVERVIEW
Receiver/Amplifier
Power Supply
SYSTEM COMPONENTS AND UNPACKING
The standard configuration of the 705iR will contain:
Cradle Charger and
Power Supply
REDMIKE®
Classroom
Microphone
705iR Receiver/Amplifier
and Carry Bag
705iR
CHA
CHB
TREBLE
BASS
AUX
AUX
POWER
IN
OUT

6
1. Overview 2. Setup & Use
3. Optional
Accessories
4. Troubleshooting
5. Warranty, Safety
& Specifications
OPTIONAL COMPONENTS
Optional equipment which may be part of your 705iR system:
Optional Components
RMV REDMIKE VM Volume Control classroom microphone w/
lavaliere cord and rechargeable AA sensing battery
LT71 LightMic microphone with lavaliere cord, rechargeable
batteries and charging cable
RMS Handheld microphone with rechargeable batteries and
charging cable
REDMIKE™ VC
Volume Control
Microphone
REDMIKE Share
Handheld Mic &
Charging Cable
LT- 71
LT71 LightMic
and Charging
Cable

7
1. Overview 2. Setup & Use
3. Optional
Accessories
4. Troubleshooting
5. Warranty, Safety
& Specifications
TOP PANEL CONTROLS
1. CH A POWER: This knob turns on
the power for the 705iR and
controls the channel A volume. We
recommend using channel A if you
are using a single microphone for
your system.
2. LED LIGHT: Located above the
CH A POWER knob. Turns red
momentarily when the system
power is turned on.
NOTE: When a transmitter/
microphone set to channel A is
turned on, the channel A LED
glows green to indicate your
transmitter’s signal is being
received by the amplifier.
3. CH B VOLUME: This knob
controls the volume for channel
B. You must first turn the 705iR
on with the CH A POWER knob,
then turn the CH B VOLUME knob
clock-wise to increase volume. Use
channel B when using a second
microphone.
4. LED LIGHT: Loacted above CH
B VOLUME knob. Turns green to
indicate a signal is being received
from a microphone/transmitter set
to channel B.
5. TREBLE: This knob controls the
high-frequency sound of the 705iR.
6. BASS: This knob controls the low-
frequency sound of the 705iR.
7. AUX IN VOLUME: This knob
controls the volume level of an
external audio source (computer,
iPod, CD player) that is plugged
into the AUX IN jack.
8. AUX INPUT JACK: This 3.5 mm
jack is used to connect to an
external audio source.
9. AUX OUTPUT JACK: This jack
sends audio to external equipment
such as an assistive listening
device (Personal FM System) or
recording device.
10. AUX OUT VOLUME: This knob
controls the audio level going to
external equipment when plugged
into the AUX OUT jack.
1 2 3 4 5 6 7 8 9 10

8
1. Overview 2. Setup & Use
3. Optional
Accessories
4. Troubleshooting
5. Warranty, Safety
& Specifications
1. TRANSMITTER CHARGING
JACKS: This connector is used
to connect the charging cable to
the optional LightMic transmitter
or the optional RMS handheld
microphone for daily battery
recharging.
2. EXTERNAL IR SENSOR JACK:
This jack is for testing purposes
only.
3. CHARGING LED: This LED glows
red when the 705iR battery is
charging and glows green when
fully charged.
4. DC POWER INPUT JACK: This
input connects to the 16 V AC/DC
adaptor that comes with the 705iR.
The adaptor is used to either
charge the internal battery pack or
power the 705iR with AC power.
REAR PANEL CONTROLS
EXT SENSOR
www.Lightspeed-tek.com
800-732-8999
DC POWER
CHARGER OUT
1
2
3
4

9
1. Overview 2. Setup & Use
3. Optional
Accessories
4. Troubleshooting
5. Warranty, Safety
& Specifications
1. POWER BUTTON: Press this
button to turn the REDMIKE on,
press again to turn it off (mute).
2. POWER/LOW BATTERY
INDICATOR: A blue light indicates
the REDMIKE is on and fully
charged. A red light indicates a
charge is needed.
3. BATTERY COMPARTMENT: To
access the battery compartment,
slide the door downward. The
battery should only be replaced
by a Lightspeed AA rechargeable
sensing battery (part # NH2A27).
4. YELLOW PROTECTIVE TAB:
Slide the battery compartment
door open to remove this
disposable protective tab before
use. NOTE: do not attempt to
remove the tab without first
opening the compartment door, as
it may tear, leaving fragments.
5. AUDIO/MICROPHONE INPUT:
Use this input to plug in a laptop,
MP3 player or other audio
source to wirelessly transmit
audio to be played through the
system. Alternatively, an external
microphone can be connected.
6. CHANNEL SELECT SWITCH
(CH A/B): This switch allows
for selection between channel
A or B. If you are using a single
microphone, we recommend using
channel A.
7. CHARGER CONTACTS (+ -):
These contacts interface with the
charging tabs in the RMCC cradle
charger for daily charging. Simply
place the REDMIKE in the charger.
REDMIKE CONTROLS AND CONNECTIONS
1
2
3
5
6
7
S
l
i
d
e
b
a
t
t
e
r
y
d
o
o
r
o
p
e
n
R
e
m
o
v
e
t
a
b
b
e
f
o
r
e
u
s
e
4

10
1. Overview 2. Setup & Use
3. Optional
Accessories
4. Troubleshooting
5. Warranty, Safety
& Specifications
1. CHARGE INDICATORS: The light
glows red while the REDMIKE is
charging. When fully charged, the
light will glow green. A blinking
red light indicates that no battery
is sensed, (REDMIKE Yellow
Protective Tab may not have been
completely removed—see page
5, item 4.) A blinking green LED
means a non- Lightspeed battery
has been installed (possibly an
alkaline battery).
2. DC POWER PORT: Connect the
5V/1.0A DC power cord here.
3. OPTIONAL CHARGING PORT:
Plug the charging cord for the
optional LT71 or the REDMIKE
Share microphone here.
CRADLE CHARGER CONTROLS AND
CONNECTIONS
1
2
3

11
1. Overview 2. Setup & Use
3. Optional
Accessories
4. Troubleshooting
5. Warranty, Safety
& Specifications
The 705iR has a built-in speaker, which should be directed toward the area of the
classroom where the students are sitting. The unit can be placed on a table top
or bookshelf at a height of 36 to 60 inches.
The ideal position in the classroom is centered along the longest wall. However,
due to different classroom setups, this is not always possible. Here is a quick
guide to choosing a location:
• BEST: Centered on the longest wall.
• GOOD: Centered on the short wall.
• OKAY: In a corner.
• AVOID: Placing the unit directly in front of a window.
SECTION 2:
SET-UP & USE
1. POSITIONING THE 705iR
705iR
CHA
CH
B
T
REB
LE
B
A
SS
A
UX
A
UX
P
OW
E
R
IN
OU
T
705iR
CHA
CH
B
T
REB
LE
B
A
SS
A
UX
A
UX
P
OW
E
R
IN
OU
T
705iR
CHA
CHB
TRE
B
L
E
B
ASS
AUX
AUX
POWER
IN
O
UT
705iR
CHA
CHB
TRE
B
L
E
B
ASS
AUX
AUX
POWER
IN
O
UT
705iR705iR
Best placement Okay placement Good placement
Longest wall Short wall

12
1. Overview 2. Setup & Use
3. Optional
Accessories
4. Troubleshooting
5. Warranty, Safety
& Specifications
When fully charged, the circuit switches to a trickle charge, which will not
overcharge or damage the batteries. A fully charged 705iR can operate under
battery power for up to 6 hours.
2. CHARGING THE 705iR
1. Ensure the power knob (CH A
POWER) on top of the 705iR is
turned off.
2. Plug the power supply/charger
cable into a standard AC outlet.
NOTE: Many users opt to only use the
AC power. If this is the case, it’s not
necesary to charge the battery.
3. Plug the other end of the power
supply/charger into the DC power
jack on the back of 705iR. The LED
above the DC will glow red. A solid
green LED indicates the 705iR is
fully charged.
EXT SENSOR
www
.Lightspeed-tek.com
800-732-8999
DC POWER
CHARGER OUT
Caution:
Discharging NiMH batteries until no
charge remains can reduce battery life
and, with continued discharging, to fail.
Recharging the NiMH batteries in this
product every day will extend their life.

13
1. Overview 2. Setup & Use
3. Optional
Accessories
4. Troubleshooting
5. Warranty, Safety
& Specifications
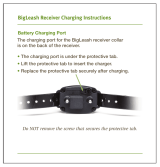
3. CHARGING THE REDMIKE
Before use, the REDMIKE should be charged. It will take 8-9 hours for the
REDMIKE to obtain a full charge. A fully charged REDMIKE will last for over 7
hours of use. If microphones are used daily, they should be kept in the cradle –
microphones can be left in a charging cradle constantly for up to 2 weeks without
causing degradation to battery life.
A red light on the charging cradle indicates the REDMIKE is charging. A green
light indicates that charging is complete and a full charge has been reached. A
blinking light indicates a charging or sensing error. See Troubleshooting section
for more information.
REDMIKE incorporates alkaline protection into the microphone design. Always
use a Lightspeed rechargeable sensing battery. Replacement AA NiMH batteries
may only be purchased through Lightspeed Technologies (part # NH2A27). Do
not attempt to charge alkaline batteries. They can overheat and expand creating
a significant hazard and damaging the microphone (this is not covered by
warranty).
CAUTION: Discharging NiMH batteries until no charge remains can reduce
battery life and, with continued discharging, to fail. Recharging the NiMH
batteries in this product every day will extend their life.
1. Plug power cord into the cradle
charger and then plug the AC end
into an electrical outlet.
2. Place the REDMIKE into the
cradle. The REDMIKE will
automatically turn off. The LED on
the cradle will glow red indicating
charging has started. When the
REDMIKE is fully charged the LED
on the cradle charger will change
to green.

14
1. Overview 2. Setup & Use
3. Optional
Accessories
4. Troubleshooting
5. Warranty, Safety
& Specifications
4. OPERATING THE REDMIKE
Once the REDMIKE is charged, follow these steps to set it up for use.
1. Turn the 705iR power switch to the
on position. The red LED on the
switch will glow.
2. Turn on the REDMIKE. The red
IR LED on the 705iR will light to
indicate a signal is being received.
3. Slip the REDMIKE with lanyard
around the neck and position the
top of the microphone just below
the collarbone. NOTE: Positioning
of the REDMIKE is critical for
proper volume adjustment.
4. While speaking in a normal voice
slowly increase the volume of the
corresponding channel on the
705iR until your voice is barely
audible.
REMEMBER: This equipment
supplements the user’s voice
so they are able to speak in a
conversational tone. Having the
volume set too high will result in
feedback and listener fatigue.
5. Once initial volume level is set,
walk around the room and listen
for audio dropout and overall
audio quality.
Fine-tuning the audio is
accomplished by making minor
adjustments to the BASS or
TREBLE knobs on the top of the
705iR.
6. If a second REDMIKE was
purchased, repeat steps 2-4.
NOTE: Each REDMIKE has its
channel pre-set to either A or B, as
indicated on the back of the Mic.

15
1. Overview 2. Setup & Use
3. Optional
Accessories
4. Troubleshooting
5. Warranty, Safety
& Specifications
OUTPUT TO PERSONAL FM TRANSMITTER
1. Using a cable with a 3.5 mm
connector at one end, connect
the AUX OUT of the 705iR to the
input jack of the FM transmitter.
Different manufacturers use
different size audio input jacks on
the transmitter. The Lightspeed
370T requires the MMC 3535
cable.
2. Connect a patch cable from the
AUX OUT jack on the top of the
705iR to the FM transmitter’s
microphone or AUX input jack.
3. Adjust the volume control on the
Personal FM receiver to maximum
output. NOTE! This is to set the
maximum allowable signal from
the 705iR.
4. With the 705iR and FM transmitter
turned on, speak into the
microphone and slowly adjust the
AUX OUT volume control until the
appropriate audio level is
achieved through the personal FM
system.
NOTE The optional LT71 can also
amplify external audio. Simply plug
the 3.5mm patch cable from the
audio source into the input labeled
“AUX IN” and adjust the volume of
the source to the desired sound level.
CH A
MASTER
CH B
VOLUME
AUX
IN
AUX
OUT
TREBLE BASS
LT-71

16
1. Overview 2. Setup & Use
3. Optional
Accessories
4. Troubleshooting
5. Warranty, Safety
& Specifications
The REDMIKE includes a 3.5mm audio input jack to connect to an audio source
like a laptop or MP3 player. The REDMIKE will transmit the audio signal to be
played through the system.
1. If your system includes two
REDMIKEs, use the student
microphone (already set to
channel B). NOTE: This feature
works on both channels but we
recommend using channel B
so the teacher’s volume on the
channel A does not have to be
adjusted. REMEMBER: It’s easy
to determine which REDMIKE is
set to channel B by speaking into
the mic and watching which set of
LED’s glow on the top panel of the
705iR.
2. Plug your laptop, MP3 player or
other audio source into the input
on the REDMIKE labeled “INPUT”
using a 3.5mm patch cable.
3. Adjust the volume of the selected
mic channel to achieve desired
loudness.
USING THE REDMIKE TO AMPLIFY
EXTERNAL AUDIO EQUIPMENT
AUDIO
OUTPUT
AUDIO
INPUT

17
2. Setup & Use
3. Optional
Accessories
1. Overview
5. Warranty, Safety
& Specifications
4. Troubleshooting
SECTION 3:
OPTIONAL ACCESSORIES
OPTIONAL REDMIKE VC (Volume Control)
Controls and Connections
5
6
7
8
1
2
3
S
l
i
d
e
b
a
t
t
e
r
y
d
o
o
r
o
p
e
n
R
e
m
o
v
e
t
a
b
b
e
f
o
r
e
u
s
e
4
1. POWER /MUTE BUTTON
2. POWER/LOW BATTERY
INDICATOR: A blue light indicates
the REDMIKE VC is on and fully
charged. A red light indicates a
charge is needed.
3. BATTERY COMPARTMENT: To
open, slide the door downward.
The battery should only be
replaced by a Lightspeed AA
rechargeable sensing battery
(part # NH2A27).
4. YELLOW PROTECTIVE TAB:
Slide the battery compartment
door and remove this disposable
protective tab before use.
5. AUDIO/MICROPHONE INPUT:
Use this input to plug in a laptop,
MP3 player or other audio
source to wirelessly transmit
audio to be played through the
system. Alternatively, an external
microphone can be connected.
6. CHANNEL SELECT SWITCH (CH
A/B): Use this to choose channel
A or B. If you are using a single
microphone, we recommend using
channel A.
7. VOLUME CONTROLS (UP -
DOWN)
8. CHARGER CONTACTS (+ -):
These contacts interface with the
charging tabs when the REDMIKE
VC is placed in the RMCC cradle
charger.

18
2. Setup & Use
3. Optional
Accessories
4. Troubleshooting
5. Warranty, Safety
& Specifications
1. Overview
REDMIKE VC : Charging
REDMIKE VC : Initial Set-up
Before use, the REDMIKE VC should
be charged. See page 13 and
follow the same instructions for the
REDMIKE.
See page 14 and follow the same
instructions for the REDMIKE to setup
the REDMIKE VC.
NOTE: A nominal volume level must
be set on the 705iR before adjusting
controls on the REDMIKE VC.
The teacher can now use the controls on
the REDMIKE VC to adjust the volume
level from anywhere in the room. The
microphone volume control has 4 steps
up and 4 steps down from the mid point
(9 levels total).

19
2. Setup & Use
3. Optional
Accessories
1. Overview
5. Warranty, Safety
& Specifications
4. Troubleshooting
1. ON/OFF/MUTE SWITCH
2. CHANNEL SELECT SWITCH (CH
A/B): Use this to choose channel
A or B. If you are using a single
microphone, we recommend using
channel A.
3. POWER/CHARGE INDICATOR: A
blue light indicates the REDMIKE
VC is on and fully charged. A red
light indicates a charge is needed.
4. EXTERNAL MICROPHONE
INPUT (MIC): Use the 3.5mm
MIC jack for the optional TK250M
headset microphone (part#
TK250M).
5. AUXILIARY (AUX): Plug a laptop,
MP3 player or other audio source
into this jack to wirelessly transmit
the audio signal to be played
through the system.
6. CHARGER INPUT (CHARGER):
Plug the charging cable from the
charger into this jack for daily
charging. The LED on the front will
glow red to indicate charging.
OPTIONAL LT71: Controls and Connections
LT- 71
LT- 71
1
2
4
5
6
3

20
2. Setup & Use
3. Optional
Accessories
4. Troubleshooting
5. Warranty, Safety
& Specifications
1. Overview
SPEAKER OUTPUTS
AUDIO INPUT
CHARGERS
DC
POWER
TV/VCR
CD/DVD
L L
R
R
24V
DC
SENSOR INPUT
SENSOR
SHORT
2.06/2.54
LT71: Charging
1. Ensure that the LT71 is turned off.
2. Make sure the cradle charger
is plugged into a wall outlet.
Connect one end of the charging
cable into the jack labeled
CHARGER on the side of the LT71
and plug the other end into the
charging jack on the rear of the
REDMIKE cradle charger. The
LT71’s rechargeable batteries are
factory installed. The LED on the
front of the LT71 will glow red
when charging.
3. Leave the LT71 plugged in
overnight (8–10 hrs.) to obtain a
full charge.
NOTE: If the system was purchased
without a REDMIKE or REDMIKE VC,
the LT71 will utilize a charging cable.
Simply connect the charging cables
to the jacks labeled CHARGER on
the back of the amplifier and connect
the opposite ends to the jacks on the
back of the cradle charger.
/