Page is loading ...

2
3 4 7 8
1
9
User Manual
DIGITAL DOOR VIEWER
Greeter
Safety Guideline
Please do not expose this product to high temperatures or
high humidity, or an environment with large amounts of dust,
or any other grimy substance.
Please do not forcibly press the main indoor display screen
lens, or the outdoor lens, as this may cause hardware damage.
Be sure to use extreme caution during the installation
process, and do not forcibly pull on the cables. Avoid
scratching or cracking the cable; cable damage due to
improper installation is not covered under regular warranty.
Please only use the charger included in this package, as using
other chargers with different specifications may lead to
battery damage, or may cause system damage.
When installing the MicroSD card, cable connectors, and data
wires, please read through the instructions carefully. Pay
attention to insertion direction to prevent incorrect
installation, which can lead to hardware or system damage.
When selecting screws with which to install the outdoor unit,
be sure to choose ones that are appropriate for the door
thickness; avoid unsuitable screws that could lead to product
damage.
Troubleshooting Common Errors
At the time of installation, if the screws are not restrained
in place or the unit is not sturdy, the incorrect screws may
have been selected. If this is the case, reconfirm the door
thickness, and replace the screws.
1.
2. If a message such as “DID NOT INSTALL PROPERLY” or
“VIDEO LOST” appears when pressing the Preview key,
the cable connected to the main unit may not be fully
connected or may be damaged, recheck all cable
connections. If all connections are properly in place,
the problem may lie with a damaged cable, in which case
the cable or unit need to be replaced.
Indoor Screen Dimensions:
5.3in x 3in x 0.7in ( 135.5mm x 76.5mm x 18.7mm )
Technical Parameters
Applicable door thickness: 1.4in - 4.1in (35mm ~ 105mm)
Applicable peephole: 0.5in - 2.3in (13mm ~ 58mm)
When choosing screws to install the outdoor camera, you must
know your door’s thickness.
Notes:
For the door thickness between 1.4in - 2.6in (35mm ~ 65mm),
choose 1.4in (35mm) short screws;
For the door thickness between 2.6in - 3.7in (65mm ~ 95mm),
choose 2.6in (65mm) long screws;
For the door thickness above 3.7in (95mm), use your own M3
screws around 3.2in (80mm).
Outdoor Camera Dimensions:
2.4in x 2.4in x 0.6in ( 60mm x 60mm x 14mm )
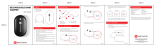
Main Components Installation
Bracket Outdoor Camera Indoor Screen
Charger USB Cable Screws
1 piece 1 piece 1 piece
1 piece 1 piece 2 pairs ( 4 peices) Installation is complete, and
the unit is ready for use
Take off the front door’s
existing peephole, or drill a
new hole into the door
(suggested hole diameter
is approximately 0.8 inch/
20 mm)
Peel off the strip on the back
of the outdoor unit
Note: Before installing the outdoor unit, it is
recommended that the selected screws are
fastened into the bracket by lightly twisting
for a few revolutions. This will allow for more
convenient installation later on.
Based on the door thickness
select the appropriate length
screws, and after several
hand-turns replace the unit
over the peephole opening
With the doorbell button at
the bottom of the unit, place
it against the door; be aware
that the unit is not yet fully
secured into place, and could
fall off
Straighten out the cable,
feeding it from the bracket
out through the slot in the
middle
Tighten the screws, securing
the bracket into position.
Ensure that the “Up” arrow
on the back of the bracket
is pointing upward
Squeeze the cable from the
outdoor unit through the slit
on the back of the main unit
Insert the MicroSD memory
card into the main indoor unit
(pay attention to the memory
card’s orientation)
Fasten the main indoor unit
onto the bracket; if the cable
is sticking out, bend it into
the form of an “S”
5 6 910

ok
Product Components and Software Usage Instructions
Indoor Screen Outdoor Camera
Main Interface
Display Screen
Affirmation
Button (OK)
Left
Arrow
Preview
Button
Power/
Back Button
Right
Arrow
Surveillance Camera
Infrared Light
Doorbell Push Button
Software Interface Instructions How To Use
Time Display
Visitor Record
System Settings
Battery Charge Level Display
User Guide
Date Display
Indoor Unit User Interface
Doorbell Answer Mode: The default setting is for the screen
to automatically illuminate when someone presses the
doorbell button; to conserve electricity, manual screen
illumination mode can be selected.
Doorbell Volume: Adjustable to 6 levels.
Charging Method: This product uses a rechargeable lithium
battery. When the battery charge level is low, the battery
indicator will change to red, indicating empty; under these
circumstances, begin charging immediately. To charge
through the USB cable, connect to the charging port at the
bottom of the indoor screen.
Video Preview: Press the video preview button to enter the
preview screen, where the left and right arrow buttons can
be used to scale the view outside the door. Pressing the left
button will shrink the person’s image, and increase the view
angle; pressing the right button will enlarge the person’s
image, and decrease the view angle.
System Settings
Time and Date: Within the system settings, the “OK”, “Left”,
“Right”, and “Power/Back” buttons can be used to control
time and date settings; note that once the settings have been
completed, the “Power/Back” button must be pressed to
save and exit.
Recording Mode: Recording mode is divided into two modes,
photo and video, and more specifically divided into the
following conditions:
Picture (640 x 480): Large image storage mode (default mode)
Picture (320 x 240): Small image storage mode
Video (3 second): Video recording time of 3 seconds
Video (5 second): Video recording time of 5 seconds
Video (10 second): Video recording time of 10 seconds
Note: Memory card must be inserted for video recording
Picture and Video Brightness
Low: Suitable under normal circumstances
High: Suitable when backlighting is present
Automatic Deletion
Turn On: When free space is low, the earliest recorded
photographs will be automatically deleted.
Turn Off: When free space is low, the earliest recorded
photographs will not be automatically deleted, and there will
be a reminder that memory card space is low.
Visitors: When the exterior doorbell is pressed, the indoor
screen will automatically take a picture (or video,
depending on user-defined settings), while at the same
time broadcasting the bell sound and displaying the
outside scene on the display screen.
CONTACT INFO
ADDRESS:
2100 Geng Road, Suite 210,
Palo Alto, CA 94303, USA
CUSTOMER SERVICE EMAIL:
WEBSITE:
www.equeshome.com
Main Menu Overview: Calendar and clock display,
visitor record, system settings, and user guide can be
controlled by pressing the following four buttons, “OK”,
“Left”, “Right”, “Power/Back”.
Visitor Record: The software will automatically establish a
folder for that day according to the system time, and will
automatically provide a name based on the system time,
so that the host can conveniently look back on past visits.
The Visitor Record formatting is as follows:
“Year Month Day - Hour Minute Second”, for example:
“[M]20170401-102956.jpg”, representing the image of a
visitor who pressed the doorbell button on
April 1st, 2017, at 10:29.56.
Note: During times that the MicroSD card is not inserted,
this device can store at most 10 photos in its internal
memory, and when the automatic deletion function is
enabled, the earliest taken photos will be automatically
deleted by the system when storage space is low; once
the memory card is inserted, any stored images will be
automatically transferred onto the memory card.
User Guide: Contains system information as well as our
contact information.
Actively Observe Outside Circumstances: The Preview
button on the main unit can be pressed directly to display
the outside scene on the indoor screen; if a picture of
the outside is desired, press the Preview button once
more, and the photograph will be automatically saved.
Delete Pictures: Enter the Visitor Record navigate to
folder for the date of interest move selection to the
photograph that will be deleted;
There are two ways for deletion:
*Briefly press the “OK” button, enter the image preview,
press the “OK” button again, and the screen will prompt
for confirmation of delete action; press the “OK” button once
more to delete, or press the “Power/Back” button to cancel.
*Hold down the “OK” button, do not enter the image preview,
and the screen will prompt for confirmation of delete action;
press the “OK” button once more to delete, or press the
“Power/Back” button to cancel.
Delete Video: Enter the Visitor Record navigate to
folder for the date of interest move selection to the
video that will be deleted, hold down the “OK” button, and
the screen will prompt for confirmation of delete action;
press the “OK” button once more to delete, or press cancel.
Infrared Night Vision: Option to turn on/turn off the infrared
night vision function.
Display Screen Brightness: Adjustable to 5 levels
Backlight Time Control: The default time when the screen
automatically turns off is 5 seconds.
Memory Card Format: To delete content from the memory
card, this function can be selected to format the memory card.
Restore to Factory Settings: If the system becomes
confusing or is displaying abnormally, it can be restored to
factory settings.
/