Vxl Itona Md75 and TC75yyd Installation guide
- Category
- Deep fryers
- Type
- Installation guide

Installation Manual
for
Itona TC7521d with Wall Mounting Bracket
600 0110 433 75 A01
1
Installation Manual for Itona TC7521d with Wall Mounting Bracket

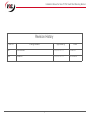
Revision History
Rev no. Change Details Approved by Date
A01 Title revised
Mahendran R.V.
2/1/2013
A00 Creation
Mahendran R.V.
31/12/2012
2
Installation Manual for Itona TC7521d with Wall Mounting Bracket

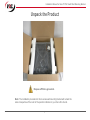
Unpack the Product
Note: The installation procedure for Itona series wall mounting bracket will remain the
same irrespective of the color of the position indicator on your Itona thin clients.
3
Installation Manual for Itona TC7521d with Wall Mounting Bracket
Dispose off Silica gel sachet.

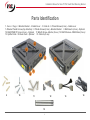
1. Itona 2. Cage 3. Monitor Bracket 4. Cable Cover 5. Cable tie 6. Thumb Screws (2 nos) – Cable cover
7. Retainer Thumb Screws (top & bottom) 8. Thumb Screws (2 nos) – Monitor Bracket 9. Wall Inserts (4 nos.) - Optional
10. M4x35 PAN ST Screw (4 nos.) – Optional 11. M4x25 Screw – Monitor (4 nos.) 12. M4x10 Screws –VESA Stand (4 nos.)
13. Splitter Cable 14.Power Cord – Optional 15. Cable tie (2 nos)
11
9
10
12
4
6
3
5
7
8
2
1
13
15
Parts Identification
14
4
Installation Manual for Itona TC7521d with Wall Mounting Bracket

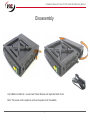
Cut & Remove Cable tie. Loosen two Thumb Screws and separate Cable Cover.
Note: The power cord is optional, remove the power cord if available.
Disassembly
5
Installation Manual for Itona TC7521d with Wall Mounting Bracket

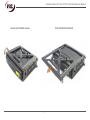
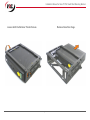
Loosen two Thumb screws.
Pull Out Monitor Bracket.
6
Installation Manual for Itona TC7521d with Wall Mounting Bracket

Loosen both the Retainer Thumb Screws.
Remove Itona from Cage.
7
Installation Manual for Itona TC7521d with Wall Mounting Bracket


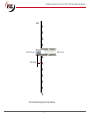
Drill 4 holes as per center to center dimensions and details given below.
197mm 175mm
• Hole Diameter: 5mm
• Hole Depth: 35mm
• Insert wall inserts into drilled holes.
• Fix M4x35 Screws on the wall as shown.
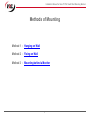
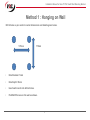
Method 1 : Hanging on Wall
9
Installation Manual for Itona TC7521d with Wall Mounting Bracket

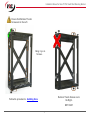
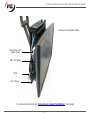
Screw head to project out as shown.
2 to 3mm
Wall Insert
M4x35 Screw
Wall
10
Installation Manual for Itona TC7521d with Wall Mounting Bracket


Method 2 : Fixing on Wall
Drill 4 holes as per center to center dimensions and details given below.
160mm 160mm
• Hole Diameter: 5mm
• Hole Depth: 35mm
• Insert wall inserts into drilled holes.
12
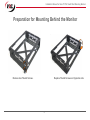
Installation Manual for Itona TC7521d with Wall Mounting Bracket

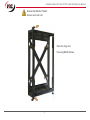
Ensure that Retainer Thumb
Screws are to the Left
Place the Cage and
Fix using M4x35 Screws
13
Installation Manual for Itona TC7521d with Wall Mounting Bracket


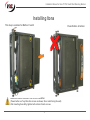
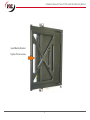
Make sure Itona is inserted in the correct orientation
(Power button on Top, Direction arrows as shown, Sl no. label facing the wall)
After inserting Itona fully, tighten both retainer thumb screws.
Installing Itona
Power Button at bottom
NOT OKAY
This step is common for Method 1 and 2
15
Installation Manual for Itona TC7521d with Wall Mounting Bracket

Insert Monitor Bracket.
Tighten Thumb screws.
16
Installation Manual for Itona TC7521d with Wall Mounting Bracket


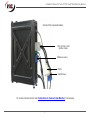
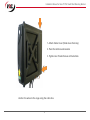
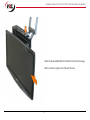
1. Attach Cable Cover (Slide down from top)
2. Push the bottom end inwards
3. Tighten two Thumb Screws at the bottom
Anchor the wires to the cage using the cable ties.
18
Installation Manual for Itona TC7521d with Wall Mounting Bracket

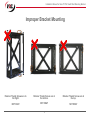
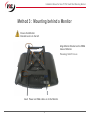
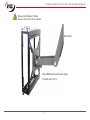
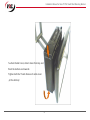
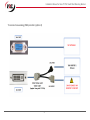
Method 3 : Mounting behind a Monitor
Align Monitor Bracket on the VESA
holes of Monitor.
Fix using M4x25 Screws.
Ensure that Monitor
Bracket Lock is to the left.
Insert Power and VGA cables on to the Monitor.
19
Installation Manual for Itona TC7521d with Wall Mounting Bracket

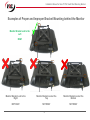
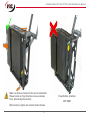
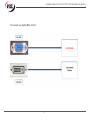
Examples of Proper and Improper Bracket Mounting behind the Monitor
Monitor Bracket Lock to the
Left
O K AY
Monitor Bracket Lock to the
Right
NOT OKAY
Monitor Bracket Lock at the
Top
NOT OKAY
Monitor Bracket Lock at the
Bottom
NOT OKAY
20
Installation Manual for Itona TC7521d with Wall Mounting Bracket
Page is loading ...
Page is loading ...
Page is loading ...
Page is loading ...
Page is loading ...
Page is loading ...
Page is loading ...
Page is loading ...
Page is loading ...
Page is loading ...
Page is loading ...
Page is loading ...
Page is loading ...
Page is loading ...
Page is loading ...
-
 1
1
-
 2
2
-
 3
3
-
 4
4
-
 5
5
-
 6
6
-
 7
7
-
 8
8
-
 9
9
-
 10
10
-
 11
11
-
 12
12
-
 13
13
-
 14
14
-
 15
15
-
 16
16
-
 17
17
-
 18
18
-
 19
19
-
 20
20
-
 21
21
-
 22
22
-
 23
23
-
 24
24
-
 25
25
-
 26
26
-
 27
27
-
 28
28
-
 29
29
-
 30
30
-
 31
31
-
 32
32
-
 33
33
-
 34
34
-
 35
35


Vxl Itona Md75 and TC75yyd Installation guide
- Category
- Deep fryers
- Type
- Installation guide
Ask a question and I''ll find the answer in the document
Finding information in a document is now easier with AI
Related papers
-
Vxl Itona Md75 and TC75yyd User guide
-
-
-
-
-
-
-
-
-
Other documents
-
 Bitspower BP-VGLINK-V2 Installation guide
-
American Standard AM00495400.213 Installation guide
-
Lenovo VXL Itona F21 Datasheet
-
Wyse - Dell 920277-01L Owner's manual
-
Kenwood 663 User manual
-
PROLINK PSG2401M User manual
-
 Frymaster HLZ18 User manual
-
MTD 12A-264L163 Owner's manual
-
MTD 12A-289W722 Owner's manual
-
Panasonic SLPJ28A Operating instructions

