Filemaker Pro 9 Advanced User guide
- Category
- Database software
- Type
- User guide
This manual is also suitable for

FileMaker
®
Pro 9 Advanced
Development Guide

© 2007 FileMaker, Inc. All Rights Reserved.
FileMaker, Inc.
5201 Patrick Henry Drive
Santa Clara, California 95054
FileMaker is a trademark of FileMaker, Inc., registered in the U.S. And other countries, and
ScriptMaker and the file folder logo are trademarks of FileMaker, Inc. All other trademarks are
the property of their respective owners.
FileMaker documentation is copyrighted. You are not authorized to make additional copies or
distribute this documentation without written permission from FileMaker. You may use this
documentation solely with a valid licensed copy of FileMaker software.
All persons and companies listed in the examples are purely fictitious and any resemblance to
existing persons and companies is purely coincidental. Credits are listed in the
Acknowledgements document provided with this software. Mention of third-party products is for
informational purposes only and constitutes neither an endorsement nor a recommendation.
FileMaker, Inc. assumes no responsibility with regard to the performance of these products.
For more information, visit our website at www.filemaker.com.
Edition: 01

Contents
Chapter 1
Introducing FileMaker Pro Advanced 5
About this guide 5
Using the FileMaker Pro Advanced documentation 5
Where to find PDF documentation 6
Abiding by the license agreement for runtime solutions 6
Your responsibilities as a developer 7
Chapter 2
Creating database solutions 9
Using the Developer Utilities 9
About creating runtime solutions 11
Converting and upgrading previous solutions 11
Binding the solution 12
Starting runtime database solutions 12
Distributing runtime solutions 13
Organizing solution components 13
Choosing a distribution method 14
Testing before and after creating your solution 15
Distributing updates to runtime database solutions 15
Creating Kiosk solutions 16
Chapter 3
Customizing database solutions 19
Adding tooltips 19
Copying or importing field and table schemas 19
Creating custom functions 20
About custom menus 21
Custom menu example 21
Creating custom menus 22
Creating custom menu items 22
Creating custom menu sets 24
Creating custom layout themes 25
Requirements for theme files 26
Chapter 4
Debugging, analyzing, and optimizing files 27
Debugging scripts 27
Disabling script steps 28
Using the Data Viewer 28
Using the Database Design Report 30
Compressing and optimizing files 31
Chapter 5
Developing third-party FileMaker plug-ins 33
About external functions 33
About the example plug-in 33
Installing, enabling, and configuring the example plug-in 34
Description of the FMExample plug-in’s external functions 35
Using the example plug-in 36
Customizing the plug-in example 37
Customizing the example resources 37
Customizing FMPluginExample.cpp 37
Customizing FMPluginPrefs.cpp 37
Customizing FMPluginFunctions.cpp 37
Requirements for writing external function plug-ins 38
API code files 38
Option string syntax 38
Naming conventions for external functions 39

4 FileMaker Pro Advanced Development Guide
FileMaker messages sent to the plug-in 39
Initialization message 39
Shutdown message 40
Idle message 40
Preferences message 40
External Function message 41
GetString message 41
Avoiding potential Mac OS X resource conflicts 41
Providing documentation for your plug-in 41
Appendix A
Feature comparison of the runtime application
with FileMaker Pro
43
Application and document preferences 44
Toolbar comparison 45
Menu command comparison 45
Ignored script steps 49
Stored registry settings or preferences 49
Index 51

Chapter 1
Introducing FileMaker Pro Advanced
Welcome to FileMaker
®
Pro Advanced. This product includes
advanced development and customization tools designed especially
for database developers. You can use either FileMaker
Pro or
FileMaker Pro Advanced to create and test your database solutions.
In addition to all of the features that are available with FileMaker Pro,
FileMaker Pro Advanced includes:
1 Developer Utilities, for creating, customizing, and deploying
runtime database solutions
1 Database Design Report feature, for publishing comprehensive
documentation on structures or schemas of databases
1 Script Debugger, for systematic testing and debugging of
FileMaker scripts
1 Data Viewer, for monitoring fields, variables, and calculations
1 Copy feature, for copying fields or tables. You can also import
table schema for use within the same file or across different files.
1 Tooltip feature, for creating custom tooltips on layouts
1 Custom Menus feature, for creating customized menus for the
solution
1 File Maintenance feature, for compacting the size of database files
and improving their performance
1 Custom Functions feature, for creating custom functions for use
anywhere within the solution
About this guide
This Development Guide includes information about features that are
available with FileMaker Pro Advanced.
In addition, this guide gives an overview of how to create custom
layout themes and external function plug-ins.
See FileMaker Pro Help for detailed information on product features.
Using the FileMaker Pro Advanced
documentation
This Development Guide is one component in a comprehensive
documentation suite provided with FileMaker
Pro Advanced. Some
of the documents are provided in print and in portable document
format (PDF), while others are available in PDF only. FileMaker Pro
Advanced also includes an online Help system to provide details on
FileMaker Pro features.
This guide assumes that you are familiar with FileMaker Pro or
FileMaker
Pro Advanced, and that you have created a database
solution that you want to work on using the FileMaker
Pro Advanced
features. If you are new to the FileMaker family, start with the
FileMaker Pro User’s Guide.

6 FileMaker Pro Advanced Development Guide
The following manuals are included:
1 FileMaker Pro Advanced Development Guide (this manual):
describes how to use the features available in FileMaker
Pro
Advanced
1 Installation and New Features Guide for FileMaker Pro and
FileMaker
Pro Advanced: contains installation instructions and a list
of the new features in the current version
1 FileMaker Pro User’s Guide: contains key concepts and basic
procedures
1 FileMaker Pro Tutorial: contains step-by-step lessons that teach
you how to create and use FileMaker Pro databases
1 FileMaker Pro Advanced Database Design Report XML Output
Grammar manual: describes the FileMaker Pro Advanced Database
Design Report (DDR) XML output grammar for users who want to
create tools that analyze or process the structure of databases
1 FileMaker Instant Web Publishing Guide: describes how to make
FileMaker
Pro and FileMaker Pro Advanced databases accessible to
web browser users over an intranet or the internet
1 FileMaker ODBC and JDBC Guide: describes how to share
FileMaker data with other applications using ODBC and JDBC.
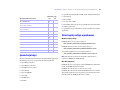
Where to find PDF documentation
To access PDFs of FileMaker documentation:
1 in FileMaker Pro Advanced, choose Help menu > Product
Documentation
1 click the Learn More button in the Quick Start Screen
1 see www.filemaker.com/downloads for additional documentation
Most PDF manuals are located in the folder where you installed
FileMaker
Pro Advanced. If you installed FileMaker Pro Advanced in
the default folder location, the PDF manuals are located here:
1 Windows: C:\Program Files\FileMaker\FileMaker Pro
Advanced\English Extras\Electronic Documentation
1 Mac OS: Macintosh HD/Applications/FileMaker Pro Advanced/
English Extras/Electronic Documentation
To view the PDF files, you need a PDF reader. In Mac OS X, you can
use either the built-in Preview application or Adobe Reader
®
.
Windows users need Adobe Reader. If you do not have Adobe
Reader, you can download it from the Adobe website at
www.adobe.com.
All of the PDF files use the tagged Adobe Portable Document format
(PDF). Tagged PDF files work with assistive technology such as the
screen readers JAWS and Window-Eyes for Windows. For more
information about tagged PDF files, see the Adobe website at
www.adobe.com.
Abiding by the license agreement for runtime
solutions
The FileMaker Pro Advanced license agreement allows you royalty-
free distribution of an unlimited number of FileMaker
Pro runtime
database solutions. However, there are several terms and conditions in
the license agreement you must abide by, including the following:
1 You must provide all of the end-user technical support.
1 You must provide an “About” layout that includes your name,
address, and the telephone number for your technical support. For
more information about creating an About layout, see the next section.
Note You must read and agree to the terms and conditions of the
FileMaker
Pro Advanced license agreement, available through the
FileMaker
Pro Advanced installer, before using the FileMaker Pro
Advanced software.

Chapter 1
|
Introducing FileMaker Pro Advanced 7
Your responsibilities as a developer
FileMaker has established procedures for repairing files. If a customer
complies with these procedures, then FileMaker may supply a
repaired file to the customer.
If you distribute database files with passwords or you have removed
full access privileges and do not want FileMaker to repair a file for a
customer who requests this service, you must:
1. Notify your customers in writing and keep a record of such notice
that your database solution contains passwords or data that can only
be provided by you.
2. Every file in your runtime database solution must contain an About
layout accessible from any layout in the database.
3. The layout name must begin with the word “About.”
4. The About layout must contain these items:
1 solution name
1 your company name and contact information
1 your support policy (for example, how and when you are
available for technical support)
5. The About layout must contain this exact warning:
“USER WARNING: This database solution contains password(s) that can
only be provided by the Developer identified above.”
For more information about creating an About layout, see Help.
6. If full access privileges have been permanently removed from your
database solution by selecting the Remove admin access from files
permanently option in the Developer Utilities, then the About layout
must contain this exact warning:
“USER WARNING: This file is not customizable. Contact the above named
Developer for information on customizing this database solution.”
The accounts and privileges protection in a FileMaker file should not
be viewed as an absolute barrier that will prevent a customer from
accessing files. FileMaker cannot guarantee that a customer will not
be able to identify or bypass the password through third-party
solutions or tools. Therefore, FileMaker recommends that you take
appropriate steps to protect your consulting and development efforts
without relying solely upon the password. For more information about
accounts and privileges, see Help.
If you have a dispute with your customer, you must resolve this
dispute directly with the customer. FileMaker is unable to, and will
not, attempt to resolve such disputes.

8 FileMaker Pro Advanced Development Guide

Chapter 2
Creating database solutions
FileMaker Pro Advanced provides Developer Utilities that let you:
1 rename a set of database files and automatically update the internal
links to related files and scripts
1 bind your database files into a stand-alone runtime database
solution that does not require FileMaker
Pro or FileMaker Pro
Advanced in order to be used on a computer
1 remove administrative access from all accounts and prevent users
from modifying most design or structural elements of your databases
1 display your database files in Kiosk mode
1 add the FileMaker Pro filename extension to your files
Note See Help for detailed, comprehensive information and step-by-
step procedures about using FileMaker Pro Advanced.
Using the Developer Utilities
To customize your database files or bind the files to a runtime
solution:
1. Close all of your database files that you are going to customize.
2. Choose Tools menu > Developer Utilities.
3. If you have used the Developer Utilities on the same database
before and saved your settings, click Load Settings.
A dialog box opens so that you can browse to find your settings file.
4. Click Add to locate the files that you want to customize.
5. If you are binding multiple files into a runtime solution,
double-click a file in the list to specify the primary file.
6. To rename a file, select the file in the list, type the new name in the
Rename file box, and click Change.
7. To remove a file, select the file in the list and click Remove.
8. Under Project Folder, click Specify to choose the location in which
the copy of the database solution will be saved.

10 FileMaker Pro Advanced Development Guide
9. If you do not want the new files to overwrite earlier versions, clear
Overwrite matching files within the Project Folder.
Important If Overwrite matching files within the Project Folder is
selected, the Developer Utilities will overwrite files with the same
names as those in the list of files.
10. Do one of the following:
1 If you want to create a copy of your database files with new
names, click Create.
Note FileMaker Pro Advanced automatically updates internal
links to related files and scripts.
1 If you want to further customize your database files or bind the
files, under Solution Options, click Specify.
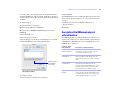
The Specify Solution Options dialog box appears.
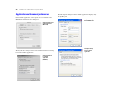
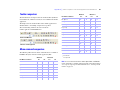
11. In the Specify Solution Options dialog box, select one or more options:
12. Click OK.
13. To be able to quickly repeat the process, click Save Settings, and
choose a folder and location for your settings file. For more
information about saving solution settings, see Help.
14. Click Create.
To Do this
Bind databases to
runtime applications
Select Create Runtime solution application(s).
Note This option can be combined with all others,
except Databases must have a FileMaker file extension.
See “About creating runtime solutions” on page 11.
Permanently prohibit
any administrative
access to your solution
Select Remove admin access from files permanently.
Important Once removed, administrative access
cannot be restored to the custom solution.
For more information about removing Admin access
to databases, see Help.
Force accounts without
full access privileges to
open your solution in
Kiosk mode
Select Enable Kiosk mode for non-admin accounts.
See “Creating Kiosk solutions” on page 16.
Add the FileMaker
extension to the
filenames of database
files
Select Databases must have a FileMaker file extension.
Note This option is not available if you select Create
Runtime solution application(s). You can use this feature
to add extensions to files that do not have extensions.
Create a log file to
record any errors
encountered during
processing
Select Create Error log for any processing errors.
Specify a location and a filename for the error log.
Notes
1 If you don't specify a filename and location for the
error log, it will be saved to the project folder with
the filename Logfile.txt.
1 If an error occurs during the processing of the options,
the error is logged in the error log. An error message
may also indicate that an error has been encountered.

Chapter 2
|
Creating database solutions 11
About creating runtime solutions
Use the Developer Utilities to produce a stand-alone runtime database
solution that users can access without running FileMaker
Pro or
FileMaker Pro Advanced. The Developer Utilities create a copy of
your files, and bind the database file or files to a runtime application
with a name that you specify.
Runtime applications do not have all the functionality and features of
FileMaker Pro. For a complete list of the differences between the
runtime application and FileMaker
Pro, see appendix A, “Feature
comparison of the runtime application with FileMaker Pro.”
You may need to bind your database files several times before you
prepare them for delivery to your users. When you have completed
development and the final version is bound and ready to distribute,
you should thoroughly test your runtime solution to ensure that it
behaves as expected.
Note FileMaker Pro and FileMaker Pro Advanced allow you to
include as many database tables as you need in a database file. This
capability eliminates one of the main reasons for using multiple files.
However, other elements, like scripts and access privileges, are stored
at the file level and so some complex solutions will still benefit from
using multiple files.
Before you begin to build your database solution, you need to decide
how users will interact with it. Your database solution might have any
of the following components:
1 a primary database file that connects all of the auxiliary files
1 scripts and buttons to open and close auxiliary files, return to the
primary file, display a splash screen layout at startup, or quit a runtime
application
1 common elements and a consistent appearance for cross-platform
solutions
1 tooltips and custom menus
1 a custom layout theme used for every file in the solution
1 an About layout to introduce your solution (required)
1 a custom Help system that provides usage tips for your solution
1 multiple privilege sets that can specify levels of access to layouts,
menus, specific tables, record, fields, and so on
1 password-protected accounts assigned to privilege sets that
determine the level of access of account users
For information about what users need in order to use your runtime
database solution, see
“Distributing runtime solutions” on page 13.
Converting and upgrading previous solutions
If you have developed a FileMaker Pro runtime database solution
using the Solutions Development Kit (SDK) for FileMaker
Pro 3.0 or
earlier, the Binder utility in the FileMaker
Pro 4.0 Developer Edition,
or the Developer Tool in FileMaker Developer 5.x and 6.0, you can
upgrade your solution and provide your users with the converted files.
Files bound to a runtime application using the earlier tools must be
rebound using the Developer Utilities.
You must convert FileMaker Pro files created in version 6.0 or earlier to
the new file format. You can convert a single file or convert multiple files
at once. For more information about converting files, see Help.
Once you have converted the files, you can upgrade them to take
advantage of newer FileMaker
Pro and FileMaker Pro Advanced
features. If necessary, create scripts to import users’ existing data
from the old runtime database solution into the new, upgraded
solution. See Help for more information on importing data into
upgraded runtime solutions. Use the Developer Utilities to bind the
solution files into a new, upgraded runtime database solution.
Distribute the new upgraded runtime database solution and provide
instructions for how users can upgrade their files by converting the old
files in the new runtime application and importing their data.

12 FileMaker Pro Advanced Development Guide
Binding the solution
To bind database files into a runtime database solution:
1. Follow the procedures in “Using the Developer Utilities” on page 9.
2. In the Specify Solution Options dialog box, select Create Runtime
solution application(s).
3. To name your runtime application:
1 For Runtime Name, type a name. The name is used for the
runtime application filename and for the name of the folder that
contains the runtime database solution files.
1 For Extension, type a three-character filename extension. The
extension is used to associate the solution files with the runtime
applications.
For more information about naming runtime solutions, see Help.
4. For Bindkey, type a key between 1 and 24 characters long.
The binding key links the runtime application to the database files and
ensures that the bound files will only open in the appropriate runtime
application. The binding key is case-sensitive. For more information
on setting the binding key, see Help.
Important Binding installs system files pertaining to each platform. If
your solution will be used in Windows, bind it using the Developer
Utilities for Windows. If your solution will be used on Mac
OS X,
bind it using the Developer Utilities for Mac
OS X. If you’re creating
a solution to be used on both Windows and the Mac
OS X, create two
separate runtime solutions by binding the original solution files twice:
first using FileMaker Developer Utilities for Windows, and then using
FileMaker Developer Utilities for Mac
OS X. Use the same binding
key on both platforms.
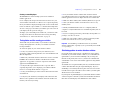
5. To add a company logo or other custom image to the closing splash
screen, click Specify, select the closing image, and click Select.
The image should be at least 32 x 175 pixels (72 dpi) or higher,
otherwise it will be distorted when displayed. The supported image
formats are JPEG and GIF.
6. For Delay, set the number of seconds that you want the splash
screen to display.
You can preview the effect that your custom splash screen will have
by clicking the Preview button.
7. Once you have specified options, click OK.
8. To be able to quickly repeat the process, click Save Settings, and
choose a folder and location for your settings file.
For more information about saving and reusing Developer Utilities
settings, see Help.
9. Click Create.
The Developer Utilities copy all of the runtime files to a new folder
created inside the Project Folder and named after the runtime solution.
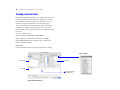
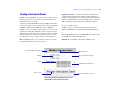
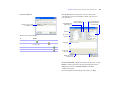
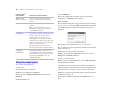
Starting runtime database solutions
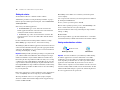
Important Your users should start your solution by double-clicking
the runtime application icon, not the solution file icon. Double-
clicking the icons for the solution or auxiliary files might result in
errors, depending on whether there are other copies of the runtime
application on their hard disk. If your users have more than one
solution on their computers associated with the same three-character
extension and they double-click the icon for the solution file, the first
solution installed will attempt to open the file, and this might not be
the correct application for the specific file.
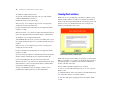
Double-click to start
Solution file iconRuntime application icon

Chapter 2
|
Creating database solutions 13
Distributing runtime solutions
The final steps in developing your runtime database solution are to
bundle all of the necessary files together, choose how you will distribute
your solution—for example, on a CD-ROM or over a network—and
provide your users with documentation for installing your solution. In
addition, your documentation should include instructions for starting
the runtime application and what to do if a file is damaged.
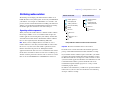
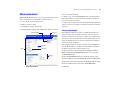
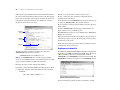
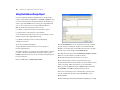
Organizing solution components
When you bind your database files into a runtime database solution,
the Developer Utilities create a new solution folder and place the
runtime application, the bound primary and auxiliary database files,
and an Extensions folder inside it. For Windows runtime solutions
there are also required Dynamic Link Library (DLL) files.
Note When you move multiple files into one folder to create a
runtime solution, be aware that your internal links are affected. For
this reason, every data source must include a path that is just the
filename of the file being referenced. Although the runtime
application will check other data sources, it will then be able to find
the file in the same folder in which it resides. You can still keep any
absolute or relative paths in the same data source reference in case the
files are also used in FileMaker Pro or FileMaker Pro Advanced.
Important These files and folders must not be renamed.
For details on the contents of the Mac OS X runtime application
package and the Windows Extensions folder and DLLs, see Help.
If your runtime database solution requires custom files, you should
provide the files with the runtime files. Plug-ins should be stored in
the Extensions folder. If a developer uses a font not found on a user’s
system, the runtime application will make a font substitution. If a font
is included with the runtime, provision should be made for its
installation through the installer program. See
“Using a custom
installation program” below.
In addition to the runtime files, you will need to provide installation
instructions for your users. For more information on documenting
developer solutions, see Help.
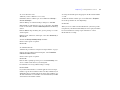
Windows solution folder Mac OS X solution folder
Runtime application
Runtime application
package
Bound primary and
auxiliary solution files
Bound primary and
auxiliary solution files
Extensions
Dictionaries
DLLs generated during
binding
Example of Windows and Mac OS X solution contents for distribution
Extensions
Dictionaries
language resource
folders

14 FileMaker Pro Advanced Development Guide
Choosing a distribution method
After you have organized the files that comprise your solution, you
need to decide how your users will install them. You can distribute
your bundled solution on a CD-ROM, over a network, or via the
internet. In order to run your runtime database solution, your users
will need the same minimum equipment and software required by the
FileMaker Pro Advanced application. See the Installation and New
Features Guide for FileMaker Pro and FileMaker Pro Advanced.
Using a custom installation program
You should use a custom installation program to package your
runtime solution for installation by users. Configuring a custom
installation application to automatically install runtime database
solution files may require more engineering than using a compression
utility, but will help to ensure that your users do not have difficulties
installing your runtime solution.
Here are some custom installation applications you might want to use:
1 MindVision Installer VISE
1 InstallShield MultiPlatform
1 MacInstallerBuilder
Using a compression utility program
If your runtime database solution is not complex and you have
confidence in the technical experience of your end users, you might
consider a compression utility program rather than a custom
installation program. To compress files, use a utility such as:
1 WinZip for Windows
1 StuffIt Deluxe
Sharing solutions over a network
Users cannot share your runtime database solution over a network
unless they access the files using FileMaker Pro or FileMaker Pro
Advanced installed on their machines. You must have a master
password to enable or change network access to the file. For optimal
performance, you can host the solution files using FileMaker Server.
For information about the FileMaker Server and FileMaker Pro
products, and information about volume license sales, see the
FileMaker website at www.filemaker.com.
Recovering damaged files
Power failures, hardware problems, or other factors can damage a
FileMaker database file. If your database solution becomes damaged,
your users will need to recover the damaged file. When the runtime
application discovers a damaged file, a dialog box appears, telling the
user to contact the developer. Even if the dialog box does not appear,
files can become corrupted and exhibit erratic behavior.
For information about recovering runtime files, see Help.
Creating an About layout
For runtime database solutions, the FileMaker Pro Advanced license
specifies that you must create an About layout that provides
information for your users on how to contact you for technical
support. FileMaker uses the About layout to distinguish databases
created by developers using FileMaker Pro Advanced rather than
users of FileMaker Pro.
For more information about what is required to appear in the About
layout for runtime database solutions, see
“Your responsibilities as a
developer” on page 7.

Chapter 2
|
Creating database solutions 15
Creating a custom Help layout
The FileMaker Pro Advanced Help system is not available in
runtime
applications.
Create a Help layout that provides instructions for how to use your
custom solution and add data to it. Then create a script in the primary
file of your solution to display the Help system. Use the custom menus
feature to make the script available as a command in the Help menu.
To create a web page to document your solution, put a web viewer in
your Help layout that opens the web page.
To display your custom Help menu on Mac OS, you must start with
an empty menu. For more information about creating and editing
custom menus, see
“About custom menus” on page 21.
Testing before and after creating your solution
You should verify the functionality of your database solution by
testing it thoroughly before and after you customize it with the
Developer Utilities.
To ensure the quality of your custom database solution:
1 Verify every function and option in your solution. If you’re
developing a solution for both platforms, test it on both Windows and
Mac OS X platforms.
1 Make sure your runtime database solution does not use a standard
FileMaker Pro feature that is hidden or disabled in the runtime
application. See
appendix A, “Feature comparison of the runtime
application with FileMaker Pro.”
1 Verify that all scripts and buttons work as expected. This is
especially important if you’re displaying your solution in Kiosk
mode. See
“Creating Kiosk solutions” on page 16.
1 Verify your installation procedures and test other instructions in the
documentation.
1 Verify that your database layouts display well on monitors with
different color capabilities and resolutions and on the smallest size
monitor your users may be using.
1 Test your runtime database solution with actual data. This is
especially important if users are upgrading from earlier versions of the
runtime application and need to import data into new solution files.
1 Make sure all the auxiliary files and DLLs (Windows) are present.
1 Show your database solution to intended users to uncover any
usability issues.
1 Install your bundled database files on a completely different
computer to verify that all the files associated with the primary file can
be found.
1 If you’re assigning passwords or permanently removing full access
privileges, test all access levels.
1 Make sure your database solution contains an About layout that
notifies users of the level of access you’re providing.
Important You should keep an unbound version of any runtime
database solution files, especially if you’ve permanently removed full
access privileges.
Distributing updates to runtime database solutions
If you make feature enhancements or modifications to the primary
bound file of your runtime database solution, you can distribute the
updated file to your users without rebinding it. If you change the
filename of the primary file, however, you’ll need to rebind the file
and distribute a new version of the runtime application along with the
updated file.
To distribute new or updated auxiliary files for your runtime database
solution, bind them first using the original binding key. If you are
distributing a new auxiliary file that requires new data sources in the
main file or that requires other files to interact with it, you must update
all files that have been modified.
If you forget the original binding key for your runtime database solution
and want to update or add a file, you’ll need to rebind all of the database
files with a new binding key and redistribute the entire solution.

16 FileMaker Pro Advanced Development Guide
To distribute an updated primary file:
1. Open the original primary file from your copy of the runtime
solution in FileMaker Pro Advanced.
2. Make the changes to the primary file.
3. If necessary, create an Import script so users can import their
existing data into the new primary file.
For more information about importing data into upgraded runtime
solutions, see Help.
4. Send your users a copy of the new primary file with instructions to
replace the old primary file in the runtime database solution folder.
To distribute a new or updated auxiliary file:
1. In FileMaker Pro Advanced, create the new auxiliary file or open
the original auxiliary file (before it was bound) and make changes as
required.
2. If necessary, create an Import script so users can import their
existing data into the new file.
For more information about importing data into upgraded runtime
solutions, see Help.
3. Use the Developer Utilities to rebind all of the files in the runtime
database solution and include the new or updated auxiliary file.
Use the same binding key that you used for the primary file.
4. Send your users a copy of the new or updated auxiliary file along
with instructions to place it in the runtime database solution folder,
replacing the old file if appropriate.
As long as the binding key has not changed, you don’t need to
redistribute the runtime application or other solution files.
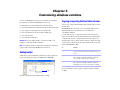
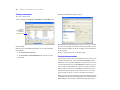
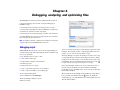
Creating Kiosk solutions
Kiosk mode is a way of displaying your database solution or your
runtime database solution on a full screen, without any toolbars or
menus. As the name suggests, Kiosk mode can be used to present your
database to users as an information kiosk. You can design your
database to run through a touch screen.
Kiosk mode is ignored if the solution is opened by accounts with the
Full Access privilege set, a privilege set that allows management of
extended privileges, or a privilege set that allows modification of
layouts, value lists, and scripts.
For your solution to display in Kiosk mode, you must:
1 create an account with a limited privilege set or create a specific
Kiosk account.
1 enable Kiosk mode. At the same time that you enable Kiosk mode,
you can bind the database as a runtime solution.
1 clear the default option of logging into the file with the Admin
account.
A Kiosk solution containing a single Help layout

Chapter 2
|
Creating database solutions 17
To create a Kiosk account:
1. Ensure you have a limited access account.
2. With the database solution open, choose File menu > Manage >
Accounts & Privileges.
3. In the Manage Accounts & Privileges dialog box, click New.
4. In the Edit Account dialog box, type an account name, click Active
for the Account Status, and select New Privilege Set from the Privilege
Set list.
5. In the Edit Privilege Set dialog box, give the privilege set a name
and description.
6. For Layouts, Value Lists, and Scripts, select either All view only or
All no access.
7. Clear the Manage extended privileges checkbox.
8. Select other options as required.
9. Click OK.
To enable Kiosk mode:
1. Follow the procedures in “Using the Developer Utilities” on page 9.
2. In the Specify Solution Options dialog box, select Enable Kiosk
mode for non-admin accounts.
3. Select other options as required.
4. Click OK.
5. To be able to quickly repeat the process, click Save Settings, and
choose a folder and location for your settings file.
For information on saving solution settings, see Help.
6. Click Create.
If you did not bind the files to a runtime application, the Developer
Utilities copy the selected database files to the Project Folder. If you
did bind the files to a runtime application, the Developer Utilities copy
all of the runtime files to a new folder created inside the Project Folder
and named after the runtime solution.
To change the default option of logging into the file with the Admin
account:
1. With the database solution open, choose File menu > File Options.
2. On the Open/Close tab, clear Log in using.
3. Click OK.
When you create a solution to run in Kiosk mode, you need to provide
navigation for your solution and the ability for users to quit your solution.
For more information on using scripts and buttons to control
Kiosk solutions, see Help.

18 FileMaker Pro Advanced Development Guide

Chapter 3
Customizing database solutions
You can use FileMaker Pro Advanced to customize your solutions
beyond what is possible with FileMaker Pro. You can:
1 add tooltips to provide information about layout objects
1 copy and paste fields for use within the same file or other database files
1 copy or import existing tables into your database file
1 create custom functions for use anywhere within a file
1 create custom menus
1 create custom layout themes
Important Except for adding tooltips, you must have full access
privileges to customize database solutions.
Note See Help for detailed, comprehensive information and step-by-
step procedures about using FileMaker Pro Advanced.
Adding tooltips
Add tooltips to provide information about layout objects. In Layout
mode, select the object and choose Format menu > Set Tooltip.
For more information about adding tooltips, see Help.
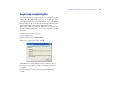
Copying or importing field and table schemas
You can copy or import field and table schemas within a file or to other
database files.
With FileMaker Pro Advanced, you can consolidate tables from a
multi-file solution into one file. There are two methods for
consolidating solutions:
1 Copy table schemas — Open source files to select and copy the
tables you want. Then, paste the table schemas into the destination file.
1 Import table schemas — Import table schemas directly into the
destination file. You can import just the schemas or import data with
a single schema. (To import the data with a single schema, choose File
menu
> Import Records > File.)
For more information about copying or importing fields and tables,
see Help.
Tooltip
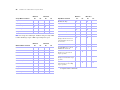
To Do this
Copy a field schema Choose File menu > Manage > Database > Fields tab.
Select the field from the list, then click Copy. Data is not
copied.
Copy a table schema Open the file that contains the table you want to copy.
Choose File menu > Manage > Database > Tables tab.
Select the table from the list, then click Copy.
Import a table schema Open the file into which you want to import a table.
Choose File menu > Manage > Database > Tables tab.
Click Import. Select the source file and table, and click OK.

20 FileMaker Pro Advanced Development Guide
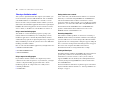
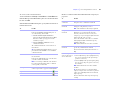
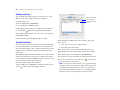
Creating custom functions
Use the Custom Functions feature to create custom functions that can
be reused anywhere in the database file in which they are created.
Once formulas are written for the function, they don’t have to be
rewritten to be applied to other fields or used in other scripts.
You can maintain and edit custom functions and the formulas they
contain in one central location. Any change made to the custom
function will be copied to all instances where that custom function has
been used.
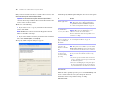
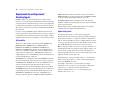
To create a custom function:
1. Choose File menu > Manage > Custom Functions.
2. In the Manage Custom Functions dialog box, click New.
3. In the Edit Custom Function dialog box, type a name for the
function and build a formula.
4. Click OK.
For more information about creating custom functions, see Help.
Function list
Formula box
Parameters list
Your custom parameters
appear in this space
View list (opened)
Edit Custom Function dialog box
Page is loading ...
Page is loading ...
Page is loading ...
Page is loading ...
Page is loading ...
Page is loading ...
Page is loading ...
Page is loading ...
Page is loading ...
Page is loading ...
Page is loading ...
Page is loading ...
Page is loading ...
Page is loading ...
Page is loading ...
Page is loading ...
Page is loading ...
Page is loading ...
Page is loading ...
Page is loading ...
Page is loading ...
Page is loading ...
Page is loading ...
Page is loading ...
Page is loading ...
Page is loading ...
Page is loading ...
Page is loading ...
Page is loading ...
Page is loading ...
Page is loading ...
Page is loading ...
Page is loading ...
Page is loading ...
-
 1
1
-
 2
2
-
 3
3
-
 4
4
-
 5
5
-
 6
6
-
 7
7
-
 8
8
-
 9
9
-
 10
10
-
 11
11
-
 12
12
-
 13
13
-
 14
14
-
 15
15
-
 16
16
-
 17
17
-
 18
18
-
 19
19
-
 20
20
-
 21
21
-
 22
22
-
 23
23
-
 24
24
-
 25
25
-
 26
26
-
 27
27
-
 28
28
-
 29
29
-
 30
30
-
 31
31
-
 32
32
-
 33
33
-
 34
34
-
 35
35
-
 36
36
-
 37
37
-
 38
38
-
 39
39
-
 40
40
-
 41
41
-
 42
42
-
 43
43
-
 44
44
-
 45
45
-
 46
46
-
 47
47
-
 48
48
-
 49
49
-
 50
50
-
 51
51
-
 52
52
-
 53
53
-
 54
54


Filemaker Pro 9 Advanced User guide
- Category
- Database software
- Type
- User guide
- This manual is also suitable for
Ask a question and I''ll find the answer in the document
Finding information in a document is now easier with AI
Related papers
-
Claris Pro 10 Advanced User guide
-
Claris Pro 12 Advanced User guide
-
-
-
-
-
-
-
-
Other documents
-
 Wiley 978-0-471-77708-3 Datasheet
-
HP Electronic Forms User manual
-
 Wiley 978-1-1180-0759-4 Datasheet
-
Xerox Instant Print Kiosk Administration Guide
-
 Remote Automation Solutions OpenEnterprise Calculation User guide
-
Epson TM-U220 Installation guide
-
Texas Instruments TMS320C5x C Source Debugger (Rev. B) User guide
-
 Wiley 978-0-470-55651-1 Datasheet
-
 Planex FMX-24P User manual
-
Adobe Illustrator CC User guide


