Page is loading ...

DigitalMedia™ Connectors: DM-CONN-20
Description
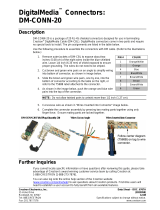
DM-CONN-20 is a package of 20 RJ-45 shielded connectors
designed for use in terminating Crestron
®
DigitalMedia Cable
(DM-CBL). DigitalMedia connectors come in two parts and
are used to terminate the blue Shielded Twisted Pair (STP)
cable (sectional view shown to the right) that plugs into the D
port of a DigitalMedia device.
Proper cable termination will ensure that the cable lengths for
the terminated CAT5e and terminated STP cables are similar.
The only tools required for assembly are a wire stripper, razor
knife and side cuts (or edge nippers).
Use the following procedure to assemble the connectors with
STP cable. Use caution to avoid nicking or cutting the wires or
insulation. Pin assignments are listed in the table to the right.
1. Strip 6 inches (153 mm) of the DigitalMedia Cable to
expose the three inner cables.
2. Strip the blue outer jacket of the STP cable 1 3/4 inch
(45 mm) from end. Gather and twist the braid. Refer to
“Strip Jacket and Trim Shield” to the right.
3. Trim foil shield to 1/2 inch (13 mm) and fold back against
the outer jacket of the cable. Refer to “Strip Jacket and
Trim Shield” and “Fold Foil and Cut Spline” to the right.
4. Remove the white inner jacket and separate the twisted
pairs to expose the spline. Cut the spline so that it is near
flush with the outer jacket of the STP cable. Return
twisted pairs to original position. Refer to “Fold Foil and
Cut Spline” to the right.
5. Fold foil shield back to original position over wire pairs.
Neatly wrap twisted braid around foil shield. Only silver
side of foil shield is conductive. Refer to “Wrap Braid
around Shield” to the right.
NOTE: Braid should wind neatly around foil shield. Loose
braid may cause shorts or difficulty completing assembly of
connector.
NOTE: Do not allow the twisted pairs to untwist for more than
1/2 inch (13 mm).
Crestron Electronics, Inc. Data Sheet – DOC. 6767B
6. Arrange brown and green wire pairs for T568B
termination (shown on the attached tag). Insert the brown
and green wire pairs into the holes in the connector.
Refer to “Insert Wires in Holes” to the right. Pull the
excess wire through the holes until the wrapped braid is
near flush to the insertion point of the holes.
7. Arrange the blue and orange wire pairs for T568B
termination (shown on the attached tag). Seat the blue
and orange pairs in the wire channels on the top of the
connector. Refer to “Attach Plastic Clamp” to the right.
8. Snap the attached plastic clamp to secure the wire. Refer
to “Attach Plastic Clamp” to the right.
9. Trim the blue and orange pairs with the side cuts so that
they are flush with the end of the wire channels. Trim the
brown and green pairs so that the ends are flush with the
holes on the connector. Refer to “Trim Wires” to the right.
10. Align and attach the other half of the connector. To
complete assembly, press firmly until you hear a click.
Refer to “Complete Assembly” to the right.
15 Volvo Drive Rockleigh, NJ 07647 (2023058)
Tel: 888.CRESTRON 01.09
Fax: 201.767.7576 Specifications subject to
www.crestron.com change without notice.

DigitalMedia™ Connectors Crestron DM-CONN-20
Use the following procedure to disassemble the connector.
The only tool required is a flat head mini-screwdriver (not
supplied).
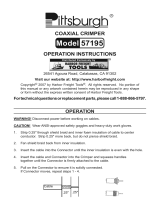
1. Hold the connector with the flat side facing up, and use a
mini-screwdriver to separate the interlocking sides of the
connector. Twist the screwdriver until the side separates
from the connector, refer to “Separate Interlocking Sides
of Connector” below.
Separate Interlocking Sides of Connector
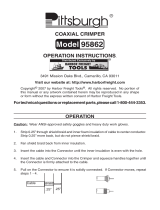
2. Insert screwdriver in gap that is created on the same side
and twist to finish disassembly of connector, refer to
“Separate Side of Connector” below.
Separate Side of Connector
3. It may be necessary to repeat steps 1 and 2 for the other
side of the connector.
Further Inquiries
If you cannot locate specific information or have questions
after reviewing this sheet, please take advantage of
Crestron's award winning customer service team by calling
Crestron at 1-888-CRESTRON [1-888-273-7876].
You can also log onto the online help section of the Crestron
website (
www.crestron.com/onlinehelp) to ask questions
about Crestron products. First-time users will need to
establish a user account to fully benefit from all available
features.
Return and Warranty Policies
Merchandise Returns / Repair Service
1. No merchandise may be returned for credit, exchange or
service without prior authorization from CRESTRON. To
obtain warranty service for CRESTRON products, contact an
authorized CRESTRON dealer. Only authorized
CRESTRON dealers may contact the factory and request an
RMA (Return Merchandise Authorization) number. Enclose a
note specifying the nature of the problem, name and phone
number of contact person, RMA number and return address.
2. Products may be returned for credit, exchange or service
with a CRESTRON Return Merchandise Authorization
(RMA) number. Authorized returns must be shipped freight
prepaid to CRESTRON, 6 Volvo Drive, Rockleigh, N.J. or its
authorized subsidiaries, with RMA number clearly marked on
the outside of all cartons. Shipments arriving freight collect
or without an RMA number shall be subject to refusal.
CRESTRON reserves the right in its sole and absolute
discretion to charge a 15% restocking fee plus shipping
costs on any products returned with an RMA.
3. Return freight charges following repair of items under
warranty shall be paid by CRESTRON, shipping by standard
ground carrier. In the event repairs are found to be non-
warranty, return freight costs shall be paid by the purchaser.
CRESTRON Limited Warranty
CRESTRON ELECTRONICS, Inc. warrants its products to be free
from manufacturing defects in materials and workmanship under
normal use for a period of three (3) years from the date of
purchase from CRESTRON, with the following exceptions: disk
drives and any other moving or rotating mechanical parts, pan/tilt
heads and power supplies are covered for a period of one (1)
year; touchscreen display and overlay components are covered
for 90 days; batteries and incandescent lamps are not covered.
This warranty extends to products purchased directly from
CRESTRON or an authorized CRESTRON dealer. Purchasers
should inquire of the dealer regarding the nature and extent of the
dealer's warranty, if any.
CRESTRON shall not be liable to honor the terms of this warranty
if the product has been used in any application other than that for
which it was intended or if it has been subjected to misuse,
accidental damage, modification or improper installation
procedures. Furthermore, this warranty does not cover any
product that has had the serial number altered, defaced or
removed.
This warranty shall be the sole and exclusive remedy to the
original purchaser. In no event shall CRESTRON be liable for
incidental or consequential damages of any kind (property or
economic damages inclusive) arising from the sale or use of this
equipment. CRESTRON is not liable for any claim made by a third
party or made by the purchaser for a third party.
CRESTRON shall, at its option, repair or replace any product
found defective, without charge for parts or labor. Repaired or
replaced equipment and parts supplied under this warranty shall
be covered only by the unexpired portion of the warranty.
Except as expressly set forth in this warranty, CRESTRON makes
no other warranties, expressed or implied, nor authorizes any
other party to offer any warranty, including any implied warranties
of merchantability or fitness for a particular purpose. Any implied
warranties that may be imposed by law are limited to the terms of
this limited warranty. This warranty statement supersedes all
previous warranties.
Trademark Information
All brand names, product names and trademarks are the sole property of their
respective owners. Windows is a registered trademark of Microsoft Corporation.
Windows95/98/Me/XP/Vista and WindowsNT/2000 are trademarks of Microsoft
Corporation.
2 • DigitalMedia
™
Connectors: DM-CONN-20 Data Sheet – Doc. 6767B
/