Ole Iron Slides SP121-WR038CAN Installation guide
- Type
- Installation guide

NEW
EASY INSTALL!
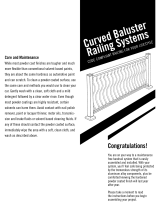
ONE BALUSTER FITS ALL
Adjustable Wrought Iron Balusters
Perfect do-it-yourself
install!
• Easy transition from traditional
wood stair case to wrought iron
by replacing the balusters
• Install with 3 screws
• Already painted –
No finish required
• 4 designs to
choose from
• Available in 2
different finishes
Moulding to Your Lifestyle
Installation
Guide on
reverse
SWIVEL TOP
Adjusts to any
stair angle –
90 degrees both
directions
TELESCOPIC
SHAFT
Extends from
30-1/4” to 38”
in height
4144_ALEX_WroughtIronAdjustableBaluster_PromoSheet_EN_v7.indd 1 21/10/09 5:17 PM

InstallatIon guIde for exIstIng staIrcases
4 desIgns to choose from
tools and hardware requIred
• Phillips screw driver • Hand saw
• Level • Masking tape
• Construction adhesive • Allen key
• 3 Screws per baluster • Thread locking liquid
décor Ideas
Plain
SP121-WRO38C
• Colour/Finish: Satin Black
• Height Adjustment:
30-1/4” to 38”
Spiral
SP124-WRO38C
• Colour/Finish: Antique Nickel
• Height Adjustment:
30-1/4” to 38”
Double-Knuckle
SP123-WRO38C
• Colour/Finish: Satin Black
• Height Adjustment:
30-1/4” to 38”
Basket
SP122-WRO38C
• Colour/Finish: Antique Nickel
• Height Adjustment:
30-1/4” to 38”
alexandriamoulding.com customerservice@alexmo.com
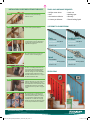
Apply masking tape to side of handrail
and treads to help mark existing
balusters center.
STEP 1
Use a level to mark existing balusters
center at the top and the bottom.
STEP 2
To keep the handrail supported cut
out and remove only 4 or 5 balusters at
one time then replace them with the
adjustable wrought iron.
STEP 3
Once existing balusters are removed
mark the centers on masking tape.
STEP 4
With the help of your Allen key, loosen
the base set screws (1) and remove the
base from the baluster. Apply adhesive
underneath the base before aligning
with the existing hole on the tread. Run
screw through the baluster base into
tread. Once the baluster base is set, place
the baluster shaft into base.
STEP 5
Apply adhesive on the flat surface of the
baluster swivel top. Loosen the telescopic
shaft set screw (1) with Allen key and
extend baluster to reach underside of the
handrail. Adjust swivel top to handrail
angle and secure into position using two
screws.
STEP 6
Once the baluster is installed, tighten
and lock the baluster base, telescopic
shaft and swivel top with the set screw.
It is suggested to apply thread locking
liquid on the set screws. Do not apply
thread lock liquid on the swivel top until
it is securely screwed into the handrail.
STEP 7
4144_ALEX_WroughtIronAdjustableBaluster_PromoSheet_EN_v7.indd 2 21/10/09 5:17 PM
-
 1
1
-
 2
2


Ole Iron Slides SP121-WR038CAN Installation guide
- Type
- Installation guide
Ask a question and I''ll find the answer in the document
Finding information in a document is now easier with AI
Other documents
-
 Crown Heritage BC419601016 Installation guide
-
 Trex 5457472 Operating instructions
-
 Trex 5457185 Installation guide
-
Trex WT040448APSRT Installation guide
-
Trex WT12088 Installation guide
-
Fusion 6501125 Installation guide
-
TimberTech ARRP10W Installation guide
-
HOUSE OF FORGINGS HFWHT5.1.1 Installation guide
-
-
 EZ Handrail EZCB10PKT36-HB Installation guide


