Kichler Lighting 1TEC4TRSF8SIL User manual

Type
User manual

This manual is also suitable for

Kichler Lighting 1TEC4TRSF8SIL is a versatile and durable TE-Series PRO Tread Channel designed for illuminating stairs and floors. It features a sleek silver finish, providing a modern aesthetic to any space. The channel can accommodate up to four strips of LED tape light, allowing for customized lighting intensity. It includes anti-slip tread inserts that enhance safety and conceal screw heads for a clean look. Installation is straightforward, with direct mounting using appropriate hardware and optional sealing with silicone for added protection.

Kichler Lighting 1TEC4TRSF8SIL is a versatile and durable TE-Series PRO Tread Channel designed for illuminating stairs and floors. It features a sleek silver finish, providing a modern aesthetic to any space. The channel can accommodate up to four strips of LED tape light, allowing for customized lighting intensity. It includes anti-slip tread inserts that enhance safety and conceal screw heads for a clean look. Installation is straightforward, with direct mounting using appropriate hardware and optional sealing with silicone for added protection.

Were here to help 866-558-5706
Hrs: M-F 9am to 5pm EST
IS-TE-Series PRO Channels Tread and Floor Installation-US
TE-Series PRO Channels
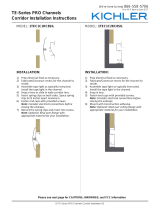
Tread and Floor Installation Instructions
MODEL: 1TEC4TRSF8SIL
MODEL: 1TEC1FLRC8SIL
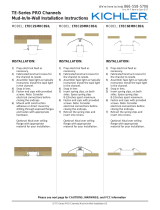
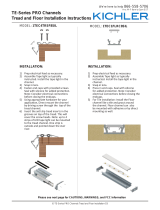
INSTALLATION:
1) Prep electrical feed as necessary.
2) Assemble Tape light as typically
instructed. Install the tape light in the
channel.
3) Snap in lens.
4) Fasten end caps with provided screws.
Seal with silicone for added protecon.
Note: Consider electrical connecons
before closing the endcaps.
5) Using appropriate hardware for your
applicaon, Direct mount the channel
by driving screw through the top of the
tread channel.
6) Insert the an slip tread inserts in the
grooves on top of the tread. This will
cover the screw heads. Note: up to 4
strips of LED tape light can be mounted
to the tread channel. One strip is
outside and pointed down the stair
riser.
INSTALLATION:
1) Prep electrical feed as necessary.
2) Assemble Tape light as typically
instructed. Install the tape light in the
channel.
3) Snap in lens.
4) Press in end caps. Seal with silicone
for added protecon. Note: Consider
electrical connecons before closing the
endcaps.
5) For Tile installaon: Install the Floor
channel like a le and grout around
the channel. Floor channel can also
be mounted with adhesive or by direct
mounng as well.
Please see next page for CAUTIONS, WARNINGS, and FCC Information
Were here to help 866-558-5706
Hrs: M-F 9am to 5pm EST
TE-Series PRO Channels
Cautions, Warnings, FCC
Please see previous page for channel installation instructions
CAUTIONS
CAUTION – RISK OF SHOCK –
Disconnect Power at the main
circuit breaker panel or main
fusebox before starting and
during the installation.
WARNING
• This xture is intended for
installation in accordance with the
National Electrical Code (NEC)
and all local code specications.
If you are not familiar with
code requirements, installation
by a certied electrician is
recommended.
• This lighting xture is suitable for
indoor use, dry or damp locations.
• The LED light output is strong
enough to injure human eyes.
Precautions must be taken to
prevent looking directly at the LED’s
with unaided eyes for more than a
few seconds.
• Supply leads and interconnects
are not listed for in-wall use. In-
wall rated wire may be purchased
separately. Read all instructions
thoroughly before starting
installation.
FCC Information:
This device complies with part 15 of
the FCC Rules. Operation is subject
to the following two conditions:
1. This device may not cause
harmful interference, and
2. This device must accept any
interference received, including
interference that may cause
undesired operation.
Note: This equipment has been
tested and found to comply with the
limits for a Class B digital device,
pursuant to part 15 of the FCC
Rules. These limits are designed
to provide reasonable protection
against harmful interference in
a residential installation. This
equipment generates, uses and
can radiate radio frequency energy
and, if not installed and used in
accordance with the instructions,
may cause harmful interference
to radio communications.
However, there is no guarantee
that interference will not occur
in a particular installation. If this
equipment does cause harmful
interference to radio or television
reception, which can be determined
by turning the equipment off and
on, the user is encouraged to try to
correct the interference by one or
more of the following measures:
• Reorient or relocate the receiving
antenna.
• Increase the separation between
the equipment and receiver.
• Connect the equipment into an
outlet on a circuit different from that
to which the receiver is connected.
• Consult the dealer or an
experienced radio/TV technician for
help.
IS-Instalación de Piso y Huella de Escalón de Canales TE-Series PRO-US
Canales TE-Serie PRO
Instrucciones de Instalación
MODELO: 1TEC4TRSF8SIL
Consulte la siguiente página para obtener información sobre PRECAUCIONES, ADVERTENCIAS, y FCC
Estamos aquí para ayudarle 866-558-5706
Horario: Lunes-Viernes 9am a 5pm EST (hora ocial del este)
De Canal De Piso Y Huella De Escalón
MODELO: 1TEC1FLRC8SIL
INSTALACIÓN:
1) Prepare el suministro eléctrico según sea
necesario.
2) Ensamble la ra de LED conforme a la
instalación pica. Instale la ra de LED en el
canal.
3) Encaje los focos
4) Ajuste las tapas laterales con los tornillos
proporcionados. Selle con silicona para mayor
protección. Nota: controle las conexiones
eléctricas antes de cerrar las tapas laterales.
5) Instale directamente el canal ulizando las
piezas metálicas apropiadas para su aplicación,
atornillando el tornillo a través de la parte
superior del canal de huella de escalón.
6) Inserte los accesorios andeslizantes de la
huella de escalón en las ranuras de la parte
superior de la huella de escalón. Esto cubrirá
las cabezas de los tornillos. Nota: pueden
instalarse hasta 4 ras de LED en el canal de
huella de escalón. Una ra se ubica por fuera
y se orienta hacia abajo de la contrahuella de
escalón.
INSTALACIÓN:
1) Prepare el suministro eléctrico según sea
necesario.
2) Ensamble la ra de LED conforme a la instalación
pica. Instale la ra de LED en el canal.
3) Encaje los focos
4) Paso 4: presione hasta cerrar las tapas laterales.
Selle con silicona para mayor protección. Nota:
controle las conexiones eléctricas antes de cerrar
las tapas laterales.
5) Para instalación de baldosas, instale el canal de
piso como si fuera una baldosa y rellene con
mezcla de cemento para juntas (grout) alrededor
del canal. El canal de piso también puede
instalarse con adhesivo o en forma directa.
Canales TE-Serie PRO
Precauciones, Advertencias, FCC
Consulte la página anterior para obtener instrucciones sobre instalación de canales.
PRECAUCIONES
¡PRECAUCIÓN! – RIESGO DE DESCARGA
ELÉCTRICA
Desconecte el suministro de energía
eléctrica desde el panel principal del
disyuntor o la caja principal de fusibles
antes de comenzar la instalación y durante
ella.
ADVERTENCIA:
• Este artefacto debe instalarse conforme
a las especicaciones del Código de
Electricidad Nacional (NEC) y todas las
especicaciones de los códigos locales. Si
usted no conoce los requisitos del código,
se recomienda contratar los servicios de
un electricista profesional para realizar la
instalación.
• Este artefacto de iluminación es para uso en
interiores, en lugares secos o húmedos.
• La intensidad de la luz de LED es lo
sucientemente fuerte como para dañar el ojo
humano. Deben tomarse precauciones para
evitar el contacto visual directo con las luces
de LED sin ningún tipo de protección durante
más de un par de segundos.
• Los cables y las interconexiones de
alimentación no están indicados para uso
en instalaciones embutidas en la pared. Los
cables para ese tipo de instalaciones pueden
comprarse por separado. Lea atentamente
todas las instrucciones antes de comenzar
con la instalación.
INFORMACIÓN DE LA FCC:
Este dispositivo cumple con la parte 15
de las Reglas de la FCC. La operación
es sujeto a las dos condiciones
siguientes:
1. Este dispositivo no puede causar
interferencia dañina, y
2. Este dispositivo debe aceptar
cualquier interferencia recibida,
incluyendo interferencias que puedan
causar un funcionamiento no deseado.
Nota: Este equipo ha sido probado
y cumple con los límites para un
dispositivo digital de Clase B, de
acuerdo con la parte 15 de las
Reglas de la FCC. Estos límites están
diseñados para proveer protección
razonable contra interferencias
dañinas en una instalación residencial.
Este equipo genera, utiliza y puede
irradiar energía de radiofrecuencia y,
si no se instala y utiliza de acuerdo
con las instrucciones, puede causar
interferencias en las comunicaciones
por radio. Sin embargo, no hay
garantizar que no se produzcan
interferencias en una instalación
en particular. Si este equipo causa
interferencia perjudicial a la recepción
de radio o televisión, que puede
determinarse encender y apagar el
equipo, se recomienda al usuario
que intente corregir la interferencia
mediante una o más de las siguientes
medidas:
• Reorientar o reubicar la antena
receptora.
Aumente la separación entre el
equipo y el receptor.
• Conecte el equipo a una toma de
corriente en un circuito distinto al que
está conectado el receptor.
• Consulte al distribuidor oa un técnico
de radio / TV experimentado para
obtener ayuda.
Estamos aquí para ayudarle 866-558-5706
Horario: Lunes-Viernes 9am a 5pm EST (hora ocial del este)
  • Page 1 1
  • Page 2 2
  • Page 3 3
  • Page 4 4

Kichler Lighting 1TEC4TRSF8SIL User manual

Type
User manual
This manual is also suitable for

Kichler Lighting 1TEC4TRSF8SIL is a versatile and durable TE-Series PRO Tread Channel designed for illuminating stairs and floors. It features a sleek silver finish, providing a modern aesthetic to any space. The channel can accommodate up to four strips of LED tape light, allowing for customized lighting intensity. It includes anti-slip tread inserts that enhance safety and conceal screw heads for a clean look. Installation is straightforward, with direct mounting using appropriate hardware and optional sealing with silicone for added protection.

Ask a question and I''ll find the answer in the document

Finding information in a document is now easier with AI