Page is loading ...

We’re here to help 866-558-5706
Hrs: M-F 9am to 5pm EST
IS-TE-Series PRO Channels Tread and Floor Installation-CB
TE-Series PRO Channels
Tread and Floor Installation Instructions
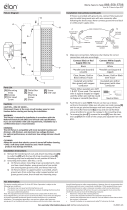
MODEL: 1TEC4TRSF8SIL
MODEL: 1TEC1FLRC8SIL
INSTALLATION:
1) Prep electrical feed as necessary.
2) Assemble Tape light as typically
instructed. Install the tape light in the
channel.
3) Snap in lens.
4) Fasten end caps with provided screws.
Seal with silicone for added protecon.
Note: Consider electrical connecons
before closing the endcaps.
5) Using appropriate hardware for your
applicaon, Direct mount the channel
by driving screw through the top of the
tread channel.
6) Insert the an slip tread inserts in the
grooves on top of the tread. This will
cover the screw heads. Note: up to 4
strips of LED tape light can be mounted
to the tread channel. One strip is
outside and pointed down the stair
riser.
INSTALLATION:
1) Prep electrical feed as necessary.
2) Assemble Tape light as typically
instructed. Install the tape light in the
channel.
3) Snap in lens.
4) Press in end caps. Seal with silicone
for added protecon. Note: Consider
electrical connecons before closing the
endcaps.
5) For Tile installaon: Install the Floor
channel like a le and grout around
the channel. Floor channel can also
be mounted with adhesive or by direct
mounng as well.
Please see next page for CAUTIONS, WARNINGS, and FCC Information

We’re here to help 866-558-5706
Hrs: M-F 9am to 5pm EST
TE-Series PRO Channels
Cautions, Warnings, FCC
Please see previous page for channel installation instructions
CAUTIONS
CAUTION – RISK OF SHOCK –
Disconnect Power at the main
circuit breaker panel or main
fusebox before starting and
during the installation.
WARNING
• This xture is intended for
installation in accordance with the
National Electrical Code (NEC)
and all local code specications.
If you are not familiar with
code requirements, installation
by a certied electrician is
recommended.
• This lighting xture is suitable for
indoor use, dry or damp locations.
• The LED light output is strong
enough to injure human eyes.
Precautions must be taken to
prevent looking directly at the LED’s
with unaided eyes for more than a
few seconds.
• Supply leads and interconnects
are not listed for in-wall use. In-
wall rated wire may be purchased
separately. Read all instructions
thoroughly before starting
installation.
FCC Information:
This device complies with part 15 of
the FCC Rules. Operation is subject
to the following two conditions:
1. This device may not cause
harmful interference, and
2. This device must accept any
interference received, including
interference that may cause
undesired operation.
Note: This equipment has been
tested and found to comply with the
limits for a Class B digital device,
pursuant to part 15 of the FCC
Rules. These limits are designed
to provide reasonable protection
against harmful interference in
a residential installation. This
equipment generates, uses and
can radiate radio frequency energy
and, if not installed and used in
accordance with the instructions,
may cause harmful interference
to radio communications.
However, there is no guarantee
that interference will not occur
in a particular installation. If this
equipment does cause harmful
interference to radio or television
reception, which can be determined
by turning the equipment off and
on, the user is encouraged to try to
correct the interference by one or
more of the following measures:
• Reorient or relocate the receiving
antenna.
• Increase the separation between
the equipment and receiver.
• Connect the equipment into an
outlet on a circuit different from that
to which the receiver is connected.
• Consult the dealer or an
experienced radio/TV technician for
help.

IS-Installation sur plan de marche et au sol avec canaux PRO de la série TE-CB
MODÈLE : 1TEC4TRSF8SIL MODÈLE : 1TEC1FLRC8SIL
INSTALLATION :
1) Préparez l’alimentaon électrique si
nécessaire.
2) Assemblez la bande éclairante selon
l’installaon type. Installez la bande éclairante
dans le canal.
3) Enclenchez la lenlle.
4) Fixez les capuchons avec les vis fournies.
Scellez avec du silicone pour une meilleure
protecon. Remarque : Pensez aux connexions
électriques avant de fermer les capuchons.
5) Avec le matériel approprié à votre applicaon,
montez directement le canal en serrant la vis
par le haut du canal du plan du canal.
6) Installez les inserts andérapants du plan dans
les rainures situées en haut du plan de marche
(cela permet de recouvrir les têtes de vis).
Remarque : Il est possible de monter jusqu’à
4 bandes éclairantes LED sur le plan du canal.
Une bande est à l’extérieur et dirigée vers le
bas de la contremarche d’escalier.
Veuillez consulter la page suivante pour les MISES EN GARDE, les AVERTISSEMENTS et
les informations de la FCC.
Nous sommes là pour vous aider 866-558-5706
Heures : du lundi au vendredi, de 9h à 17h (heure de l’Est)
Canaux PRO de la série TE
Instructions D’installation
Sur Plan De Marche Et Au Sol
INSTALLATIÓN :
1) Préparez l’alimentaon électrique si nécessaire.
2) Assemblez la bande éclairante selon l’installaon
type. Installez la bande éclairante dans le canal.
3) Enclenchez la lenlle.
4) Enfoncez les capuchons. Scellez avec du silicone
pour une meilleure protecon. Remarque : Pensez
aux connexions électriques avant de fermer les
capuchons.
5) Pour l’installaon avec carreaux, installez le canal
au sol comme un carreau et appliquez du coulis
autour du canal. Le canal au sol peut également
être monté avec un adhésif ou directement.

Canaux PRO de la série TE
Mises en garde, Avertissements, FCC
Nous sommes là pour vous aider 866-558-5706
Heures : du lundi au vendredi, de 9h à 17h (heure de l’Est)
Veuillez vous reporter à la page précédente pour les instructions d’installation du canal.
PRÉCAUTIONS
ATTENTION – RISQUE DE
DÉCHARGES ÉLECTRIQUES -
Couper le courant au niveau du
panneau du disjoncteur du
circuit principal ou de la boîte à
fusibles principale avant de
procéder à l’installation.
ATTENTION :
• Ce luminaire est prévu pour une
installation conformément au code
national d’électricité américain
(NEC) et tous les codes d’électricité
locaux en vigueur. Si vous n’êtes
pas familier avec les exigences
de ces codes, l’installation
par un électricien certié est
recommandée.
• Ce luminaire est approprié pour
une installation à l’intérieur, dans un
emplacement sec ou humide.
• L’éclairage DEL est sufsamment
puissant pour provoquer des
dommages à l’oeil humain.
Des précautions doivent être prises
pour éviter de garder directement
aux DEL sans assistance oculaire
pour plus de quelques secondes.
• Les câbles d’alimentation et
les interconnexions ne sont pas
répertoriés pour utilisation avec
encastrement dans le mur. Le l
approprié à installation dans le
mur peut être acheté séparément.
Prière de lire attentivement toutes
les instructions avant de procéder à
l’installation.
FCC Information :
Cet appareil est conforme à la section
15 de la réglementation de la FCC.
L’exploitation est soumise aux deux
conditions suivantes :
1. Cet équipement ne doit pas causer
d’interférences nuisibles, et
2. Cet équipement doit accepter toute
interférence reçue, y compris les
interférences risquant d’engendrer un
fonctionnement indésirable.
Remarque : Des tests ont conrmé
que ce matériel respecte les limites
d’un dispositif numérique de catégorie
B, en vertu de la section 15 de la
réglementation de la FCC. Ces
limites ont été conçues pour fournir
une protection raisonnable contre le
brouillage nuisible d’une installation
résidentielle. Cet équipement génère,
utilise et peut rayonner de l’énergie
radiofréquence et, s’il n’est pas
installé et utilisé selon les instructions,
peut causer de l’interférence
nuisible aux communications de
radio. Cependant, il est néanmoins
possible qu’il y ait de l’interférence
dans une installation en particulier. Si
cet équipement cause du brouillage
nuisible à la réception du signal de
radio ou de télévision, ce qui peut
être déterminé en éteignant puis en
rallumant l’appareil, l’usager peut
essayer de corriger l’interférence
en appliquant une des mesures
suivantes :
• Réorienter l’antenne de réception ou
changer son emplacement.
• Augmenter la distance séparant
l’équipement et le récepteur.
• Brancher le matériel dans la prise
de courant d’un circuit différent de
celui auquel le récepteur est branché.
• Consulter le revendeur ou un
technicien radio/télé d’expérience.
/