Premier 67374-7101 Installation guide
- Category
- Sanitary ware
- Type
- Installation guide

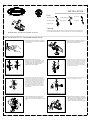
Shut off water supply at angle stop. Remove
old faucet. Clean sink surface in preparation
for new faucet.
Attach horizontal rod (1) to strap (2) using
clip (3). Insert lift rod (4) into strap and
tighten screw (5). Connect assembly to drain
(6).
Important: After installation is completed,
remove aerator. Turn on water supply and
allow both hot and cold water to run for at
least one minute each. While water is
running, check for leaks. Replace aerator.
6
2
5
1
4
3
3.
2.
1.
INSTALLATION STEPS: Two handle lavatory faucet
Cleaning:
To maintain and protect the fine luster of all products, clean with a soft, damp cloth
only. DO NOT USE detergents or cleansers as they may harm the protective finish.
INSTALLATION
Model Number: 120335LF & 120336LF & 110705
7.
8.
Place new faucet in position on sink. From
under sink, thread mounting nuts onto
faucet. Tighten mounting nuts.
Making the waterline connections:
Use 1/2 in. I.P.S. faucet connections (2, not
included), or use the coupling nuts (3, not
included) with a 3/8 in. O.D. ball-nose riser
(1, not included). Use wrenches when
tightening. Do not overtighten.
(A)
(B)
4
2
1
3
Brand Lavatory Faucets
Groove joint pliers
Plumber's putty
Tools:
Adjustable wrench
Basin wrench
Screwdriver
Thread sealant tape
Pipe wrench
11
4
6
7
8
3
9
5
1
2
10
Remove the stopper (1) and the flange (2). Screw
the brass nut (3) all the way down. Push the plastic
washer (4) and the gasket (5) down. Unscrew the
pivot nut (6) from the pop-up body (7) and remove
the seal washers (8). Take off the spring clip (9)
from the horizontal rod (10). Remove the tailpiece
(11) from the pop-up body (7).
4.
Install the horizontal rod (2) and the stopper (3) as
shown (4). Hand tighten the pivot nut (1).
Apply the silicone to the underside of the flange (2).
Insert the pop-up body (1) into the drain hole from
below sink. Screw the flange (2) into the pop-up body
(1). With the pivot hole (3) facing toward faucet, Use
groove joint pliers to tighten the nut (4), do not over
tighten. Do not turn the pop-up while tightening the
nut, or sealant may not seal drain. Clean excess
putty.
Apply thread sealant tape to the top threads of
the tailpiece (5) in a clockwise direction, as shown
and hand tighten.
3
1
5
4
2
4
3
2
1
5.
6.

120335LF & 120336LF & 110705
10
9
3
8
4
2
7
6
5
1
11
12
14
13
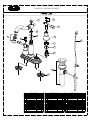
Brass Pop-Up
Lift Rod & Lift Knob
Mounting Nuts
Accessorize Head
Cartridge(C)
Cartridge(H)
11
O-Rings
13
14
12
8
Aerator
10
9
Washer
7
45
332
333
46
329
1
44
331
1
1
4
3
1
1
Washers
Bonnet Nuts
Handle Seats
Handle Assembly
Handle Screw & Screw Cap (H)
Handle Screw & Screw Cap (C)
PART DESCRIPTION
1
4
5
6
2
3
NO.
325 1
344
1
177
173
1
1
327
326
1
1
PART NO.
MODEL NO.110705
QTY.
PART DESCRIPTION
MODEL NO.120335
Handle Screw & Screw Cap (C)
Handle Screw & Screw Cap (H)
6
Washers
10
Washer
13
14
Lift Rod & Lift Knob
Brass Pop-Up
12
11
O-Rings
Mounting Nuts
8
Aerator
9
Accessorize Head
7
Cartridge(C)
Cartridge(H)
1
5
4
Handle Seats
Bonnet Nuts
2
3
Handle Assembly
NO.
177
1
1
1
1
124020
47
1
1
45
46
168
1
43
44
1
4
1
1
3
133
173
1
40
1
34
167 1
1
QTY.
PART NO.
1
177 6
Washers
1
Washer
10
14
13
Lift Rod & Lift Knob
Brass Pop-Up
12
O-Rings
11
Mounting Nuts
51
124011
46
45
Aerator
8
9
Accessorize Head
7
Cartridge(H)
Cartridge(C)
1
170
1
50
44
1
1
3
4
135 1
Handle Screw & Screw Cap (C)
Handle Screw & Screw Cap (H)
5
4
Handle Seats
Bonnet Nuts
3
2
Handle Assembly
1
173
1
49
1
1
36
171
MODEL NO.120336
PART DESCRIPTION
NO. QTY.
PART NO.
1
1
1
1 1
1
1
1
www.premierfaucet.com, [email protected]
-
 1
1
-
 2
2


Premier 67374-7101 Installation guide
- Category
- Sanitary ware
- Type
- Installation guide
Ask a question and I''ll find the answer in the document
Finding information in a document is now easier with AI
Related papers
-
Premier 284447 Installation guide
-
-
-
-
-
-
-
-
Premier 842L-2027 Installation guide
-
Other documents
-
Design House 523290 User manual
-
-
-
-
-
-
-
-
-
ANZZI L-AZ006 Installation guide