Cannon mini®AV Quick start guide

Type
Quick start guide

This manual is also suitable for

Cannon mini®AV is a fully automated, single-sample, benchtop viscometer that helps determine the kinematic viscosity of asphalts. It offers AASHTO T201, ASTM D2170, ASTM D445/D446, ISO 3104/3105, IP 71 method precision. Its common applications include asphalt binders, asphalt cements, and asphalt cutbacks. The Cannon mini®AV automated viscometer features a temperature range of 15 °C to 100 °C with an accuracy of ±0.01 °C, a viscosity range of 0.5 mm²/s (cSt) to 10,000 mm²/s (cSt), and a maximum throughput of 12 tests per hour.

Cannon mini®AV is a fully automated, single-sample, benchtop viscometer that helps determine the kinematic viscosity of asphalts. It offers AASHTO T201, ASTM D2170, ASTM D445/D446, ISO 3104/3105, IP 71 method precision. Its common applications include asphalt binders, asphalt cements, and asphalt cutbacks. The Cannon mini®AV automated viscometer features a temperature range of 15 °C to 100 °C with an accuracy of ±0.01 °C, a viscosity range of 0.5 mm²/s (cSt) to 10,000 mm²/s (cSt), and a maximum throughput of 12 tests per hour.

Cannon Instrument Company | miniAV Quick Start Guide
1
MiniAV Series Quick Start Guide
Introduction:
Thank you for purchasing the miniAV series automated viscometer. The popular CANNON minAV
family includes the miniAV, the miniAV-HT and the miniAV-X. This quick reference is intended to
provide the operator with key information on setting up and operating all three of the miniAV
series instruments.
Function
Specifications/Installation
Calibrating
Cable Installation
Running a Sample
Function
miniAV-HT Function
The miniAV-HT is a fully automated, single-sample, benchtop viscometer for determining the kinematic viscosity of
asphalts at 60 °C and 135 °C. The Ubbelohde-style tube covers a 100-fold viscosity range at values between 0.5 mm²/s
(cSt) and 10,000 mm²/s (cSt). The miniAV-HT offers AASHTO T201, ASTM D2170, ASTM D445/D446, ISO 3104/3105, IP
71 method precision. Common applications include asphalt binders, asphalt cements and asphalt cutbacks.
miniAV Function
The miniAV is a fully automated, single-sample, benchtop viscometer for D445 testing. The Ubbelohde-style tube
covers a 100-fold viscosity range at values between 0.5 mm²/s (cSt) and 10,000 mm²/s (cSt) from 15 °C to 100 °C (with
available options). Meets ASTM D446/ISO 3105 requirements.
miniAV-X Function
miniAV®-X is a fully automated, single-bath, benchtop viscometer with a 10-position sample handler for unattended
D445 processing. The Ubbelohde-style tube covers a 100-fold viscosity range between 0.5 mm²/s (cSt) and
6,000 mm²/s (cSt) from 15 °C to 100 °C (with available TE cooler).
miniAV Series Apparatus
The miniAV series test apparatus consists of the same three major units: the Bath Unit, the external Power Supply, and
the Waste Receiver as shown in Figure 1.
miniAV Series Quick Start Guide
2
Cannon Instrument Company | 2139 High Tech Road | State College | PA | 16803 | USA | 814-353-8000 | 800-676-6232
Figure 1: miniAV Series Components, assembled
miniAV Specifications:
Instrument Specifications
Dimensions
(W x D x H)
Unit: 25.4 cm x 30.5 x 59.8 cm (10 in x 12.0 in x 23.5 in)
Power Supply: 33 cm x 39.6 cm x 17.2 cm (13 in x 15.6 in x 6.8 in)
Waste Receiver: 33 cm x 39.6 cm x 17.2 cm (13 in x 15.6 in x 6.8 in)
Weight
Unit: 12.5 kg (27.5 lb)
Power Supply: 11 kg (24 lb)
Waste Receiver: 6 kg (13 lb)
Shipping Weight
64 kg (140 lb)
Data Output
RS-232 via DB-9 connector
Temperature Range and Accuracy
15 °C to 100 °C ± 0.01 °C*
*temperatures within 5 °C of ambient and below require bath cooling
Viscosity Range
0.5 mm
2
/s (cSt) to 6,000 mm
2
/sec (cSt) in 100-fold increments (depending on
viscometer tube selection). Fast-run tubes also available.
Maximum Throughput
12 tests per hour
Automated sample capacity
1
Minimum Sample/solvent volume
5 mL sample*/15 mL solvent per test
*as little as 3 mL with fast run tubes
Operating Conditions
15 °C to 30 °C, 10% to 75% relative humidity (non-condensing), Installation
Category II, Pollution Degree 2
Electrical Specifications
100 VAC; 50/60 Hz; 115 VAC, 50/60 Hz; 230 VAC, 50/60 Hz; 1,000 watt power
consumption
Compliance
CE Mark; EMC Directive 2004/108/EC); Low voltage directive (2006/95/EC);
HI-POT (1900 VDC, 60 sec.); ROHS
Power Supply
Bath Unit
Waste Receiver
Solvent Vessel
Cannon Instrument Company® | miniAV Quick Start Guide
3
Installation
The miniAV series setup can be accomplished in just a few minutes by following the instructions in the installation
guide provided with the instrument. Please refer to your instrument instruction manual and the diagram at the end of
this document, Figure 4.
Note: Once the instrument and VISCPRO II are successfully installed, a calibration
must be performed at the wash temperature and each temperature at which the
user wishes to run samples.
Preparing the miniAV Series for Testing
Calibrate the miniAV Instrument
Temperature calibration is essential for the proper operation of the miniAV after installation. The calibration process
consists of sending a temperature and its offset to the instrument, then waiting for the temperature to equilibrate.
Equilibration is complete when the instrument stays within 0.02 °C for 150 seconds. To calibrate temperature on the
miniAV series, follow the instructions below.
Note: It is necessary to log in as a manager to complete the calibration.
1. Click Configure from the primary display and select Instrument Settings from the Configure options for the
desired instrument.
2. Click Tray Settings: Tube and Bath option.
3. Enter the temperature you wish to calibrate in the Bath Temp input box and then press OK to save new target
temperature.
4. Click Service from the primary display and select your desired instrument.
5. Click Temperature Calibration option. The Temperature Calibration Data window will open.
Note: The value in the Calibration Temperature box should display the
temperature the user selected in the tray settings.
6. Place your reference thermometer inside the bath.
7. Wait for the machine to equilibrate at the desired temperature.
8. Enter the current temperature reading to the nearest 0.01 °C from the reference thermometer into the Reference
Temperature display window as shown in Figure 2.
Figure 2: Reference Temperature Window
4
Cannon Instrument Company | 2139 High Tech Road | State College | PA | 16803 | USA | 814-353-8000 | 800-676-6232
9. Click the Apply as Current Offset option button (always click the radio button for the Apply as Current Offset
unless directed otherwise by a CANNON service engineer).
10. Click the Calibrate button and wait for the machine equilibrate using the offset.
11. Repeat this entire process for each temperature at which the user wishes to run samples.
Occasionally a temperature may require several calibrations in order to get an accurate calibration. The General Bath
Offset is a factory-preset value affecting temperature control at all temperatures and should not be changed.
Once all desired running temperatures have been calibrated, the user must train the tube sensors at each of these
temperatures.
Train the Tube Sensors
MiniAV series tube sensors must be trained in order for the instrument to properly perform test functions. To train the
miniAV series sensors, follow the instructions below.
Note: Depending on the security level settings, it may be necessary for you to log
in as a manager to complete the calibration.
1. To train tube sensors, click Service from the primary display and select the Train Tube Sensors option for the
desired instrument. This opens the Train Tube Sensors window as shown in Figure 3.
Figure 3: Train Tube Sensors Window
2. Wait for the machine to equilibrate at the desired temperature.
3. Click the Train at Wash Temperature checkbox if wash temperature training is desired.
Select the desired training parameters as follows:
Prewash: Click the Prewash option if the tube is not clean and dry. VISCPRO will initiate a cleaning cycle using
current wash configuration settings prior to initiating the sensor training procedure.
Note: The instruction panel will instruct you to insert an empty vial in order to
perform the prewash.
4. Raise the empty vial to enable the Start button. Or, for the miniAV-X, place in position 2.
5. Click the Start button.
After the prewash is complete, the instrument will then obtain the voltages for each sensor at each of the specified
temperatures.
The instruction panel will then instruct you to insert a vial containing an oil with a viscosity three times the lower limit
of the tube and raise it into the ready position for determining trip points.
Once all voltages and trip points have been obtained for all desired temperatures, the tube sensors have been trained.
Cannon Instrument Company® | miniAV Quick Start Guide
5
Cable & Tubing Installation Back of miniAV Series
The back cable/piping installation of the miniAV series is outlined in the diagram Figure 4.
Figure 4: miniAV Cable & Tubing Installation Guide
A = 6 mm transparent tubing
B = 1/8” transparent tubing
Running a Sample
1. If the miniAV instrument is powered off, ensure MAINS power cable is plugged in and turn the instrument on by
switching the power switch on the front of the power supply to the ON position.
2. Turn on the computer and load the VISCPRO software by clicking the desktop icon.
a. If the software is already open, click Main from the menu bar and click Poll for Instruments from the Main
Menu bar. This establishes connection between the computer and instrument.
b. Permit the bath to stabilize at test temperature before testing samples.
miniAV
Instrument
Waste
Receiver
Power Supply
Solvent
Vessel
6
Cannon Instrument Company | 2139 High Tech Road | State College | PA | 16803 | USA | 814-353-8000 | 800-676-6232
3. Pour sample material into the glass vial(s). For 20 mL vials, fill only half full, as the viscometer tube will displace
sample in the vial. Approximately 10 mL of sample should be sufficient for testing in either bulb of the viscometer.
Caution: Do not overfill the sample vials as sample overflow may create
problems for the tube cleaning cycle.
4. Place the sample vial in the holder underneath the viscometer tube.
5. Raise the holder until the magnetic coupling engages. The viscometer tube tip will be touching the bottom of the
sample vial. Refer to Figure 5.
Figure 5: Raised Sample Vial
6. Check the thermometer in the temperature bath to make sure the bath is holding the proper temperature. If
necessary, calibrate the miniAV temperature control probe using the temperature calibration procedure in
Chapter 3 of the Operator’s Manual.
7. Open the View Instrument Group window (if it is not already open) by clicking View Instrument from the Main
menu and selecting the desired instrument group from the list box. Refer to Figure 6.
Figure 6: View Instrument Group Window
8. Select the desired Group Id and Click OK to display the Sample Input View as shown in Figure 7. Then click the
tray corresponding to the desired miniAV.
Figure 7: Sample Input Window
9. Double-click on Sample ID (1) with the left mouse button to access the sample ID data entry field (or press 2).
Cannon Instrument Company® | miniAV Quick Start Guide
7
10. Enter sample ID information in the sample list box using your computer keyboard. After you have typed the
sample ID, press the Tab key to complete the entry and move the cursor to the next Sample ID field. Or press Enter
to complete the entry.
Once sample information is entered, the software automatically assigns a sample action, Measure Sample Viscosity,
for the sample. If you do not enter a sample ID, the sample is automatically labeled Unknown.
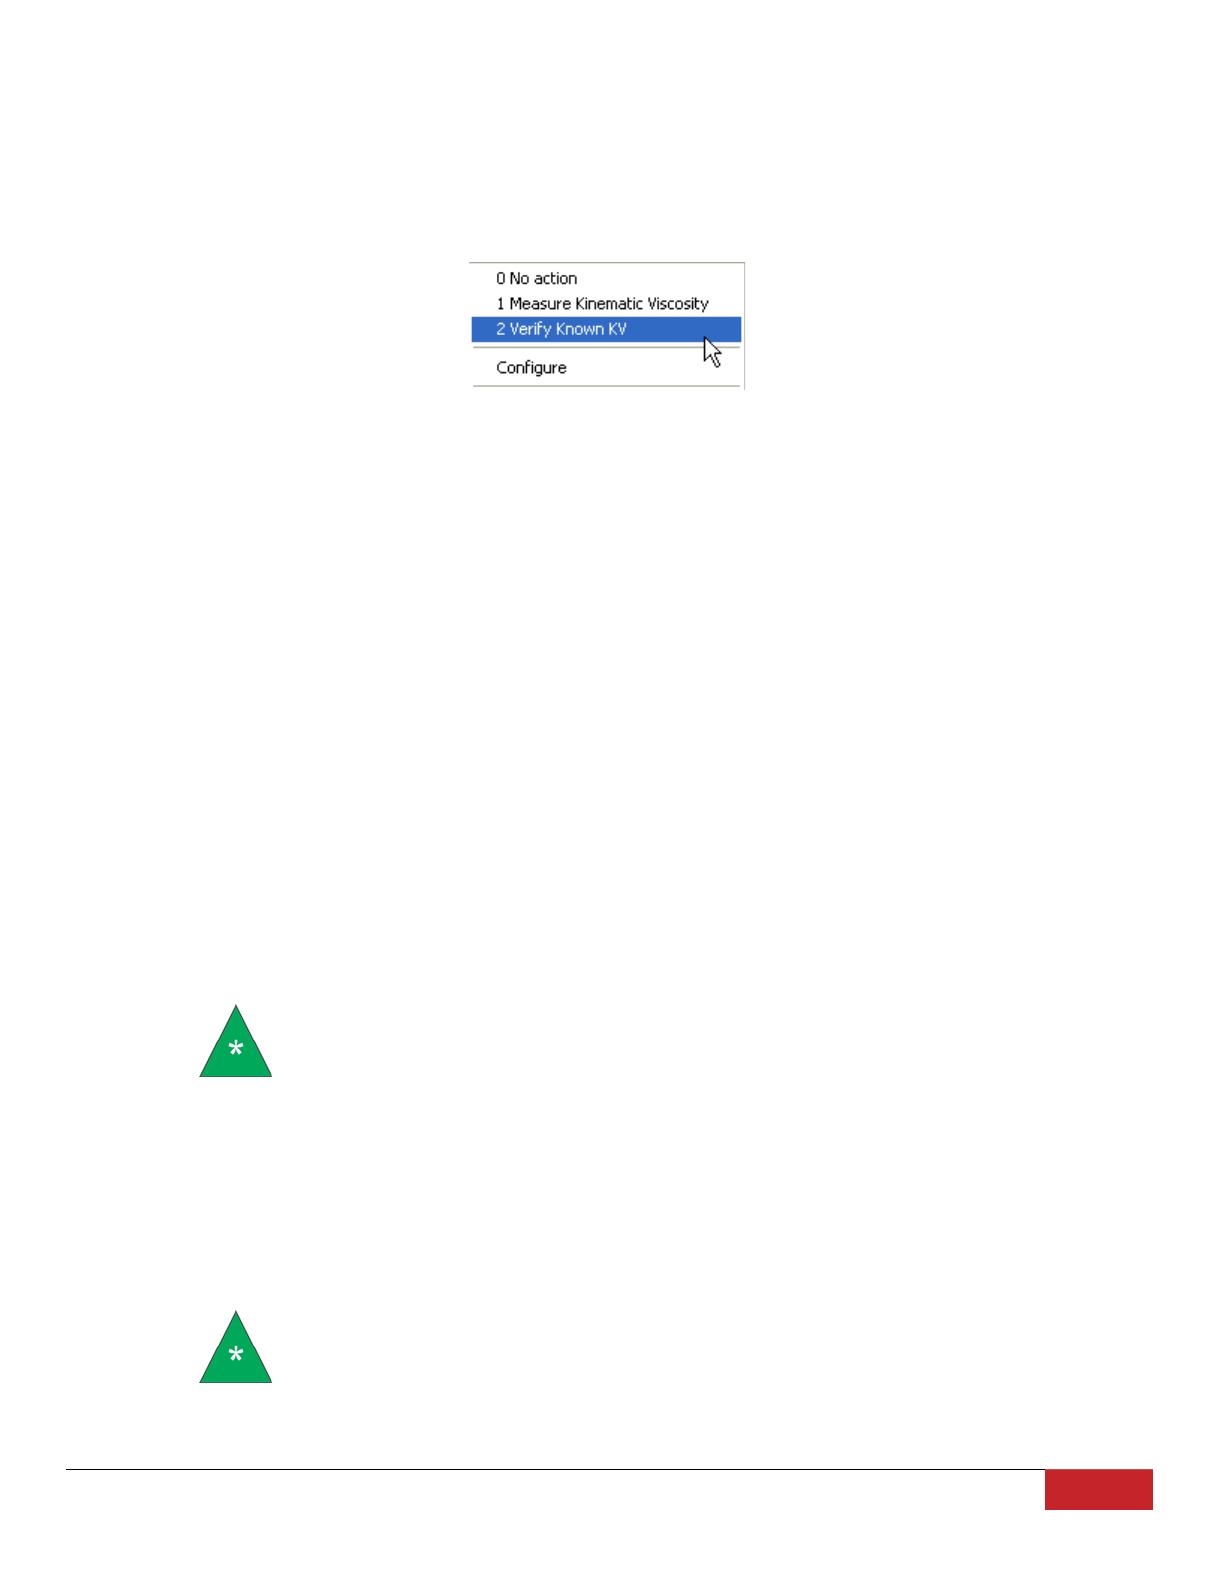
To select or change a sample action, highlight the appropriate Sample ID(s) using the mouse or arrow keys, then click
the RIGHT mouse button to access sample action options as shown in Figure 8.
Figure 8: Sample Actions
Select the desired action by highlighting it with the mouse and clicking the left mouse button.
If Verify Known KV
is selected as the test option for a sample, the Viscosity Action window will open automatically.
Enter the necessary check standard data, including the Check Standard viscosity from the standard bottle, and click
OK to complete data entry. To revise or confirm standard data, right-click on the desired sample ID from the list box
and select Configure from the popup menu choices.
11. Continue entering sample information for all desired trays. When sample ID data entry is complete, check the Tray
Status window to verify all trays are ready for testing.
12. Click on the Run button at the bottom of the Sample Input window. The Select Trays window will open if more
than one miniAV instrument is online.
13. If necessary, click on the check box(es) to select the desired prepared “tray” (sample sequence) for automatic
testing. For the miniAV, a tray corresponds to the miniAV instrument. Then click OK to begin the miniAV test(s).
Pause a Test
To temporarily halt testing for a given tube/sample, click the Pause button from the Sample Input window. Then
select the desired tray (miniAV instrument) and pause action(s) from the Select Trays window (Pause Now will
immediately pause test actions; Pause after current sample will pause testing after the current test is complete). Click
OK to pause testing for the selected tray(s).
Note: If the test was paused prior to the initiation of the Wash cycle, drop time
data for that sample will be discarded.
Resume a Test
To resume test actions for paused trays, click the Resume button from the Sample Input window. Then select the
desired trays from the Select Trays window. Click OK to resume sample testing.
Abort a Test
To permanently halt testing for a given tube/tray, click the Abort button from the Sample Input window. Then select
the desired trays from the Select Trays window. Click OK to abort testing for the selected tray.
Note: Aborting a test clears all sample test information for that tray. If test
actions are aborted, it is the responsibility of the user to restore the instrument
to a safe state before running tests.
Conclude a Test
8
Cannon Instrument Company | 2139 High Tech Road | State College | PA | 16803 | USA | 814-353-8000 | 800-676-6232
After the automatic testing has completed, make certain that:
1. The sample vial carrier is in the lowered position.
Warning: Use appropriate caution when handling warm sample vials to avoid the
possibility of injuries and burns.
2. The Machine Status (as indicated in the VISCPRO Sample Input Machine Status window), is Ready.
3. The Tray Status for the tube, as indicated in the VISCPRO Sample Input Tray Status window, is Idle. Kinematic
viscosity for any tested samples will be displayed in the Sample Action column in the action list for the selected
tube.
4. Press Resume to clear data and begin testing the next sample as shown in Figure 9.
Figure 9: Next Sample
  • Page 1 1
  • Page 2 2
  • Page 3 3
  • Page 4 4
  • Page 5 5
  • Page 6 6
  • Page 7 7
  • Page 8 8

Cannon mini®AV Quick start guide

Type
Quick start guide
This manual is also suitable for

Cannon mini®AV is a fully automated, single-sample, benchtop viscometer that helps determine the kinematic viscosity of asphalts. It offers AASHTO T201, ASTM D2170, ASTM D445/D446, ISO 3104/3105, IP 71 method precision. Its common applications include asphalt binders, asphalt cements, and asphalt cutbacks. The Cannon mini®AV automated viscometer features a temperature range of 15 °C to 100 °C with an accuracy of ±0.01 °C, a viscosity range of 0.5 mm²/s (cSt) to 10,000 mm²/s (cSt), and a maximum throughput of 12 tests per hour.

Ask a question and I''ll find the answer in the document

Finding information in a document is now easier with AI