Page is loading ...

HEAVY DUTY METAL BENDER
INS TRUCTIONS
© Copyright 2017 Easthill Group, Inc. 3/17 Instruction Item #28135Q Rev. 1
If you have any questions about the use of this product, please contact
The Eastwood Technical Assistance Service Department: 800.343.9353 >> email: techelp@eastwood.com
PDF version of this manual is available online >> eastwood.com/28135manual
The Eastwood Company 263 Shoemaker Road, Pottstown, PA 19464, USA
US and Canada: 800.343.9353 Outside US: 610.718.8335
Fax: 610.323.6268 eastwood.com
Item #28135
OPTIONAL METALWORKING ITEMS:
51088 - Shrinker/Stretcher Set
13475 - Eastwood Electric Metal Shears
11797 - Throatless Shear
14042 - Versa Bend Sheet Metal Brake
20254 – Eastwood 24" Slip Roll

MAKING “U” BOLTS AND ANCHOR BOLTS
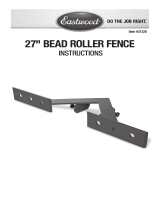
Following the next steps will allow a 12" Anchor Bolt from a 14-1/4" blank (Fig 18).
As with all bending, shorter or longer Anchor Bolts can be made by varying the length of the blank. Use a
scrap piece to experiment with length and placement of bends. First determine if you are creating an Anchor
Bolt or a “U” Bolt then plan material length and positioning accordingly.
1. Install the 1" Die at the Center Pivot Point around the 15mm x 120mm Long Hitch Pin [G].
2. Using the 15mm x 95mm Short Hitch Pin [H], place the 2" Die in the Handle/Die Receiver 2nd hole.
3. Using a Long Hitch Pin, set the Square Stop Block into place in either position “B” or “D” (Fig 19).
NOTE: Position “B” for 3/8" or 1/2" bolts or “D” for 5/8" bolts.
4. Place the workpiece into the Bender so that the unthreaded end extends sufficiently beyond the
Square Stop Block – 1/2" for 3/8" bolts, 5/8" for 1/2" bolts and 1/4" for 5/8" bolts.
5. Rotate the Handle/Die Receiver until a 90° bend is achieved.
6. Remove and re-position workpiece then reposition and follow above steps for creating a “U” Bolt (Fig 20).
2 Eastwood Technical Assistance: 800.343.9353 >> techelp@eastwood.com To order parts and supplies: 800.343.9353 >> eastwood.com 11
The Eastwood Heavy Duty Metal Bender is a high quality, industrial style tool capable of generating a powerful leveraged force to create 180° or greater
repeatable bends in mild steel and aluminum up to 2" wide.
CONTENTS
COMPONENTS
• (1) Base/Stand [A]
• (1) Ring Assembly/Die Receiver [B]
• (3) Mounting Spacers [C]
• (1) Ring Assembly Spacer [D]
• (1) Handle/Die Receiver [E]
• (1) Handle Extension [F]
• (2) Long 15mm x 120mm Hitch Pins [G]
• (1) Short 15mm x 95mm Hitch Pin [H]
• (1) 6mm x 40mm Handle Hitch Pin [J]
• (1) Pin Clip [K]
• (1) Stop Support Pin [L]
• (1) Square Stop Block [M]
• (1) Right Angle Bending Attachment [N]
• (1) Stationary Stop [P]
• (1) Adjustable Stop Loop [Q]
• (1) 1" Die [R]
• (1) 1-1/4" Die [S]
• (2) 1-1/2" Dies [T]
• (1) 1-3/4" Die [U]
• (1) 2" Die [V]
• (1) 2-1/2" Die [W]
• (1) 3" Die [X]
HARDWARE
• (2) M10 x 35mm Countersunk Phillips Head Screws
• (1) M10 x 120mm Hex Bolt
• (1) M10 x 30mm Hex Bolt
• (4) M10 Nuts
• (4) M10 Washers
• (3) M10 Lock Washers
SPECIFICATIONS
Maximum Material Width: 2"
Maximum Material Thickness: 5/16" for 1-1/4" wide mild steel or 1/4" for 2" wide mild steel
Maximum Round Stock Diameter: 5/8"
Maximum Square Stock: 5/8"
Maximum Handle Length: 44"
FIG. 18
Square Stop
Block Orientation
FIG. 20
✓
Step Block
Measurement
Center Pin
Die
Work Piece
Handle Die/
Receiver Die
✓
✓
✓
✓
✓
FIG. 19
1" Die
2" Die
✓
✓
STORAGE
• Apply a thin film of light oil or rust-preventive to all bare steel areas.
• Store in a clean, dust-free, dry, dampness free area preferably covered with plastic sheeting.
MAINTENANCE
NOTE: Maintenance should be performed before each use
• Clean dirt and debris from all pivot points.
• Check tightness of all hardware.
• Check operation for binding. Lubricate moving parts periodically with medium bodied chassis grease.

DANGER indicates a hazardous situation which, if not avoided, will result in death or serious injury.
WARNING indicates a hazardous situation which, if not avoided, could result in death or serious injury.
CAUTION used with the safety alert symbol, indicates a hazardous situation which, if not avoided, could result in minor or moderate injury.
NOTICE is used to address practices not related to personal injury.
SAFETY INFORMATION
The following explanations are displayed in this manual, on the labeling, and on all other information provided with this product:
10 Eastwood Technical Assistance: 800.343.9353 >> techelp@eastwood.com To order parts and supplies: 800.343.9353 >> eastwood.com 3
Excessive resistance while operating could indicate a defect with the workpiece material or broken or damaged Metal Bender
components. To avoid injury, stop work immediately and inspect workpiece material for nicks, dents, welds, excessive scale or
remaining coatings. Clean or repair as necessary or discard and begin with a new piece. Also inspect Metal Bender components for
looseness or damage.
PINCH AND CRUSH HAZARD!
• This tool has leveraged rotating components that generate greatly amplified crushing and bending forces which can quickly cause
severe injury! Keep fingers and hands away from moving parts when operating.
INJURY HAZARD!
• Tremendous external torque loads are placed on this Metal Bender during operation. This tool cannot be operated without adequate support
or severe personal injury or property damage can occur if it should suddenly become dislodged or moves while in use. Before beginning ANY
work with this tool, it is absolutely necessary that it be securely bolted to a solid, level floor surface.
FALL HAZARD!
• Strenuous physical force may need to be applied to the Metal Bender during use. Failure to ensure proper footing can quickly result in a
fall which could inflict serious personal injury or property damage. Always work in a clean, uncluttered environment.
• Be sure there is sufficient working room around the tool to allow for safe handling of various lengths of tubing.
INJURY HAZARD!
• The Eastwood Metal Bender is equipped with an Extension Handle for added bending force. DO NOT add pipe, bars or any other de-
vices which would add additional length to the Handle to increase bending force. This will exceed the design limits of the tool and can
result in serious injury and/or component failure.
CUT HAZARD!
• Handling sharp metal can cause serious cuts. Wear thick, well-fitting work gloves to prevent cuts from handling sharp metal.
EYE INJURY HAZARD!
• Pieces of mill scale, rust and other debris may be ejected from the workpiece during operation. Wear ANSI approved eye protection
while operating.
SAFETY INFORMATION
MAKE HANDLES FROM FLAT STOCK
To make handles using flat stock, the Right Angle Bending Attachment [N] is used (Fig 13).
Use a 10” section of 3/16" thick x 1" wide, hot rolled flat stock.
1. Install the Right Angle Bending Attachment [N] into the Ring Assembly/
Die Receiver [B].
2. Mark the material where the bends will be (Fig 14). Place the workpiece into the
bender to the 1st mark. Bend to 90°.
3. It may be helpful to set up the Bender with the Adjustable Stop to make accurate
repeated bends (Fig 15).
4. Remove and place the opposite end of the workpiece in the Bender. Insert to the
2nd mark and make a 90° bend (Fig 15).
5. Reverse the workpiece and make the 3rd bend at the 3rd mark. Repeat for
opposite end and make the 4th bend at the 4th mark (Fig 15).
6. Remove any sharp edges or rough areas by grinding or sanding.
MAKING TUBE CLAMPS
The following steps will allow the creation of a 1" inner diameter tube clamp using hot
rolled flat stock 4-1/2" long x 3/16" thick x 1" wide (Fig 16).
1. Install the 1" Die at the Center Pivot Point around
the 15mm x 120mm Long Hitch Pin [G].
2. Using the 15mm x 95mm Short Hitch Pin [H],
place the 1-1/2" Die in the Handle/Die Receiver
2nd hole.
3. Set the Square Stop Block [M] into the 1st hole
on the Ring Assembly/Die Receiver. Orient it in
position “B” as in (Fig 17).
4. Insert the workpiece in the Bender so that it
extends 1-3/4" beyond the center point. Secure
the workpiece into position against the Square
Stop Block with a clamp or Vice Grip type locking
pliers (Fig 17).
5. Bend the workpiece past 180° until the Die on the
Handle/Die Receiver slides of the end (Fig 17).
6. Remove the Square Stop Block and the Die. Install
the Right Angle Bend Attachment (Fig 17).
7. With the workpiece tight against the Long Hitch
Pin as close to center a s possible, make a right
angle bend (Fig 17).
FIG. 13
FIG. 14
FIG. 15
FIG. 16 FIG. 17
B.
Orientation

4 Eastwood Technical Assistance: 800.343.9353 >> techelp@eastwood.com To order parts and supplies: 800.343.9353 >> eastwood.com 9
SETUP
• Select an area for permanent location of the Eastwood Metal Bender. Allow a minimum of 4' of working area around the tool to allow for proper handle
swing and operator space.
• With the four 9/16" (14 mm) holes in the Baseplate of the Base/Stand [A], as a guide, mark the locations and centers with a pencil.
• Select appropriate concrete anchors (Not Included) or lag bolts (Not Included) and drill four proper sized mounting holes in work surface.
• Using appropriate hardware, mount the baseplate to work surface.
MOUNTING BENDER TO STAND
• Place the three Mounting Spacers [C] over the three holes in
the Triangular Flange at the top of the Base/Stand [A].
• Set the Ring Assembly/Die Receiver [B] over the three
Mounting Spacers [C] so that two of the holes of the Ring
Assembly/Die Receiver align with two of the Mounting
Spacers [C].
• Insert two M10 x 35mm Countersunk Phillips Head Screws
through the Ring Assembly/Die Receiver [B], Mounting
Spacers [C], and Triangular Base, then secure with 2 M10
Nuts and Washers (Fig 1).
• Set the Ring Assembly Spacer [D] in the “U” of and aligned
with the rearmost holes of the Ring Assembly/Die Receiver
(Fig 1).
• Insert the M10 x 120mm Hex Bolt through the Ring
Assembly/Die Receiver [B], Ring Assembly Spacer [D],
Mounting Spacer [C], and Triangular Base, then secure with
an M10 Nut and Washer (Fig 1).
Tremendous external torque loads are placed on this Metal Bender during operation. This tool cannot be operated
without adequate support or severe personal injury or property damage can occur if it should suddenly be become dislodged or
moves while in use. Before beginning ANY work with this tool, it is absolutely necessary that it be securely bolted to a solid, level,
well supported floor surface capable of withstanding the tremendous torque and side loads this tool is subjected to during use.
A minimum thickness of 2” concrete or 1” of a wood-based surface is strongly recommended.
The Eastwood Metal Bender consists of moderately heavy metal components which can present a hand/finger pinch
hazard and cause potentially serious injuries if dropped on feet. Avoid pinching hands while handling parts during assembly and
wear thick, well-fitting work gloves to prevent cuts from handling sharp metal. The use of safety shoes is strongly recommended.
FIG. 1
✓
A.
✓
B.
✓
C.
✓
C.
D.
✓
✓
STATIONARY STOP
• Test and decide the degree and distance of Handle rotation required to
make the desired bend.
• Remove and place the Stationary Stop [P] into the next hole (Clockwise)
after the initial rotation is completed (Fig 10).
ADJUSTABLE STOP LOOP
The Adjustable Stop Loop
[Q]
is used where a finer adjustment is needed.
The Adjustable Stop Loop allows for more precise stops as it can be adjusted
whereas the Stationary Stop [P] is simply placed into a hole on the Ring (Fig 10).
• Test and decide the degree and distance of Handle rotation required to make
the desired bend.
• Place the Adjustable Stop Loop [Q] directly at the point where
rotation of the Handle is to end. Insert the M10 x 30mm Hex
Bolt through an M10 Washer to hold
the Adjustable Stop Loop [Q] in place. Add additional M10 Washer and M10 Nut then tighten securely (Fig 10).
• Try a test bend and adjust the Adjustable Stop Loop [Q] as necessary to obtain a precise bend.
NOTE: At this point, the basic operating instructions have been described and practice using the Eastwood Metal Bender on scrap material is highly
recommended. As with many metal working tools, a period of “trial and error” is needed to achieve a degree of proficiency in their use. Remember, a little time
and material used at this step will avoid disappointing results on an actual project.
After becoming familiar with the Eastwood Metal Bender, a number of sample projects are presented on the following pages to increase proficiency and provide
project ideas.
FIG. 10
✓
✓
M10 Washer
Adjustable
Stop
✓
D.
M10 Nut
M10 Washer
M10 x 35mm
Q.
P.
Stationary
Stop
SAMPLE PROJECTS
MAKE HANDLES FROM ROUND STOCK
To make handles using round stock, the Square Stop Block [M] is used (Fig 11).
Use a 10" section of 5/8" round stock and two pieces of flat stock for the flanges. The
measurements provided are general guides only. Actual measurements should be adjusted per
individual preferences & requirements. If using another stock size, some experimentation is required
to find the best points for each bend.
1. Set the Square Stop Block [M] in orientation “D”, into the Ring Assembly/Die Receiver [B].
2. With the Handle in the normal position, place the 1" Die on the Center Pin. Place the 2"
Die in the Handle/Die Receiver 2nd hole (Fig 12a). Insert the round stock so that the end
extends 2" down past the 1" Die (Fig 12b). Make the first bend at 90°.
3. Remove the round stock from its original position. Place the opposite
end into the Metal Bender in the same way as the 1st bend. Both ends
must be bent in the same direction. Make the 2nd bend at 90°. Remove
piece from the Bender (Fig 12b)
4. Determine how the round stock should mate with the flat stock flanges.
Drill 5/8" holes into the flanges at the desired position. Insert the bent
ends of the round stock into the holes.
5. Weld the round stock handles into the flat stock flanges. Grind away any
excess material to allow the handle flanges to lay flat.
FIG. 11
FIG. 12B
FIG. 12A
✓
D.
Orientation
1"Die
2"Die
✓
✓
✓
✓
2"
THE STATIONARY STOP AND ADJUSTABLE STOP LOOP
• Many projects on the Metal Bender will require repeated bends of the same type and angle. In these instances, using the Adjustable Stop Loop [Q] or the
Stationary Stop [P] will save time and provide precisely the same bends (Fig. 10).
• Adjust the Stationary Stop [P] or Adjustable Stop Loop [Q] with a piece of scrap material prior to using your actual workpiece. This will assure accuracy and aid
in obtaining ideal placement of the selected Stop [P or Q].

8 Eastwood Technical Assistance: 800.343.9353 >> techelp@eastwood.com To order parts and supplies: 800.343.9353 >> eastwood.com 5
BENDER ASSEMBLY
• Place the Handle/Die Receiver [E] “U” inside the larger “U” of the Ring Assembly/Die Receiver [B] and secure it in place by inserting a Long 15mm x
120mm Hitch Pin [G].
• Slide the tubular Handle Extension with rubber grip [F] into the larger diameter tubular section of the Handle/Die Receiver [E]. NOTE that there are two
sets of holes. For normal use, align the outermost hole of the Handle Extension [F] with the holes in the Handle/Die Receiver [E] then place the 6mm x
40mm Hitch Pin [J] through the holes and secure with the Pin Clip [K]. For projects requiring more leverage, remove the Pin Clip and Hitch Pin, extend the
Handle, re-align the holes and reinstall the Pin Clip and Hitch Pin.
• The Eastwood Metal Bender is now ready for use.
FIG. 2
✓
✓
E
✓
G.
Hitch Pin
✓
J.
Handle
Hitch Pin
B.
Ring Assembly/
Die Receiver
Handle/Die
Receiver
K.
Pin Clip
F.
Handle
Extension
✓
✓
✓
USE OF THE SQUARE STOP BLOCK
The Square Stop Block [M] is identified as such because it is designed to stop the workpiece from turning
while it is being bent and “stopping” any movement of the workpiece (Fig 6).
When bending the workpiece, place the Square Stop Block [M] over one of the holes the Ring/Die
Receiver [B]. Some testing will need to be done to determine the best placement of the Square Stop Block
[M]. It will need to be placed over the appropriate hole that works with the desired bend and Die in use.
• There are four key positions to place the Square Stop Block [M] in while bending. The four
positions (as seen from looking down on the top of the Square Stop Block [M] are identified in
these instructions by a letter; A, B, C or D (Fig 7).
NOTE: Always position the Square Stop Block [M] so that it’s hole is oriented to the right side. Even
though another side of the Square Stop Block may actually face the work piece. If the hole is oriented left
instead of right, this will result in the Square Stop Block turning which will cause the workpiece to move.
• Set the appropriate Die into place on the Handle/Die Receiver [E] between the upper and lower blades
of the “U”. Secure the Die in place by inserting the shorter, 15mm x 95mm Short Hitch Pin [H] through
the Handle/Die Receiver [E] and the Square Stop Block
[M]
. The Square Stop Block is held in place
against the workpiece (Fig 9).
• Set the workpiece into position. With the Handle [E] in the starting position, set the Square Stop Block
[M] as close to the longer 15mm x 120mm Hitch Pin [G] at the center pivot position, as possible.
NOTE: To avoid large spaces between the Square Stop Block, the 15mm x 120mm Long Hitch Pin acting
as center pivot pin and the selected Die, orient the Square Stop Block differently, or if possible, move it
one hole closer to the center pivot point.
FIG. 6
FIG. 7
USE OF THE RIGHT ANGLE BENDING ATTACHMENT
It is best to use the Right Angle Bending Attachment [N] instead of the Square Stop Block [M] when making a
right angle or sharp bend in the workpiece (Fig 8).
The Right Angle Bending Attachment [N] fits on the Metal Bender only one way.
• Install the Support Pin [L] under the Right Angle Bending Attachment. This will raise it up so that it
sits above the Ring Assembly/Die Receiver [B] (Fig 9).
• Set the Support Pin [L] into the 3rd hole on the Ring Assembly/Die Receiver [B]. Line up the
hole in the top of the Right Angle Bending Attachment [N] with the hole in the Ring Assembly/Die
Receiver [B] (Fig 9). Insert a longer, 15mm x 120mm Long Hitch Pin [G] in the 2nd hole of the
Ring Assembly/Die Receiver [B] to secure the Right Angle Bending Attachment [N] in place.
NOTE: The workpiece will not need to be clamped when using the Right Angle Bending Attachment.
• Mark the workpiece at the desired points to make a bend. Align the workpiece so that the Right
Angle Bending Attachment [N] hits directly at the midpoint of your mark.
FIG. 8
FIG. 9
Right-Angle-Bend
Attachment
Right-Angle-Bend
Attachment
✓
E.
✓
B.
L.
✓
M.
✓
A B
C D
N.
✓
N.
✓
✓

6 Eastwood Technical Assistance: 800.343.9353 >> techelp@eastwood.com To order parts and supplies: 800.343.9353 >> eastwood.com 7
USE OF THE SUPPORT PIN WITH THE SQUARE STOP BLOCK
• Insert the Support Pin [L] in the hole so that it is
located under the Square Stop Block [M] but does
not block a 15mm x 120mm Long Hitch Pin [G] from
passing through the hole in the Square Stop Block
[M] and into the lower hole of the “U” of the Ring
Assembly/Die Receiver [B] (Fig. 4).
If the Stop Block [M] is correctly placed,
it should not be necessary to clamp the
workpiece into place. If high precision is
required however, it may be helpful to clamp
the workpiece into place with Vice-Grip type
clamping pliers (Not Included).
FIG. 4
G.
✓
B.
✓
✓
E.
✓
L.
Stop Support Pin
M.
Stop Block
✓
G.
PLACEMENT OF DIE
Dies are placed at one or two different locations depending
on the bend to be made.
• A Die can be used in conjunction with the 15mm x
120mm Long Hitch Pin [G] at the intersection of the
Handle/Die Receiver [E] and the Ring Assembly/Die
Receiver [B].
• The Die can also be placed on the Handle/Die Receiver
[E] using a 15mm x 95mm Short Hitch Pin [H].
• Two Dies can be placed so that one is on the
Handle/Die Receiver [E] and one at the center
point where the Handle/Die Receiver [E] and Ring
Assembly/Die Receiver [B] intersect (Fig 5).
FIG. 5
✓
B.
✓
B.
Die Location
✓
E.
Die
Location
✓
Die
Location
✓
ORIENTATION OF HANDLE
The Handle is always oriented Up and on the Right side. The Handle is always moved clockwise when a bend is being made.
✓
✓
B.
Die Location
G.
H.
✓
✓
OPERATION
The Eastwood Metal Bender is capable of producing a virtually endless configuration of bends and shapes. The purpose of this Instruction Booklet is intended to
provide a full understanding of the functions of this tool and to assist the user in creating basic bends and shapes. More complex projects will require planning
and some degree of “trial and error”.
• Fully read and understand these instructions before
beginning.
• Through the instructions, become familiar with all
attachments and their purpose
• Select the type and size of material for the planned project.
• Determine the best Die for the planned shape.
• Choose the Stop Block or Right Angle Attachment as
required. Install the Block Support. If using a Stop Block,
position it correctly. (This is addressed further along in
instructions).
• Place material in the Metal Bender and make sure to
position it properly.
• Make the desired bend. Use a protractor (Not Included) to
measure the planned angle.
• As the desired bend is achieved, check shape and angle and
adjust if needed.
• Re-position or remove and switch position of workpiece to
make additional bends.
FIG. 3
E.
✓
B.
✓
✓
Tremendous external torque loads are placed on this Eastwood Metal Bender during operation. This tool cannot be
operated without adequate support or severe personal injury or property damage can occur if it should suddenly be become
dislodged or moves while in use. Before beginning ANY work with this tool, it is absolutely necessary that it be securely bolted
to a properly anchored heavy, sturdy, anchored workbench.
Workpiece material should be clean of any rust, burrs, nicks, welds or coatings before attempting to bend or interference and binding
may occur.
The Eastwood Metal Bender exerts tremendous bending and crushing forces in operation which can present a hand/
finger pinch hazard and cause potentially serious injuries. Avoid moving parts while operating and wear thick, well-fitting work
gloves to prevent cuts from handling sharp metal. The use of safety shoes is strongly recommended.
G.
D.
✓
Apply a minimal amount of a light lubricant to material and die surfaces to ease bending process. Do not over lubricate.
INJURY HAZARD!
The Eastwood Metal Bender is equipped with an Extension Handle for added bending force. DO NOT add pipe, bars or any other
devices which would add additional length to the Handle to increase bending force. This will exceed the design limits of the tool and
can result in serious injury and/or component failure.
For ease of description and clarification in these instructions, the holes in the “U” and Ring of the Ring Assembly/Die Receiver [B]
and the Handle/Die Receiver [E] are referred to by numbers. No numbers are actually displayed on the components (Fig 3).

8 Eastwood Technical Assistance: 800.343.9353 >> techelp@eastwood.com To order parts and supplies: 800.343.9353 >> eastwood.com 5
BENDER ASSEMBLY
• Place the Handle/Die Receiver [E] “U” inside the larger “U” of the Ring Assembly/Die Receiver [B] and secure it in place by inserting a Long 15mm x
120mm Hitch Pin [G].
• Slide the tubular Handle Extension with rubber grip [F] into the larger diameter tubular section of the Handle/Die Receiver [E]. NOTE that there are two
sets of holes. For normal use, align the outermost hole of the Handle Extension [F] with the holes in the Handle/Die Receiver [E] then place the 6mm x
40mm Hitch Pin [J] through the holes and secure with the Pin Clip [K]. For projects requiring more leverage, remove the Pin Clip and Hitch Pin, extend the
Handle, re-align the holes and reinstall the Pin Clip and Hitch Pin.
• The Eastwood Metal Bender is now ready for use.
FIG. 2
✓
✓
E
✓
G.
Hitch Pin
✓
J.
Handle
Hitch Pin
B.
Ring Assembly/
Die Receiver
Handle/Die
Receiver
K.
Pin Clip
F.
Handle
Extension
✓
✓
✓
USE OF THE SQUARE STOP BLOCK
The Square Stop Block [M] is identified as such because it is designed to stop the workpiece from turning
while it is being bent and “stopping” any movement of the workpiece (Fig 6).
When bending the workpiece, place the Square Stop Block [M] over one of the holes the Ring/Die
Receiver [B]. Some testing will need to be done to determine the best placement of the Square Stop Block
[M]. It will need to be placed over the appropriate hole that works with the desired bend and Die in use.
• There are four key positions to place the Square Stop Block [M] in while bending. The four
positions (as seen from looking down on the top of the Square Stop Block [M] are identified in
these instructions by a letter; A, B, C or D (Fig 7).
NOTE: Always position the Square Stop Block [M] so that it’s hole is oriented to the right side. Even
though another side of the Square Stop Block may actually face the work piece. If the hole is oriented left
instead of right, this will result in the Square Stop Block turning which will cause the workpiece to move.
• Set the appropriate Die into place on the Handle/Die Receiver [E] between the upper and lower blades
of the “U”. Secure the Die in place by inserting the shorter, 15mm x 95mm Short Hitch Pin [H] through
the Handle/Die Receiver [E] and the Square Stop Block
[M]
. The Square Stop Block is held in place
against the workpiece (Fig 9).
• Set the workpiece into position. With the Handle [E] in the starting position, set the Square Stop Block
[M] as close to the longer 15mm x 120mm Hitch Pin [G] at the center pivot position, as possible.
NOTE: To avoid large spaces between the Square Stop Block, the 15mm x 120mm Long Hitch Pin acting
as center pivot pin and the selected Die, orient the Square Stop Block differently, or if possible, move it
one hole closer to the center pivot point.
FIG. 6
FIG. 7
USE OF THE RIGHT ANGLE BENDING ATTACHMENT
It is best to use the Right Angle Bending Attachment [N] instead of the Square Stop Block [M] when making a
right angle or sharp bend in the workpiece (Fig 8).
The Right Angle Bending Attachment [N] fits on the Metal Bender only one way.
• Install the Support Pin [L] under the Right Angle Bending Attachment. This will raise it up so that it
sits above the Ring Assembly/Die Receiver [B] (Fig 9).
• Set the Support Pin [L] into the 3rd hole on the Ring Assembly/Die Receiver [B]. Line up the
hole in the top of the Right Angle Bending Attachment [N] with the hole in the Ring Assembly/Die
Receiver [B] (Fig 9). Insert a longer, 15mm x 120mm Long Hitch Pin [G] in the 2nd hole of the
Ring Assembly/Die Receiver [B] to secure the Right Angle Bending Attachment [N] in place.
NOTE: The workpiece will not need to be clamped when using the Right Angle Bending Attachment.
• Mark the workpiece at the desired points to make a bend. Align the workpiece so that the Right
Angle Bending Attachment [N] hits directly at the midpoint of your mark.
FIG. 8
FIG. 9
Right-Angle-Bend
Attachment
Right-Angle-Bend
Attachment
✓
E.
✓
B.
L.
✓
M.
✓
A B
C D
N.
✓
N.
✓
✓

4 Eastwood Technical Assistance: 800.343.9353 >> techelp@eastwood.com To order parts and supplies: 800.343.9353 >> eastwood.com 9
SETUP
• Select an area for permanent location of the Eastwood Metal Bender. Allow a minimum of 4' of working area around the tool to allow for proper handle
swing and operator space.
• With the four 9/16" (14 mm) holes in the Baseplate of the Base/Stand [A], as a guide, mark the locations and centers with a pencil.
• Select appropriate concrete anchors (Not Included) or lag bolts (Not Included) and drill four proper sized mounting holes in work surface.
• Using appropriate hardware, mount the baseplate to work surface.
MOUNTING BENDER TO STAND
• Place the three Mounting Spacers [C] over the three holes in
the Triangular Flange at the top of the Base/Stand [A].
• Set the Ring Assembly/Die Receiver [B] over the three
Mounting Spacers [C] so that two of the holes of the Ring
Assembly/Die Receiver align with two of the Mounting
Spacers [C].
• Insert two M10 x 35mm Countersunk Phillips Head Screws
through the Ring Assembly/Die Receiver [B], Mounting
Spacers [C], and Triangular Base, then secure with 2 M10
Nuts and Washers (Fig 1).
• Set the Ring Assembly Spacer [D] in the “U” of and aligned
with the rearmost holes of the Ring Assembly/Die Receiver
(Fig 1).
• Insert the M10 x 120mm Hex Bolt through the Ring
Assembly/Die Receiver [B], Ring Assembly Spacer [D],
Mounting Spacer [C], and Triangular Base, then secure with
an M10 Nut and Washer (Fig 1).
Tremendous external torque loads are placed on this Metal Bender during operation. This tool cannot be operated
without adequate support or severe personal injury or property damage can occur if it should suddenly be become dislodged or
moves while in use. Before beginning ANY work with this tool, it is absolutely necessary that it be securely bolted to a solid, level,
well supported floor surface capable of withstanding the tremendous torque and side loads this tool is subjected to during use.
A minimum thickness of 2” concrete or 1” of a wood-based surface is strongly recommended.
The Eastwood Metal Bender consists of moderately heavy metal components which can present a hand/finger pinch
hazard and cause potentially serious injuries if dropped on feet. Avoid pinching hands while handling parts during assembly and
wear thick, well-fitting work gloves to prevent cuts from handling sharp metal. The use of safety shoes is strongly recommended.
FIG. 1
✓
A.
✓
B.
✓
C.
✓
C.
D.
✓
✓
STATIONARY STOP
• Test and decide the degree and distance of Handle rotation required to
make the desired bend.
• Remove and place the Stationary Stop [P] into the next hole (Clockwise)
after the initial rotation is completed (Fig 10).
ADJUSTABLE STOP LOOP
The Adjustable Stop Loop
[Q]
is used where a finer adjustment is needed.
The Adjustable Stop Loop allows for more precise stops as it can be adjusted
whereas the Stationary Stop [P] is simply placed into a hole on the Ring (Fig 10).
• Test and decide the degree and distance of Handle rotation required to make
the desired bend.
• Place the Adjustable Stop Loop [Q] directly at the point where
rotation of the Handle is to end. Insert the M10 x 30mm Hex
Bolt through an M10 Washer to hold
the Adjustable Stop Loop [Q] in place. Add additional M10 Washer and M10 Nut then tighten securely (Fig 10).
• Try a test bend and adjust the Adjustable Stop Loop [Q] as necessary to obtain a precise bend.
NOTE: At this point, the basic operating instructions have been described and practice using the Eastwood Metal Bender on scrap material is highly
recommended. As with many metal working tools, a period of “trial and error” is needed to achieve a degree of proficiency in their use. Remember, a little time
and material used at this step will avoid disappointing results on an actual project.
After becoming familiar with the Eastwood Metal Bender, a number of sample projects are presented on the following pages to increase proficiency and provide
project ideas.
FIG. 10
✓
✓
M10 Washer
Adjustable
Stop
✓
D.
M10 Nut
M10 Washer
M10 x 35mm
Q.
P.
Stationary
Stop
SAMPLE PROJECTS
MAKE HANDLES FROM ROUND STOCK
To make handles using round stock, the Square Stop Block [M] is used (Fig 11).
Use a 10" section of 5/8" round stock and two pieces of flat stock for the flanges. The
measurements provided are general guides only. Actual measurements should be adjusted per
individual preferences & requirements. If using another stock size, some experimentation is required
to find the best points for each bend.
1. Set the Square Stop Block [M] in orientation “D”, into the Ring Assembly/Die Receiver [B].
2. With the Handle in the normal position, place the 1" Die on the Center Pin. Place the 2"
Die in the Handle/Die Receiver 2nd hole (Fig 12a). Insert the round stock so that the end
extends 2" down past the 1" Die (Fig 12b). Make the first bend at 90°.
3. Remove the round stock from its original position. Place the opposite
end into the Metal Bender in the same way as the 1st bend. Both ends
must be bent in the same direction. Make the 2nd bend at 90°. Remove
piece from the Bender (Fig 12b)
4. Determine how the round stock should mate with the flat stock flanges.
Drill 5/8" holes into the flanges at the desired position. Insert the bent
ends of the round stock into the holes.
5. Weld the round stock handles into the flat stock flanges. Grind away any
excess material to allow the handle flanges to lay flat.
FIG. 11
FIG. 12B
FIG. 12A
✓
D.
Orientation
1"Die
2"Die
✓
✓
✓
✓
2"
THE STATIONARY STOP AND ADJUSTABLE STOP LOOP
• Many projects on the Metal Bender will require repeated bends of the same type and angle. In these instances, using the Adjustable Stop Loop [Q] or the
Stationary Stop [P] will save time and provide precisely the same bends (Fig. 10).
• Adjust the Stationary Stop [P] or Adjustable Stop Loop [Q] with a piece of scrap material prior to using your actual workpiece. This will assure accuracy and aid
in obtaining ideal placement of the selected Stop [P or Q].

DANGER indicates a hazardous situation which, if not avoided, will result in death or serious injury.
WARNING indicates a hazardous situation which, if not avoided, could result in death or serious injury.
CAUTION used with the safety alert symbol, indicates a hazardous situation which, if not avoided, could result in minor or moderate injury.
NOTICE is used to address practices not related to personal injury.
SAFETY INFORMATION
The following explanations are displayed in this manual, on the labeling, and on all other information provided with this product:
10 Eastwood Technical Assistance: 800.343.9353 >> techelp@eastwood.com To order parts and supplies: 800.343.9353 >> eastwood.com 3
Excessive resistance while operating could indicate a defect with the workpiece material or broken or damaged Metal Bender
components. To avoid injury, stop work immediately and inspect workpiece material for nicks, dents, welds, excessive scale or
remaining coatings. Clean or repair as necessary or discard and begin with a new piece. Also inspect Metal Bender components for
looseness or damage.
PINCH AND CRUSH HAZARD!
• This tool has leveraged rotating components that generate greatly amplified crushing and bending forces which can quickly cause
severe injury! Keep fingers and hands away from moving parts when operating.
INJURY HAZARD!
• Tremendous external torque loads are placed on this Metal Bender during operation. This tool cannot be operated without adequate support
or severe personal injury or property damage can occur if it should suddenly become dislodged or moves while in use. Before beginning ANY
work with this tool, it is absolutely necessary that it be securely bolted to a solid, level floor surface.
FALL HAZARD!
• Strenuous physical force may need to be applied to the Metal Bender during use. Failure to ensure proper footing can quickly result in a
fall which could inflict serious personal injury or property damage. Always work in a clean, uncluttered environment.
• Be sure there is sufficient working room around the tool to allow for safe handling of various lengths of tubing.
INJURY HAZARD!
• The Eastwood Metal Bender is equipped with an Extension Handle for added bending force. DO NOT add pipe, bars or any other de-
vices which would add additional length to the Handle to increase bending force. This will exceed the design limits of the tool and can
result in serious injury and/or component failure.
CUT HAZARD!
• Handling sharp metal can cause serious cuts. Wear thick, well-fitting work gloves to prevent cuts from handling sharp metal.
EYE INJURY HAZARD!
• Pieces of mill scale, rust and other debris may be ejected from the workpiece during operation. Wear ANSI approved eye protection
while operating.
SAFETY INFORMATION
MAKE HANDLES FROM FLAT STOCK
To make handles using flat stock, the Right Angle Bending Attachment [N] is used (Fig 13).
Use a 10” section of 3/16" thick x 1" wide, hot rolled flat stock.
1. Install the Right Angle Bending Attachment [N] into the Ring Assembly/
Die Receiver [B].
2. Mark the material where the bends will be (Fig 14). Place the workpiece into the
bender to the 1st mark. Bend to 90°.
3. It may be helpful to set up the Bender with the Adjustable Stop to make accurate
repeated bends (Fig 15).
4. Remove and place the opposite end of the workpiece in the Bender. Insert to the
2nd mark and make a 90° bend (Fig 15).
5. Reverse the workpiece and make the 3rd bend at the 3rd mark. Repeat for
opposite end and make the 4th bend at the 4th mark (Fig 15).
6. Remove any sharp edges or rough areas by grinding or sanding.
MAKING TUBE CLAMPS
The following steps will allow the creation of a 1" inner diameter tube clamp using hot
rolled flat stock 4-1/2" long x 3/16" thick x 1" wide (Fig 16).
1. Install the 1" Die at the Center Pivot Point around
the 15mm x 120mm Long Hitch Pin [G].
2. Using the 15mm x 95mm Short Hitch Pin [H],
place the 1-1/2" Die in the Handle/Die Receiver
2nd hole.
3. Set the Square Stop Block [M] into the 1st hole
on the Ring Assembly/Die Receiver. Orient it in
position “B” as in (Fig 17).
4. Insert the workpiece in the Bender so that it
extends 1-3/4" beyond the center point. Secure
the workpiece into position against the Square
Stop Block with a clamp or Vice Grip type locking
pliers (Fig 17).
5. Bend the workpiece past 180° until the Die on the
Handle/Die Receiver slides of the end (Fig 17).
6. Remove the Square Stop Block and the Die. Install
the Right Angle Bend Attachment (Fig 17).
7. With the workpiece tight against the Long Hitch
Pin as close to center a s possible, make a right
angle bend (Fig 17).
FIG. 13
FIG. 14
FIG. 15
FIG. 16 FIG. 17
B.
Orientation

MAKING “U” BOLTS AND ANCHOR BOLTS
Following the next steps will allow a 12" Anchor Bolt from a 14-1/4" blank (Fig 18).
As with all bending, shorter or longer Anchor Bolts can be made by varying the length of the blank. Use a
scrap piece to experiment with length and placement of bends. First determine if you are creating an Anchor
Bolt or a “U” Bolt then plan material length and positioning accordingly.
1. Install the 1" Die at the Center Pivot Point around the 15mm x 120mm Long Hitch Pin [G].
2. Using the 15mm x 95mm Short Hitch Pin [H], place the 2" Die in the Handle/Die Receiver 2nd hole.
3. Using a Long Hitch Pin, set the Square Stop Block into place in either position “B” or “D” (Fig 19).
NOTE: Position “B” for 3/8" or 1/2" bolts or “D” for 5/8" bolts.
4. Place the workpiece into the Bender so that the unthreaded end extends sufficiently beyond the
Square Stop Block – 1/2" for 3/8" bolts, 5/8" for 1/2" bolts and 1/4" for 5/8" bolts.
5. Rotate the Handle/Die Receiver until a 90° bend is achieved.
6. Remove and re-position workpiece then reposition and follow above steps for creating a “U” Bolt (Fig 20).
2 Eastwood Technical Assistance: 800.343.9353 >> techelp@eastwood.com To order parts and supplies: 800.343.9353 >> eastwood.com 11
The Eastwood Heavy Duty Metal Bender is a high quality, industrial style tool capable of generating a powerful leveraged force to create 180° or greater
repeatable bends in mild steel and aluminum up to 2" wide.
CONTENTS
COMPONENTS
• (1) Base/Stand [A]
• (1) Ring Assembly/Die Receiver [B]
• (3) Mounting Spacers [C]
• (1) Ring Assembly Spacer [D]
• (1) Handle/Die Receiver [E]
• (1) Handle Extension [F]
• (2) Long 15mm x 120mm Hitch Pins [G]
• (1) Short 15mm x 95mm Hitch Pin [H]
• (1) 6mm x 40mm Handle Hitch Pin [J]
• (1) Pin Clip [K]
• (1) Stop Support Pin [L]
• (1) Square Stop Block [M]
• (1) Right Angle Bending Attachment [N]
• (1) Stationary Stop [P]
• (1) Adjustable Stop Loop [Q]
• (1) 1" Die [R]
• (1) 1-1/4" Die [S]
• (2) 1-1/2" Dies [T]
• (1) 1-3/4" Die [U]
• (1) 2" Die [V]
• (1) 2-1/2" Die [W]
• (1) 3" Die [X]
HARDWARE
• (2) M10 x 35mm Countersunk Phillips Head Screws
• (1) M10 x 120mm Hex Bolt
• (1) M10 x 30mm Hex Bolt
• (4) M10 Nuts
• (4) M10 Washers
• (3) M10 Lock Washers
SPECIFICATIONS
Maximum Material Width: 2"
Maximum Material Thickness: 5/16" for 1-1/4" wide mild steel or 1/4" for 2" wide mild steel
Maximum Round Stock Diameter: 5/8"
Maximum Square Stock: 5/8"
Maximum Handle Length: 44"
FIG. 18
Square Stop
Block Orientation
FIG. 20
✓
Step Block
Measurement
Center Pin
Die
Work Piece
Handle Die/
Receiver Die
✓
✓
✓
✓
✓
FIG. 19
1" Die
2" Die
✓
✓
STORAGE
• Apply a thin film of light oil or rust-preventive to all bare steel areas.
• Store in a clean, dust-free, dry, dampness free area preferably covered with plastic sheeting.
MAINTENANCE
NOTE: Maintenance should be performed before each use
• Clean dirt and debris from all pivot points.
• Check tightness of all hardware.
• Check operation for binding. Lubricate moving parts periodically with medium bodied chassis grease.

HEAVY DUTY METAL BENDER
INS TRUCTIONS
© Copyright 2017 Easthill Group, Inc. 3/17 Instruction Item #28135Q Rev. 1
If you have any questions about the use of this product, please contact
The Eastwood Technical Assistance Service Department: 800.343.9353 >> email: techelp@eastwood.com
PDF version of this manual is available online >> eastwood.com/28135manual
The Eastwood Company 263 Shoemaker Road, Pottstown, PA 19464, USA
US and Canada: 800.343.9353 Outside US: 610.718.8335
Fax: 610.323.6268 eastwood.com
Item #28135
OPTIONAL METALWORKING ITEMS:
51088 - Shrinker/Stretcher Set
13475 - Eastwood Electric Metal Shears
11797 - Throatless Shear
14042 - Versa Bend Sheet Metal Brake
20254 – Eastwood 24" Slip Roll
/