Page is loading ...

GB
We move people.
OPERATING MANUAL
SMART,
Model 9.906

2
Contents
Introduction .................................................................................................. 6
Indications ..................................................................................................... 7
Acceptance .................................................................................................... 7
Specifi cations ................................................................................................ 8
Use ................................................................................................................. 8
Adjustment ................................................................................................... 9
Life span ........................................................................................................ 9
Overview ..................................................................................................... 10
Model: 9.906 .......................................................................................................10
Driving behavior ........................................................................................ 11
Functional checks ...............................................................................................11
Brakes .......................................................................................................... 11
Service brake .......................................................................................................11
Braking the wheelchair ................................................................................11
Parking brake .....................................................................................................11
Selection lever.....................................................................................................12
Locking the brake .........................................................................................12
Releasing the brake ......................................................................................12
Drive-/push mode ...............................................................................................13
Selecting the push mode ..............................................................................13
Selecting the motor mode ...........................................................................13
Selecting the operation ............................................................................. 14
Pre-operation checks ..........................................................................................16
Charging procedure ......................................................................................17
Positioning the operating module ....................................................................18
Function description .....................................................................................18
Horizontal adjustment ..................................................................................18
Vertical adjustment .......................................................................................18
Remove the operating module ....................................................................18
Fitting of the operating module ..................................................................18
Turning the operating module to the side .................................................19

3
Arm supports .............................................................................................. 20
Remove the arm support ..............................................................................20
Inserting the arm support ............................................................................20
Back support ............................................................................................... 21
Folding over the back support .....................................................................21
Folding up the back support ........................................................................21
Adjusting the back support angle ...............................................................21
Adjustable back .............................................................................................22
Seat .............................................................................................................. 24
Seat cushion ........................................................................................................24
Seat cushion ........................................................................................................24
Seat angle ...........................................................................................................25
Mechanically adjusting the seat angle ........................................................25
Electrically adjusting the seat angle ............................................................26
Calf belt ....................................................................................................... 27
Leg supports ............................................................................................... 27
Foot supports ......................................................................................................28
Folding up the footplates.............................................................................28
Folding down the footplates .......................................................................28
Foot board ..........................................................................................................29
Folding up the foot board ...........................................................................29
Folding down the foot board ......................................................................29
Leg support upper part ......................................................................................30
Turning the leg supports to the side ..........................................................30
Remove the leg supports ..............................................................................31
Attaching the leg supports ..........................................................................31
Mechanically height-adjustable leg supports ..................................................32
Lifting the leg supports ................................................................................32
Lowering the leg supports ...........................................................................32
Electrically height-adjustable leg support ........................................................33
Height adjustment ........................................................................................33
Removing the electrically height adjustable leg supports ........................34
Attaching the electrically height adjustable leg supports .........................34

4
Stump support ....................................................................................................35
Removal .........................................................................................................35
Hanging-in ..................................................................................................... 35
Height adjustment ........................................................................................35
Angle adjustment .........................................................................................35
Retaining strap ........................................................................................... 36
Retaining strap with buckle ..............................................................................36
Fastening the retaining strap .......................................................................36
Opening the retaining strap ........................................................................37
Adjustment of belt length ...........................................................................37
Strap with velcro ................................................................................................37
Fastening the retaining strap with velcro strap .........................................37
Opening the retaining strap with velcro fastener .....................................37
Adjustment of belt length ...........................................................................37
Head support .............................................................................................. 38
Adjustment of the head support .................................................................38
Attendant control with priority switch ................................................... 39
Positioning the controller .............................................................................39
Lighting ....................................................................................................... 40
Rear view mirror ........................................................................................ 40
Removing the rear-view mirror ...................................................................40
Attaching the rear-view mirror ....................................................................40
Adjusting the rear-view mirror ....................................................................40
Specialities of the Junior version ............................................................. 41
Continuous leg support .....................................................................................41
Folding up the foot board ...........................................................................41
Folding down the foot board ......................................................................41
Arm supports ......................................................................................................42
Remove the arm support ..............................................................................42
Inserting the arm support ............................................................................42
Loading and transportation ...................................................................... 43
Loading ...............................................................................................................43
Transport security ...............................................................................................43
Passenger transport in handicapped transport vehicles (HTV).......................44
Securing the wheelchair ...............................................................................44

5
Maintenance ............................................................................................... 44
Maintenance ....................................................................................................... 44
Maintenance schedule ..................................................................................45
Fuses ....................................................................................................................47
Replacing the fuses .......................................................................................47
Tyre damage on pneumatic tyres ......................................................................47
Lighting ...............................................................................................................48
Headlights ......................................................................................................48
Headlights ......................................................................................................49
Front indicator ...............................................................................................50
Rear indicator ................................................................................................51
Back light .......................................................................................................52
Information for the specialist dealer ................................................................53
Programming the driving behaviour ...........................................................53
Technical data ............................................................................................. 54
Kilometric performance .....................................................................................54
Hill climbing ability .......................................................................................54
Fuses ....................................................................................................................55
Lighting ...............................................................................................................55
Model 9.906 / 9 .906-603 ....................................................................................56
Meaning of the labels on the electric wheelchair ...........................................60
Meaning of the symbols on the type plate ......................................................61
Fault correction .......................................................................................... 62
Inspection certifi cate ................................................................................. 63
Notes ............................................................................................................ 64
Warranty / Guarantee ................................................................................. 66
Inspection certifi cate for transfer .....................................................................67

6
INTRODUCTION
We thank you for the confi dence you
have placed in our company by choos-
ing an electric wheelchair from this
series.
The model of your selection, fulfi ls
the wish for mobility and more inde-
pendence by way of a new styling of
the proven MEYRA-Ortopedia tech-
nology.
With all equipment and their accesso-
ries the electric wheelchair offers the
respective adaptation to your disabil-
ity.
Like any other vehicle, an electric
wheelchair is a technical aid. It is sub-
ject to explanations, requires regular
care and can cause danger when used
improperly. The correct handling must
therefore be learned. This operating
manual is to help you get accustomed
to the handling of the electric wheel-
chair as well as to prevent accidents.
☞ Note:
Please note that the illustrated
equipment variants can deviate
from your model.
We have therefore also listed chapters
with options that might not be appli-
cable for your vehicle.
!
Attention:
Read and observe the following
documentation belonging to the
electric wheelchair before fi rst use:
– this operating manual,
– the operating manual < Operating
module >,
– the safety and general handling in-
structions < Electronic vehicles >.
☞ Note:
Children and juveniles should read
the documentation belonging to
the electric wheelchair together
with their parents respectively a
supervisor or attendant before
fi rst use.
For users with visual impairments the
PDF-fi les of the above mentioned doc-
uments can be accessed on our web-
site < www.meyra-ortopedia.com >.
☞ Contact your specialist dealer
when required.
Alternatively people with visual im-
pairments can have the documenta-
tion read out by a helper.

7
INDICATIONS
If the following indications occur we
recommend the application of this
mobility product:
☞ Walking disability resp. extremely
limited walking ability as part of
the basic need to move around in
your own home.
☞ The need to be able to leave home
for a short walk in fresh air or in or-
der to reach the places, commonly
in the perimeter of the home, re-
quired to fulfi l basic needs.
ACCEPTANCE
All products are checked for faults
in the factory and packed in special
boxes.
☞ Note:
However, we request that you
check the vehicle for possible
transport damage immediately on
receipt – preferably in the pres-
ence of the carrier.
☞ Note:
The packaging of the wheelchair
should be stored for a further
transport that might become nec-
essary.

8
USE
The electric wheelchair, with attached
leg supports and arm supports, serves
exclusively for the conveyance of one
sitting person. Other pulling or trans-
porting uses do not comply with its
intended purpose.
This model is an electric wheelchair
especially for indoor and outdoor use
on fi rm, level surfaces.
The electric wheelchair offers mani-
fold adjustment possibilities to indi-
vidual vital statistics.
The wheelchair should be adapted
to your needs by a specialist dealer
before the fi rst use. The adaptation
will take into account the driving ex-
perience, the physical limits of the
user and the main place of use of the
wheelchair.
!
Attention:
Always have adaptation and ad-
justment work carried out by a
specialist dealer.
SPECIFICATIONS
The electric wheelchair is an environ-
ment-friendly electronic vehicle. It
was developed to extend the mobility
of persons with health-related or age-
related restrictions.
☞ The model has been assigned the
'Use Class B' as per the EN12184
standard.

9
ADJUSTMENT
The specialist workshop will hand out
the electric wheelchair to you under
consideration of all relevant safety
instructions, ready for operation and
adjusted to your needs.
☞ Note:
☞ We recommend a regular control
if the wheelchair adjustment in
order to ensure a long-term opti-
mal provision even with changing
illness/handicap patterns of the
user. Especially for children and
juveniles an adjustment every 6
months is recommendable.
☞ We recommend regular medical
exams in order to ensure safety for
active participation in traffi c.
☞ Retrospective adjustments should
be carried out solely by the special-
ist dealer!
LIFE SPAN
We expect an average lifespan of
about 5 years for this product, as far
as the product is applied for its des-
ignated purpose and all maintenance
and service guidelines.
The life span of your product depends
upon the frequency of use, the appli-
cation environment and care.
The implementation of spare parts
can prolong the life span of the prod-
uct. As a rule spare parts are available
up to 5 years after production is dis-
continued.
☞ The indicated life span does not
constitute additional guarantee.

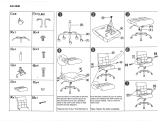
1
2
3
4
5
6
7
8
9
101112
13
10
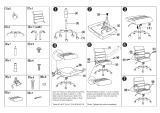
OVERVIEW
Model: 9.906
The overview shows the most important components and operating devices of
the electric wheelchair.
Push modeDrive mode
Pos. Description
1 Back support
2 Operating module
3 Seat cushion
4 Leg support
5 Footplate
6 Calf strap
7 Selection lever drive-/push mode
8 Arm support
9 Steering wheel
10 Drive wheel
11 Support castor
12 Baggage rack
13 Push bar

11
DRIVING BEHAVIOR
The fi ne-tuning to optimise the driv-
ing behaviour of the electric wheel-
chair with the personal situation is to
be done by your specialist dealer or
therapist.
The adaptability offers suffi cient driv-
ing comfort as well as a high operat-
ing safety.
You defi ne the speed and direction
yourself with the joystick movements
(driving and steering lever) while
driving as well as the pre-adjusted
maximum fi nal speed of your electric
wheelchair.
Functional checks
The functions and safety of the elec-
tric wheelchair must be checked be-
fore the start of each journey.
☞ For this observe chapter < Inspec-
tions before starting to drive > in
the Operating manual of the < Op-
erating module >.
BRAKES
Service brake
The motors work electrically as oper-
ating brake and carefully brake the
electric wheelchair down without
jerks to stillstand.
Braking the wheelchair
For allotted braking of the wheelchair
slowly guide the joystick back to the
centre position (zero-setting).
☞ The electric wheelchair stops in
shortest distance after releasing
the joysticks.
Parking brake
The parking brakes only work when
the selection lever is in the drive
mode position. They disengage auto-
matically when the wheelchair starts
off. They are disengaged manually by
moving the selection lever to the push
mode position.
☞ Therefore observe chapter < Drive/
push mode >.

3
1
2
12
Selection lever
Locking the brake
Swivel the selection lever forward as
far as possible (1).
!
Attention:
It is impossible to push the electric
wheelchair when in drive mode.
• The brake performance reduces
with
the brake pads are worn.
If the electric wheelchair demon-
strates an uneven or impaired brak-
ing effect, take it immediately to your
specialist workshop for repair.
Releasing the brake
Activate the locking sleeve (2) on the
selection lever and swivel the selec-
tion lever back as far as possible (3).
!
Attention:
Do not get into/out of the electric
wheelchair unless it is switched off
and the selection lever has been
set to "drive mode".
• An unintentional movement of
the joysticks (driving and steering
lever) can otherwise lead to an
uncontrolled start of the electric
wheelchair! – Danger of accidents!

3
2
1
13
Drive-/push mode
The lever (1) for switching the drive
motors between the drive mode and
push mode is located on the right side
of the electric wheelchair.
!
Attention:
Push the electric wheelchair only
for manoeuvring or in emergency
cases but never on gradients.
The electric magnetic brakes are
switched off in the push mode.
A braking of the electric wheelchair
is then only possible by switching
to the drive mode. Therefore do
not switch to the push mode on
gradients.
Selecting the push mode
1. Switch off the operating module
because the pushing will otherwise
be made diffi cult by the electric
system.
2. Pull the locking sleeve (2) up and
then push the selection lever to
the rear ( 3).
☞ The electric wheelchair can now be
pushed.
Selecting the motor mode
1. Push the selection lever to the
front (1) until it audibly latches.
2. Switching the operating module
on. The electric wheelchair is now
ready for operation again.

1
2
14
SELECTING THE OPERA-
TION
In order to obtain operational readi-
ness of the electric wheelchair the fol-
lowing directions are to be carried out
in the indicated order.
☞ Note:
Charge the drive batteries via the
operating module before the fi rst
journey.
1. Shift to drive mode
Move the drive motors to the drive
mode position. Push the selection
lever to the front (1) until it audibly
latches.
2. Check the correct fi t of the bat-
tery/mains fuse
Blade-type fuse:
The blade fuse for the main current
has to sit tightly in the fuse holder (2).

4
3
15
3. Checking the position of the
operating module
The operating module should be po-
sitioned in such a way that you can
comfortably and safely steer the elec-
tric wheelchair.
Horizontal adjustment:
After loosening the clamping screw
(3) the operating module can be ad-
justed horizontally.
!
Attention:
Tighten the adjusting screws again.
Vertical adjustment:
☞ Therefore observe chapter < Posi-
tioning the operating module >.
4. Switching the operating mod-
ule on
Press the ON/OFF-key on the key fi eld
of the control panel.
☞ Note:
Only actuate the joystick (4) after
the self-test of the electronics has
been completed!
☞ Key-lock function:
☞ The key-lock function enables you
to secure the electric wheelchair
against unauthorised use.
☞ Observe user manual < Operat-
ing module >, chapter < Key func-
tion >.

16
Pre-operation checks
Before starting to drive, the following
should be checked:
☞ the battery charge level,
☞ the pre-selected top speed setting.
– Therefore observe operation man-
ual < Operating module >.
☞ Note:
– Only transfer to and from the elec-
tric wheelchair when the electric
wheelchair is switched off and
the brake release lever has been
placed into the forward position!
– Inadvertently knocking the joy-
stick will set the electric wheelchair
in motion without control! – Dan-
ger of accidents!

1
2
17
Charging procedure
1. Switch the operating module off.
The selection lever should be in the
drive mode position.
2. Insert the battery charger plug
into the operating module (1).
!
Attention:
Do not insert any objects other
than the battery charger plug into
the battery charging socket. – Dan-
ger of short circuit!
3. Switch on the battery charger, re-
spectively, plug the mains plug of
the battery charger into a conven-
ient mains socket. The battery is
now charging.
☞ The charging process only runs
with an intact battery fuse (2)!
4. Disconnect the battery charger
from the mains socket at the end
of the charging process and then
pull the charging plug out of the
operating module.

1
2
18
Positioning the operating
module
Function description
You will fi nd a detailed description of
the keys and symbols in the operating
manual for < Operating module >.
The position of the operating module
can be adjusted to suit the individual
size of the user. The control unit can
also be detached for transportation or
storage and can be laid on the seat or
stored separately.
!
Attention:
Switch off the operating module
before adjusting/removing it.
Horizontal adjustment
Slacken the clamping screw for depth
adjustment (1). Move the operating
module into the desired position. In
doing so carefully guide the cable and
retighten the clamping screw securely.
Vertical adjustment
With the optional height adjustable
operating module adapter the op-
erating module can be adjusted in
height.
For this loosen the clamping screw (2)
while holding the operating module
in position. Afterwards adjust the op-
erating module to the desired height
and retighten the clamping screw (2).
Remove the operating module
To remove the control unit, slacken
the clamping screw (1). Pull the oper-
ating module to the front.
☞ Carefully route the cable when do-
ing this.
Fitting of the operating module
Insert the operating module into its
clamping device. Tighten the clamp-
ing screw (1).
☞ Carefully route the cable when do-
ing this.

2
1
3
3
19
Turning the operating module to
the side
With the optional swivel away operat-
ing module adapter (1) the operating
module can be swivelled back to the
side (2) so that it is located parallel to
the arm support. This makes it possi-
ble, for example:
– to drive closer to a table,
– remove the operating module
more easily.
For regular drive mode the operating
module can be swivelled back toward
the front (1) until it engages back into
the magnetic lock.
☞ Note:
☞ The power of the magnets (3) can
be reduced, for example with tape
on top of the magnets, for easier
swivelling of the operating mod-
ule.
☞ Should the operating module be
positioned too close to the arm
support, move it forward before
swivelling.
!
Attention:
Do not grab into the area of the
cross brace. – Danger of squashing!

2
3
4
1
20
ARM SUPPORTS
!
Attention:
Do not use the arm supports (1) to
lift or carry the wheelchair.
• Do not drive without the arm sup-
ports!
Remove the arm support
Slacken the clamping screw (2) and
pull off the arm support upwards.
☞ Note:
The operating module must be re-
moved fi rst if the arm support on
the control side is to be detached.
To remove the control unit, slacken
the clamping screw (3).
☞ Note:
Carefully route the cable when do-
ing this.
Inserting the arm support
Insert the arm support as far as pos-
sible into the bracket and tighten the
clamping screw (2).
☞ Note:
After inserting the operating mod-
ule tighten the clamping screw (3)
and guide the cable carefully back.
/