
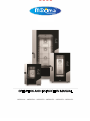
OPERATING AND INSTRUCTION MANUAL
ȁȉȆȇȁȂȁȅɠȁȉȆȇȄȆȁȂɠȁȉȆȇȁȆȆȃɠȁȉȆȇȁȂȆȃɠȁȉȆȇȁȇȆȂɠȁȉȆȇȂȁȆȂ

ȃ
CONTENTS
TECHNICAL SERVICE BBBBBBBBBBBBBBBBBBBBBBBBBBBBBBBBBBBBBBBBBBBBBBBBBBBBBBBBBBBBBBBBBBBBBB8
INSTRUCTIONS FOR THE USER ______________________________________________________________ 9
2.1 Control panel _____________________________________________________________________ 9
2.2 "BLACK MASK" control operation ____________________________________________________ 9
2.3 Switching on _____________________________________________________________________ 10
2.4 STAND-BY mode __________________________________________________________________ 10
2.5 DATE and TIME settings ____________________________________________________________ 10
2.6 Operating parameters _____________________________________________________________ 14
2.7 MANUAL operation _______________________________________________________________ 14
2.7.1General information ___________________________________________________________ 14
2.7.2PRE-HEATING setting __________________________________________________________ 14
2.7.3Cooking TIME setting __________________________________________________________ 14
2.7.4Setting cooking STEPS __________________________________________________________ 15
2.7.5Cooking TEMPERATURE setting __________________________________________________ 15
2.7.6CORE TEMPERATURE setting ____________________________________________________ 15
2.7.7'T VALUE setting ______________________________________________________________ 15
2.7.8HUMIDITY/STEAM setting _______________________________________________________ 17
2.7.9FAN SPEED setting _____________________________________________________________ 17
2.7.10SEMI-STATIC cooking setting __________________________________________________ 17
2.7.11DELAYED START setting ______________________________________________________ 17
2.7.12HOLDING setting ____________________________________________________________ 17
2.7.13STARTING/STOPPING the cooking cycle _________________________________________ 18
2.8 Recipe book ______________________________________________________________________ 18
2.9 Saving a new recipe ("CHEF" recipe book) ____________________________________________ 20
2.10 Overwrite recipe from the "CHEF" recipe book _______________________________________ 20
2.11 Deleting recipes from the "CHEF" recipe book________________________________________ 20
2.12 "Import/Export" with "USB flash drive" ("CHEF" recipe book) __________________________ 20
2.12.1 "Import" recipes (stored programs) _______________________________________________ 20
2.12.2 "Export" recipes (stored programs) _______________________________________________ 20
2.13 COOLING setting ________________________________________________________________ 21
2.14 HACCP function _________________________________________________________________ 21
2.15 Accessories (optional) _____________________________________________________________ 22
2.15.1 AUTOMATIC WASHING (for set-up ovens)__________________________________________ 22
2.16 PROOFER/HOLDING CABINET (if available) ___________________________________________ 23
2.17 Wheeled models (mod. MKF 1664 BM - MKF 2011 BM) ________________________________ 23
3. CLEANING ____________________________________________________________________________ 24
3.1 General information _______________________________________________________________ 24
3.2 Manual cooking chamber cleaning ___________________________________________________ 25
3.3 Semi-automatic cooking chamber cleaning ____________________________________________ 25
3.4 Automatic cooking chamber cleaning (optional) ________________________________________ 25
3.5 Cleaning the fans _________________________________________________________________ 25
3.6 Cleaning the door gasket __________________________________________________________ 25
3.7 Cleaning the door _________________________________________________________________ 26
3.8 Cleaning the external casing ________________________________________________________ 26
3.9 Inactivity period ___________________________________________________________________ 26
4. TROUBLESHOOTING _____________________________________________________________________ 26
5. POSSIBLE ALARMS ______________________________________________________________________ 27
6. TECHNICAL SUPPORT __________________________________________________________________ 29
7. DISPOSAL OF THE APPLIANCE ___________________________________________________________ 29
8. CONVENTIONAL WARRANTY ___________________________________________________________ 30
9. AVAILABILITY AND SUPPLY OF SPARE PARTS _____________________________________________ 30
10. APPLICABLE LAW AND COMPETENT COURT _____________________________________________ 30
7
8
8
8
9
9
9
13
13
13
13
13
14
14
14
14
16
16
16
16
16
17
17
19
19
19
19
19
19
20
20
21
21
22
22
22
23
23
23
23
23
24
24
24
24
25
27
27
28
28

Ȅ
GENERAL INFORMATION
It is essential for this instruction manual to be stored together with the appliance for future referencing;
in the event of misplacing it, a copy must be obtained directly from the manufacturer.
This information has been prepared for your safety and that of others.
Therefore, we kindly ask you to read it carefully before installing and using the appliance.
If upon reception of the goods the packaging should not be intact or should it be damaged, affix
the following wording: “GOODS SUBJECT TO CHECK”, with the specification of the damage
and countersigned by the driver; file a written complaint with the vendor within 4 calendar days (not
business days) from the date of delivery, after which no complaints shall be accepted.
For periodic maintenance checks and repairs, contact your nearest Technical Support Centre and only
use original spare parts. Failure to comply with this provision shall forfeit the warranty right
The “technical data” plate is located on the side panel of the appliance.
A periodic check (at least once a year) of the appliance contributes to extending its service life and assures
proper operation.
Any maintenance operation on the appliance must only be done by highly qualified personnel trained in
the operations to be performed.
Before performing any maintenance on the appliance, the power supply must be disconnected (act on the
safety magnetic circuit breaker located upstream of the appliance) and let it cool down.
The components that might require maintenance are all accessible by removing the left side and back of
the appliance.
The inappropriate or incorrect use of the appliance shall invalidate any liability and warranty right by the
Manufacturer.

ȅ
BURN AND INJURY HAZARD
xThe temperature of the appliance's external surfaces may exceed 60°C, only touch control elements.
Burn hazard!
xPay attention to handling food containers during and after cooking: they might be very hot. Wear
appropriate protective thermal clothing to prevent burns.
xDuring operation, with the door open, do not remove the fan cover; do not touch the moving fans and
resistors which are still hot.
xThe maximum working height, referred to the highest surface level, must be 160 centimetres from the
(supplied) at a height of
vfloor. After installing the appliance apply the suitable adhesive symbol
160 centimetres.
xTo prevent boiling, do not use containers filled with liquids or food that liquefy with heat, in excessive
amounts that cannot be easily kept under control. For this reason, only use trays that let you see inside
the container. When extracting a tray containing hot liquid pay attention not to spill any liquid.
xBefore removing the food from the oven after cooking with the needle shaped thermal probe (core
probe), carefully extract the still hot probe from the food, taking care not to leave it hanging outside the
cooking chamber.
xDo not open the door during washing operations, as chemical substances (corrosive) used for cleaning
and hot fumes might escape.
ELECTRIC SHOCK HAZARD
xBefore performing any cleaning on the appliance, disconnect the power supply (from the safety circuit
breaker) and water supply (close the water cock). Let it cool completely.
xAny modification to the electrical system that might be required to install the appliance must be carried
out by competent personnel only.
xThe power supply system must be fitted with an effective earthing connection according to the
regulations in force.
xIn the permanent connection to the mains, a protective pole switch must be installed between the
appliance and the mains with minimum opening between the contacts of overvoltage category III
(4000V), sized for the load and complying with applicable regulations (automatic circuit breaker).
xIf the power supply cable is damaged, it must be replaced by the manufacturer or their technical
support service, or in any case by a person with similar qualifications, to prevent any risk.
xThe appliance also has electrical components inside, for safety reasons it is forbidden to wash it with
water or steam jets especially if aimed at the aeration vents on the metal surfaces of its outer casing.
FIRE HAZARD
xNo foods containing easily flammable substances must be cooked, such as alcohol-based foods; self-
combustion phenomena might occur leading to fires and explosions in the cooking chamber.
xBefore using the appliance, make sure that there are no non-compliant objects (e.g. User manuals,
plastic bags or other flammable objects) or detergent residues, inside the cooking chamber.
xAlways keep the cooking chamber clean. Cooking liquids (fats) or food residues may ignite!

Ȇ
USER SAFETY
xThe appliance is intended for professional use in institutional and professional kitchens and must only be
used by skilled personnel who have been trained on its proper use. For safety reasons the appliance
must be supervised during operation.
xThe appliance is not intended to be used by children and/or persons with impaired physical, sensory or
mental abilities, or who lack experience or knowledge, unless they are supervised by a person
responsible for their safety, or who has been instructed on using the appliance.
xIn the event of failure or poor operation, switch off the appliance, close the water supply cock,
disconnect the power supply and contact an authorised Technical Support Centre.
xThis appliance shall be used only for the purposes for which it was designed, meaning for all types of
baking of pastries, baked goods and food: fresh and frozen; for reconditioning chilled and frozen food,
for steam cooking meats, fish and vegetables.
xAny other use is considered improper.
xThe noise level of the appliance in operation is less than 70 dB (A).
INFORMATION FOR THE USER
xWhen the appliance is used for the first time it is recommended to run an empty cycle for 40/50 minutes
at a temperature of 220/230°C. In this way all unpleasant yet fully normal smells due to heating the
thermal insulation enveloping the cooking chamber and the silicone used for its external sealing are
dissipated.
xAvoid prolonged permanence on the steel surfaces of foods containing acidic substances (lemon juice,
vinegar, salt, etc.) which cause corrosive deterioration.
xThe appliance must be cleaned regularly, even daily (using automatic washing, if available), to ensure
the best functionality and to extend its service life.
xIf specific detergents (degreasers) are used for cleaning stainless steel, ensure they do not contain
corrosive acid substances (no presence of chlorine even if diluted) or abrasive substances. Carefully
follow the instructions and warnings of the detergent's manufacturer and take precautions such as
using adequate rubber gloves.
xStrictly avoid using scouring pads, steel wool and scrapers that may ruin the treated surfaces.
xIn order not to irreparably damage the needle shaped thermal probe (core probe), avoid using it in high
temperature cooking (OVER 230°C); also avoid letting the probe cable come into direct contact with the
hot metal surfaces inside the cooking chamber.
COOKING TIPS
xIn placing the food in the cooking chamber, maintain a space of at least 40 mm between trays
in order not to excessively obstruct air circulation.
xDo not use trays with sides higher than necessary: the sides form barriers that prevent hot air
circulation.
xPreheat the oven every time before cooking to achieve top performance.
xFor cooking as consistently as possible, spread the food evenly in every tray taking into account
its size, layer or thickness.
xAvoid adding salt to food in the cooking chamber.
xTo check correct progress of the cooking cycle use the chamber's internal lighting: avoid
uselessly opening the door, which causes wastes of energy and longer cooking times.

ȇ
RESIDUAL RISKS
xAfter baking open the door with caution, to avoid the violent outflow of heat which might cause burns.
xDuring oven operation pay attention to hot areas of its outer surfaces (marked on the appliance).
xDo not use the door handle to move the appliance (possible glass breakage).
xThe supporting bench must be able to withstand the weight of the machine and house it correctly.
xThe appliance is fitted with electrical parts and must never be washed with a water or steam jet.
xThe appliance is electrically connected: disconnect the power supply before performing any type of
cleaning.
xTo avoid incorrect connections of the appliance, the relevant electrical/water connections are
marked on the appliance by suitable identification plates.

1. TECHNICAL SERVICE
xIt is essential for this instruction manual to be stored together with the appliance for future referencing;
in the event of misplacing it, a copy must be obtained directly from the manufacturer.
xThis information has been prepared for your safety and that of others; therefore we kindly ask you to
read it carefully before installing and using the appliance.
xFor periodic maintenance checks and repairs, contact your nearest Technical Support Centre and only
use original spare parts. Failure to comply with this provision shall forfeit the warranty right.
xAll installation and commissioning operations must exclusively be performed by technically skilled
installers, according to the manufacturer's instructions and in compliance with national standards in
force.
xThe “technical data” plate is located on the side panel of the appliance.
Note: The inappropriate or incorrect use of the appliance and failure to comply with installation rules shall
invalidate any liability by the Manufacturer.

ȉ
2. INSTRUCTIONS FOR THE USER
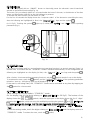
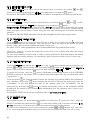
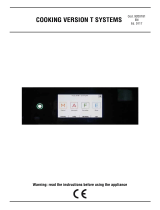
2.1 Control panel
7” Touch Screen Display
Fig.1
2.2 "BLACK MASK" control operation
The "BLACK MASK" control is activated by touching with your finger the "symbol" of the function and/
or the "digit" of the parameter highlighted on the display (use only your fingers and not other tools such
as knives, forks, or other objects in general). This way the desired function is activated and/or the value of
the operating parameter can be set.
To facilitate the use of the control panel, only the "symbols" of the function and/or the "digit" of the
operating parameter that can be activated remain highlighted (lit up).
Tapping on the "symbol" and/or the "digit" of the operating parameter emits an acoustic
warning ("beep").
Tapping on the "digit" of the operating parameter displays the PARAMETER SCREEN with the value
of the single parameter of the cooking cycle.
By touching the symbols or (nr.8 or nr.9 Fig.2) the value of the parameter increases or
decreases. If you hold your finger on the same symbols, the value of the parameter increases or decreases
quickly. The set value of the operating parameter is confirmed by touching the "digit" of the
parameter or the
symbol (nr.10 Fig.2).
Within 5 seconds of tapping on the "digit" of the operating parameters: "TIME",
"TEMPERATURE", "HUMIDITY", "FAN SPEED", the desired value must be set; otherwise, the display
automatically returns to the OVERVIEW SCREEN (displaying all the values of the cooking cycle
parameters) with the value of the parameter still to be set.

Ȋ
2.3 Switching on
The oven is equipped with an "ON/OFF" button to electrically power the electronic control board and
activate its operational functionality (Fig. 1a).
The button (A) is not directly visible as it is located under the base of the oven, in the direction of the door
sensor: an identification plate (B) on the side indicates its presence.
To activate the oven function, set the button to "ON".
For the first 10 seconds the display shows the "computer codes" of the electronics controlling the oven,
then the following are highlighted (in blue): the "Date and Time"Ɉ logo and the symbol
(nr.11 Fig.2). Touching the symbol lights up (in white) the "symbols" and "digits" of the operating
parameters (Fig.1).
Fig. 1a
.
2.4 STAND-BY mode
If the oven is not being used (it is not performing any operating functions), an acoustic warning ("beep") is
emitted after 10 minutes and the "STAND-BY" mode is activated automatically. In this configuration the
following are highlighted on the display (in blue): the "Date and Time", thelogo and thesymbol.
After a further 10 minutes without operating functions, only the symbol remains lit up on the display.
To reactivate the oven, touch the symbol, and the "symbols" and "digits" of the operating parameters
related to "start-up" will light up again on the display (Fig. 1).
If the oven is not being used, the "STAND-BY" mode can be activated at any time by tapping on
the symbol for a few seconds.
2.5 DATE and TIME settings
These settings can only be made in "STAND-BY" mode.
On the display, tap on the digits relating to "Date and Time" (nr.30 Fig.2). The bottom of the
display shows the . symbols, while the upper part of the display shows the first 2 "digits"
related to the Time value, which are set to be modified by touching the symbols and . Touching the
symbol confirms the set value and the next value to be changed appears automatically.
Proceed as shown below to set the desired values relating to: "Minutes" - "Day" - "Month" -
"Year".
To exit the setting mode, touch the digits relating to "Date and Time", and the display returns to
"STAND-BY" mode. To activate the oven, touch the symbol,
A
B

Ȃȁ
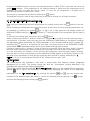
Fig. 2

ȂȂ
Explanation of symbols/digits: (Fig.2)
1 PRE-HEATING
2 HOLDING .
3 FAST COOLING
4 WASHING (optional)
5 HACCP FUNCTION
6 PROOFER (accessory)
7 HOLDING CABINET (accessory)
8 INCREASE IN VALUE
9 DECREASE IN VALUE
10 START/STOP
11 ON/OFF
12 DELETE
13 M
DELAYED START
14

Ȃȃ
NUMBER OF RECIPES
15 "qÝ" RECIPE BOOK
16 "CHEF" RECIPE BOOK
17
CORE TEMPERATURE/ 'T
18
FAN SPEED
19 SEMI-STATIC FUNCTION
ACTIVATION/DISABLING
20 COOKING WITH CORE PROBE
21 CORE PROBE AND “DELTA T”
COOKING
22 / %HUMIDITY/ ERROR CODE
23 MANUAL HUMIDIFICATION
24
TEMPERATURE (°C/°F)
25 ° °C / °F
26 IMPORTS / EXPORTS FROM USB
FLASH DRIVE
27 M HOURS
28 MINUTES
29 NUMBER OF STEPS
30
M
/
/
DATE AND TIME

ȂȄ
2.6 Operating parameters
COOKING TIME from 1 minute to 11 hours and 59 minutes or "INFINITE" time (InF)
COOKING
TEMPERATURE 30°C to 270°C (from 86°F to 518°F)
CORE TEMPERATURE from 01°C to 99°C (from 33°F to 210°F)
ǻ7TEMPERATURE from 01°C to 99°C (from 33°F to 210°F)
HUMIDITY from OFF to 100% with 10% steps
FAN SPEED from 0 to 3
2.7 MANUAL operation
2.7.1 General information
xWhen anomalies occur during the operation of the oven that prevent the continuation of the
cooking cycle or the automatic washing cycle, the display shows alarms with an acoustic
warning. Alarms are highlighted (in different colours) by the letter “E” followed by the number
that identifies the anomaly. To reset the alarm touch the symbol: the display highlights the
"STAND-BY" mode (paragraph 2.4).
xTo reactivate the oven, touch the symbol again.
xThe various types of alarms are described in the relevant paragraph 5.
2.7.2 PRE-HEATING setting
The PRE-HEATING function can be activated or disabled by touching the symbol (nr.1 Fig.2). When
the function is active the symbol becomes . The PRE-HEATING temperature value is preset at 40°C;
however, by touching the symbols and , you can change this value from 10°C to 150°C (in 10°C
steps), according to the different cooking needs.
For example, if a cooking temperature of 180°C ("step 1") and a PRE-HEATING temperature of 50°C are
set, a temperature of 230°C will be reached inside the cooking chamber. An acoustic signal ("beep")
warns when this temperature is reached, which is maintained as long as the oven door remains closed.
Open the door (the acoustic signal is disabled) and put the product to be cooked into the oven. Close the
door: the cooking cycle starts automatically.
Important
The PRE-HEATING function cannot be used together with the delayed start.
The PRE-HEATING temperature cannot exceed 270°C.
2.7.3 Cooking TIME setting
Touch the 2 "digits" that indicate the "Hours" (nr.27 Fig. 2), and set the desired value by touching the
symbols and . Confirm the set value by touching the 2 "digits" of the parameter or by touching

Ȃȅ
the symbol. In the same way touch the 2 "digits" that indicate the "Minutes" (nr.28 Fig. 2) and set the
desired value.
During the cooking cycle the display alternately shows: for 4 seconds, the value of the time set for the
active step, and for 4 seconds the value of the total time remaining ("countdown") for the rest of
the other steps. In case "INFINITE time" is set, the display shows alternately: for 4 seconds, the
"N.” value, and for 4 seconds the elapsed time value.
The value of the TIME parameter ("Hours/Minutes") can also be changed with the cooking cycle
active.
2.7.4 Setting cooking STEPS
Each cooking cycle may consist of up to 10 STEPS. The operating parameters and the desired
values can be set for each step (section 2.2).
After setting the parameters and relative values for the first step ("Phase 01"), the following ones
("Phase 02", "Phase 03" ...), can be set by touching the 2 "digits" indicating the number of the
STEPS (nr.29 Fig.2), and touching the symbol .
The desired operating parameter values must be set for each step.
During cooking, the display shows alternately: for 4 seconds, the number of the active step, and for
4 seconds the maximum number of steps set.
2.7.5 Cooking TEMPERATURE setting
Touch the 3 "digits" indicating the TEMPERATURE (nr.24 Fig.2) and set the desired value by touching the
symbols and . Confirm the set value by touching the 3 "digits" of the parameter or touching the
symbol.
During the cooking cycle the display alternately shows: for 4 seconds, the temperature value set for the
active step, and for 4 seconds the value of the temperature measured inside the cooking chamber.
The value of the TEMPERATURE parameter can also be changed with the cooking cycle active.
2.7.6 CORE TEMPERATURE setting
Touch the symbol (nr.20 Fig.2): the PARAMETER SCREEN appears with the temperature value preset at
50°C. Touch the symbols and to set the different desired value (nr.17 Fig.2). Confirm the set value
by tapping on the symbol.
During cooking, the display shows alternately: for 4 seconds, the value of the "core temperature" set
for the active step, and for 4 seconds the value of the measured "core" temperature of the food
being cooked.
The value of the CORE TEMPERATURE parameter can also be changed with the cooking
cycle active.
Warning
The CORE TEMPERATURE parameter value once confirmed excludes the TIME parameter.
2.7.7 'T VALUE setting
Touch the symbol (nr.21 Fig.2): the PARAMETER SCREEN appears with the symbol and the preset
temperature value at 50°C. Touching the symbols and set the different desired value (nr.17 Fig.2).
Confirm the set value by tapping on the symbol. Below is the PARAMETER SCREEN with the

ȂȆ
symbol and the "core temperature" value preset at 50°C. Touch the symbols and set the different
desired value (nr.17 Fig.2). Confirm the set value by tapping on the symbol.
During cooking, the display shows the value of the measured "core" temperature of the food being
cooked.
The display can show for 5 seconds the value set for "core temperature" or the value set for 'T: by
touching the symbol or the symbol respectively.
The parameters and CORE TEMPERATURE values can also be changed with the cooking cycle
active.
Warning
The parameters and CORE TEMPERATURE values, once confirmed, exclude the cooking TIME and
TEMPERATURE parameters.
INSIGHTS:
xCOOKING WITH CORE PROBE
There are two parameters to be set to cook with core probe: core temperature and cooking temperature.
The cooking time is no longer a control parameter and so does not appear on the “overview screen”.
If the cooking cycle consists of a single step, the oven works until the temperature detected by the core
probe is reached inside the food. If the cooking cycle consists of several steps and core probe cooking is
enabled in one of them, once the temperature detected by the core probe is reached, the oven continues
to work switching to the next step.
If, during a cooking cycle with needle shaped thermal probe (core probe) the probe is not properly
connected, the display shows an error with corresponding sound alarm.
IMPORTANT
The needle shaped thermal probe must be inserted inside the food, in the thickest area, avoiding
contact with any bones.
If a cooking cycle with core probe is enabled, the needle shaped thermal probe must already be
connected to the specific socket on the bottom of the oven; otherwise, the display will show the
corresponding alarm.
With the door closed, the needle shaped t
hermal probe cable must pass between the door
gasket (bottom area) and the door itself.
xCOOKING WITH “ǻT” TEMPERATURE
There are two parameters to be set to cook with “ȟT” temperature: the core temperature and “ȟT”
temperature. The cooking time is no longer a control parameter and so does not appear on the “overview
screen”.
The “ȟT” temperature parameter makes it possible to maintain constant, throughout the cooking step,
the difference between the temperature inside the food (temperature detected by the needle shaped
thermal probe) and the temperature inside the cooking chamber (cooking temperature). In this way the
value of the temperature in the cooking chamber becomes the sum of the temperature inside the food
and the set “ȟT” temperature. In practical terms there is a slow increase of the temperature in the
cooking chamber: the food undergoes a prolonged and delicate cooking process.
If the cooking cycle consists of a single step, the oven works until the temperature detected by the core
probe is reached inside the food. If the cooking cycle consists of several steps and cooking with “ȟT”
temperature is enabled in one of them, once the temperature detected by the core probe is reached, the
oven continues to work switching to the next step.
If, during a cooking cycle with “ȟT” temperature and needle shaped thermal probe (core probe) the probe
is not properly connected, the display shows an error with corresponding sound alarm.

Ȃȇ
2.7.8 HUMIDITY/STEAM setting
Touch "/"/"digits" (nr.22 Fig.2) and set the desired value by touching the symbols and .
Confirm the set value by adjusting the "digits" of the parameter or touching the symbol.
The value of the HUMIDITY/STEAM parameter can also be changed with the cooking cycle active.
2.7.9 FAN SPEED setting
Touch the digit "3" (nr.18 Fig.2) and set the desired value by touching the symbols and . Confirm
the set value by touching the "digit" of the parameter or by touching the symbol
Setting the value "" activates the "STOP MOTORS" function: the motors (fans) are blocked, the heating
elements and the humidity/steam regulation are disabled. For this reason the function, suitably inserted
within a program, may be used as a pause during the cycle itself (leavening the food inside the cooking
chamber).
The value of the FAN SPEED parameter can also be changed with the cooking cycle active.
2.7.10 SEMI-STATIC cooking setting
Touch the symbol (nr.19 Fig.2): the active function is shown on the display by the symbol that
systematically disappears and reappears every two seconds; while the value of the relative set speed
remains "fixed" and can also be modified during the cooking cycle.
The SEMI -STATIC cooking parameter can also be disabled with the cooking cycle active.
“Semi-static” cooking is a mode that allows the motors (fans) to be activated only when the heating
elements are operating.
The fans are activated for a few seconds, in order to evenly distribute the heat generated by the heating
elements inside the cooking chamber. This reproduces a type of operation similar to that of a static oven.
2.7.11 DELAYED START setting
Touch the 2 "digits" that indicate the "Hours" (nr.13 Fig. 2), and set the desired value by tapping on the
symbols and . Confirm the set value by touching the symbol: the 2 "digits" of the "Minutes"
appear. Their value can be set and confirmed in the same way as the "Hours".
To confirm the function, touch the symbol: the display automatically returns to the OVERVIEW
SCREEN (showing all the values of the cooking cycle parameters) with the set parameter value
("pause time").
Touch the symbol for a few seconds to cancel the function (the cooking TIME is also cancelled if
set); otherwise, touching the symbol activates the DELAYED START and the display only shows the
“countdown” of the time before the start of the cooking cycle. The "countdown" can be
interrupted by touching the symbol: the display automatically returns to the OVERVIEW SCREEN
(showing all the values of the cooking cycle parameters) with the parameter value ("pause time")
reset to zero.
The DELAYED START can be set for a maximum time of 23 hours 59 minutes.
2.7.12 HOLDING setting
The HOLDING function can be activated and disabled by touching the symbol (nr.2 Fig.2). When the
function is activated (the symbol becomes ) in a multi-step cooking cycle, it becomes operational in the
last step, and consists in maintaining a constant temperature inside the cooking chamber.
The value of this temperature can be set by touching the symbols and ,.between 65°C and 100°C
(in 1°C steps). During the HOLDING function you can also set a humidification value (from oFF to 50%).

ȂȈ
During the HOLDING function, the oven automatically switches to SEMI -STATIC mode with the lowest fan
speed ("1"). However, if the temperature in the cooking chamber is higher than the temperature set for
HOLDING, the oven runs with the fans at speed "2" until the set temperature is reached, then it
automatically switches to SEMI-STATIC mode.
The function is interrupted at any time by touching the symbol.
The HOLDING function is used to keep food warm at the end of cooking, for as long as necessary.
2.7.13 STARTING/STOPPING the cooking cycle
After setting the parameters and their desired values for cooking, simply touch the symbol to start the
cycle.
Before activating a cooking cycle with one or more steps, all the values of the set operating parameters can
be cancelled by touching the symbol (nr.12 Fig.2) for a few seconds: the display shows the
OVERVIEW SCREEN relating to first step (“Phase 01”) with the values of the parameters that still have to
be set.
To interrupt the cooking cycle at any time, touch the symbol.
When a cooking cycle ends (in "manual" mode or in "programmed" mode) an acoustic warning ("beep")
is activated for 15 minutes, and at the same time the OVERVIEW SCREEN flashes on the display, showing
the parameter values (excluding the TIME parameter) of the finished cooking cycle in green. By
touching the symbol or by opening the oven door, the display returns to the OVERVIEW SCREEN
which shows all the parameter values set for the finished cooking cycle in white.
If during a cooking cycle a "blackout" occurs for less than one minute, when the power supply is restored
the oven restarts automatically, and the cooking cycle starts again from the moment it was interrupted.
If, on the other hand, the "blackout" occurs for more than one minute, when the power supply is restored,
the oven does not restart automatically, but the OVERVIEW SCREEN appears on the display, showing in red
the values of the parameters set with the time remaining after the end of cooking. Moreover the "4
digits" (nr.13 Fig. 2) concerning the DELAYED START, display the error code "E18".
2.8 Recipe book
The manufacturer has included in the oven a recipe book that features recipes (programs)
developed by its chefs. The chosen recipe can also be "customised" before executing it by
modifying the values of the cooking parameters.
The recipes can be found inside the "qÝ" recipe book, which can be accessed by touching the
symbol (nr.15 Fig.2): the OVERVIEW SCREEN appears displaying the values of the operating
parameters of the first stored recipe. By touching the symbols and you can choose the
number of the desired recipe (see table 1). Confirm the selected recipe by tapping on the symbol,
and start the cooking cycle by touching the symbol.

Ȃȉ
The oven also includes a second recipe book: the "CHEF" recipe book in which up to 100 new
recipes can be stored. To access the recipe book, simply touch the symbol (nr.16 Fig.2): the
OVERVIEW SCREEN appears displaying the values of the operating parameters of the recipe to be set
and stored in blue. After setting and storing the recipes, follow the same operating mode used to
execute the recipes in the "qÝ" recipe book.
TABLE 1
1
Lasagna
24
Cod In Stew
2
Cannelloni
25
Grilled Prawns
3
Steamed Rice
26
Scallops Au Gratin
4
Rice Pilaf
27
Steamed Spinach
5
T_Bone Steak
28
Steamed Potatoes
6
Raost Beef
29
Steamed Broccoli
7
Braised Beef
30
Grilled Zucchini
8
Rack Of Lamb
31
Roast Potatoes
9
Pork Knuckle
32
Duchess Potatoes
10
Spare Ribs
33
Caponata
11
Grilled Chicken
34
Vegetable Flan
12
Breaded Chicken Supreme
35
Creme Caramel
13
Stuffed Turkey Breast
36
Sponge Cake
14
Stewed Rabbit
37
Base For Shortcrust Tart
15
Skewers
38
Puff Pastry
16
Duck Breast
39
Croissants
17
Roasted Stuffed Quail
40
Cream Puffs
18
Steamed Lobster
41
Common Bread
19
Steamed Salmon
42
Brioche Bread
20
Steamed Octopus
43
Breadsticks
21
Steamed Mussels
44
Pizza
22
Sea Bass With Salt
45
Flat Bread
23
Baked Sea Bream

ȂȊ
2.9 Saving a new recipe ("CHEF" recipe book)
From the OVERVIEW SCREEN that displays all the values of the cooking cycle parameters in white, set
the desired values for the new recipe to be stored (paragraph 2.2). Touch the symbol: the
OVERVIEW SCREEN appears displaying all the set parameter values in white. Tap on the symbols
and select the "recipe number" of the cookbook to match the new recipe. If the OVERVIEW SCREEN
displays the parameter values in white it means that there is already a stored recipe in that "recipe
number". If the OVERVIEW SCREEN displays the parameter values in blue, it means that the "recipe
number" is empty and can be occupied by the new recipe. The new recipe is stored by touching
the symbol for at least 5 seconds: an acoustic confirmation warning ("beep") is emitted and
the OVERVIEW SCREEN displays the parameter values in white.
2.10 Overwrite recipe from the "CHEF" recipe book
You cannot overwrite a recipe, you must delete it and store it again.
2.11 Deleting recipes from the "CHEF" recipe book
Touch the symbol: the OVERVIEW SCREEN appears displaying all the parameter values set for the
first stored recipe in white. Tap on the symbols and select the "recipe number" of the recipe
book you wish to delete. The recipe is deleted by touching the symbol for at least 5 seconds: an
acoustic warning ("beep") is emitted to confirm that the recipe has been deleted.
2.12 "Import/Export" with "USB flash drive" ("CHEF" recipe book)
Through the "USB port" present in the lower hinge of the door, it is possible to "Import" new recipes into
the "CHEF recipe book", or "Export" the recipes from the same recipe book containing them, using a
"USB flash drive".
2.12.1 "Import" recipes (stored programs)
After connecting the "USB flash drive" (with the new recipes) to the relative "USB port", touch the
symbol (nr.26 Fig.2) for at least 2 seconds: you will hear an acoustic warning ("beep") confirming the
successful "import" (the symbol becomes ) of all the new recipes within the "CHEF" recipe
book, in the first "recipe numbers" free from stored programs (recipes).
Important
If the "USB flash drive" is not connected or detected, the symbol does not appear.
2.12.2 "Export" recipes (stored programs)
After connecting the "USB flash drive" ("empty") to its "USB port", tap on the symbols and ; select
from the "CHEF" recipe book the "recipe number" you wish to export to the "USB flash drive". It is also
possible to export all the recipes in the recipe book at the same time: touch the symbols and until
the word "))" appears instead of the "3 digits" that make up the "recipe number". In both cases to
confirm the successful "export" (the symbol becomes ) touch the symbol for at least 5 seconds:
you will hear the acoustic confirmation warning ("beep").
Important
If the "USB flash drive" is not connected or detected, the symbol does not appear.

ȃȁ
2.13 COOLING setting
The COOLING function can be activated by touching the symbol (nr.3 Fig.2) and the symbol ,
opening the oven door after finishing a cooking cycle. During cooling (the symbol becomes ) the "3
digits" that on the display indicate the temperature parameter, show in real time the value inside the
cooking chamber.
The COOLING function can only be activated (the symbol appears on the display) when the temperature
is at least 50°C inside the cooking chamber.
The function may be disabled at any time by touching the symbol; otherwise, it is disabled
automatically when the temperature inside the cooking chamber reaches 40°C.
Warning
During operation, with the door open, do not remove the fan cover; do not touch the moving fans and
resistors which are still hot.
2.14 HACCP function
The purpose of the HACCP function is to record the operational data of the cooking cycles performed,
constantly monitoring their progress.
The HACCP data is recorded in a "USB flash drive" that must be connected to the "USB port" of the oven:
the symbol (nr.5 Fig.2) appears on the display.
2.14.1 HACCP function activation
After connecting the "USB flash drive" to the "USB port" of the oven, touch the symbol to activate
the function (the symbol becomes ): the operating parameters of the cooking cycle (manual or
programmed) are recorded in a "file" inside the "USB flash drive".
2.14.2 Displaying HACCP data (on PC)
To display the operating parameters of a finished cooking cycle on a PC, simply remove the "USB flash
drive" from the "USB port" of the oven (the symbol disappears from the display) and insert it into the
"USB port" of the PC.
The HACCP "files" inside the "USB flash drive", can be "opened" and displayed with the same procedure
used for any "file".
Important
All the data concerning the cooking cycles carried out on the same day are contained in the same HACCP
“file”.
If more than one cooking cycle is carried out, but on different days, they are recorded in different HACCP
"files": identified by the date of the day on which the cooking cycle was carried out.
Page is loading ...
Page is loading ...
Page is loading ...
Page is loading ...
Page is loading ...
Page is loading ...
Page is loading ...
Page is loading ...
Page is loading ...
-
 1
1
-
 2
2
-
 3
3
-
 4
4
-
 5
5
-
 6
6
-
 7
7
-
 8
8
-
 9
9
-
 10
10
-
 11
11
-
 12
12
-
 13
13
-
 14
14
-
 15
15
-
 16
16
-
 17
17
-
 18
18
-
 19
19
-
 20
20
-
 21
21
-
 22
22
-
 23
23
-
 24
24
-
 25
25
-
 26
26
-
 27
27
-
 28
28
-
 29
29


Maxima 08560104 Owner's manual
- Type
- Owner's manual
Ask a question and I''ll find the answer in the document
Finding information in a document is now easier with AI
Related papers
-
Maxima 08563511 Owner's manual
-
Maxima 08560260 User manual
-
-
-
Maxima 08560651 Owner's manual
-
-
-
Maxima 09371000 Owner's manual
-
-
Other documents
-
GGM Gastro KDTE511 Owner's manual
-
GGM Gastro KDMTE511 User manual
-
 TECNOEKA EKF416DUD Use And Instruction Manual
-
Diamond FVS-1111 Instructions For Use And Maintenance Manual
-
Univex Double Rack Rotating Owner's manual
-
-
 Moduline GCE060T Original Instructions Manual
-
Electrolux AOS202GAPQ (260878) User manual
-
-
Bartscher 117552 Operating instructions

