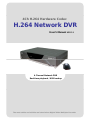
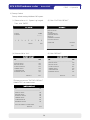
Opticom KDR-4B-U System Kit DVR User manual
- Category
- Digital Video Recorders (DVR)
- Type
- User manual

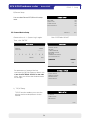
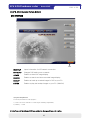
H.264 Network DVR
4Ch H.264 Hardware Codec
VER 2.1
User’s Manual
4 Channel Network DVR
Real-time playback / USB backup
The most stable and reliable real stand alone Digital Video Multiplex Recorder

4Ch H.264 hardware codec -Network DVR Installation & Safeguards
INSTALLATION & SAFEGUARDS
All the safety and operating instructions should be read before the unit is operated.
Environment Condition for Installation
1 To prevent electric shock or other hazard do not expose units to rain moisture or dust
1
.
To
prevent
electric
shock
or
other
hazard
,
do
not
expose
units
to
rain
,
moisture
,
or
dust
.
2. Place this unit in a well-ventilated place and do not place heat-generating objects on this unit.
3. This unit should not be located in an area where it is likely to be subjected to mechanical shocks.
Before You Start
1. Ensure the power switch is in the OFF position prior to starting.
1.
Ensure
the
power
switch
is
in
the
OFF
position
prior
to
starting.
2. Do not attempt to open or remove the covers. That may expose you to dangerous voltage or
other hazards.
3. Installation should be performed by qualified service personnel only.
4. This unit should be operated only from the type of power source indicated on the manufacturer’s
label and with the power supply included with the unit.
Notice
1. Before initial configuration or operation you must first set the TIME/DATE, followed by HDD clear.
If you don’t follow this steps first, that may cause non recording on the HDD or non saving
setting value. Even though it is recorded, you cannot search recorded data.
2. When it comes to HDD capacity, you can use a big size of HDD.
3. When you set the record setup, you have to set the Record Configuration and also Schedule
Setup. This unit records as per the Record type & Schedule setup. The default setting value for
Schedule setup is Continuous mode.
Notice
This equipment has been tested and found to comply with the limits for a ClassAdigitaldevice
This
equipment
has
been
tested
and
found
to
comply
with
the
limits
for
a
Class
A
digital
device
,
pursuant to part 15 of the FCC Rules. These limits are designed to provide reasonable
protection against harmful interference when the equipment is operated in a commercial
environment. This equipment generates, uses, and can radiate radio frequency energy and, if
not installed and used in accordance with the instruction manual, may cause harmful
interference to radio communications. Operation of this equipment in a residential area may
cause harmful interference in which case the manufacturer of the device is not responsible and
the user would be responsible to correct the interference.
1

4Ch H.264 hardware codec -Network DVR Contents
Contents
CHAP 1
Features & Package Contents
4
CHAP
.
1
Features
&
Package
Contents
----------------------------------------------------------------
4
1-1. Features ---------------------------------------------------------------- 4
1-2. Package Contents ---------------------------------------------------------------- 5
CHAP. 2 Function of Each Button ---------------------------------------------------------------- 6
2-1. Front ---------------------------------------------------------------- 6
2
2
Rear
7
2
-
2
.
Rear
----------------------------------------------------------------
7
CHAP. 3 Installation ---------------------------------------------------------------- 8
3-1. Installation ---------------------------------------------------------------- 8
1) HDD (Hard Disk Drive) ---------------------------------------------------------------- 9
2) Camera ---------------------------------------------------------------- 9
3)
Monitor
----------------------------------------------------------------
10
3)
Monitor
----------------------------------------------------------------
10
4) Power ---------------------------------------------------------------- 10
5) Other External Device ---------------------------------------------------------------- 11
CHAP. 4 Operation ---------------------------------------------------------------- 12
4-1. System Log In ---------------------------------------------------------------- 12
4
-
2.
HDD Clear & Factory Default
----------------------------------------------------------------
12
4
2.
HDD
Clear
&
Factory
Default
12
4-3. Display Configuration ---------------------------------------------------------------- 15
4-4. Live View Setup ---------------------------------------------------------------- 16
1) Full / Multiple View ---------------------------------------------------------------- 16
2) SEQ ---------------------------------------------------------------- 16
3
)
PIP View ---------------------------------------------------------------- 16
)
4) ZOOM View ---------------------------------------------------------------- 16
5) Freeze ---------------------------------------------------------------- 16
4-5. Record ---------------------------------------------------------------- 17
4-6. Playback ---------------------------------------------------------------- 17
4-7. Search ---------------------------------------------------------------- 18
4-8. PTZ Camera Operation ---------------------------------------------------------------- 19
4-9. Data Backup ---------------------------------------------------------------- 19
CHAP. 5 Setup ---------------------------------------------------------------- 21
5-1. General Operation ---------------------------------------------------------------- 21
5-2. Display Setup ---------------------------------------------------------------- 22
2
1) VGA Setup ---------------------------------------------------------------- 22
2) Screen Display Setup ---------------------------------------------------------------- 23
3) OSD Setup ---------------------------------------------------------------- 23

4Ch H.264 hardware codec -Network DVR Contents
Contents
5-3. Record ---------------------------------------------------------------- 24
1) Record Setup ---------------------------------------------------------------- 24
2) Schedule Setup ---------------------------------------------------------------- 25
5-4. Configuration ---------------------------------------------------------------- 26
1) HDD Management ---------------------------------------------------------------- 26
2) Time/Date Setup ---------------------------------------------------------------- 27
3) Camera Setup ---------------------------------------------------------------- 27
4) Motion Setup ---------------------------------------------------------------- 28
5) Interval Setup ---------------------------------------------------------------- 29
6) Alarm Setup ---------------------------------------------------------------- 29
7) Password Setup ---------------------------------------------------------------- 29
8) Buzzer Setup ---------------------------------------------------------------- 30
5-5. External Device Setup ---------------------------------------------------------------- 30
1) TCP/IP Setup ---------------------------------------------------------------- 30
2) Pan / Tilt Setup ---------------------------------------------------------------- 39
3)
Adi St
39
3)
A
u
di
o
S
e
t
up ----------------------------------------------------------------
39
4) Spot Setup ---------------------------------------------------------------- 39
5-6. Firmware Upgrade ---------------------------------------------------------------- 40
5-7. Factory Default ---------------------------------------------------------------- 40
CHAP. 6 IRS ---------------------------------------------------------------- 41
6
1
IRS Setup
42
6
-
1
.
IRS
Setup
----------------------------------------------------------------
42
6-2. DVR Setup ---------------------------------------------------------------- 43
6-3. Viewer ---------------------------------------------------------------- 44
6-4. Search ---------------------------------------------------------------- 45
6-5. Backup ---------------------------------------------------------------- 46
6
6
Player
48
6
-
6
.
Player
----------------------------------------------------------------
48
CHAP. 7 DDNS Web-server ---------------------------------------------------------------- 51
7-1. Registering DVR for DDNS ---------------------------------------------------------------- 51
7-2. DDNS set up in DVR ---------------------------------------------------------------- 53
7-3. Web Program ---------------------------------------------------------------- 57
CHAP 8
Specification
----------------------------------------------------------------
58
3
CHAP
.
8
Specification
58
CHAP. 9 Remote Controller ---------------------------------------------------------------- 59

4Ch H.264 hardware codec -Network DVR
CHAP 1. Features & Package Contents
CHAP 1. Features & Package Contents
1-1. Features
Live Display
Real time display per camera
Auto Sequence
Auto
Sequence
PIP (Picture in picture)
Digital Zoom of display (2X ZOOM)
Freeze
Simple playback mode
Simple PTZ camera control
Record
Efficient Image Quality in 3 steps
Adjustable Frame Rate in 5 steps
Audio recording
Schedule recording
Event record by alarm and motion detection
Emergency recording
Network
IRS (Integrated Remote Station)
DDNS supported
Playback
Search and playback by recorded data size, date/time, and event
Various playback speed (forward and backward)
Event Search
Data backup
Backup via USB memory stick / via network
Others
SUNI
CO
S
upports
UNI
-
CO
DE
Supports SPOT Monitor
PAL/NTSC Auto detection
Video loss detection
4

4Ch H.264 hardware codec -Network DVR
1-2. Package Contents
CHAP 1. Features & Package Contents
USB
NETWORK DVR
POWER HDD ACTIVE
USB
NETWORK DVR
POWER HDD ACTIVE
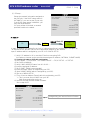
1. DVR Main Unit 2. Remote Controller
3. Power Cable 4. Power Adapter 5. User’s Manual 6. Software CD
7. HDD absorber 8. HDD Bolts
Package Contents Description
1. DVR Main Unit Stand-Alone Digital Video Recorder
9. Mouse
2. Remote Controller Remote controller
3. Power Cable AC power supply to adapters for 12V DC power
4. Power Adapter DC power supply
5. User’s Manual User’s Manual
6. Software CD IRS (Integrated Remote Station) program
7. HDD absorber Absorbs the mechanical shock of HDD against the case bottom.
8. Bolts Bolts for fixing HDD.
9. Mouse Enables to control all functions of DVR.
5

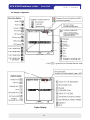
4Ch H.264 hardware codec -Network DVR CHAP 2. Function of Each Button
2-1. Front
CHAP 2. Function of Each Button
12
Name Function
① USB HOST Used for Data Backup and Firmware Update
(Only USB memory stick should be used.)
② LED Lamps Shows status of operation
POWER : Power status
HDD Active : HDD status
HDD
Active
:
HDD
status
6

4Ch H.264 hardware codec -Network DVR
2-2. Rear
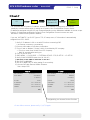
CHAP 2. Parts name & functions
2 3 5 641
7 8 9
Name Function
1 Audio input 1ch audio input
Audio output 1ch audio output
2
RS 485
Connection with PTZ camera or other external device using RS 485
2
RS
485
Connection
with
PTZ
camera
or
other
external
device
using
RS
485
Relay output Relay out terminal
Sensor input Sensor input terminal
3 VGA Connection to VGA monitor (CRT or TFT LCD monitor)
4 Ethernet Connection to Ethernet device
5
Camera input
4ch camera input (NTSC/
PAL)
5
Camera
input
4ch
camera
input
(NTSC/
PAL)
6 Monitor output 1ch composite monitor output (NTSC/ PAL)
7Spot monitor output 1ch spot monitor output (NTSC/ PAL)
8 PS/2 Connection to PS/2 Mouse
9 DC power DC 12V
7

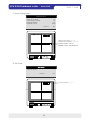
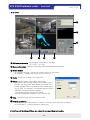
4Ch H.264 hardware codec -Network DVR CHAP. 3 Installation
CHAP.3 Installation
3-1. Installation configuration
8

4Ch H.264 hardware codec -Network DVR
3-1. Installation
CHAP. 3 Installation
1) HDD
MAIN B OARDMAIN B OARD
HDDHDD
1. Connect Main Board and HDD using SATA data cable and HDD power cable.
2. Stick the HDD absorber (included in package) on the bottom of case and then install the
HDD on top of them by using the bolts (included in package).
3. Screws must be inserted from outside of the case bottom.
2) Camera
2)
Camera
CH1 CH2 MONITOR
V
IDEO
V.P
DC
LEVEL
CH1 CH2 MONITOR
CH1 CH2 MONITOR
V
IDEO
V.P
DC
LEVEL
Connect camera to the camera input on rear panel of DVR marked CAMERA IN.
SPOTCH3 CH4 PS/2 DC12V
LENS
VIDEO
DC
AC24V/DC12
SPOTCH3 CH4 PS/2 DC12V
SPOTCH3 CH4 PS/2 DC12V
LENS
VIDEO
DC
AC24V/DC12
Rear view of CAMERA
9

4Ch H.264 hardware codec -Network DVR CHAP. 3 Installation
3
)
Monito
r
)
Connect the video output marked MONITOR to Video
In of Main monitor
4) Power
Connect
the
video
output
marked
MONITOR
to
Video
-
In
of
Main
monitor
.
DC 12V d t (3 33A)
DC
12V
a
d
ap
t
er
(3
.
33A)
10

4Ch H.264 hardware codec -Network DVR CHAP. 3 Installation
5) Other External Device
ETHER NET
AUDIO
IN OUT
RS-485 : Controls external device like PTZ camera.
(Pin No.1 & No.2)
RELAY Output : Relay Output (Pin No.3 & No.5).
SENSOR Input
: Sensor Input
Alarm Input (Pin No 6 ~ No 10)
SENSOR
Input
:
Sensor
Input
–
Alarm
Input
(Pin
No
.
6
~
No
.
10)
.
ETHERNET: Connection to LAN, WAN
Audio Input: Connection to a microphone
Audio Output: Connection to a speaker
VGA : Connection to CRT or TFT LCD monitor (D-SUB)
11

4Ch H.264 hardware codec -Network DVR CHAP. 4 Operation
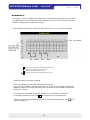
4-1. System Log-In
Mouse buttons Functions
Mouse Wheel Increases or decreases setup value on the Menu mode
Ri
g
ht Decreases setu
p
value on the Menu mode
GENERAL USE OF MOUSE
1) After power on, a right-click of the mouse
shows an icon bar on the screen. Then click
th [M ] i t l i
g
p
Left Increases setup value on the Menu mode
Execute all of the functions (clicking icons)
* Please use a mouse pad for proper operation of the mouse.
DVR LOG-INDVR LOG-IN
th
e
[M
enu
]
i
con
t
o
l
og
i
n.
2) Then, you will see ‘DVR Log-In’ message
shown at right.
3) You may log in as an ADMIN, MANAGER, or
USER1 ~ USER8.
4) Input your password (Max. 8 digits are
available for password) and click ‘ENTER’.
5) To exit click
‘
EXIT
’
button
USER ID ADMIN
USER PW ________
1 2 3 4 5 6 7 8 9
ENTER EX
IT
USER ID ADMIN
USER PW ________
1 2 3 4 5 6 7 8 9
ENTER EX
IT
If the password entered matches previously set password, you can log into ‘MAIN MENU’. If
an incorrect password is entered, you will see “PW IS NOT CORRECT” message on display.
The factory default password is none. Just click ‘ENTER’ for first time initial log in.
5)
To
exit
,
click
EXIT
button
.
ENTER
EX
IT
ENTER
EX
IT
-Factory default password
ADMIN : (Blank)
MANAGER : ‘1’
USER1~USER8 : ‘2’~’9’
※ For security reasons, be sure to make note of your own password.
※The authority of MANAGER & USERS for changing critical settings of DVR is limited due to security reasons.
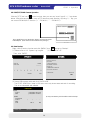
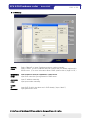
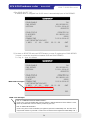
4-2. HDD Clear & Factory Default
Before first operation, you must check that each channel is displaying properly and log in
‘Main Menu’ and set Time/Date and set HDD clear.
12

4Ch H.264 hardware codec -Network DVR
1) HDD Clear
You can see HDD Model name, serial number, number of blocks and size of HDD.
In order to clear HDD click
‘
CLEAR
’
at the bottom as shown below
CHAP. 4 Operation
In
order
to
clear
HDD
,
click
CLEAR
at
the
bottom
as
shown
below
.
(1) Please refer to 4-1. System Log in again.
Then, click ‘ENTER’.
(2) Click ‘CONFIGURATION’.
DVR LOG-INDVR LOG-IN
MAIN MENU
DISPLAY SETUP
MAIN MENU
DISPLAY SETUP
USER ID ADMIN
USER PW ________
1 2 3 4 5 6 7 8 9
ENTER EXIT
USER ID ADMIN
USER PW ________
1 2 3 4 5 6 7 8 9
ENTER EXIT
DISPLAY
SETUP
RECORD
CONFIGURATION
EXTERNAL DEVICE
BACK-UP
FIRMWARE UPGRADE
FACTORY DEFAULT
LANGUAGE ENGLISH
EXI
T
DISPLAY
SETUP
RECORD
CONFIGURATION
EXTERNAL DEVICE
BACK-UP
FIRMWARE UPGRADE
FACTORY DEFAULT
LANGUAGE ENGLISH
EXI
T
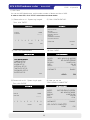
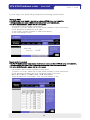
(3) Click ‘HDD MANAGEMENT’. (4) Click ‘CLEAR’.
EXI
T
EXI
T
CONFIGURATION
HDD MANAGEMENT
CONFIGURATION
HDD MANAGEMENT
HDD MANAGEMENT
MODEL WDC WD3200JS-60PDB0
HDD MANAGEMENT
MODEL WDC WD3200JS-60PDB0
HDD
MANAGEMENT
CAMERA SETUP
MOTION SETUP
ALARM SETUP
INTERVAL SETUP
TIME/DATE SETUP
PASSWORD SETUP
BUZZER SETUP
ESC
HDD
MANAGEMENT
CAMERA SETUP
MOTION SETUP
ALARM SETUP
INTERVAL SETUP
TIME/DATE SETUP
PASSWORD SETUP
BUZZER SETUP
ESC
SERIAL WD-WCAPD3768692
BLOCKS 1048576 LBA
SIZE 250 GB
SPEED PIO4
-------------------------------
OVERWRITE ENABLE
SERIAL WD-WCAPD3768692
BLOCKS 1048576 LBA
SIZE 250 GB
SPEED PIO4
-------------------------------
OVERWRITE ENABLE
(6) Now you can see
“HDD CLEAR IS COMPLETED”.
(5) Please refer to 4-1. System Log in again.
Then, click ‘ENTER’.
ESCESC
CLEAR ESCCLEAR ESC
DVR LOG-INDVR LOG-IN
HDD MANAGEMENTHDD MANAGEMENT
USER ID ADMIN
USER PW ________
1 2 3 4 5 6 7 8 9
ENTER EX
IT
USER ID ADMIN
USER PW ________
1 2 3 4 5 6 7 8 9
ENTER EX
IT
MODEL WDC WD3200JS-60PDB0
SERIAL WD-WCAPD3768692
BLOCKS 1048576 LBA
SIZE 250 GB
SPEED PIO4
-------------------------------
OVERWRITE ENABLE
MODEL WDC WD3200JS-60PDB0
SERIAL WD-WCAPD3768692
BLOCKS 1048576 LBA
SIZE 250 GB
SPEED PIO4
-------------------------------
OVERWRITE ENABLE
13
ENTER
EX
IT
ENTER
EX
IT
HDD CLEAR IS COMPLETED
CLEAR ESC
HDD CLEAR IS COMPLETED
CLEAR ESC

4Ch H.264 hardware codec -Network DVR CHAP. 4 Operation
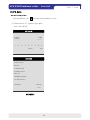
2) Factory Default
Factory default setting initializes DVR system.
(1) Please refer to 4-1. System Log in again.
Then, click ‘ENTER’.
(2) Click ‘FACTORY DEFAULT’.
DVR LOG-INDVR LOG-IN MAIN MENUMAIN MENU
USER ID ADMIN
USER PW ________
1 2 3 4 5 6 7 8 9
ENTER EXIT
USER ID ADMIN
USER PW ________
1 2 3 4 5 6 7 8 9
ENTER EXIT
DISPLAY SETUP
RECORD
CONFIGURATION
EXTERNAL DEVICE
BACK-UP
FIRMWARE UPGRADE
FACTORY DEFAULT
LANGUAGE ENGLISH
DISPLAY SETUP
RECORD
CONFIGURATION
EXTERNAL DEVICE
BACK-UP
FIRMWARE UPGRADE
FACTORY DEFAULT
LANGUAGE ENGLISH
(4) Choose ON for ‘ALL’. (2) Click ‘DEFAULT’.
EXITEXIT
FACTORY DEFAULT
ALL OFF
FACTORY DEFAULT
ALL OFF
FACTORY DEFAULT
ALL OFF
FACTORY DEFAULT
ALL OFF
ALL
OFF
---------------------------------
DISPLAY SETUP OFF
RECORD SETUP OFF
SCHEDULE SETUP OFF
CAMERA SETUP OFF
CONFIGURATION OFF
EXTERNAL DEVICE OFF
ALL
OFF
---------------------------------
DISPLAY SETUP OFF
RECORD SETUP OFF
SCHEDULE SETUP OFF
CAMERA SETUP OFF
CONFIGURATION OFF
EXTERNAL DEVICE OFF
ALL
OFF
---------------------------------
DISPLAY SETUP OFF
RECORD SETUP OFF
SCHEDULE SETUP OFF
CAMERA SETUP OFF
CONFIGURATION OFF
EXTERNAL DEVICE OFF
ALL
OFF
---------------------------------
DISPLAY SETUP OFF
RECORD SETUP OFF
SCHEDULE SETUP OFF
CAMERA SETUP OFF
CONFIGURATION OFF
EXTERNAL DEVICE OFF
(5) Now you can see “FACTORY DEFAULT
COMPLETED” as shown below.
DEFAULT ESCDEFAULT ESC
DEFAULT ESCDEFAULT ESC
FACTORY DEFAULT
ALL ON
FACTORY DEFAULT
ALL ON
ALL
ON
---------------------------------
DISPLAY SETUP ON
RECORD SETUP ON
SCHEDULE SETUP ON
CAMERA SETUP ON
CONFIGURATION ON
EXTERNAL DEVICE ON
ALL
ON
---------------------------------
DISPLAY SETUP ON
RECORD SETUP ON
SCHEDULE SETUP ON
CAMERA SETUP ON
CONFIGURATION ON
EXTERNAL DEVICE ON
14
FACTORY DEFAULT COMPLETED
DEFAULT ESC
FACTORY DEFAULT COMPLETED
DEFAULT ESC

4Ch H.264 hardware codec -Network DVR CHAP. 4 Operation
4-3. Display Configuration
15

4Ch H.264 hardware codec -Network DVR
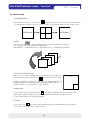
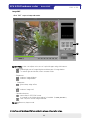
4-4. Live View Setup
CHAP. 4 Operation
CHAP. 4 사용방법
1) Full / Multiple View
Move the cursor onto [4 - split icon] in the icon bar and click it to view 4 channel division.
To enlarge each channel, click 1,2,3,4 Icon. Then, you will see a channel in full screen mode.
2) SEQ
Click ‘SEQ’ icon . It automaticall
y
dis
p
la
y
s full screen ima
g
es in se
q
uence.
Full Screen Full Screen
ypy g q
You can setup SEQ time interval on setup menu.
(MAIN MENU -> CONFIGURATION –> INTERVAL SETUP -> SEQUENCE SCREEN)
CH04
CH03
CH02
C
H
0
1
●
●
●
3) Picture in Picture (PIP View)
C0
4) ZOOM View
When it is in full screen display mode, you can see other camera in a
small window by clicking [PIP] icon , the other camera in small
window is rotating in sequence to next number of camera and you can
set the rotating time interval as per the procedure in MAIN MENU ->
SCREEN SETUP -> PIP INTERVAL -> PIP SCREEN.
CAM01
CAM02
4)
ZOOM
View
In live mode, if you click [ZOOM] icon , images are displayed in two times larger size.
While using [ZOOM] mode, you can move the enlargement area by using the mouse.
To exit ZOOM mode, click ZOOM icon again.
5) Freeze
Clik[FRZ]i d lik h ltht tt f t il i li d
16
Cli
c
k
[FRZ]
i
con an
d
c
li
c
k
a c
h
anne
l
th
a
t
you wan
t
t
o
f
reeze
t
emporar
il
y
i
n
li
ve mo
d
e.
If you click [FRZ] icon again, it will cancel all.

4Ch H.264 hardware codec -Network DVR CHAP. 4 Operation
4-5. Record
It basically records as a setting made in Schedule Record mode except for emergency record mode
It
basically
records
as
a
setting
made
in
Schedule
Record
mode
except
for
emergency
record
mode
.
- Emergency Record
Once you click this icon , it keeps recording continuously regardless of schedule setting.
- Schedule Record (Continuous, Motion, Alarm and Motion/Alarm)
Go to MAIN MENU-> RECORD -> SCHEDULE SETUP and setup schedule as you want.
It records as a setting.
-
Record Icon in Red indicates Emergency Record and Schedule Record
Record
Icon
in
Red
indicates
Emergency
Record
and
Schedule
Record
.
Record [RED]- Emergency Record & Schedule Record
Stop Recording [GREEN]
[Recording Status Display]
2005 /07/ 21 22: 05:18 17D
Click icon to activate Emergency Record.
Click to stop Emergency Record and go
back to Schedule Record .
1 2 3 4
- This DVR unit does not record in following conditions ;
※ When overwrite function is off and HDD is full
※ When there is no scheduled recording
※Wh d t fi
4-6. Playback
※
Wh
en you up
d
a
t
e a
fi
rmware
※ When there is no event detected in motion, alarm and motion/alarm record mode
of schedule record setting.
※ During backup process
On record mode or live mode, click [playback] icon to play the recorded data in 1x speed.
17

4Ch H.264 hardware codec -Network DVR
4-7. Search
CHAP. 4 Operation
Th th h th d t ll d b h l b tt l ft d i ht b tt f
Th
ere are
th
ree searc
h
me
th
o
d
s con
t
ro
ll
e
d
b
y a mouse w
h
ee
l
b
u
tt
on,
l
e
ft
an
d
r
i
g
ht
b
u
tt
on o
f
a mouse.
When you click [SEARCH] icon , then you see a window shown as below.
Select a target data by using the mouse.
In PERCENT SEARCH Mode, you can select certain data by clicking on the bar.
To move to the previous mode, click ‘ESC’.
1. PERCENT SEARCH
Search by percentage of total recorded data. It starts from image corresponding to set % of
data on the search bar.
2. TIME/DATE SEARCH
Search by time & date. Playback starts from the time & date selected.
3. EVENT SEARCH
Search by event list (Motion, Alarm, Video Loss)
SEARCH
PERCENT SEARCH
TIME/DATE SEARCH
EVENT SERACH
EXIT
PERCENT SEARCH
START 2006 / JUL / 09 PM 01 : 58 : 56
END 2006 / JUL / 10 PM 11 : 58 : 56
TARGET 2006 / JUL / 09 PM 05 : 58 : 56
PERCENT 20%
SERACH MAIN MENU PERCENT SEARCH
PLAY ESC
TIME/DATE SEARCH
EVENT SEARCH
TIME/DATE
SEARCH
START 2006 / JUL / 09 PM 01 : 58 : 56
END 2006 / JUL / 10 PM 11 : 58 : 56
TARGET 2006 / JUL / 09 PM 05 : 58 : 56
EVENT
SEARCH
DATE/TIME CHANNEL EVENT
----------------------------------
/ / : : - --
/ / : : - --
/ / : : - --
/ / : : - --
/ / : : - --
//
TIME/DATE SEARCH
EVENT SEARCH
PLAY ESC
/
/
: : - --
PAGE 000/000
ESC
18

4Ch H.264 hardware codec -Network DVR CHAP. 4 Operation
4-8. PAN/TILT/ZOOM Camera Operation
Click the [PTZ] the icon in the icon bar, then you can see ‘arrow’ keys & ‘+/-’ key shown
below. Click these arrow keys to move a PTZ camera to each direction. By using ‘+/-’ key, you
can control ZOOM IN/OUT function. (‘+’ : ZOOM IN / ‘-” : ZOOM OUT)
CAM01
•If you would like to use PTZ function, please connect PTZ camera
to RS-485port. (PTZ camera is not included in this package.)
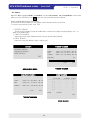
4-9. Data Backup
(1) Please refer to 4-3. System Log in again.
Then, click ‘ENTER’.
Right-click to see the icon bar and click [MENU] icon and go to ‘Backup’.
(2) Click ‘BACK-UP’.
DVR LOG-INDVR LOG-IN
MAIN MENUMAIN MENU
USER ID ADMIN
USER PW ________
1 2 3 4 5 6 7 8 9
ENTER EXIT
USER ID ADMIN
USER PW ________
1 2 3 4 5 6 7 8 9
ENTER EXIT
DISPLAY SETUP
RECORD
CONFIGURATION
EXTERNAL DEVICE
BACK-UP
FIRMWARE UPGRADE
FACTORY DEFAULT
LANGUAGE ENGLISH
DISPLAY SETUP
RECORD
CONFIGURATION
EXTERNAL DEVICE
BACK-UP
FIRMWARE UPGRADE
FACTORY DEFAULT
LANGUAGE ENGLISH
(3) Insert USB memory stick and click ‘CHECK USB’.
※ The START & END time / date in HDD sub-menu only shows start and end of recording.
This is not selectable and editable.
EXITEXIT
USB SETUP
※Only USB memory stick should be used for backup.
HDD
START JUN/14/2007 16:19:08
END JUN/14/2007 16:36:21
MEDIA
PARTITION
START / / : :
END
SIZE MB MB
19
CHECK USB BACK-UP ESC
Page is loading ...
Page is loading ...
Page is loading ...
Page is loading ...
Page is loading ...
Page is loading ...
Page is loading ...
Page is loading ...
Page is loading ...
Page is loading ...
Page is loading ...
Page is loading ...
Page is loading ...
Page is loading ...
Page is loading ...
Page is loading ...
Page is loading ...
Page is loading ...
Page is loading ...
Page is loading ...
Page is loading ...
Page is loading ...
Page is loading ...
Page is loading ...
Page is loading ...
Page is loading ...
Page is loading ...
Page is loading ...
Page is loading ...
Page is loading ...
Page is loading ...
Page is loading ...
Page is loading ...
Page is loading ...
Page is loading ...
Page is loading ...
Page is loading ...
Page is loading ...
Page is loading ...
Page is loading ...
Page is loading ...
Page is loading ...
-
 1
1
-
 2
2
-
 3
3
-
 4
4
-
 5
5
-
 6
6
-
 7
7
-
 8
8
-
 9
9
-
 10
10
-
 11
11
-
 12
12
-
 13
13
-
 14
14
-
 15
15
-
 16
16
-
 17
17
-
 18
18
-
 19
19
-
 20
20
-
 21
21
-
 22
22
-
 23
23
-
 24
24
-
 25
25
-
 26
26
-
 27
27
-
 28
28
-
 29
29
-
 30
30
-
 31
31
-
 32
32
-
 33
33
-
 34
34
-
 35
35
-
 36
36
-
 37
37
-
 38
38
-
 39
39
-
 40
40
-
 41
41
-
 42
42
-
 43
43
-
 44
44
-
 45
45
-
 46
46
-
 47
47
-
 48
48
-
 49
49
-
 50
50
-
 51
51
-
 52
52
-
 53
53
-
 54
54
-
 55
55
-
 56
56
-
 57
57
-
 58
58
-
 59
59
-
 60
60
-
 61
61
-
 62
62


Opticom KDR-4B-U System Kit DVR User manual
- Category
- Digital Video Recorders (DVR)
- Type
- User manual
Ask a question and I''ll find the answer in the document
Finding information in a document is now easier with AI
Other documents
-
 Gadspot GS2002V User manual
-
Memorex DVR H264 User manual
-
 Security Labs SLD287 Owner's manual
-
Maxtor 16Channel User manual
-
Appro DVR-3704T Installation & Operation Manual
-
Maxtor 4Channel Stand-alone DVMR User manual
-
 Security Labs SLD275 User manual
-
Hitachi JPEG2000 User manual
-
-


