Page is loading ...

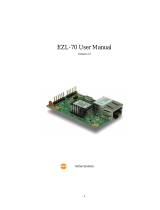
EZL-300S User’s Manual
Version 1.3
Sollae Systems Inc.

- 2 -
To all residents of the European Union
Important environmental information about this product
This symbol on this unit or the package indicates that disposal of this unit after its
lifecycle could harm the environment. Do not dispose of the unit as unsorted municipal
waste; it should be brought to a specialized company for recycling. It is your responsibility to
return this unit to your local recycling service. Respect your local environmental regulation. If in
doubt, contact your local waste disposal authorities.

- 3 -
-Table of Context -
1. OVERVIEW..................................................................................................................... - 6 -
1.1. OVERVIEW ......................................................................................................................- 6 -
1.2. COMPONENTS..................................................................................................................- 7 -
1.3. SPECIFICATIONS ..............................................................................................................- 7 -
1.4. INTERFACE ......................................................................................................................- 8 -
1.4.1. Power ............................................................................................................................ - 8 -
1.4.2. Dsub Connector ............................................................................................................ - 8 -
1.4.3. Status LEDs................................................................................................................. - 10 -
1.4.4. wireless LAN Interface ................................................................................................ - 10 -
2. INSTALLATION AND TEST RUN ............................................................................. - 11 -
2.1. INSTALLATION METHOD................................................................................................- 11 -
2.1.1. Checking the Communication Environment................................................................ - 11 -
2.1.2. Configuration wireless LAN........................................................................................ - 12 -
2.1.3. Connecting to the Network.......................................................................................... - 12 -
2.1.4. Configuring the Environmental Variables................................................................... - 12 -
2.2. TEST RUN......................................................................................................................- 13 -
2.2.1. Changing PC IP Address............................................................................................. - 13 -
2.2.2. Installing EZL-300S .................................................................................................... - 13 -
2.2.3. Configuring EZL-300S ................................................................................................ - 13 -
2.2.4. Connecting to the PC Serial Port................................................................................ - 14 -
2.2.5. Communication Test.................................................................................................... - 14 -
3. CONFIGURING WIRELESS LAN, IP ADDRESS, AND ENVIRONMENTAL
VARIABLES ........................................................................................................................... - 15 -
3.1. CONFIGURATION WIRELESS LAN ..................................................................................- 15 -
3.1.1. Items to Check for the Wireless LAN........................................................................... - 15 -
3.1.2. Setting Wireless LAN Items of the EZL-300S.............................................................. - 17 -
3.2. IP ADDRESS AND ENVIRONMENTAL VARIABLES ............................................................- 19 -
3.3. CONFIGURATION BY EZCONFIG .....................................................................................- 23 -
3.3.1. ezConfig Menus........................................................................................................... - 23 -
3.3.2. Example configuration of ezConfig............................................................................. - 25 -
3.4. CONFIGURATION USING TELNET ...................................................................................- 26 -
3.4.1. Example of Configuration using Telnet....................................................................... - 27 -
3.4.2. Configuration Commands by telnet............................................................................. - 30 -

- 4 -
3.5. AT COMMAND...............................................................................................................- 31 -
3.6. SETTING IP ADDRESS BY ARP.......................................................................................- 31 -
3.6.1. Setting of EZL-300S’s IP address in Windows............................................................. - 32 -
3.6.2. Setting of EZL-300S’s IP address in Linux .................................................................. - 32 -
3.7. SETTING IP ADDRESS-RELATED ITEMS BY DHCP.........................................................- 33 -
4. OPERATION MODE.................................................................................................... - 34 -
4.1. OPERATION MODE OVERVIEW ......................................................................................- 34 -
4.1.1. Overview ..................................................................................................................... - 34 -
4.2. HOW TO INITIATE EACH OPERATION MODE..................................................................- 34 -
4.2.1. How to Initiate Normal Mode ..................................................................................... - 34 -
4.2.2. How to Initiate Console Mode..................................................................................... - 34 -
4.2.3. Comparison of Operation Modes................................................................................ - 35 -
4.3. NORMAL COMMUNICATION MODE................................................................................- 35 -
4.4. CONSOLE MODE............................................................................................................- 35 -
5. NORMAL COMMUNICATION MODE .................................................................... - 37 -
5.1. T2S (TCP TO SERIAL)...................................................................................................- 37 -
5.2. ATC (AT COMMAND)....................................................................................................- 39 -
5.3. COD (CONNECT ON DEMAND) .....................................................................................- 41 -
5.4. U2S (UDP TO SERIAL)..................................................................................................- 43 -
6. ATC MODE ................................................................................................................... - 45 -
6.1. OVERVIEW ....................................................................................................................- 45 -
6.1.1. AT command format .................................................................................................... - 45 -
6.2. BASIC AT COMMAND SET (EXAMPLE: ATA , AT D ETC.) ................................................- 45 -
6.3. EXTENDED AT COMMANDS (EXAMPLE: AT + P L IP ETC.) ...............................................- 46 -
6.4. ONLINE STATE AND ONLINE COMMAND STATE .............................................................- 46 -
6.4.1. Changing Online State to Online Command State ...................................................... - 46 -
6.4.2. Changing Online Command State to Online State ...................................................... - 47 -
6.5. EXAMPLE OF CONFIGURATION WITH AT COMMAND......................................................- 47 -
6.6. EXAMPLE OF TCP CONNECTION ...................................................................................- 47 -
6.6.1. Example of Active Connection .................................................................................... - 47 -
6.6.2. Example of passive Connection................................................................................... - 48 -
6.7. EXAMPLE OF TCP DISCONNECTION ..............................................................................- 48 -
6.7.1. Example of active disconnection ................................................................................. - 48 -
6.7.2. Example of passive disconnection............................................................................... - 48 -

- 5 -
7. OTHER FUNCTIONS................................................................................................... - 49 -
7.1. SSL...............................................................................................................................- 49 -
7.2. PING TEST .....................................................................................................................- 49 -
7.3. DESIGNATING TCP TX BLOCK ......................................................................................- 49 -
7.4. SETTING COD DELAY IN COD MODE ...........................................................................- 50 -
7.5. MULTI-CONNECTION .....................................................................................................- 50 -
7.6. DEBUGGING ..................................................................................................................- 50 -
8. TECHNICAL SUPPORT, WARRANTY, AND NOTES ON OPERATION............. - 51 -
8.1. TECHNICAL SUPPORT ....................................................................................................- 51 -
8.2. WARRANTY ..................................................................................................................- 51 -
8.2.1. Refund ......................................................................................................................... - 51 -
8.2.2. Free Repair Services ................................................................................................... - 51 -
8.2.3. Charged Repair Services............................................................................................. - 51 -
8.2.4. Notes on Operation ..................................................................................................... - 51 -
9. REVISION HISTORY.................................................................................................. - 53 -

- 6 -
1. Overview
1.1. Overview
Along with the development of the Internet, the demand for data communication
functions has increased recently. Data communication over the Internet requires using
TCP/IP, the Internet communication protocol. That is to say, in order to connect a
system to the Internet, TCP/IP protocol must be implemented. It is possible to
implement TCP/IP by directly implementing the protocol, porting public TCP/IP, or
using Operating System (OS). However, all these methods impose burdens on the
developer in time, cost, and technology.
ezTCP series, a Serial ↔ TCP/IP protocol converter product group of Sollae Systems,
enables you to use TCP/IP communication (the Internet communication) function simply
by “connecting the cable to a serial port”. ezTCP sends data from the serial port to the
Internet network after TCP/IP processing, and vice versa.
EZL-300S in ezTCP product group is a product that provides TCP/IP communication
through wireless LAN. In other words, like other ezTCP products, EZL-300S sends data
from the serial port to the wireless LAN after TCP/IP processing and vice versa.
As supporting RS-422, and RS485 as well as RS-232 for serial ports, EZL-300S can be
connected to various systems. It provides DHCP function, so that it can be applied to the
cable network and the xDSL network.
As EZL-300S provides SSL security function, it can be used in a system that requires a
high level of security.

- 7 -
1.2. Components
z EZL-300S Body
z 5V Power Adopter (Option)
z RS232C cable for PC connection (Option)
z PCMCIA Card (Option)
1.3. Specifications
Input Voltage 5V (±10%)
Power
Current 340mA typical
Dimension 136mm x 83mm x 29mm
Weight About 140g
Serial 9pin Dsub male
Interface
Network IEEE802.11b (PCMCIA card required)
Serial Port RS232 / RS422(full duplex) / RS485 (half duplex)
(1200bps ~ 115200bps)
Network IEEE802.11b
Protocols TCP, UDP, IP, ICMP, ARP, DHCP, SSL 3.0 / TLS 1.0
T2S TCP Server Mode
COD TCP Client Mode
ATC TCP Server/Client
(AT command emulation)
Communicati
on Mode
U2S UDP
ezConfig Configuration utility via LAN
ezSerialConfig Configuration utility via serial port
ezterm Socket test utility
Utilities
hotflash Firmware download utility via TFTP
) You can download free utilities and firmware from http://www.eztcp.com.

- 8 -
1.4. Interface
1.4.1. Power
DC 5V is used for EZL-300S and the specification is below:
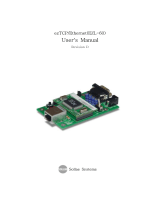
1.4.2. Dsub Connector
The connector of serial port is 9 pin Dsub male. The specification is below:
DC Jack 9pin-Dsub
LEDs
PCMCIA card
Insert Hole

- 9 -
z RS-232
number name description level Dir. Etc.
1 DCD Data Carrier Detect RS232 Input Mandatory
2 RXD Receive Data RS232 Input Mandatory
3 TXD Transmit Data RS232 Output Mandatory
4 DTR Data Terminal Ready RS232 Output Optional
5 GND Ground Ground - Mandatory
6 DSR Data Set Ready RS232 Input Optional
7 RTS Request To Send RS232 Output Optional
8 CTS Clear To Send RS232 Input Optional
9 RI Ring Indicator RS232 Input Optional
z RS-422 (full duplex)
number name description level Dir. Etc.
9 TX+ Transmit Data +
1 TX- Transmit Data -
Differential Output
4 RX+ Receive Data +
3 RX- Receive Data -
Differential Input
Mandatory
z RS-485(half duplex)
number name description level Dir. Etc.
9 TRX+ Data +
1 TRX- Data -
Differential Input/Output Mandatory

- 10 -
1.4.3. Status LEDs
EZL-300S has 5 LEDs.
Each LED functions as follows:
N
ame Meaning Color LED
Status Description
PWR Power Red ON Power is supplied.
Blinking
for a Sec
IP is allocated but TCP connection is not
established.
Blinking 4
Times/Sec IP is not allocated.
ON TCP connection is established.
STS Status Yellow
Rapidly
Blinking Console mode
LINK LAN
Link Green ON Connected to wireless LAN
RXD LAN Rx Yellow Blinking There are data on the wireless LAN
TXD LAN Tx Green Blinking Packets are being transmitted to wireless
LAN
1.4.4. wireless LAN Interface
EZL-300S requires a PCMCIA 16bit PC card. The card should be compliant to PRISM.
(If you would use a wireless LAN card which is not provided from Sollae Systems,
please test or contact me in advance.)
The MAC address of EZL-300S is in bottom of the body, not in PCMCIA card.

- 11 -
2. Installation and Test Run
2.1. Installation Method
You can install EZL-300S in the following steps.
Title Item Sub-item Description
IP address environment 3.
Serial port settings 3.
1.
Checking the
communication
environment
Check items Application program to be
used 5.
Configuration
method
ezSerialConfig
console 3.1.
Infrastructure/ad-hoc 3.1.1.
SSID
(Service Set Identification)) 3.1.1.
Channel 3.1.1.
2.
Configuration
wireless LAN Check items
WEP 3.1.1.
3.
Connecting to the
network
Check method Check if LINK LED is ON.
Set by ezConfig, a utility
program for configuration
through the network.
3.3.
telnet 3.4.
console 4.4.
Set by AT commands in
ATC mode 6.
Configuration
method
By arp
(Temporarily set IP address
only)
3.6.
IP address related items 3.1.
Serial port related items 3.1.
4.
Configuring the
environmental
variables
Configuration
items Communication mode
(Decided depending on
application program)
5.
5. Application to the field
2.1.1. Checking the Communication Environment
Before installing EZL-300S, check the network environment where EZL-300S is to be

- 12 -
installed, including the followings matters:
z Wireless LAN type(Infrastructure/adhoc)
z Wireless LAN SSID, channel
z WEP and WEP key
z IP address environment (local IP, subnet mask, gateway, etc.)
z Serial port type of the equipment to which EZL-300S is going to be connected
(RS232, RS422, RS485)
z Serial port items of the equipment to which EZL-300S is going to be
connected (baud rate, data bit, parity, stop bit)
z Application program protocol to be used (TCP/UDP, server/client, SSL, etc.)
) For application program protocol to be used, see “5. Normal Communication
Mode”.
2.1.2. Configuration wireless LAN
Before using the EZL-300S, the user must set wireless LAN-related items. Wireless
LAN-related items can be set via ezSerialConfig or console in a Console mode. Supply
power without the PCMCIA card insertion to enter into Console mode. In the Console
mode, the user can set not only wireless LAN-related items but also all setup values of
the EZL-300S.
2.1.3. Connecting to the Network
Insert the PCMCIA card while power is not supplied. Then, connect the device with the
EZL-300S using RS232 cable that is compliant with the specification, and supply
power. After power is supplied, the link LED should be turned on. When the link
LED is on, it means that a link has been established between the AP and wireless LAN
device or between the wireless LAN devices to enable communication between them.
2.1.4. Configuring the Environmental Variables
When network connection is completed, configure the environmental variables such as
IP address related items, serial port related items, and communication mode related
items through the LAN using “ezConfig,” the environmental variable configuration
program.
) For environmental variable configuration, see “3. Configuring wireless LAN,
IP Address and Environmental Variables.”

- 13 -
2.2. Test Run
You can perform test run according to the following orders. The test run described here
is based on the assumption that the IP address of the PC is set to 10.1.0.2 and its serial
interface is configured as RS232 interface.
2.2.1. Changing PC IP Address
You can change the IP address of your PC as follows:
IP Address 10.1.0.2
Subnet Mask 255.0.0.0
Gateway IP Address 0.0.0.0
2.2.2. Installing EZL-300S
Connect the AP with the PC through the crossed LAN cable.(When connecting through
a hub, use a one-to-one cable for this connection.) After installing the cable, supply
power to the AP as provided by the AP vendor. After supplying power, check the link
LED indicating a connection between the AP and PC to make sure this connection is
successfully made.
2.2.3. Configuring EZL-300S
Configure EZL-300S setting using ezConfig, the ezTCP configuration program, as
follows.
Run ezConfig, and click [Search ezTCP] button in the ezConfig window. And, ezConfig
program will search all ezTCPs on the local network.
When ezTCP is searched, MAC address of the ezTCP is displayed on the [Search List]
window (The MAC address is indicated at the bottom of the product case).
Select the corresponding MAC address, and set the same as shown in the following
figure and click [Write] button to save the settings.

- 14 -
.
2.2.4. Connecting to the PC Serial Port
Connect the serial port of your PC and that of EZL-300S, using the supplied serial
communication cable. Then, run serial communication program such as Hyper Terminal
and Teraterm. When the program is run, select the same serial port values as those set to
EZL-300S [19200bps, data bit: 8 bits, stop bit: 1 bit, no parity], which will finish the
preparation for serial communication.
2.2.5. Communication Test
When the preparation for serial communication is finished, enter the following in the
DOS window on your PC, to connect to TCP through Telnet program.
"Telnet 10.1.0.1 1470"
When TCP connection succeeds, STS LED of EZL-300S turns ON.
When the STS LED turns ON, enter “123” on the Telnet window, and "123" will appear
on the hyper terminal. Enter “ABC” on the hyper terminal, and “ABC” will appear on
the Telnet window. Otherwise, communication test fails.

- 15 -
3. Configuring wireless LAN, IP Address, and
Environmental Variables
3.1. Configuration wireless LAN
When configuring the wireless LAN, the user must check the network type and security
issues of the network currently being used or to be installed in the future.
3.1.1. Items to Check for the Wireless LAN
z Network Type (infrastructure/ad-hoc)
The infrastructure is a network connection mode that allows communication between
wireless LAN devices or between the wireless LAN and the wired LAN (Ethernet)
through the Access Point (AP). When a network type is set to infrastructure,
communication with wired LAN via AP is possible, which allows both wired and
wireless Internet communications.
<Infrastructure>
The ad-hoc network is designed to communicate between wireless LANs without any

- 16 -
AP. Since communication is established without any AP, the user cannot access an
external network or the Internet. This is also called a peer-to-peer mode.
<Ad-hoc>
z Service Set Identifier (SSID)
When configuring a network, the user can configure different networks using different
APs. In this case, the SSID is used to differentiate one network from another. In other
words, when configuring an infrastructure network, the user can make communication
with the AP which he/she wants to communicate with by setting the SSID of the desired
AP in the EZL-300S. (See 3.1.2.) For information about SSID of the AP, AP manual or
AP configuration program can be referred to. If the user did not set the SSID, the EZL-
300S will be connected with the AP that is first found when power is supplied.
The maximum length of the SSID is 32 bytes, and the user can use ASCII code to set the
SSID.
z Channel
The channel is communication path in the network that it belongs to. Channel values
are set as the same value with the AP.

- 17 -
z Wired Equivalent Privacy (WEP)
This is about security of the wireless LAN. The wireless LAN provides similar security
to that of the wired LAN using the WEP. To use the WEP, the user must set the key
value. According to the key value, data is encoded in 64 bits or 128 bits for
communication. If the user did not set the WEP, security-related problems may occur.
3.1.2. Setting Wireless LAN Items of the EZL-300S
There are two ways to configure wireless LAN-related items - Windows
utility "ezSerialConfig" and via console.
The following table describes each configuration field.
Field Description Factory-set
TARGET
SSID SSID of the Network to Participate
N
ot set.
CREATE
SSID
SSID of the Network to Newly Create When Configuring
an Ad-hoc Network
N
ot set.
0) IBSS: Ad-hoc Network
1) BSS: Infrastructure Network
2) WDS: Reserved (Reserved)
CC TYPE
3) Pseudo IBSS: Reserved (Reserved)
1
CHANNEL Channel number 0
0) WEP is not used.
1) 64 bit WEP key
WEP TYPE
2) 128 bit WEP key
0
KEY ID
N
umber of the Key to be Used 0
z Setting via ezSerialConfig utility
① After connecting EZL-300W without PC card to COM port of PC via a serial cable,
Turn on the EZL-300W.
② Execute ezSerialConfig.
③ After selecting COM port in ezSerialConfig, press [READ]. If you press [READ]
button, The configuration values of EZL-300W will be shown.
④ After inputting configuration value what you want, Press [WRITE] button. The
configuration values will be saved into the EEPROM area of EZL-300W.

- 18 -
z Setting via console
When entering into Console mode, enter "env wlan" and set fields relating to the
wireless LAN.
If the user presses the Enter key in a field without entering any key, the user will use the
existing value in the field. When the user completes entering data, the EZL-300S is
reset to restart operation.
The user can enter "." to delete existing values when setting the SSID.
☞ For more information about Console mode, see "4. Operation Mode."
msh>env wlan
TARGET SSID (APAIR): SOLLAE
CREATE SSID ( no SSID ):
0 - IBSS
1 - BSS
2 - WDS
3 - Pseudo IBSS
CC TYPE (1):
CHANNEL (0):
0 - disable WEP encryption

- 19 -
1 - select 64bit WEP key
2 - select 128bit WEP key
WEP TYPE (1):
KEY0 - 4e dc 58 80 15
KEY1 - 00 00 00 00 00
KEY2 - 00 00 00 00 00
KEY3 - 00 00 00 00 00
EDIT KEY : 1
KEY0 - 4e dc 58 80 15
KEY1 - 11 22 33 44 55
KEY2 - 00 00 00 00 00
KEY3 - 00 00 00 00 00
EDIT KEY :
select default WEP key id
KEY ID (0): 1
updating eeprom...done.
<Example of Configuring the Wireless LAN>
3.2. IP Address and Environmental Variables
For TCP/IP communication, you must set IP address related items. In addition, you have
to set serial port related items (serial port type, communication speed, data bit length,
parity bit, flow control, etc) to EZL-300S.
You can set the IP address and the serial port related items by using ezConfig, the
supplied configuration utility which allows you to configure your EZL-300S over the
network, by logging in Telnet, or by using AT commands in ATC mode. Also, you can
set IP address temporarily, using ARP method which uses MAC address (hardware
address).
Item Description
Local IP
Address IP address of EZL-300S
Subnet Mask Subnet mask
Gateway IP
Address IP address of gateway
IP Address-related
Items
Local Port Port number for waiting to be connected
in Server mode

- 20 -
Port number for waiting UDP data
Peer IP
Address
IP address to connect in Client mode
IP address to send data in UDP mode
Peer Port Port number to connect in Client mode
Port number to send data in UDP mode
Serial Type Serial port type(RS232,RS422,RS485)
Baud Rate Serial port speed (bps)
Data Bits Data bit length
Parity Parity
Stop Bit Stop bit
Serial Port
Flow Control Flow control
Communication Mode ezTCP Mode Communication mode
Conn. Byte Minimum number of bytes attempting to
connect/transmit
COD
DELAY
Reconnect time when COD connection
is closed (unit: seconds)
Connect/Disconnect
Event
Timeout Limit time to keep connection
ezConfig Enable ezConfig function.
Telnet Enable Telnet log in function
Password Select between Telnet password and
ezConfig password.
Configuration Method
Used
ARP Enable IP setting by ARP.
Flexible IP DHCP Select to receive EZL-300S IP address
as DHCP.
SSL Enable SSL security feature.
SEND
DEALY
TCP data transmission interval
(unit: ms)
Comment User comment on the product
Other Functions
Multi Conn. Multi-connection at T2S
z Local IP Address
IP address of EZL-300S. If you set DHCP is set, an IP address is automatically allocated.
So, you cannot set the local IP address.
z Subnet Mask
Sets subnet mask of the network where EZL-300S is installed
/