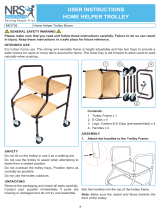
Figure 3 – Attaching the Handles
Front
User Instrucons
Home Helper Trolley
General Safety Warning
Please ensure these instructions are fully read
and implemented. Failure to do so may result in
injury. Retain these instructions in a safe place
for future reference.
1.0 Intended Use
The Home Helper Trolley is ideal for indoor
home use. The strong and versatile frame is
height adjustable and is fitted with two trays to
provide a safer means for users to move items
around the home. The lower tray is set forward
to allow users to walk naturally when pushing.
2.0 Safety Precautions
Do not use the trolley as a walking aid.
Do not use the trolley to assist when attempting
to stand from a seated position.
Do not attempt to sit on the trolley.
Do not overload the trolley trays. When possible
it is advisable to position items centrally.
Do not use the trolley outdoors.
3.0 Unpacking
Remove packaging and check all parts carefully
before assembling the product (figure 2). Do not
assemble if any parts are damaged.
4.0 Assembly
Attach the handles to the Trolley Frame:
Slot the handles into the top of the trolley
frame, figure 3.
Ensure the raised end faces towards the
front of the trolley.
Depress the brass button clip to allow the
handle tube to slide inside the trolley
frame tube.
Ensure the button clip clicks back into place.
Trolley Frame
Legs
Handles
‘E-Clips’
Castors
Figure 2 – Contents
M03792
BROWN
P11917
WHITE
Figure 1 – Model M03792

NRS Healthcare is a Leading Supplier of Community Equipment and
Daily Living Aids, to view our full range, visit our website:
www.nrshealthcare.co.uk
UI/M03792, P11719/10/17/Iss5
Figure 4 – Attaching the Legs
Tel. Head Office: 0330 100 0098
Tel. Customer Services: 0345 121 8111
Email: customerservices@nrshealthcare.co.uk
NRS Healthcare
Sherwood House, Cartwright Way,
Forest Business park, Bardon Hill,
Coalville, Leicestershire, LE67 1UB, UK
Attach the legs to the Trolley Frame:
Slot the leg tube over the ends of the
trolley frame, figure 4.
Align the holes and insert an ‘e-clip’.
Repeat for all 4 legs.
Attach the castors to the legs:
Slide the castor inside the leg tube.
Align the holes at the desired height and
insert an ‘e-clip’.
Repeat for all 4 castors.
Ensure all 4 castors are set to the same
height to prevent instability.
6.0 Cleaning
Clean regularly using a general purpose,
neutral detergent and warm water.
If required the trays can be removed for
cleaning, simply unclip from the frame.
Please check the suitability of the cleaning
product before use. Do not use abrasive
cleaners/cloths as this will damage the
surface.
Allow product to dry thoroughly before use.
7.0 Maintenance
Regularly check the condition of the castors
and remove any build-up of dirt or debris.
Check that all the fixing clips are inserted
correctly and that there is no excessive
movement.
Periodically check the trolley for signs of wear.
Any suspected faults or damage should
immediately be reported to the supplier and
the product taken out of use.
8.0 Product Disposal
Product should be thoroughly cleaned prior to
disposal.
Product is manufactured from metal and
plastic and can be disposed of through Local
Authority Household Waste and Recycling
Centres or through Local Trade Waste
Collectors.
9.0 Product Guarantee
NRS Healthcare, guarantee this product for a
period of 12 months from the date of purchase
against faulty materials and workmanship.
This guarantee does not cover; abuse,
misuse, interference or tampering with any
part of the product.
Any guarantee issued by NRS Healthcare
does not affect your statutory rights.
5.0 Adjustment
To adjust the height:
Remove the ‘e-clip’ securing the castor
in position.
Slide to the required height.
Align the holes and re-insert the ‘e-clip’.
Repeat for all 4 castors.
Ensure all 4 castors are set to the same
height to prevent instability.
/


