Page is loading ...

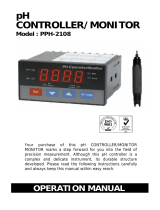
pH MONITOR
Model : PH-321M
L11'i.u1ron PH-321 M
'I
ENTER
,,,,,
I.LI LI
pH
••
PH METER:
Your purchase of this
pH
monitor marks a step
forward for you into the
field of
precision
measurement. Although
this
pH monitor is a
complex and delicate
instrument, its durable
structure will allow many
years of use if proper
operating techniques are
developed. Please read the
following instructions
carefully and always keep
this manual within easy
reach.
'
UKAS
Q
UA
L
I
T
Y
,
\
\
A
N
A
G
C
M
(
N
T
005
OPERATION
MANUAL
Your purchase of this
pH monitor marks a
step forward for you into
the eld of precision
measurement. Although
this pH monitor is a
complex and delicate
instrument, its durable
structure will allow many
years of use if proper
operating techniques are
developed. Please read
the following instructions
carefully and always
keep this manual within
easy reach.

2 3
TABLE OF CONTENTS
FEATURES .......................................................................... 3
SPECIFICATIONS .............................................................. 3
FRONT PANEL DESCRIPTIONS ...................................... 5
Display ............................................................................... 5
CAL (Enter) Button ............................................................. 5
ESC Button ........................................................................ 5
▼ Button ............................................................................ 5
pH Electrode BNC Socket ................................................. 5
DC 9V Input Socket ........................................................... 5
Stick Sponge Fix Position .................................................. 5
Hanging Hall ...................................................................... 5
pH CALIBRATING PROCEDURE ........................................ 6
Calibrating Considration .................................................... 6
Requiring Equipment for Calibration .................................. 6
Calibration Procedures ...................................................... 6
Calibration Clear ................................................................ 9
MEASURING PROCEDURES ......................................... 10
OPTIONAL ACCESSORIES .............................................11

3
FEATURES
• Economical cost digital pH meter General purpose
applications. Easy operation.
• Back light LCD display.
• Auto calibration.
• Compact size, light weight.
• Avaialble for wide applications, such as AQUARIUM,
BEVERAGE, FISH HATCHERIES, FOOD PROCESSING,
PHOTOGRAPHY, LABORATORY, QUALITY CONTROL,
SCHOOL & COLLEGES, SWIMMING POOLS, WATER
CONDITONS.
SPECIFICATIONS
Display LCD size : 31 mm x 31 mm.
LCD with back light, easy read.
Measurement
Range
0 to 14 pH x 0.01 pH
Resolution 0.01 pH
Accuracy ± 0.07 pH (pH 5 - pH 9).
± 0.1 pH (pH 4 - pH 10).
± 0.2 pH (pH 1 - pH 3.9, pH 10.1 - pH 13).
* Main instrument only
Input
Impedance
10^12 ohms.
Temperature
Compensation
Not necessary to make adjustment.
Sampling Time Approx. 1 second.
Operating
Temperature
0°C to 50°C (32°F to 122°F)
Operating
Humidity
Less than 80% RH.

4 5
Calibration Automatically, calibrated by front buttons.
* pH 7 calibration.
* pH 4 calibration.
* pH 10 calibration
Power Supply DC 9V via optional external adapter
Power
Consumption
Approx. 11 mA
Dimension 89mm x 57mm x 31 mm,
(3.5 in x 2.2 in x 1.2 in).
Weight 117 g / 0.26 LB.
pH electrode
(Optional)
Any connector pH Electrode with
BNC connector.
Standard
Accessories
Instruction Manual - 1 PC
Stick sponges - 2 PC’s
Optional
Accessories
pH electrodes :
pH electrode,
pH electrode,
Standard buer solutions :
pH 7.0 buer solutions,
pH 4.0 buer solutions,
DC 9V adapter, AP-9VA
* Input voltage : 100 to 240 ACV,
50/60 Hz.
* Output voltage : Regulation DC 9V/1
Amp. rating max.
* Output plug : round 2.5 mm dia. plug.
plug converter, AP-GTU
* Convert the input plug of AP-9VA from
the Germany type to USA type
* Appearance and specifications listed in this brochure are
subject to change without notice.

5
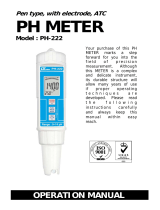
FRONT PANEL DESCRIPTION
1. Display
2. CAL (Enter) button
3. ESC button
4. ▼ button
5. pH Electrode BNC Socket
6. DC 9V Input Socket
7. Stick Sponge Fix Position
8. Hanging Holes
1.
2.
3.
4.
5.
5.
6.
8.
7.

6 7
pH CALIBRATING PROCEDURE
Calibrating Consideration
These pH meter already calibrated by mV signal that simu-
lated from the ideal pH Electrode mV output base on 25°C
environment. However due to
a. An ideal electrode will produce 0 mV at pH 7.00, but
most elctrodes are slightly o.
b. The measuring environment temperature may not near
25°C (15 to 35°C).
It is necessary to make the following calibration prpcedures
if the user need to keep instrument combined electrode
within accuracy.
Requiring Equipment for Calibration
1. Combination pH Electrode (optional).
2. Two buer solutions (optional): pH 7.00 & pH 4.00
(or pH 10.00).
Calibration Procedures
pH 7.00 Calibration
1. Rinse the electrode in distilled water completely.
2. Connect the pH Electrode to the “BNC Socket” and place
electrode onto standard buer pH 7.00 solution.
3. Power on the instrument by plugging in the DC 9V adapter
in the “DC 9V Input Socket”.
4. Press “CAL button” once, the display will show:

7
5. Press “ENTER button” once, the display will ashing
several time, the show 7.00 (if show 6.99, 7.01 it is
normal), now nish the pH 7.0 calibration procedures.
pH 4.00 Calibration
1. Rinse the electrode in distilled water completely.
2. Connect the pH Electrode to the “BNC Socket” and place
electrode onto standard buer pH 4.00 solution.
3. Power on the instrument by plugging in the DC 9V adapter
in the “DC 9V Input Socket”.
4. Press “CAL button” once, the display will show:
Press “▼button” once, the display will show:
5. Press “ENTER button” once, the display will ashing
several time, the show 4.00 (or 4.00 ± 0.01), now nish
the pH 4.0 calibration procedures.

8 9
pH 10.00 Calibration
1. Rinse the electrode in distilled water completely.
2. Connect the pH Electrode to the “BNC Socket” and place
electrode onto standard buer pH 10.00 solution.
3. Power on the instrument by plugging in the DC 9V adapter
in the “DC 9V Input Socket”.
4. Press “CAL button” once, the display will show:
Press “▼button” once a while with two times, the display
will show:
5. Press “ENTER button” once, the display will ashing
several time, the show 10.00 (or 4.00 ± 0.01), now nish
the pH 10.0 calibration procedures.
Calibration Consideration
• During make the Calibration if intend to exit the calibration
procedures, then just press “ESC button” will return to
normal screen.
• The calibration procedures should be executed two points
calibration (pH 7 & pH 4 or pH 7 & pH 10) and start from
the pH7 at rst, then pH4 (or pH10).

9
• During the calibration, the circuit will sensing solution value
automatically. If the buer solution value already beyond 7
± 2 pH. 4 ± 2 pH, 10 ± 2 pH, the LCD will show “Err”.
• Rinse the Electrode in distilled water before change the
buer solution.
• Repeat above calibration procedures two times at least
if possible.
• Rinse the electrode in distilled water after execute the
calibration procedures.
Calibration Clear
During execute the calibration procedures, if happen
something wrong (display Error information), the execute
the following “Calibration Clear” procedures will clear all the
existing calibration data and return to default value.
However after execute the “Calibration Clear” then make
the calibration again. If the display still show “Err” (error
information), then the “Standard solution” or the “pH
electrode” may existing problem.
1. Power on the instrument by plugging in the DC 9V adapter
into the “DC 9V Input socket”
2. Press “CAL button” once, the display will show:

10 11
Press “▼button” once a while with three times, the display
will show:
Press “ENTER button” once, the display will show following
screen once a while,
Then return to normal screen and nish the “Calibration
Clear” procedures.
MEASUREMENT PROCEDURES
After the instrument and pH electrode are calibrated, then
the unit is now ready for measuring.
1. Connect the combination pH Electrode to the “BNC socket”.
2. Power on the instrument by plugging in the DC 9V adapter
into the “DC 9v Input socket”.
3. Place the electrode into the measured solution, then the
instrument will display the pH value.
4. After make the measurement, please rinse the electrode in
distilled water.

11
OPTIONAL ACCESSORIES
pH Electrode PE-03
General purpose pH electrode with BNC connector.
Range: 1 to 13 pH (typical 0 to 14 pH).
Epoxy body, Body size: 12 mm dia. x 160 mm.
Cable length: 1 meter.
pH Electrode PE-11
General purpose & high quality pH electrode with
BNC connector.
Range: 1 to 13 pH (typical 0 to 14 pH).
Epoxy body, Body size: 9.5 mm dia. x 120 mm.
Cable length: 1 meter.
Spear Tip pH Electrode PE-06HD
The “Spear Tip ph Electrode” is perfect for those pH
measurements in applications where sample piercing is
required. Meat, sausage and cheese ideal applications.
The electrode features a very durable glass measuring spear
packaged in a rugged virtually unbreakable epoxy body.
Range: 1 to 13 pH (typical 0 to 14 pH).

12 PB
DC 9V Power Adapter AP-9VA
Input voltage: 100 to 240 ACV, 50/60 Hz.
Output voltage: Regulation DC 9V/1 amp. rating max
Output plug: round 2.5 mm dia. plug.
Plug Converter AP-GTU
Convert the input of AP-9VA, AP-9VB from the Germany type
to the USA type.
Plug Converter AP-GTE
Convert the input plug of AP-9VA, AP-9VB from Germany
type to the UK (England) type.
/