Page is loading ...

aspenhome
RASSEMBLY INSTRUCTIONS
MADE IN VIETNAM
ah
Page 1/2
ITEM NO: I644-280 80" Console
Thank you for purchasing this quality product. Be sure to check all packing material carefully for
small parts that may come loose inside the carton during shipment.
BEFORE USING THIS PRODUCT PLEASE READ, UNDERSTAND, AND FOLLOW THESE INSTRUCTIONS.
Save these instructions for future reference. FOR INDOOR USE ONLY
FUNCTIONALITY INSTRUCTION
TOOLS REQUIRED (NOT PROVIDED)
PHILLIPS SCREWDRIVER
COMPONENTS LIST:
No. Description Sketch Quantity
1 Case 1 PC
24 PCS
04-24-2023
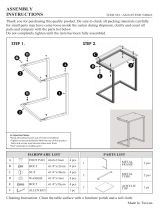
HARDWARE LIST:
No. Description Sketch Quantity
A Bolt Ø5/16" x 1" 12 PCS
B Lock Washer Ø5/16"
C Flat Washer Ø5/16" x 3/4"
D Allen Wrench 4mm 1 PC
Metal Leg
12 PCS
12 PCS 3 3 PCS
Support Leg
Adjust the leveler
when necessary
Leveler on Legs & Support Legs
If you prefer to adjust the shelf
location, remove the screws and
move shelf brackets to the
desired location. Then secure the
brackets to shelf with screws.
Adjustable Shelves

aspenhome
RASSEMBLY INSTRUCTIONS
MADE IN VIETNAM
ah
Page 2/2
STEP 1: Put the case upside down on a soft surface.
STEP 2: Attach the metal legs by using 12 bolts (A), lock washers (B) and flat washers (C).
Use the allen wrench (D) to tighten all bolts. Return the console to the upright position.
ITEM NO: I644-280 80" Console
A
B
C
D Metal Leg
Support Leg
Guide Pin
Release Button
Adjust here to adjust
the roller up or down
Roller
DOWNUP
INSTALL THE SLIDE DOORS:
Push the guide pins down so they are inside the door. Place the roller on the metal track so the
door rolls smoothly. Place the top of the door underneath the track so when you push the release
button the pins go up in to the track as shown below.
REMOVE THE SLIDE DOORS(if necessary):
Press and lower the release buttons on the back of the door to lower the guide pins as shown
below. Then remove the door.
Slide Door-Left Slide Door-Right
04-24-2023

aspenhome
RASSEMBLY INSTRUCTIONS
MADE IN VIETNAM
ah
Page 1/2
ITEM NO: I644-280B TV Backer Panel
Thank you for purchasing this quality product. Be sure to check all packing material carefully for
small parts that may come loose inside the carton during shipment.
BEFORE USING THIS PRODUCT PLEASE READ, UNDERSTAND, AND FOLLOW THESE INSTRUCTIONS.
Save these instructions for future reference. FOR INDOOR USE ONLY
FUNCTIONALITY INSTRUCTION
TOOLS REQUIRED (NOT PROVIDED)
PHILLIPS SCREWDRIVER
COMPONENTS LIST:
No. Description Sketch Quantity
1 TV Backer 1 PC
24 PCS
HARDWARE LIST:
No. Description Sketch Quantity
A Bolt Ø5/16" x 1-1/2" 8 PCS
B Lock Washer Ø5/16"
C Flat Washer Ø5/16" x 3/4"
D Allen Wrench 4mm 1 PC
Metal Strip
16 PCS
16 PCS
Adjust the leveler
when necessary
Leveler on Legs
& Support Legs
E
Bolt Ø5/16" x 2" 8 PCS
04-24-2023

aspenhome
RASSEMBLY INSTRUCTIONS
MADE IN VIETNAM
ah
Page 2/2
ITEM NO: I644-280B TV Backer Panel
STEP 1: Attach the metal strips to the console by using 8 bolts (B), lock washers (C), and flat
washers (D) with an allen wrench (E). Do not tighten bolts completely.
STEP 2: Attach the metal strips to the TV backer by using 8 bolts(A), lock washers(C), and flat
washers(D). Tighten all bolts on console and TV backer with Allen wrench.
E
Metal Strip
B
C
D
Console Back
Console Back
TV Backer Back
E
A
C
D
04-24-2023
/