Page is loading ...

1
Grab Rail
Fittings instruction for the following products:
D02620 - 300mm White Powder Coated Grab Rail
D02621 - 300mm Stainless Steel Grab Rail
D02622 - 450mm White Powder Coated Grab Rail
D02623 - 450mm Blue Powder Coated Grab Rail
D02624 - 450mm Stainless Steel Grab Rail
D02625 - 600mm White Powder Coated Grab Rail
D02626 - 600mm Blue Powder Coated Grab Rail
D02627 - 600mm Stainless Steel Grab Rail
Tools Required (not supplied)
Pencil; Tape measure; Screwdriver appropriate to xings; Spirit level; Drill;
Masonry drill bit appropriate to xings, Ceramic drill bit (optional) appropriate to xings.
KEEP DIY TOOLS OUT OF THE REACH OF CHILDREN
Note: Fixings are not supplied so please ensure suitable xings are purchased that are compatible with
wall construction materials.
Home Safety Advice
• It is recommended that two people t this product to ensure that it is tted safely.
• Always take care when using power tools, particularly in the bathroom.
• Always check for hidden cables and pipework before drilling and take extreme care if there is
any water in the working area.
• It is advisable to use a residual current circuit breaker (RCCB).
• Always wear suitable eye protection when drilling.
• If the product is to be tted on a ceramic tiled wall, a ceramic drill bit should be used.
• Always ensure that the drill hole passes through the central tiled area rather than through the
grouted area. To prevent damage to the tile, mask the area around the hole with tape before
drilling.
• Do not strike the product with hard or sharp objects.
Product Care
To retain the best quality nish, clean product regularly with a soft damp cloth.
Do not use abrasive or chemical cleaners as these will damage the product.
Product Location
The grab rails are only as strong as the wall to which they are xed and the xings that are used.
For dierent wall types you will need to ensure that you are using the correct type of xing for the
material of the wall.
The addition of backboards on the outside of the wall or appropriate strengthening of internal structures
may be required to provide adequate wall strength.
S&H 032 R02

2S&H 032 R02
NOTE: If the wall is made of lightweight thermal blocks, aerated hollow brickwork or
prefabricated partitions even the most appropriate xings may not be able to withstand the
loads which can be suddenly applied to grab rails.
Fitting Instruction
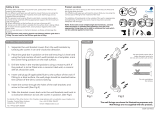
1. Seperate the wall bracket covers from the wall brackets by twisting the covers in an
anti-clockwise direction.
2. Place the grab bar in position on the wall and using the hole centres of each wall bracket as a
template, mark the screw xing positions on the wall surface. If tting the product in a vertical
or horizontal orientation it is important to ensure the grab bar is level. (See Fig.2)
3. Drill the holes in the marked positions using a masonry drill. If the product is to be tted onto a
ceramic tiled wall, a ceramic drill bit should be used.
4. Insert wall plugs (if applicable) ush to the surface of the wall. If tting to a tiled surface, the
wall plugs should be inserted below the surface of the tile to avoid cracking.
5. Insert the screws through the holes of the wall brackets and screw to the wall. (See Fig.2)
6. Slide the bracket covers back onto the wall brackets and twist in a clockwise direction to lock
the covers in position. (See Fig.1)
Additional Information
This product must only be tted to solid brick, concrete block walls or similarly strong
materials oering appropriate support for the maximum safe working load.
Maximum safe working load for the grab rail is 100kg.
Wolseley UK Ltd
Warwickshire
CV31 3HH
www.wolseley.co.uk
Fig.1 Fig.2
Fixings are shown for reference
only and are not supplied.
/


