
InfoScan™ TS Elite
User Manual


Table of Contents
1
Table of Contents
Introduction ................................................................. 3
Contact and Support Information ............................. 3
Getting Started ............................................................ 4
The Pen Parts .......................................................... 4
The Pen Power Supply ............................................ 5
Unpacking the Pen ................................................... 6
Installing the WizCom Desktop ................................ 6
Learning to Scan (using the Trainer) ........................ 7
The Pen User Interface ............................................... 8
The Pen Keys .......................................................... 8
The Pen Main Menu ................................................. 9
Connect to PC ..................................................... 9
The Preferences Menu ........................................ 9
The Information Menu ....................................... 11
Icons and Indicators ............................................... 11
The Pen Applications ............................................... 13
Notes ..................................................................... 13
The Notes Functions ......................................... 13
The Notes Toolbar ............................................ 13
Toolbar Options ................................................. 14
Notes Tutorial .................................................... 17
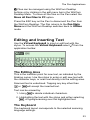
Editing and Inserting Text ................................. 23
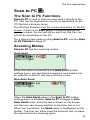
Scan to PC ............................................................. 25
The Scan to PC Functions ................................ 25
The Scan to PC Toolbar .................................... 26
Toolbar Options ................................................. 26
Scan to PC Tutorial ........................................... 27
The WizCom Desktop ............................................... 32
Introduction to the Desktop .................................... 32
The Desktop Modes .......................................... 32
The Desktop User Interface ..................................... 34
The Desktop Main Menu ........................................ 34
The Desktop Tabs .................................................. 34
The Task Bar Icons and Menu ............................... 36

Table of Contents
2
Managing Notes Files Using the Desktop ............. 37
Tips ............................................................................ 39
Changing Scanning Settings ................................. 39
Scanning Guidelines ............................................. 41
Pen Maintenance .................................................. 42
Troubleshooting Pen-PC Communications ........... 42
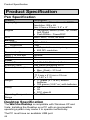
Product Specification .............................................. 44
Pen Specification................................................... 44
Desktop Specification ............................................ 44

Introduction
3
Introduction
Congratulations on your choice of a state-of-the-art scanning
Pen from WizCom Technologies. WizCom makes personal,
portable scanning Pens that assist with reading,
understanding and utilizing text.
Inside the tip of the Pen is a sophisticated electronic eye.
This eye enables you to scan different types of printed
information directly into your Pen. The scanned text can then
be edited and transferred to the PC.
The Pen comes with a touch screen and stylus, allowing
easy manipulation of the Pen user interface and quick
editing of scanned texts with the Virtual Keyboard.
Use this guide to find out about setting up and using your
WizCom product.
Contact and Support Information
Contact us at 888 777 0552 (Toll free in USA) or +1 978 727
0026 or email [email protected]
. Visit our
website http://www.wizcomtech.com
to register your product.

Getting Started
4
Getting Started
The Pen Parts
On the Front Panel you can see:
1. Pen tip with optical scanning head (beneath the
protective cover)
2. 5-way button (Enter and direction keys)
3. Power/Escape key (red)
4. Touch Screen Display
Pen Front Panel
On the Top Panel you can see:
1. USB Cable Outlet
2. Infrared Screen
3. Stylus Slot
4. Insertion point for headphones
Pen Top Panel
Important: Before using the headphones, adjust the volume
using the Voice Settings option in the Preferences menu.

Getting Started
5
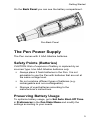
On the Back Panel you can see the battery compartment.
Pen Back Panel
The Pen Power Supply
The Pen comes with 2 AAA Alkaline batteries.
Safety Points (Batteries)
CAUTION: Risk of explosion if battery is replaced by an
incorrect type. Use AAA Alkaline batteries only.
Always place 2 fresh batteries in the Pen. It is not
advisable to use the Pen with batteries that are not at
the same voltage level.
Do not combine different types of batteries (e.g.
rechargeable and non-rechargeable).
Dispose of used batteries according to the
manufacturer's instructions.
Preserving Battery Usage
To optimize battery usage, go to Set Auto Shut-Off Time
in Preferences in the Pen Main Menu and modify the
settings according to your needs.

Getting Started
6
External Power Supply (using the USB
cable)
Connecting the Pen to the PC using the USB cable
automatically activates the power supply from the PC. This
has the following implications:
The Pen uses the external power supply when
connected to the PC, so batteries last longer.
CAUTION: Unsaved information may be lost if the USB
cable disconnects while using without batteries. It is
very important that the Pen always contains batteries,
even when connected to the PC.
Set Auto Shut-Off Time in Preferences is disabled
when the Pen is connected to the PC.
Unpacking the Pen
To get started:
1. Remove the Pen from the protective case.
2. Lift the battery cover on the back of the Pen by pushing
the tab down and out.
3. Insert the batteries into the Pen with the positive and
negative terminals corresponding to the markings on
the sides of the battery compartment.
Note: Make sure that your Pen always contains
batteries, even when connected to the PC.
4. Close the battery compartment.
5. Remove the protective cover from the Pen tip.
6. Turn the Pen on by pressing the red power key.
The Pen is ready to scan!
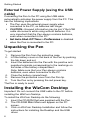
Installing the WizCom Desktop
Important: Do not connect the USB cable to the PC before
installing the WizCom Desktop.
To install the WizCom Desktop do the following:
1. Insert the CD-ROM that was supplied with the Pen.
2. The CD-ROM
Main Menu will appear on the PC
screen.
3. Click on WizCom Desktop Installation and follow the
instructions for installing the Desktop and the USB
driver.

Getting Started
7
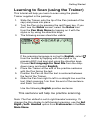
Learning to Scan (using the Trainer)
This tutorial will help you learn to scan using the plastic
Trainer supplied in the package.
1. Slide the Trainer onto the tip of the Pen (instead of the
cap) and press into place.
2. Turn the Pen on by pressing the red Power key. If you
don’t see the Notes screen, select the Notes icon
from the Pen Main Menu by tapping on it with the
stylus or by using the direction keys.
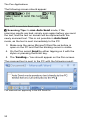
3. The following screen should be visible:
If the scanning language is not set to English, select
from the toolbar by tapping with the stylus or by
pressing ESC (red key) and using the direction keys.
Choose Set Language for New File from the drop-
down menu and select English.
4. Place the Trainer at the end of the practice sentence
with the Pen facing the text.
5. Position the Pen so that the text is centered between
the feet of the Trainer.
6. Glide the Pen from right to left in a straight line over the
text. Start scanning 1cm from the end of the sentence
and finish 1cm after.
Use the following English practice sentence:
This sentence will help me practice scanning.
Note: The Pen default is set to right-handed scanning. To
change the Pen display to left-handed scanning, use the Set
Right-/Left- Handed option from Preferences in the Pen
Main Menu.

The Pen User Interface
8
The Pen User Interface
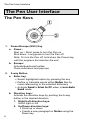
The Pen Keys
1. Power/Escape (ESC) Key
a. Power:
Start up – Short press to turn the Pen on
Shut down - Long press to turn the Pen off
Note: To turn the Pen off, hold down the Power key
until the progress bar reaches the end.
b. Escape:
Activate/deactivate toolbar
Close submenus and pop-ups
2. 5-way Button
a. Enter key:
Select highlighted option by pressing the key
Define or translate words within Notes files by
cross-referencing to the selected dictionary
Activate Send in Scan to PC when in non-Auto
Send mode
b. Direction keys:
Activate the direction keys by pushing the 5-way
button in the desired direction
1. Right/Left direction keys:
Scroll right or left
2. Up/Down direction keys:
Scroll up or down
Create a new paragraph in
Notes using the
Down key

The Pen User Interface
9
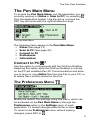
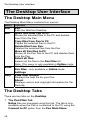
The Pen Main Menu
To access the Pen Main Menu, exit the application you are
currently working in (Notes or Scan to PC), by selecting
from the application toolbar. Use the stylus, or press the
ESC key and scroll with the right/left direction keys.
The Pen Main Menu
The following items appear in the Pen Main Menu:
Notes (See page 13)
Scan to PC (See page 25)
Connect to PC
Preferences
Information
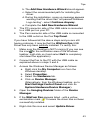
Connect to PC
Use this option to communicate with the WizCom Desktop.
Selecting this option while the WizCom Desktop is running
on the PC will establish Pen-PC Communications and allow
you to move or copy Notes files from the Pen to your PC, or
to delete files currently stored on the Pen.
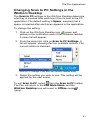
The Preferences Menu
Modify the default Pen settings using this menu, which can
be accessed via the Pen Main Menu or through the
Preferences option in the Settings menu of each
application. To accept changes press Enter or select
.
To return to the Preferences menu without making
changes, press ESC or
.

The Pen User Interface
10
Set Menu Display Language
The menu display language is the language in which the
menus and messages appear (The Pen UI). Use this option
to change the menu display language.
Voice Settings
Use this option to modify the volume, pitch and reading
speed on the Pen. This affects the way text is read aloud in
Notes.
Set Auto Shut-Off Time
If the Pen is not in use it will shut down automatically after
two minutes. Use this option to change the automatic shut-
off time setting.
Note: The auto shut-off feature is disabled while the Pen is
connected to the PC.
Set Right-/Left- Handed
Use this option to switch between right and left-handed
scanning. The Pen default is set to right-handed scanning.
Set Screen Contrast
Use this option to adjust the brightness of the display. Move
the slider bar by dragging with the stylus or using the
direction keys.
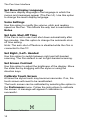
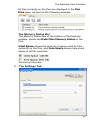
Calibrate Touch Screen
At times the stylus touch may become inaccurate. If so, the
touch screen will need to be recalibrated.
The touch screen can be calibrated by selecting the option in
the Preferences menu. Follow the instructions to calibrate
the screen. A message will appear if calibration is
successful.
Touch Screen Calibration

The Pen User Interface
11
The Information Menu
View Memory Status
Use this option to see how much memory is available on the
Pen for storing new files.
Compact Memory
Maximize free space on the Pen's extension card by
compacting the Pen file system.
Serial Number
Use this option to view the Pen serial number.
About
Use this option to view the Pen version and copyright
information.
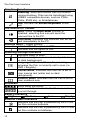
Icons and Indicators
The table below contains a list of icons and graphic
indicators. Icons can be selected by tapping on them with
the stylus, or by using the 5-way button.
Indicators cannot be selected and represent the current state
of the Pen.
Graphic Function
Common Toolbar Icons
Settin
g
s: Display the Settin
g
s menu options.
Help: Display the Help menu options.
Pen Main Menu: Exit the application.
The Notes Toolba
r
Read Aloud: Hear text on screen read aloud.
T
ranslate/Define Word: Define or translate
words by cross-referencing to the selected
dictionary.
New File: Create a new file.
File Operations: Open, rename or delete
existing files.
Para
g
raph: Create a new paragraph or delete
an existing one.

The Pen User Interface
12
Graphic Function
Beamin
g
: Send and receive files via infrared
communications. Files can be transferred using
IrOBEX compatible devices, such as PDAs
(Palm, IPAQ etc), or Smartphones.
Edit: Activate the
V
irtual Keyboard to edit
text.
The Scan to PC Toolba
r
Send: When the
A
uto Send function is
disabled, selecting this icon will send the
scanned line to the PC.
A
uto Send: Indicates that scanned text will be
sent immediately to the PC.
Settings Menu – toggle options
Indicates that the option is OFF.
Indicates that the option is ON.
Scanning Settings indicators
Indicates ready to scan.
Indicates ready to scan inverse text (white text
on dark background).
Language Indicato
r
: Shows the scanning
language the Pen is currently set to scan (i.e.
ENG = English).
Inverse Mode: Indicates that the Pen is set to
scan inverse text (white text on dark
background).
Numeric Mode: Indicates that the Pen is set to
scan numbers only.
Scrollbars
Scroll using the stylus.
Inactive scrollbars indicate that there is no text
to scroll through.
Battery Indicators
High Medium Low Empty
External Power Indicators
Indicates that the Pen is powered by the PC but
the Pen contains batteries.
Indicates that the Pen is powered by the PC and
the Pen contains no batteries.

The Pen Applications
13
The Pen Applications
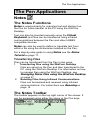
Notes
The Notes Functions
Notes is used primarily for scanning text and storing it on
the Pen for future transfer to the PC using the WizCom
Desktop.
Text can also be inserted manually using the Virtual
Keyboard, and files can be transferred using infrared
communications between the Pen and other IrOBEX
compatible devices.
Notes can also be used to define or translate text from
within a file using the dictionaries installed on the Pen.
For a step-by-step guide to using Notes see the
Notes
Tutorial
on page 17.
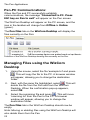
Transferring Files
Files can be transferred from the Pen in two ways:
1. Transferring files using the WizCom Desktop
Files are saved on the Pen and then transferred to the
PC using the WizCom Desktop. For information on how
to manage files using the WizCom Desktop, see
Managing Notes Files using the WizCom Desktop
on page 37.
2. Beaming Files Using Infrared Communications
Files can be beamed and received using infrared
communications. For instructions see
Beaming
on
page 15.
The Notes Toolbar
The toolbar appears on the top right corner of the screen. It
can be accessed using either the stylus or the Pen keys.

The Pen Applications
14
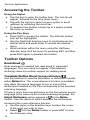
Accessing the Toolbar
Using the Stylus
a. Tap the icon to open the toolbar item. The tool-tip will
appear, followed by the drop down menu.
b. Tap with the stylus to select a menu option or scroll
up/down by activating the scroll bar.
c. To deselect the toolbar, simply tap in a space outside
the menu or toolbar.
Using the Pen Keys
a. Press ESC to access the toolbar. The leftmost toolbar
item will be highlighted.
b. Use the Right/Left direction keys to scroll between the
toolbar items and press Enter to access the desired
menu.
c. Scroll up/down within the menu using the Up/Down
direction keys. Exit the menu by pressing ESC and then
press ESC again to deselect the toolbar.
Toolbar Options
Read Aloud
Hear scanned or inserted text read aloud in supported
languages. This icon does not appear if the selected
dictionary does not contain support for reading aloud.
Translate/Define Word (cross-reference)
Use this function to view the translation or definition of words
within Notes files. The cross-reference function is available
only when the source language of one or more of the
dictionaries installed on the Pen corresponds to the selected
scanning language.
If there is more than one dictionary on the Pen whose source
language is the same as the current scanning language, the
Select Dictionary option appears in
on the Notes
toolbar. Use this option to switch between the dictionaries.
Accessing the cross-reference function:
a. Use the stylus or the direction keys to place the cursor
at the word you wish to view.
b. Select
from the Notes toolbar or press ENT to view
the dictionary entry.

The Pen Applications
15
New File
Create a new file. If there is scanned text on the screen,
selecting
will automatically save the previous file under a
default file name.
File Operations
Use this option to open or delete stored files, or to rename
the current file.
Paragraph
Use this option to create or delete paragraphs.
Beaming
Use this option to beam and receive files using infrared
communications. Files can be transferred using IrOBEX
compatible devices, such as PDAs (Palm, IPAQ etc), or
Smartphones.
Note: Only files saved as text files (.txt) can be sent to the
Pen.
Using infrared communications to beam and receive files:
1. Beaming Files
a. In the Notes application, open the Notes file you
wish to beam.
b. Confirm that the infrared port on the receiving
device is enabled to receive.
c. Align the Pen's infrared screen (see
The Pen
Parts
on page 4) with the infrared component on
the receiving device.
d. Select Beam Current File from
in the Notes
toolbar.
e. Wait for the success confirmation message on the
Pen.
2. Receiving Files
a. Make sure that the sending device is set to send a
text file.
b. Select Receive File from
in the Notes toolbar.
c. Align the Pen's infrared screen (see
The Pen
Parts
on page 4) with the infrared component on
the sending device.

The Pen Applications
16
d. Initiate infrared file sending from the sending
device.
e. Wait for the success confirmation message on the
Pen.
f. The file from the sending device will open on the
Pen screen, and will be saved automatically into
the Notes files system.
Edit
Access the Virtual Keyboard to modify scanned text or to
insert new text. See
Editing and Inserting Text
on page
23 for information on using the Virtual Keyboard.
Settings
The Settings menu contains the following options:
Enlar
g
ed Fon
t
Change the display setting to enlarged
font.
Inverse
Scan inverse text (white text on dark
background).
Numeric
Use this option to scan numbers.
Set Lan
g
ua
g
e
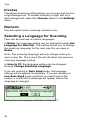
for New File
Change the scanning language for the
next new file. See
Selecting a
Language for Scanning
on page 40.
Select
Dictionary
Choose the dictionary you wish to use for
cross-referencing. This option only
appears if there is more than one
dictionary available for the source
language.
Preferences
Display the Preferences menu (from the
Pen Main Menu).
Help
The Help menu contains the following options:
Icons
An explanation of icons and graphic
indicators.
Keys
An explanation of the Pen keys and their
functions.

The Pen Applications
17
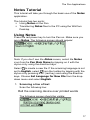
Notes Tutorial
This tutorial will take you through the basic use of the Notes
application.
The tutorial has two parts:
Using Notes on the Pen
Transferring Notes files to the PC using the WizCom
Desktop
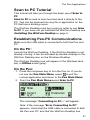
Using Notes
Press the red power key to turn the Pen on. Make sure you
are in Notes. The following screen should appear:
Note: If you don’t see the
Notes
screen, select the Notes
icon from the Pen Main Menu by tapping on it with the
stylus or by using the direction keys.
Select
to create a new file. If the scanning language is not
set to English, select
from the toolbar by tapping with the
stylus or by pressing ESC (red key) and using the direction
keys. Choose Set Language for New File from the drop-
down menu and select English.
1. Scanning a line of text
Scan the following line:
Roll the scanning device over printed words
The following screen should be visible:

The Pen Applications
18
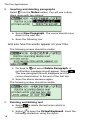
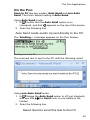
2. Inserting and deleting paragraphs
Select from the Notes toolbar. You will see a drop-
down menu with two options:
a. Select New Paragraph. The cursor should move
down to the next line.
b. Scan the following line:
and see how the words appear on your Pen.
The following screen should be visible:
c. Go back to and select Delete Paragraph. A
confirmation message should appear. Select
.
The new paragraph should disappear and the
cursor should return to the end of the first line.
d. Scan the above sentence again.
The following screen should be visible:
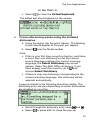
3. Deleting and Editing text
a. Select to delete the last scan (which is
underlined).
b. Select
to open the Virtual Keyboard. Insert the
following characters using the stylus:
Page is loading ...
Page is loading ...
Page is loading ...
Page is loading ...
Page is loading ...
Page is loading ...
Page is loading ...
Page is loading ...
Page is loading ...
Page is loading ...
Page is loading ...
Page is loading ...
Page is loading ...
Page is loading ...
Page is loading ...
Page is loading ...
Page is loading ...
Page is loading ...
Page is loading ...
Page is loading ...
Page is loading ...
Page is loading ...
Page is loading ...
Page is loading ...
Page is loading ...
Page is loading ...
-
 1
1
-
 2
2
-
 3
3
-
 4
4
-
 5
5
-
 6
6
-
 7
7
-
 8
8
-
 9
9
-
 10
10
-
 11
11
-
 12
12
-
 13
13
-
 14
14
-
 15
15
-
 16
16
-
 17
17
-
 18
18
-
 19
19
-
 20
20
-
 21
21
-
 22
22
-
 23
23
-
 24
24
-
 25
25
-
 26
26
-
 27
27
-
 28
28
-
 29
29
-
 30
30
-
 31
31
-
 32
32
-
 33
33
-
 34
34
-
 35
35
-
 36
36
-
 37
37
-
 38
38
-
 39
39
-
 40
40
-
 41
41
-
 42
42
-
 43
43
-
 44
44
-
 45
45
-
 46
46


WizCom Technologies InfoScan TS Elite User manual
- Type
- User manual
- This manual is also suitable for
Ask a question and I''ll find the answer in the document
Finding information in a document is now easier with AI

Other documents
-
 C-Pen C-Pen Reader C610R User manual
-
Ectaco C-Pen Dictionary Pen C610D User manual
-
Janam XG105WM User guide
-
Samsung SM-N900AZKEATT User manual
-
Penpower PCE Writing Pad Version User manual
-
IRIS IRISPEN TRANSLATOR 6 User manual
-
Motion Computing LE-Series Owner's manual
-
-
-
Fujitsu PenCentra 130 User manual
