Page is loading ...

METROPOLIS
DGT 25 BF
Installation and
servicing instructions
ENG
IT
ES
ENSURE THAT THESE INSTRUCTIONS ARE LEFT
FOR THE USER AFTER COMPLETION OF THE
BENCHMARK SECTION
Please read the Important Notice within
this guide regarding your boiler warranty
199838

All descriptions and illustrations provided in this manual have been carefully prepared but we reserve the right to make changes
and improvements in our products that may affect the accuracy of the information contained in this manual.
This boiler may require 2 or more operatives to move it into its installation site, remove it from its packaging and during
movement into its installation location. Manoeuvring the boiler may include the use of a sack truck and involve lifting pushing
and pulling.
Caution should be exercised during these operations.
Operatives should be knowledgeable in handling techniques when performing these tasks and the following precautions
should be considered:
– Grip the boiler at the base
– Be physically capable
– Use personal protective equipment as appropriate e.g. gloves, safety footwear.
During all manoeuvres and handling actions, every attempt should be made to ensure the following unless unavoidable
and/or the weight is light.
– Keep back straight
– Avoid twisting at the waist
– Always grip with the palm of the hand
– Keep load as close to the body as possible
– Always use assistance
WARNING
Caution should be exercised when performing any work on this appliance.
Protective gloves and safety glasses are recommended.
– Avoid direct contact with sharp edges.
– Avoid contact with any hot surfaces.
NOTICE
Please be aware that due to the wet testing of the appliance, there may some residual water in the hydraulic circuit.
– Protect any surfaces, carpets or floorings.
– Use a suitable container to catch any water that escape when removing the protective caps from the connections.
SAFE HANDLING
IMPORTANT NOTICE
For the first year all of our appliances are protected by our manufacturer’s guarantee which covers both parts and
labour.
As you would expect from Sime Ltd, it is our aim to provide our valued customers with the best in after sales and
service.
To take advantage of any extended warranty offered, all you have to do is to adhere to these 3 simple conditions:
• The installation must be carried out to Manufacturers/Benchmark Standards by a Gas Safe Registered
Engineer, and recorded in the installation manual.
• The appliance must be registered with both Sime Ltd and Gas Safe within 30 days of installation.
• The appliance must be serviced annually, by either Sime Ltd or a Gas Safe registered engineer- ensuring that the
Benchmark service record in the installation manual is completed.
Failure to comply with the above will result in only the 12 month warranty being offered.
In the absence of any proof of purchase, the 12 month warranty period will commence from the date of manufacture
of the boiler as shown on the appliance data plate.


The Benchmark Scheme
Sime Ltd is a licensed member of the Benchmark Scheme which aims to improve the standards of installation and
commissioning of domestic heating and hot water systems in the UK and to encourage regular servicing to optimi-
se safety, efficiency and performance.
Benchmark is managed and promoted by the Heating and Hotwater Industry Council.
For more information visit www
.centralheating.co.uk

Metropolis DGT 25 BF:
Gas Council number 47-283-22
These appliances comply with the S.E.D.B.U.K. scheme, band “D”
SIME COMBINATION BOILERS
Installer checklist
Please remember to carry out the following checks after installation. This will achieve complete customer satisfaction, and
avoid unnecessary service calls. A charge will be made for a service visit where the fault is not due to a manufacturing
defect.
– Has a correct by-pass been fitted and adjusted?
– Has the system been flushed in accordance with the guidelines given in BS7593 “Treatment of water in domestic hot
water central heating systems”?
– Is the system and boiler full of water, and the correct pressure showing on the pressure gauge?
– Is the Auto Air Vent open?
– Has the pump been rotated manually?
– Is the gas supply working pressure correct?
– Is the boiler wired correctly? (See installation manual).
– Has the D.H.W. flow rate been set to the customer requirements?
– Has the customer been fully advised on the correct use of the boiler, system and controls?
– Has the Benchmark Checklist in the use and maintenance section of this manual, been completed ?
IPX5D
Important Information
IT IS A STATUTORY REQUIREMENT THAT ALL GAS APPLIANCES ARE INSTALLED BY COMPETENT PERSONS, IN
ACCORDANCE WITH THE GAS SAFETY (INSTALLATION AND USE) REGULATIONS (CURRENT EDITION). The manu-
facturer’s instructions must not be taken as overriding any statutory requirements, and failure to comply with these
regulations may lead to prosecution.
No modifications to the appliance should be made unless they are fully approved by the manufacturer.
GAS LEAKS: DO NOT OPERATE ANY ELECTRICAL SWITCH, OR USE A NAKED FLAME. TURN OFF THE GAS SUPPLY
AND VENTILATE THE AREA BY OPENING DOORS AND WINDOWS CONTACT THE GAS EMERGENCY SERVICE ON
0800111999.
Please refer to commissioning instructions for filling in the checklist of this installation guide.
Note: All Gas Safe registered installers carry a ID Card.
You can check your installer is Gas Safe Registered by calling 0800 408 5577
CONTENTS
1 DESCRIPTION OF THE BOILER . . . . . . . . . . . . . . . . . . . . . . . . . . . . . . . . . . . . . . . . . . . . . . . . . . . . . . . . . . . . . . . . . . . . . . pag. 6
2 INSTALLATION . . . . . . . . . . . . . . . . . . . . . . . . . . . . . . . . . . . . . . . . . . . . . . . . . . . . . . . . . . . . . . . . . . . . . . . . . . . . . . . . . . . . . pag. 10
3 CHARACTERISTICS . . . . . . . . . . . . . . . . . . . . . . . . . . . . . . . . . . . . . . . . . . . . . . . . . . . . . . . . . . . . . . . . . . . . . . . . . . . . . . . . . pag. 18
4 USE AND MAINTENANCE (including BENCHMARK) . . . . . . . . . . . . . . . . . . . . . . . . . . . . . . . . . . . . . . . . . . . . . . . . . . pag. 22
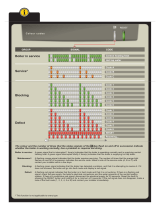
5 FAULT FINDING . . . . . . . . . . . . . . . . . . . . . . . . . . . . . . . . . . . . . . . . . . . . . . . . . . . . . . . . . . . . . . . . . . . . . . . . . . . . . . . . . . . . pag. 30
6 REPLACEMENT OF PARTS . . . . . . . . . . . . . . . . . . . . . . . . . . . . . . . . . . . . . . . . . . . . . . . . . . . . . . . . . . . . . . . . . . . . . . . . . . pag. 30
7 EXPLODED VIEWS . . . . . . . . . . . . . . . . . . . . . . . . . . . . . . . . . . . . . . . . . . . . . . . . . . . . . . . . . . . . . . . . . . . . . . . . . . . . . . . . . pag. 32
ENGLISH

6
ENG
IT
ES
K
∅60/100
85
750
10
L
G
60
100
290
70
70 70
70
=
=
M
R
G
E
U
39
50
29,5
125
1.1 INTRODUCTION
The Sime “METROPOLIS DGT 25 BF” are
wall mounted, fan assisted balanced flue
combination boilers.
The appliance is supplied suitable for use
with natural gas, L.P.G. and provide central
heating and instantaneous production of
D.H.W. Heat output is varied according to
demand by the modulating gas control on
both D.H.W. and C.H.
In order to see the several solutions for the
inlet/outlet air/smoke to see the sections
2.17 / 2.17.4.
The boiler is designed for use with sealed
primary water systems and is supplied fully
assembled and equipped with complete
valve packs.
The boiler can be used with a 24V room
thermostat (class II according to EN
60730.1).
This booklet provides instructions for the
boiler “METROPOLIS DGT 25 BF” model
with following features:
– electronic ignition,
– fully modulating.
1 DESCRIPTION OF THE BOILER
TABLE 2 - Minimum clearances
For ventilation For servicing
ABOVE THE APPLIANCE CASING 200 mm 300 mm
AT THE R.H.S. 15 m m 15 m m
AT THE L.H.S. 15 m m 15 m m
BELOW THE APPLIANCE CASING 200 mm 200 mm
IN FRONT OF THE APPLIANCE 350 mm 500 mm
TABLE 1 - Connections
R C.H. return 22 mm Compression
M C.H. flow 22 mm Compression
G Gas connection 15 mm Compression
E Cold water 15 mm Compression
U Hot water 15 mm Compression
1.2 DIMENSIONAL DETAILS
Fig. 1

1.3 GENERAL DATA
METROPOLIS DGT 25 BF
Heat output
Nominal kW 23.7
Minimum kW 7.5
Heat input
Nominal kW 25.5
Minimum kW 9.2
Termal efficiency (CEE 92/42 directive)
Class NOx 3
Water content l 3,3
Adsorbed power consumption W110
Electrical protection grade
IPX5D
Maximum water head bar 3
Maximum temperature °C 85
Expansion vessel
Water content/Preloading pressure l/bar 8/1.2
C.H. setting range °C 40÷80
D.H.W. setting range °C 30÷60
D.H.W. flow rate (EN 625) l/min 11.3
Continuous D.H.W. flow rate ∆t 30°C l/min 11.3
Minimum D.H.W. flow rate l/min 2.0
D.H.W pressure
Minimum/Maximum bar 0.2/7
Smokes temperature °C 100/125
Smokes flow gr/s 16/16
Losses after shutdown to 50°C W73
Category II2H3+
Type B22P-52P/C12-32-42-52-82
Electrical supply 230V - 50 hz, fused at 3 A
Internal fuse Line: F1.6AT
Weight kg 30
Main burner nozzle
Quantity n° 11
Natural gas (G20) ø mm 1.30
LPG (G30 - G31) ø mm 0.80
Gas consumption *
Natural gas (G20) m
3
/h 2.70
Butane (G30) kg/h 2.01
Propane (G31) kg/h 2.01
Burner gas pressure
Natural gas (G20) mbar 1.9÷13.5
Butane (G30) mbar 3.7÷27.9
Propane (G31) mbar 3.7÷35.9
Gas supply pressure
Natural gas (G20) mbar 20
Butane (G30) mbar 28 - 30
Propane (G31) mbar 37
* Gas consumption figures express the lowest calorific power of pure gas under standard conditions at 15°C – 1013 mbar; this figure may differ from the actual
figure, which is dependent on gas composition and environmental conditions.
7
ENG
IT
ES

8
ENG
IT
ES
1
3
5
6
7
12
14
15
16
13
22
21
20
19
18
8
10
11
2
4
UE G M R
23
1.4 HYDRAULIC CIRCUIT
Fig. 2
KEY
1Fan
2 Bithermal exchanger
3 D.H.W. sensor (SS)
4 C.H. sensor (SM1/SM2)
5 Combustion chamber
6 Gas valve
7 Water pressure valve
8 Circulator with air release vent
10 Hydrometer
11 Expansion vessel
12 D.H.W. flow meter
13 By-pass
14 D.H.W. filter
15 Boiler discharge
16 3 BAR safety valve
18 Connection plate
19 D.H.W. cock
20 Gas cock
21 C.H. flow cock
22 C.H. return cock
CONNECTIONS
U D.H.W. outlet
E D.H.W. inlet
G Gas connection
M C.H. flow
R C.H. return

1.6 BOILER OPERATION
The boiler operating mode is controlled by
the keys on the control panel. When set to
winter ( ) it will operate in the Domestic
Hot Water and Central Heating modes.
For Domestic Hot Water only the display
should be set to summer ( ).
Domestic hot water supply always takes
priority over central heating. If a demand for
hot water is required during a central
heating period, the boiler will automatically
switch to hot water mode until the demand
is satisfied.
1.6.1 Central Heating mode
If there is a call for central heating the pump
will start to circulate the primary heating
water and the fan will run at full speed; once
the air pressure switch has been proved
the burner will light.
The burner output then automatically
adjusts to suit the system demand; as the
temperature of the heating water in the
boiler approaches that set, the burner
output is reduced.
When this set temperature is reached, the
burner extinguishes and the fan stops.
The pump continues to run for 30 seconds
to prevent residual heat build up in the
boiler.
The burner will not relight for 3 minutes
unless there is a demand for domestic hot
water during this period.
1.6.2 Domestic Hot Water mode
The pump does not operate on a DHW
demand, the fan runs and once the air
pressure switch has proved the boiler will
light. The burner output then automatically
adjusts to suit the demand required to raise
the temperature set.
When the hot water demand has been
satisfied, it passes to the operation in C.H.,
if the selector is set to winter ( ) and
there is a C.H. demand, otherwise the
burner will extinguish.
8
9
10
11
12
7
6
5
4
3
2
1
1.5 INTERNAL VIEW
Fig. 3
9
ENG
IT
ES
KEY
1 Control panel
2 Circulation pump
3 Air relief valve
4 Burners
5 Expansion vessel
6 C.H. sensor (SM1/SM2)
7 Air pressure switch
8Fan
9 Bithermal exchanger
10
Ignition/detection electrode
11 D.H.W. sensor (SS)
12 Gas valve

10
ENG
IT
ES
2.1 STATUTORY REQUIREMENTS
GAS SAFETY (INSTALLATION AND USE)
REGULATIONS (as amended). It is the law
that all gas appliances are installed by a
registered person, in accordance with the
above regulations. Failure to install
appliances correctly could lead to
prosecution. It is in your own interest, and
that of safety, to ensure that the law is
complied with.
In addition to the above regulations, this
appliance must be installed in accordance
with the current IEE Wiring Regulations (BS
7671), Local Building Regulations, the
Building Standards (Scotland)
(Consolidation) Regulations, Byelaws of the
local water undertaking, and Health and
Safety Document No 635 “The Electricity at
Work Regulations 1989”. It should also be in
accordance with the relevant
recommendations in the current editions of
the following British Standards and Codes
of Practice: BS5449, BS5546, BS5440:1,
BS5440:2, BS6798, BS6891, and
BG.DM2, BS7074, and BS5482 for
propane installations.
Manufacturer’s instructions must NOT be
taken in any way as over-riding statutory
obligations.
2.2 BOILER POSITION
In siting the combination boiler, the following
limitations MUST be observed:
– The boiler is not suitable for external
installation. The position selected for
installation should be within the building,
unless otherwise protected by a suitable
enclosure, and MUST allow adequate
space for installation, servicing, and
operation of the appliance, and for air
circulation around it (section 2.4).
– This position MUST allow for a suitable
flue termination to be made. The
combination boiler must be installed on a
flat vertical wall which is capable of
supporting the weight of the appliance,
and any ancillary equipment.
– If the combination boiler is to be fitted in
a timber framed building it should be
fitted in accordance with the Institute of
Gas Engineers document for Gas
Installations In Timber Frame Housing,
Reference 16E/UP/7: 1998. If in doubt,
advice must be sought from the gas
supplier.
– If the appliance is installed in a room
containing a bath or shower, any
electrical switch or control utilising mains
electricity must be so situated that it
cannot be touched by a person using the
bath or shower. Attention is drawn to the
requirements of the current I.E.E. Wiring
Regulations (BS 7671), and in Scotland
the electrical provisions of the Building
Regulations applicable in Scotland.
– A compartment used to enclose the
appliance MUST be designed and
constructed specifically for this purpose.
An existing cupboard, or compartment,
may be used provided it is modified
accordingly.
– Where installation will be in an unusual
location, special procedures may be
necessary. BS6798 gives detailed
guidance on this aspect.
2.3 FLUE TERMINAL POSITION
Detailed recommendations for flue
installation are given in BS5440:1. The
following notes are for general guidance:
– The boiler MUST be installed so that the
terminal is exposed to the external air.
– It is important that the position of the
terminal allows free passage of air
across it at all times.
– It is ESSENTIAL TO ENSURE, in practice
that products of combustion discharging
from the terminal cannot re-enter the
building, or any other adjacent building,
through ventilators, windows, doors,
other sources of natural air infiltration, or
forced ventilation/air conditioning. If this
does occur, the appliance MUST be
turned OFF IMMEDIATELY and the gas
supplier consulted.
–
The minimum acceptable dimensions from
the terminal to obstructions and
ventilation openings are specified in fig. 4.
– If the terminal discharges into a pathway
or passageway check that combustion
products will not cause nuisance and that
the terminal will not obstruct the
passageway.
– Where the lowest part of the terminal is
fitted less than 2 m (78 in) above ground,
above a balcony or above a flat roof to
which people have access, the terminal
MUST be protected by a purpose
designed guard.
– Where the terminal is fitted within 850
mm (34 in) of a plastic or painted gutter,
or 450 mm (18 in) of painted eaves, an
aluminium shield at least 1,500 mm (59
in) long must be fitted to the underside of
the painted surface.
– The air inlet/outlet flue duct MUST NOT
be closer than 25 mm (1 in) to
combustible material.
– In certain weather conditions the
terminal may emit a plume of steam. This
is normal but positions where this would
cause a nuisance should be avoided.
2 INSTALLATION
Fig. 4
TABLE 3
Terminal position Minimum spacing in mm
A Directly below an openable window, 300
air vent or any other ventilation opening
B Below guttering, drain pipes or soil pipes 25 *
C/D Below eaves, balconies or carport roof 25 *
E From vertical drain pipes or soil pipes 75
F From internal or external corners 25
G Above adjacent ground, roof or balcony level 300
H From a surface facing the terminal 600
I From a terminal facing the terminal 1,200
J From an opening in the carport (e.g. door, window into dwelling) 1,200
K Vertically from a terminal on the same wall 1,500
L Horizontally from a terminal on the same wall 300
M Horizontally from a vertical terminal to a wall 300
N Horizontally from an openable window or other opening 300
P Above an openable window or other opening 300
Q From an adjacent vertical terminal 600
* With “heat shield” installed in accordance to BS 5440 Pt1.

2.4 VENTILATION REQUIREMENTS
Detailled recommendations for air supply
are given in BS5440:2. The following notes
are for general guidance:
– It is not necessary to have a purpose
provided air vent in the room or
compartment in which the appliance is
installed.
2.5 GAS SUPPLY
– The gas installation should be in
accordance with BS6891. The gas
required for the boiler is specified in
section 1.3.
–
Ensure that the pipework from the meter
to the appliance is of adequate size.
– The governor at the meter must give a
constant outlet pressure of 20 mbar (8
inwg) for natural gas and 30 - 37 mbar
(12 - 15 inwg) for LPG, when the
appliance is running.
– The gas supply line should be purged.
NOTE: Before purging open all doors
and windows, also extinguish any
cigarettes, pipes, and any other naked
flames.
– The complete installation must be tested
for gas soundness.
2.6 ELECTRICITY SUPPLY
The appliance MUST be earthed. A mains
supply of 230 V - 50 Hz single phase is
required. All external controls and wiring
MUST be suitable for mains voltage.
Wiring should be in 3 core PVC insulated
cable NOT LESS than 0.75 mm
2
(24 x 0.2
mm) to BS6500, Table 16. Wiring external
to the boiler MUST be in accordance with
current l.E.E. Wiring Regulations (BS 7671)
and local regulations.
The supply connection to the flying lead
provided MUST be made to a fused double
pole switch, having a 3 mm (1/8 in) contact
separation in both poles, serving only the
boiler and system controls; the fuse rating
should be 3 amp.
This connection should be readily accessible
and be made adjacent to the boiler (except
in the case of bathroom installations for
domestic boilers where the point of
connection to the mains MUST be outside
of the bathroom).
2.7 EXTERNAL CONTROLS
(Refer to section 2.8.1)
The boiler is intended for use with a 24 V
room thermostat. The connection is made
inside the control box as described in
section 3.9.
2.8 WATER SYSTEMS - GENERAL
– This appliance is designed for connection
to sealed central heating water systems.
– Check that the mains water pressure is
sufficient to produce the required D.H.W.
flow rate, but does not exceed the
maximum D.H.W. pressure (1.3 point).
Where mains pressure exceed 6 bar a
pressure reducing valve must be fitted
in the D.H.W. inlet.
2.8.1 Treatment of water
circulating systems
– All recirculatory systems will be subject
to corrosion unless an appropriate water
treatment is applied. This means that the
efficiency of the system will deteriorate
as corrosion sludge accumulates within
the system, risking damage to pump and
valves, boiler noise and circulation
problems.
– For optimum performance after
installation this boiler and its associated
central heating system must be flushed
in accordance with the guidelines given in
BS 7593 “Treatment of water in
domestic hot water central heating
systems”.
– Sime ltd recommend only the use of
FERNOX products for flushing and water
treatment. This particularly important in
hard water areas.
Failure to flush and add inhibitor to the
system may invalidate the appliance
warranty. Artificially softened water
must not be used to fill the heating
system.
– It is important to check the inhibitor
concentration after installation, system
modification and at every service in
accordance with the manufacturer’s
instructions. (Test kits are available from
inhibitor stockists).
2.9 REQUIREMENTS
FOR SEALED
WATER SYSTEMS
The heating system design should be based
on the following information:
a) The available pump head is given in fig. 5.
b) The burner starts when the C.H. flow
reaches 400÷450 l/h. This safety
condition is ensured by the flow switch.
c) The appliance is equipped with an internal
by-pass that operates with system heads
(H) greater than 3 m. The maximum flow
through the by-pass is about 300 l/h. If
thermostatic radiator valves are to be
installed, at least one radiator should be
without a thermostatic valve (usually the
bathroom radiator).
d) A sealed system must only be filled by a
competent person using one of the
approved methods shown in fig. 7. The
system design should incorporate the
connections appropriate to one of these
methods.
0
200
1600
140012001000800600400
PORTATA (l/h)
PREVALENZA RESIDUA (mbar)
500
400
100
200
300
30
20-25
Metropolis DGT
600
30
20-25
By-pass inserito
By-pass escluso
FLOW RATE (l/sec)
AVAILABLE HEAD (mbar)
Fig. 5
By-pass ON
By-pass OFF
11
ENG
IT
ES

12
ENG
IT
ES
TYPICAL SYSTEM DESIGN
NOTE: A drain cock should be installed at the lowest point of the heating circuit and beneath the appliance.
Fig. 6
Fig. 7
ALTERNATIVE METHODS OF FILLING A SEALED SYSTEM

2.9.1 Pump
The available head shown in fig. 5 is that in
excess of the appliance hydraulic
resistance, i.e. that available for the system
at any given heating load up to the
maximum output in C.H. mode. Never
reduce the pump speed below maximum as
this will reduce D.H.W. output. The pump
speed is indicated on the side of the pump
speed selector switch (if fitted).
2.9.2 System volume
(total water content)
The Table 4 gives the maximum system
volume that the integral expansion vessel
can sustain under different charge
pressure conditions.
If the system volume exceeds that shown,
an additional expansion vessel must be
fitted and connected to the heating system
primary return pipe as close as possible to
the appliance.
If an extra vessel is required, ensure that
the total capacity of both vessels is
adequate. Further details are available in
the current issues of BS5449 and BS6798.
NOTE: If the pressure gauge indicates
2.65 bar or greater when the appliance is
at maximum temperature with all
radiators in circulation an extra
expansion vessel is required.
2.9.3 Pressure gauge
A pressure gauge is mounted in the base of
the appliance.
2.9.4 Safety valve
A safety valve set at 3 bar is fitted to the
appliance and a discharge pipe is routed to
outside of the appliance.
This discharge pipe should be extended to
terminate safely away from the appliance
and where a discharge would not cause
damage to persons or property but would
be detected.
The pipe should be able to withstand boiling
water, be a minimum of 15 mm in diameter,
and installed with a continuous fall.
2.10 D.H.W. SYSTEMS
– Check that the mains supply pressure is
within the prescribed limits (1.3 point).
If necessary, a pressure reducing valve
should be fitted to the mains supply
before the D.H.W. inlet connection.
– A maximum D.H.W. flow rate of 11.4 l/m
(3.0 gpm).
Higher flow rates will not damage the
appliance but may lower the water
temperature below an acceptable level.
– If the appliance is installed in an area
where the temporary hardness of the
water supply is high, say over 150 ppm,
the fitting of an in line scale inhibitor may
be an advantage. Consult the Local
Water authority if in doubt.
2.10.1 Domestic hot/cold water supply
taps and mixing taps
All equipment designed for use at mains
water pressure is suitable.
2.10.2 Showers
Any WRAS approved shower suitable for
the mains water pressure available may be
used. A loose or flexible shower head type
may require the fitting of an anti-syphon
device to comply wth water by-laws.
2.10.3 Bidets
Providing that the appliance is of the over-
rim flushing type, the outlets are shrouded
and it is impossible to attach a temporary
hand held spray, no anti syphonage device is
necessary.
2.11 FILLING THE WATER SYSTEM
– Open the C.H. flow and C.H. return valves
(3 - fig. 3).
– Loosen the automatic air vent cap (8 fig.
2).
– Open all radiator valves and system air
vents. Fill the system with water using
one of the approved methods described
in section 2.9 to about 0.5 bar greater
than the system design pressure. Close
all air vents. Do not close the A.A.V. the
one near the pump!
– Check the system for water soundness.
– Completely drain the appliance and
heating system, thoroughly flush the
system, and refill the system design
pressure to BS 7593.
– Open the D.H.W. inlet valve, open any hot
tap, clear of air bubbles.
– Close hot tap.
2.11.1 Emptying the system
Use the cock boiler discharge to empty the system
(15 fig. 2). Turn off the boiler before draining.
2.12 ANTI-FREEZE FUNCTION
The boilers are equipped with anti-freeze
function which activates the pumps and the
burner when the temperature of the water
contained inside the appliance drops to
below value set at PAR 10. The anti-freeze
function is ensured, however, only if:
– the boiler is correctly connected to the
gas and electricity supply circuits;
– the boiler is constantly fed;
– the boiler ignition is not blocked;
– the essential components of the boiler
are all in working order
In these conditions the boiler is protected
against frost down to an environmental
temperature of -5°C.
ATTENTION:
In the case of installation in a place where
the temperature drops below 0°C, the
connection pipes must be protected.
2.13 APPLIANCE PACKAGE:
– Combination boiler (assembled);
– Installation and servicing instructions;
– Users instructions;
– Wall mounting templates (paper);
– Fixing screws with wall plugs;
– Plastic bags containing:
– gas service cock;
– C.H. F/R isolation valves;
– D.H.W. isolation valve;
– D.H.W. outlet fittings;
– associated gaskets and PRV discharge
pipe.
2.14 WATER CONNECTIONS
2.14.1 Central heating
connections
– Fit the two C.H. isolation valves using the
gaskets supplied to the flow and return
connections as shown in fig. 2. The pipe
connections are labelled on the lower
part of the boiler.
– Connect the C.H. pipework as required.
2.14.2 D.H.W.
connections
– Fit the D.H.W. isolation valve to the cold
water inlet connection as shown in fig. 2.
– Fit the union connection to the D.H.W.
13
ENG
IT
ES
Vessel charge and initial system pressure
bar
psi
0.5
7. 3
1.0
14.5
1.5
21.8
Total water content of system using 8 l (1.76 gal) capacity
expansion vessel supplied with appliance
l
gal
96
21.1
74
16.2
51
11. 2
For systems having a larger capacity multiply the total system
capacity in litres (gal) by the factor to obtain the total minimum
expansion vessel capacity required litres (gal)
.0833 .10 9 .15 6
TABLE 4

14
ENG
IT
ES
outlet.
– Connect the D.H.W. pipework as
required.
2.15 GAS CONNECTIONS
– Fit the gas isolation valve.
– Connect the gas supply pipe.
2.16 SAFETY VALVE
CONNECTION
– The appliance safety valve is located
towards the R.H.S. of the boiler and the
discharge pipe is supplied loose. Remove
the two selftapping screws and lower the
control box to improve access.
– Connect the discharge pipe to the valve
outlet, and extend the pipe to ensure that
any discharge from the safety valve is
safely routed to a drain.
The discharge pipe should be a minimum
of 15 mm copper, and must avoid sharp
corners or upward pipe runs where
water may be retained.
– Support the valve whilst tightening the
nut and olive to avoid damage to the
technil assembly.
2.17 INSTALLATION
OF COAXIAL DUCT
2.17.1 Accessories 60/100
The diagrams of fig. 8 illustrate some
examples of different types of discharge
options allowed and the maximum lengths
that can be reached.
2.17.2 Diaphragm for
60/100 coaxial duct
The boiler is supplied with a diaphragm of
ø 79. Use the diaphragm according to the
table in fig. 8/a.
2.17.3 Installation of separate ducts
The following guidelines should be followed
when installing separate ducts:
– With air directly from outside, when the
duct is longer than 1 metre, it is advisa-
ble to insulate the duct in order to avoid
the formation of dew on the outside of
the pipe when the weather is particularly
cold.
– With ducts with discharge positioned
outside the building, or in cold environ-
ments, insulation is necessary to avoid
difficulty in starting the burner. In these
cases, a condensation system on the
pipes must be provided for.
– If the pipe passes throught flammable
material , insulate the discharge pipe
with rounded glass wool 30 mm thick
Fig. 8/a
For discharge types C12, use the diaphragm ø 79.0 supplied with the boiler, only
when the length of the coaxial duct is less than 1 metre.
For discharge types C32, use the following diaphragm according to the length of
the duct and without additional curves:
Vertical installations with code 8086908
Diaphragm ø 79 Without diaphragm
L max = 2.5 m L max = 5 m
C12
C32
C42
3
1
2
7
6
4
3
2
min 1,3 m - max 5 m
8
x
y
x
+ y = max 3,5 m "25"
x
+ y = max 3,0 m "30-35"
max 3,5 m "25"
max 3,0 m "30-35"
2
Fig. 8
max 3.5 m
KEY
1 Coaxial flue kit L. 810 code 8084811
2 a Extension L. 1000 code 8096103
2 b Extension L. 500 code 8096102
3 Vertical extension L. 200 code 8086908
4 Additional 90° curve code 8095801
6 Articulated tile code 8091300
7 Roof outlet terminal L. 1284 code 8091200
IMPORTANT:
– Each additional 90° curve installed
reduces the available length by 1.0
metres.
– Each additional 45° curve installed
reduces the available length by 0.50
metres.

and with a density of 50 kg/m
3
.
The maximum available length is determi-
ned by the sum of the head losses of the
individual components of the flue and
must not result as more than 9.0 mm
H2O.
For the loss of charge of the accessories,
refer to Table 5 and to the example given in
fig. 9.
2.17.4 Twin Adaptor
The twin adaptor code 8093020 (fig. 10) is
supplied with a diaphragm. Segments must
be removed, depending on the maximum
head loss total in both ducts, as indicated
in fig. 10/a.
2.18 ELECTRICAL WIRING
The boiler is supplied with an electric cable.
Should this require replacement, it must be
purchased exclusively from Sime Ltd.
The power supply must be single-phase
230V - 50 Hz through a main switch pro-
15
ENG
IT
ES
Calculation example of the head loss (installation allowed as the sum of the head losses
of the accessories used is less than 9.0 mm H
2
O):
Intake Outlet
7 meter horizontal pipe ø 80 x 0.20 1.40 –
7 meter horizontal pipe ø 80 x 0.30 – 2.10
No. 2 90° elbows ø 80 x 0.35 0.70 –
No. 2 90° elbows ø 80 x 0.40 – 0.80
No. 1 wall terminal ø 80 0.15 0.50
Total head loss 2.25 + 3.40 = 5.65 mm H
2
O
With this total head loss, remove the segments from No. 1 to No. 6 from diaphragm in
the intake pipe.
TABLE 5
Accessories ø 80 Load loss (mm H
2O)
Intake Outlet
90° elbow MF 0.35 0.40
45° elbow MF 0.30 0.35
Extension L. 1000 (horizontal) 0.20 0.30
Extension L. 1000 (vertical) 0.20 0.10
Wall terminal 0.15 0.50
T-shaped condensation collector --- 0.80
Roof exit terminal* 1.60 0.10
* The loss of the roof exit terminal in aspiration concludes the collector code 8091400
Fig. 9
1
2
3
4
L
K
12 0
19 0
19 0
ø 80
ø 80
12 5
12 5
Fig. 10
KEY
1 Divider with vent
2 Inlet air diaphragm
3 Air intake bend
4 Elbow product discharge
Fig. 10/a
No. segments to remove Total load loss mm H2O
none 0 ÷ 2.0
No. 1 2.0 ÷ 3.0
No. 1 e 2 3.0 ÷ 4.0
from No. 1 to 3 -
from No. 1 to 4 4.0 ÷ 5.0
from No. 1 to 5 -
from No. 1 to 6 5.0 ÷ 6.0
from No. 1 to 7 6.0 ÷ 7.0
from No. 1 to 8 -
from No. 1 to 9 7.0 ÷ 8.0
from No. 1 to 10 -
without diaphragm 8.0 ÷ 9.0
203
400

tected by a 3A fuse with a distance of at
least 3 mm between contacts.
NOTE: The boiler must be connected with
an efficient earthing system.
SIME shall not be held liable for injury or
damage resulting from failure to earth
the boiler.
Ensure that the boiler is isolated
from the power supply before any
service or repair work is done.
2.18.1 Room Thermostat
Remove the boiler casing, remove the two
securing screws and tilt the control panel.
Connect the thermostat to the 6 pole ter-
minal board as indicated in the boiler elec-
trical diagram (see diagram 2.19) after
having removed the existing bridge.
The room thermostat to be used must be
of a class conforming to the standard EN
60730.1 (clean electrical contact).
Description of the letters indicating the
components shown on the system dia-
grams:
M System output
R System return
TA Zone room thermostat
EXP Expansion card (code 6301430)
16
ENG
IT
ES
R
M
SE
TA
CR
EXP
1 BASIC SYSTEM

17
ENG
IT
ES
TRA
SM1 / SM2
BLU-BLUE
BLU-BLUE
F
CN2
CN1
CN3
12
12
15
15
L
N
CN4
CN5
EXP
CD.6301420D
CN7
45
45
49
49
1
6
7
11
11
16
16
29
29
30
30
38
38
CN6
39
39
44
44
ROSSO - RED
ROSSO - RED
PF
NERO-BLACK
NERO-BLACK
1
2
3
EAR
PI
230 V
L
N
50 Hz
EV1-2
BLU-BLUE
MARRONE-BROWN
V
MARRONE
BLU-BLUE
MARRONE-BROWN
BLU-BLUE
BROWN
NERO-BLACK
SE
5
6
4
3
2
1
TA
PA
ROSSO-RED
ROSSO-RED
NERO-BLACK
BLU-BLUE
BLU-BLUE
VERDE - GREEN
VERDE - GREEN
78
1
3
4
2
OP
NERO-BLACK
NERO-BLACK
BLU-BLUE
MARRONE-BROWN
S.AUX
VERDE-GREEN
VERDE-GREEN
M
SS
ROSSO-RED
ROSSO-RED
FLM
VERDE - GREEN
ARANCIO- ORANGE
VCC
GND
OUT
ROSSO - RED
ROSSO - RED
ROSSO - RED
(3,3 VDC)
(24 VDC)
(3,3 VDC)
(3,3 VDC)
(24 VDC)
(3,3 VDC)
(24 VDC)
(17 VDC)
(12 VDC)
(24 VDC)
R59
Fig. 11
KEY
F Fuse (1.6 AT)
TRA Ignition transformer
PI Pump
VFan
EAR Ignition/detection electrode
EV1-2 Gas valve coil
PF Smoke thermostat
M Modulator
SM1/SM2 Heating sensor
FLM D.H.W. flow meter
SS D.H.W. sensor
PA Water pressure switch
TA Room thermostat
SE External sensor (optional)
S.AUX Auxiliary sensor
EXP Expansion card remote control (optional)
OP
Mechanical time clock (only for 8107911)
NOTE: Connect TA to the connections 5-6 after
having removed the bridge.
CONNECTOR SPARE PART CODES:
CN4 code 6316254
CN5 code 6316253
CN6 code 6316252
2.19 BOILER ELECTRICAL DIAGRAM

18
ENG
IT
ES
3.1 CONTROL PANEL
3 CHARACTERISTICS
1
2
3
4
1 - DESCRIPTION OF DISPLAY ICONS
SUMMER MODE ICON
WINTER MODE ICON
D.H.W. MODE ICON
HEATING MODE ICON
BURNER LIT ICON
LOCKOUT DUE TO NO
IGNITION/FLAME DETECTION
RESET REQUIRED
MAIN DIGITS
Fig. 12
2 - DESCRIPTION OF CONTROLS
OPERATING MODE/RESET
By pressing the key in succession, pass to the sum-
mer and winter function (stand-by function if perma-
ne on the key more than two second).
RESET is only available if a resettable anomaly is
signalled
D.H.W. SET
Press the key to display the D.H.W. temperature
value set
HEATING SET
Press the key to display the heating temperature
value set (value not realtive to the remote control)
DECREASE
Pressing this key decreases the value set
INCREASE
Pressing this key increases the value set
3 - LED GREEN
ON = Indicates the presence of electrical voltage.
It switches of momentarily every time the keys are pressed.
It can be disabled by setting PAR 3 = 0.
4 - LED RED
OFF = Normal functioning.
ON = Boiler error signalled.
Flashing when the control panel buttons are pressed inside the
PARAMETERS SECTION.

3.2 ACCESS TO INSTALLER'S
PARAMETERS
For access to the installer's parameters,
press simultaneously the keys of boiler
panel ( and ) for 5 seconds. The red
LED flashes and the display shows:
The parameters can be scrolled with
or . To enter the parameter press or
. The value set flashes, the display
shows:
Proceed as follows to change the set
value:
– set the new value using or .
– confirm the set value using or .
Press to exit the parameters section.
The display is shown automatically after 5
minutes.
The parameters section contains the
alarms log, info and meters (display only).
3.2.1 Replacing the board or
RESETTING parameters
If the electronic board is replaced or reset,
it is necessary to configure PAR 01 and
PAR 02 by associating the following values
to each type of boiler to be able to restart
the boiler:
NOTE: the boiler panel has a label with
the values that have to be set for PAR 01
and PAR 02 (fig. 19).
19
ENG
IT
ES
BOILER PAR 2
METROPOLIS DGT 25 BF 01
PARAMETERS INSTALLER
FAST CONFIGURATION
PAR DESCRIPTION RANGE UNIT OF INC/DEC DEFAULT
MEASUREMENT UNIT SETTING
01 Combustion configuration -- = ND = = “--”
1 ... 8
02 Hydraulic configuration -- = ND = = “--”
1 ... 22
03 Disabling of voltage presence LED 0 = Disabled = = 01
1 = Enabled
04 Correction of external probe values -5 ... 05 °C 1 00
05 Timer block of the keys -- = Disabled Min. 1 15
1 ... 99
D.H.W. - HEATING
PAR DESCRIPTION RANGE UNIT OF INC/DEC DEFAULT
MEASUREMENT UNIT SETTING
10 Boiler antifreeze 0 ... 10 °C 1 03
11 External sensor antifreeze -- = Disabled °C 1 - 2
- 9 ... 05
12 Climatic curve setting 03 ... 40 = 1 20
13 Minimum temperature heating 40 ... PAR 14 °C 1 40
14 Maximum temperature heating PAR 13 ... 80 °C 1 80
15 Maximum power heating 30 ... 99 % 1 99
16 Post-circulation time 0 ... 99 10 sec. 1 03
17 Pump heating activation delay 0 ... 99 10 sec. 1 01
18 Re-ignition delay 0 ... 10 Min. 1 03
19 Modulation D.H.W. flowmeter -- = Disabled = = 01
1 = Enabled
29 Anti-legionella (only D.H.W. tank) -- = Disabled °C 1 “--”
50 ... 80
PARAMETERS RE-SET
PAR DESCRIPTION RANGE UNIT OF INC/DEC DEFAULT
MEASUREMENT UNIT SETTING
49 * Reset default parameters -- , 1 = = =
(PAR 01 - PAR 02 equal “---”)
* If the current setting is difficult to understand or anomalous behaviour or if it is difficult to understand
the boiler, it is advised to restore the initial parameter values by setting PAR 49 = 1 and PAR 1 and
PAR 2 as specified in point 3.3.1.
ALARMS (visualization)
PAR DESCRIPTION RANGE UNIT OF INC/DEC DEFAULT
MEASUREMENT UNIT SETTING
A0 Code of last error = = = =
A1 Code of last error -1 = = =
A2 Code of last error -2 = = =
A3 Code of last error -3 = = =
A4 Code of last error -4 = = =
A5 Code of last error -5 = = =
A6 Code of last error -6 = = =
A7 Code of last error -7 = = =
A8 Code of last error -8 = = =
A9 Code of last error -9 = = =
INFO (visualization)
PAR DESCRIPTION RANGE UNIT OF INC/DEC DEFAULT
MEASUREMENT UNIT SETTING
i0 External sensor temperature -9 ... 99 °C 1 =
i1 C.H. 1 sensor temperature -9 ... 99 °C 1 =
i2 C.H. 2 sensor temperature -9 ... 99 °C 1 =
i3 D.H.W. sensor temperature -9 ... 99 °C 1 =
i4 Auxiliary sensor AUX temperature -9 ... 99 °C 1 =
i5 Set of effective heating temperature PAR 13 ... PAR 14 °C 1 =
i6 Level survey flame 00 ... 99 % 1 =
i7 Current to the modulator 00 ... 17 10 mA 1 =
i8 Flow rate D.H.W. flow meter 00 ... 99 l/min 1 =
COUNTERS (visualization)
PAR DESCRIPTION RANGE UNIT OF INC/DEC DEFAULT
MEASUREMENT UNIT SETTING
c0 Number hours of operation of the burner 00 ... 99 h x 100
0,1 da 0,0 a 9,9
00
1 da 10 a 99
c1 Number of ignitions of the burner 00 ... 99 x 1000
0,1 da 0,0 a 9,9
00
1 da 10 a 99
c2 Number total of the errors 00 ... 99 x 1 1 00
c3
Number approached the parameters installator
00 ... 99 x 1 1 00
c4
Number approached the parameters OEM
00 ... 99 x 1 1 00
BOILER GAS PAR 1
METROPOLIS
DGT
25 BF
METHANE
(G20)
01
LPG
(G30/G31)
03

3.3 EXTERNAL SENSOR
If there is an external sensor, the heating
settings SET can be taken from the climatic
curves according to the external tempera-
ture and, in any case, limited to with the
range values described in point 3.2 (para-
meters PAR 13 and PAR 14).
The climatic curve to be set can be selected
from a value of 3 and 40 (at step 1).
Increasing the steepness of the curves of
fig. 13 will increase the output temperature
as the external temperature decreases.
3.4 CARD FUNCTIONING
The electronic card has the following functions:
– Antifreeze protection of the heating circuit.
– Ignition and flame detection system.
– Control panel setting for the power and
the gas for boiler functioning.
– Anti-block for the pump which is fed for a
few seconds after 48 hours of inactivity.
– Chimney sweep function which can be
activated from the control panel.
– Temperature which can be shifted with
the external sensor connected.
It can be set from the control panel.
– Automatic regulation of the ignition
power and maximum heating.
Adjustments are managed automatically
by the electronic card to guarantee maxi-
mum flexibility in use of the system.
3.5 THERMISTOR VALUES
Table 6 gives the values of the electrical
element (Ω) obtained on the heating and
sanitary water sensors according to the
variations in temperature.
The C.H. sensor (SM1/SM2) is of type to
double sensing element with function safety
thermostat.
When the heating sensor (SM1/SM2) is
interrupted, the boiler will not function
for both services.
With the D.H.W. sensor (SS) interrupted,
the boiler functions only in D.H.W. mode.
3.6 ELECTRONIC IGNITION
Ignition and flame detection is controlled by
a single electrode on the burner which gua-
rantees reaction in the case of accidental
extinction or lack of gas within one second.
3.6.1 Functioning cycle
Burner ignition occurs within max. 10
seconds after the opening of the gas valve.
Ignition failure with consequent activation of
block can be due to:
– Lack of gas
The ignition electrode persists in dischar-
ging for max. 10 seconds.
If the burner does not ignite, the anomaly
is signalled. This can happen the first
time the boiler is switched on after a long
period of inactivity due to the presence of
air in the gas pipes.
It can be caused by a closed gas cock or
by a faulty gas valve.
– The electrode does not discharge.
In the boiler, only the opening of the gas
to the burner can be detected. After 10
seconds the error is signalled.
It can be caused by an break in the elec-
trode wire or if it is incorrectly connected
to the connection points.
Or the electrode may be earthed or
damaged: it must be replaced.
Or the electronic card may be defective.
In the case of a sudden lack of voltage, the
burner will immediately switch off. When
voltage returns, the boiler will automatically
start up again.
3.7 AIR PRESSURE SWITCH
The pressure switch is calibrated by the
manufacturer at the following values:
0.62 - 0.72 mm H
2
O which can guarantee
boiler operation also with intake and
discharge pipes of the maximum length
allowed.
The value of the signal to the pressure swit-
ch is measured by a differential pressure
gauge connected as indicated in fig. 14.
3.8 WATER PRESSURE SWITCH
The water pressure switch (C fig. 15) inter-
venes, stopping the boiler, if it detects that
there is insufficient pressure in the boiler
(< 0,6 bar).
To restore burner functioning, to bring back
the pressure of the boiler to between 1 -
1.2 bar.
3.9 HEAD AVAILABLE TO SYSTEM
Residual head for the heating system is
shown as a function of rate of flow in the
graph in fig. 5.
To obtain the maximum head available to
the system, turn off the by-pass by turning
the union to the vertical position (fig. 15).
20
ENG
IT
ES
TABLE 6
Temperature (°C) Resistance (Ω)
20 12.090
30 8.313
40 5.828
50 4.161
60 3.021
70 2.229
80 1.669
ATTENTION: curves are calculated at an ambient temperature of 20°C.
Using the key on the control panel, the user can change the set
ambient by ± 5°C for which the curve is calculated.
Fig. 13
/