Page is loading ...

www.rivatech.de
Specification subject to change without notice
RC6702SV-7311
Installation Guide

RC Series RC6702SV-7311 Installation Guide
04-2017-B www.rivatech.de 2
Precaution
Please read this manual carefully before installing the unit.
Never disassemble the camera. Unauthorized disassembly may cause equipment
failure or damage to the unit.
Please do not install the camera in a place exposed to direct sunlight.
Do not operate the camera in environments beyond the specified temperature.
Refer to Environment Condition on APPENDIX (A): SPECIFICATIONS in this manual.
Before applying power to the camera, check the power source to ensure that it is
within the specifications. Refer to Electrical Characteristics on APPENDIX (A):
SPECIFICATIONS.
CAUTION: RISK OF EXPLOSION IF BATTERY IS REPLACED BY AN INCORRECT TYPE.
DISPOSE OF USED BATTERIES ACCORDING TO THE MANUFACTURER’S
INSTRUCTIONS.

RC Series RC6702SV-7311 Installation Guide
04-2017-B www.rivatech.de 3
Table of Contents
Precaution ................................................................................................................ 2
1. FEATURES ............................................................................................................. 4
2. PACKAGE CONTENTS............................................................................................. 5
3. PART NAMES ........................................................................................................ 6
4. CAMERA INSTALLATION ........................................................................................ 8
4.1. Installing the camera ............................................................................................. 8
4.1.1. Installation without bracket ........................................................................................ 8
4.1.2. Compatible Accessories ............................................................................................ 10
4.2. Adjusting angle of the camera ............................................................................. 11
4.3. Adjusting Zoom and Focus ................................................................................... 12
4.4. Setting Image Attributes ...................................................................................... 13
5. CONNECTIONS .................................................................................................... 14
6. CONFIGURATION ................................................................................................ 17
6.1. Set up network environment ............................................................................... 17
6.1.1. Generic IP Environment ............................................................................................ 17
6.1.2. Custom IP Environment............................................................................................. 18
6.2. View video on web page ...................................................................................... 19
6.2.1. ActiveX Installation .................................................................................................... 19
6.2.2. View video using IPAdmin Tool ................................................................................. 20
6.3. Reboot .................................................................................................................. 21
6.4. Factory Default ..................................................................................................... 21
6.5. Safe Mode ............................................................................................................ 22
APPENDIX (A): SPECIFICATIONS .............................................................................. 23
Summary ..................................................................................................................... 23
Electrical Characteristics ............................................................................................. 24
Environment Condition ............................................................................................... 24
Mechanical Condition ................................................................................................. 24
APPENDIX (B): POWER OVER ETHERNET ................................................................. 25
Power Comparison ...................................................................................................... 25
APPENDIX (C): DIMENSIONS ................................................................................... 26
APPENDIX (D): HEXADECIMAL-DECIMAL CONVERSION TABLE ................................. 27
REVISION HISTORY ................................................................................................. 28

RC Series RC6702SV-7311 Installation Guide
04-2017-B www.rivatech.de 4
1. FEATURES
Camera
1/2.8” 1080p CMOS Image Sensor
True Day / Night
DC Auto Iris Lens
WDR
Embedded IR Illuminator
Remote Zoom/Focus Control (One Click AF)
Weather Proof (IP66)
Video
H.264 Baseline, Main, High profile(MPEG-4 Part 10/AVC), MJEPG(Motion JPEG)
Max 30 fps in 1080p
Text Overlay
Analog Video Output
Network
10/100 Base-T Ethernet
Integration
Software Development Kit (SDK) available
ONVIF Compliant (Profile S & Profile G)
General
microSD memory card slot
Power Over Ethernet Plus (PoE+)
Video Contents Analytics (VCA)
VCA Presence (Standard)
* Licenses with higher specifications than VCA Presence are optional.

RC Series RC6702SV-7311 Installation Guide
04-2017-B www.rivatech.de 5
2. PACKAGE CONTENTS
Please unpack the package carefully and handle the equipment with care.
The package contains:
Note
i
The contents above are subject to change without prior notice.
Camera
DC Power Adaptor & Plugs
Screws (M4x30) and Plastic Anchors
Hex Wrench (3mm)
Video Output Cable
Silicon Waterproof Band
Ferrite Core
Quick Installation Guide
Installation Template
ZCAT1518-0730
ZCAT2132-1130

RC Series RC6702SV-7311 Installation Guide
04-2017-B www.rivatech.de 6
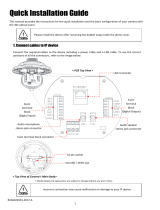
3. PART NAMES
① Sunshield
Position the sunshield to prevent direct sunshine.
② Video Out Cable socket
Socket for the video output cable included in the package (CVBS: 1.0Vp-p / 75Ω BNC)
③ PAL/NTSC button
Pressing the PAL/NTSC button each time changes the mode as follows.
No video output -> PAL-> NTSC*
* Steady output of video until you change the video output mode by pressing the button.
④ Reset button
Use the button to restart the device or to reset it to Factory Default. Refer to 6.3. Reboot and
6.4. Factory Default for more details.
⑤ microSD memory card slot
Camera supports up to 32GB. A card with Class 4 and higher is recommended for HD
recordings.
* Models herein and their appearance are subject to change without any prior notice.
①
⑦
⑥
③
④
⑧
⑤
②
②

RC Series RC6702SV-7311 Installation Guide
04-2017-B www.rivatech.de 7
⑥ Terminal Connector
Connector for cables of digital input/output and audio input/output. Refer to 5. CONNECTIONS
for more information.
⑦ Power Adaptor Connector
Use DC12V for the power supply.
⑧ LAN connector
RJ45 LAN connector for 10/100 Base-T Ethernet (PoE supported).

RC Series RC6702SV-7311 Installation Guide
04-2017-B www.rivatech.de 8
4. CAMERA INSTALLATION
4.1. Installing the camera
4.1.1. Installation without bracket
Installation Template
(Unit: mm)
Caution
!
Installation template’s image size scale in this installation guide is not 1:1.
The correct-size template paper can be found inside the package separately.
Installation template
6702 V1.0

RC Series RC6702SV-7311 Installation Guide
04-2017-B www.rivatech.de 9
Caution
!
Sealing gaps is recommended as gaps may appear after the camera installation.
Gaps may cause problems such as moisture, water leakage and etc., which
negatively affect the operation of the camera if gaps remain unsealed.
Caution
!
To prevent products from damage, place the camera on a stable and non-
vibrating surface. If the stability is in doubt, consult safety personnel for
reinforcements, and then proceed with the installation.
1) Place the installation template included in the
package on the desired installation surface.
2) Drill three holes in correct positions based on
the template paper, and insert the anchor
blocks into the holes.
3) Attach the silicon waterproof band included
in the package to the camera’s mounting surface
by aligning it with the three alignment holes.
4) Install the provided ferrite core on the cable.
For the detailed instructions, refer to the note
on the next page.
5) Connect the required cables including a
power cable and a LAN cable to the device.
Refer to the image on 5. CONNECTIONS for the
proper connections.
6) Place the camera body on the installation
surface by matching three alignment holes with
already inserted plastic anchors.
7)
Tighten the plastic anchors with the
screws(M4x30) included in the package.
8) Adjust the heading direction of the camera.
Refer to 4.2. Adjusting angle of the camera for
more information.
9) To adjust zoom and focus, refer to 4. Adjust
Zoom and Focus for the instructions.

RC Series RC6702SV-7311 Installation Guide
04-2017-B www.rivatech.de 10
Note
i
< Installation of Ferrite Core >
Installing the ferrite core is highly recommended to reduce high frequency noise
level.
The instructions and the image below explain how to install the ferrite core on
the cable.
1. Open the ferrite core by lifting the clip.
2. Make one loop with the cable through the ferrite core like the enlarged
square image below.
3. Close the ferrite core to hold the cable loop into place.
4.1.2. Compatible Accessories
The compatible accessories to mount this camera model are as follows.
Model Names & Combinations
PMA-U100
CMA-U100
JBK-U100
Refer to the corresponding accessory model’s installation guide for the instructions.
Model Image
PMA-U100
CMA-U100
JBK-U100
PMA-U100/CMA-U100
This guide illustrates how to assemble the corner mount adapter and
pole mount adapter.
Check the letter of the alphabet assigned to each adapter and tighten
the screws in the corresponding holes to assemble the adapter.
A-A-A(M4 PAM)
IPN6802HD
B-B-B(M4 PAM)
IPN6702HD
C-C-C-C(M5 PAM)
IPN6602HD
D-D-D(M6 PAM)
ODE-1000T
E-E-E-E(M6 PAM)
WMB-3000P & CMB-3000P
F-F-F-F(M5 PAM)
JBK-U100
G-G-G-G(M6 PAM)
WMB-3000 & WMB-3000S
A-A-A : IPN6802HD
B-B-B : IPN6702HD
C-C-C-C : IPN6602HD
D-D-D-D : WMB-3000P & CMB-3000P
1
HOUSING COVER에 WALL MOUNT CABLE을 통과시킨다.
2
3
1
2
3
1
2
1
2
1
2
3
4
5
1
2
3
4
5
1
2
HOUSING COVER와 WALL MOUNT BRACKET을 조립한다
결합 후 상태 이미지
3mm Hex Wrench를 사용하여 볼트를 푼다. (4EA 동일 방법)
Hinge를 젖힌 후 빼낸다. (2EA 동일 방법)
B
BULLET CAMERA의 CABLE을 HOUSING COVER에 통과시킨다.
장착하는 CAMERA에 맞는 BOLT를 사용하여
CABLE을 GASKET에 끼운 후 위치에 맞게 삽입한다.
CABLE을 GASKET에 맞춰 정리한 후 GASKET을 접어 닫는다.
M3x12 BOLT를 사용하여 PLATE를 조립한다.
왼쪽 상세 이미지를 참고 하여 CABLE GLAND 를 조립한다.
CABLE GLAND를 HOUSING COVER에 완전히 조립한다.
HOUSING COVER의 LOWER와 UPPER를
HOUSING COVER의 UPPER와 LOWER를
BB
A A
A
C C
CC
D D
DD
PMA-U100 CMA-U100 WMA-U100
M5x12 BOLT를 사용하여 HOUSING COVER와 PMA-U100을 체결한다.
결합 후 상태 이미지
M5x12 BOLT를 사용하여 HOUSING COVER와 CMA-U100을 체결한다. M5x12 BOLT를 사용하여 HOUSING COVER와 WMA-U100을 체결한다.
결합 후 상태 이미지 결합 후 상태 이미지
이미지와 같이 위치 시킨 후 HINGE를 사용하여 체결한다.
이미지와 같이 위치 시킨 후 HINGE를 사용하여 체결한다.
3mm Hex Wrench를 사용하여 볼트를 조인다. (4EA 동일 방법)
3mm Hex Wrench를 사용하여 볼트를 조인다. (4EA 동일 방법)
E E
E
E-E-E : ODE-1000T
1
2
HOUSING COVER에 조립한다.

RC Series RC6702SV-7311 Installation Guide
04-2017-B www.rivatech.de 11
4.2. Adjusting angle of the camera
1. Adjust the camera to the desired angle by unscrewing the joints referring to the following
pictures.
2. Insert the video output cable(included
in the package) to the video output
cable socket, and connect it to an
analogue video test monitor to check
if the camera angle has been set as
intended. If the angle is appropriate,
disconnect the camera from the
analogue monitor, and then remove
the video output cable from the
camera.
Adjust the joint to install
the camera on the wall.
Adjust the joint to tilt
the camera angle.
Adjust the joint to delicately
adjust the horizontal angle.
Video Out
Reset
PAL/NTSC
SD Card
Video output cable socket

RC Series RC6702SV-7311 Installation Guide
04-2017-B www.rivatech.de 12
4.3. Adjusting Zoom and Focus
*To be able to adjust zoom and focus, it is necessary to connect the device to a network.
Please refer to 6. CONFIGURATION for the instructions.
Once the device is on the network and the webpage is open, go to Setup> Video & Audio >
Zoom/Focus. Then, the features shown below will appear.
1. Adjust zoom and focus by clicking the arrow buttons: the buttons
move the
lens more extensively than the buttons
.
2. Click One Click Focus to automatically set the lens focus.
3. If focus point is considered misaligned, reset it to a zero point by clicking Calibrate.

RC Series RC6702SV-7311 Installation Guide
04-2017-B www.rivatech.de 13
4.4. Setting Image Attributes
On the camera’s webpage, users can configure the image settings. The menu of the image
attributes is available at Video Appearance via the path, Setup > Video & Audio > Camera.
The following attributes can be adjusted: Brightness, Contrast, Saturation, and Sharpness.
For more information, refer to the web page user’s manual.

RC Series RC6702SV-7311 Installation Guide
04-2017-B www.rivatech.de 14
5. CONNECTIONS
③
④
②
①
BLACK: AUD IN
BROWN: AUD GND
RED: AUD OUT
ORANGE : DI
YELLOW: DI COM
GREEN: DO1 (N.O)
BLUE: DO1 COM
①
⑤

RC Series RC6702SV-7311 Installation Guide
04-2017-B www.rivatech.de 15
① Audio Connection
The camera provides a mono audio input and output. Due to low audio output power, an
amplified speaker is recommended for enhanced sound (Refrain from connecting a
headphone or an earphone directly to the camera).
- Microphone In: Max 2Vp-p, 20KΩ (90dB)
- Headphone Out: 60mW, 16Ω (95dB)
② Sensor (DI) connection
Sensor (DI) can be connected to either a voltage type sensor or a relay type sensor.
Settings can be done through the camera’s webpage.
Input voltage range: 0VDC minimum to 5VDC maximum, Max 50mA
Caution
!
Do not exceed the maximum input voltage or relay rate.
③ Alarm (DO) connection
Only the relay type is supported.
Relay Rating: Max 24VDC 50mA
Caution
!
Do not exceed the maximum relay rating.
Mic
Amp Speaker
ETHERNET
MICRO SD
DC12V
DO
DI
1
OutOut
1
VIDEO
C C
In
AUDIO
+
Reset
SW1 SW2 SW3
SW5 SW6
N / A N / A
N / A N / A
SW1
SW2
SW3
SW4
SW5
SW6
+3.3V
DI
COM
DI
COM
+
-
Relay Type
Voltage Type
+
-
Output of
Sensor
Output of
Sensor
Internal
Internal
+
-

RC Series RC6702SV-7311 Installation Guide
04-2017-B www.rivatech.de 16
④ LAN connection
This is a RJ45 LAN connector for 10/100 Base-T Ethernet. Use the Ethernet cable (RJ45) to
connect the device to a hub or a router in the network. Refer to “Appendix (B). Power over
Ethernet” for more information.
⑤ Power Connection
The camera can be powered by either 12VDC or PoE. If the camera is powered via PoE, refer to
“Appendix (B). Power over Ethernet” for more information.

RC Series RC6702SV-7311 Installation Guide
04-2017-B www.rivatech.de 17
6. CONFIGURATION
6.1. Set up network environment
The default IP address of the device is 192.168.XXX.XXX. Users can identify the IP address of the
device from converting the MAC address’s hexadecimal numbers, which is attached to the
device. Be sure that the device and PC are on a same network before running the installation.
IP address : 192.168.xxx.xxx
Subnet mask: 255.255.0.0
6.1.1. Generic IP Environment
In case of generic private network environment where IP address 192.168.XXX.XXX are used,
users may view the live streaming images on a web page using the device’s default IP address:
1. Convert the device’s MAC address to the IP address. Refer to the Hexadecimal-Decimal
Conversion Chart at the end of the manual.
(The MAC address of the device is attached on the side or bottom of the device.)
2. Start the Microsoft® Internet Explorer web browser and enter the address of the device.
3. Web streaming and device configurations are supported through ActiveX program. When the
ActiveX installation window appears, authorize and install the ActiveX.
MAC address = 00-13-23-01-14-B1 → IP address = 192.168.20.177
Convert the last two sets of hexadecimal numbers to decimal numbers.

RC Series RC6702SV-7311 Installation Guide
04-2017-B www.rivatech.de 18
6.1.2. Custom IP Environment
Please access our website and download necessary IPAdminTool first:
http://www.rivatech.de/en/downloads/software
IPAdminTool is a management tool, which automatically scans all the the network products for
users to perform administrative tasks, which includes network configurations, firmware
update, device reboot, and device organizations.
To modify the device’s default IP address for customized network area:
1. Find the device from the IPAdminTool’s list, and highlight the device’s name.
2. Right-click the mouse, and select IP Address; IP Setup window appears.
* There are two options that are for a single device or for multiple devices respectively. For one device, click “Single”.
3. On the New Information table in the Single IP Change window, modify the last two digits of
the device’s IP address, and modify the rest parts including subnet mask, gateway, and DNS
if necessary by checking the user/ PC network area information.
4. Make sure to input the correct ID and PW of the device (default: root / pass).
5. Click Apply to complete the modification.
Give a new unique IP address by
modifying the last two digits.

RC Series RC6702SV-7311 Installation Guide
04-2017-B www.rivatech.de 19
6.2. View video on web page
Type the proper IP address to view the live streaming images through a web browser.
The default username and password is root / pass.
6.2.1. ActiveX Installation
1. When the browser asks to install the AxUMF software, click Install to proceed.
2. When Setup installation pop-up window appears, click Install to proceed with rest of
installations.
Note
i
Depending on system OS and Internet Explorer version, installation experience
may differ from one another. Figures described above are from Windows 7,
Internet Explorer 9 environment.

RC Series RC6702SV-7311 Installation Guide
04-2017-B www.rivatech.de 20
6.2.2. View video using IPAdmin Tool
IPAdminTool automatically searches all activated network encoders and IP cameras and shows
the product name, IP address, MAC address and etc.
1. From the IPAdminTool’s product list, select the device by highlighting it.
2. Right-click the mouse, and select Web view.
The system’s default web browser opens the device’s address.
Caution
!
Whether directly accessing the streaming video by typing IP address on a web
page or taking steps through IPAdminTool, the ActiveX is needed to be installed
for the Microsoft® Internet Explorer to have the complete configuration
privileges.
/