Page is loading ...

808744 - Wolf 30'' (762) Microwave Trim Kit
Installation Instructions
808662 / Rev D / May, 2009Page 1 of 2
CONTAINS: QTY DESCRIPTION
1 Ductwork, MW24
2 Screw, #8-15x1/2 Truss Hd
1 Assemblied Trim Kit
6 6-18x1 Tpg Screw Type A
2 Trim, MW24 Polycarbonate
QTY
DESCRIPTION
4 Self Tapping Screw - #8-18x1/2
1 Mtg Brkt, RT - MW
1 Mtg Brkt, LT - MW
1 Installation Instructions
INST
ALLATION PROCEDURE:
1. Locate properly grounded 3-prong receptacle 4''
(102) from right side and 4'' (102) up from
bottom of microwave oven cabinet (See Cabinet
Dimensions).
NOTE: You must have a properly grounded, 3-
prong outlet installed by a qualified electrician. Do
not use a GFCI outlet, as this may cause product
operation interruptions.
2. The floor of the opening should be constructed of
plywood strong enough to support weight of oven
and floor load (about 100lbs./ 45 kg). The floor
should be level for proper operation of oven.
NOTE: Be sure to check local building code as it
may require that the opening be enclosed with
sides, ceiling and rear partition. The proper func-
tioning of the oven does not require the enclosure.
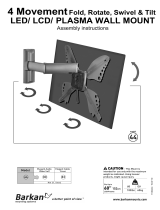
*17"
(432)
20" (508)
MIN.
*1-1/4
(32)
27-1/2"
(699)
Dimensions in brackets are in millimeters unless otherwise specified
* Dimensions may vary by +/- 1/8 (.3mm)
MICROWAVE
PLATFORM
1" (2.5) MIN.
DECORATIVE
CABINET RAIL
1-1/4" (32) MIN.
*1-1/4"
(32)
Cabinet Dimensions
NOTE: This Microwave trim kit is designed only for Wolf Microwave Ovens specifying 801527, 807056 or
808744 on rating label on the left side wall of oven cavity.
NOTE: Before begining remove turn table from microwave cavity.
TO AVOID ELECTRICAL SHOCK, SHUT OFF POWER BEFORE BEGINING INSTALLATION.
The Wolf Microwave Trim Kit (MWTRIM/5) is used only with the Wolf Microwave Model MW24. This model can
also be installed above a Wolf SO30.
The cabinet or wall opening must be the following dimensions:
Height: 17'' (432)
Width: 27-1/2'' (699)
Depth: 20'' (508) min.
This kit includes metal parts that have sharp edges, handle with care to avoid possible injury.

808744 - Wolf 30'' (762) Microwave Trim Kit
Installation Instructions
808662 / Rev D / May, 2009
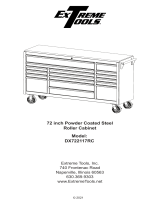
Mounting
Bracket
Screws
Mounting
Brackets
Figure 1. Mounting Brackets
Frame Assembly
Figure 3. Frame Assembly
Exhaust Duct
Assembly
Exhaust Duct
Mounting Screws
Figure 2. Exhaust Duct Assembly
3. Locate mounting brackets. Pre-drill pilot holes
before installing screws to avoid damage to cabinet
or trim kit hardware. Attach mounting brackets with
supplied screws, making sure brackets do not
extend beyond front surface of cabinet
(See Figure 1).
4. Center exhaust duct assembly in opening. When
centered correctly, its flanges will be tightly against
lower front edge of opening. Secure with mounting
screws (See Figure 2).
5. Place oven adjacent to wall or cabinet opening,
then plug power supply cord into electrical outlet.
6. Carefully guide oven into opening. Slide oven onto
exhaust duct assembly.
NOTE: Avoid pinching power cord between oven
and wall.
7. Position frame assembly to be square with oven.
Carefully place frame assembly on oven. Check
that it is level (See Figure 3).
8. Secure frame assembly with mounting screws
(See Figure 4).
9. Snap the polycarbonate trim pieces into place cov-
ering the screw holes.
Page 2 of 2
Trim Kit
Mounting
Screws
Figure 4. Trim Kit Screws
/