Page is loading ...

User Guide
Anritsu Power Master™ Using
PowerXpert™
MA24507A, Frequency Selectable mmWave Power Analyzer, 9 kHz to 70 GHz
Anritsu Company
490 Jarvis Drive
Morgan Hill, CA 95037-2809
USA
PN: 10585-00029
Revision: A
Published: October 2016
Copyright 2016 Anritsu Company
ООО "Техэнком" Контрольно-измерительные приборы и оборудование www.tehencom.com

Title-2 PN: 10585-00029 Rev. A MA24507A PowerXpert UG
ООО "Техэнком" Контрольно-измерительные приборы и оборудование www.tehencom.com

MA24507A PowerXpert UG PN: 10585-00029 Rev. A Contents-1
Table of Contents
Chapter 1—General Information
1-1 Scope of Manual. . . . . . . . . . . . . . . . . . . . . . . . . . . . . . . . . . . . . . . . . . . . . . . . . . . . . . . . . . . . 1-1
1-2 Introduction. . . . . . . . . . . . . . . . . . . . . . . . . . . . . . . . . . . . . . . . . . . . . . . . . . . . . . . . . . . . . . . . 1-1
1-3 Description . . . . . . . . . . . . . . . . . . . . . . . . . . . . . . . . . . . . . . . . . . . . . . . . . . . . . . . . . . . . . . . . 1-1
1-4 Software and Documentation. . . . . . . . . . . . . . . . . . . . . . . . . . . . . . . . . . . . . . . . . . . . . . . . . . 1-1
Related Documentation. . . . . . . . . . . . . . . . . . . . . . . . . . . . . . . . . . . . . . . . . . . . . . . . . . . . 1-1
PowerXpert Program. . . . . . . . . . . . . . . . . . . . . . . . . . . . . . . . . . . . . . . . . . . . . . . . . . . . . . 1-2
Microsoft® .NET Framework Version 4.0 . . . . . . . . . . . . . . . . . . . . . . . . . . . . . . . . . . . . . . 1-2
1-5 Initial Inspection . . . . . . . . . . . . . . . . . . . . . . . . . . . . . . . . . . . . . . . . . . . . . . . . . . . . . . . . . . . . 1-2
1-6 Power Analyzer Identification. . . . . . . . . . . . . . . . . . . . . . . . . . . . . . . . . . . . . . . . . . . . . . . . . . 1-2
Customer Asset Tag Placement . . . . . . . . . . . . . . . . . . . . . . . . . . . . . . . . . . . . . . . . . . . . . 1-3
1-7 Preparation for Storage/Shipment . . . . . . . . . . . . . . . . . . . . . . . . . . . . . . . . . . . . . . . . . . . . . . 1-3
1-8 Contacting Anritsu . . . . . . . . . . . . . . . . . . . . . . . . . . . . . . . . . . . . . . . . . . . . . . . . . . . . . . . . . . 1-4
1-9 Product Update Information . . . . . . . . . . . . . . . . . . . . . . . . . . . . . . . . . . . . . . . . . . . . . . . . . . . 1-4
Chapter 2—Installation (PC Only)
2-1 Introduction. . . . . . . . . . . . . . . . . . . . . . . . . . . . . . . . . . . . . . . . . . . . . . . . . . . . . . . . . . . . . . . . 2-1
2-2 Hardware and Software Requirements . . . . . . . . . . . . . . . . . . . . . . . . . . . . . . . . . . . . . . . . . . 2-1
2-3 PowerXpert Application and Power Analyzer Drivers. . . . . . . . . . . . . . . . . . . . . . . . . . . . . . . . 2-1
2-4 Installing PowerXpert . . . . . . . . . . . . . . . . . . . . . . . . . . . . . . . . . . . . . . . . . . . . . . . . . . . . . . . . 2-2
Microsoft® .NET Framework Version 4.0 Installation . . . . . . . . . . . . . . . . . . . . . . . . . . . . . 2-2
2-5 Setting PowerXpert to Run in Windows XP Compatibility Mode . . . . . . . . . . . . . . . . . . . . . . . 2-5
Chapter 3—Using MA24507A Power Master™ with PowerXpert™
3-1 Introduction. . . . . . . . . . . . . . . . . . . . . . . . . . . . . . . . . . . . . . . . . . . . . . . . . . . . . . . . . . . . . . . . 3-1
3-2 PowerXpert
™
Overview . . . . . . . . . . . . . . . . . . . . . . . . . . . . . . . . . . . . . . . . . . . . . . . . . . . . . . 3-2
3-3 PowerXpert Settings. . . . . . . . . . . . . . . . . . . . . . . . . . . . . . . . . . . . . . . . . . . . . . . . . . . . . . . . . 3-3
Connect Power Analyzer. . . . . . . . . . . . . . . . . . . . . . . . . . . . . . . . . . . . . . . . . . . . . . . . . . . 3-3
Power Analyzer Modes of Operation. . . . . . . . . . . . . . . . . . . . . . . . . . . . . . . . . . . . . . . . . . 3-3
3-4 Continuous Mode . . . . . . . . . . . . . . . . . . . . . . . . . . . . . . . . . . . . . . . . . . . . . . . . . . . . . . . . . . . 3-4
3-5 Continuous Mode Settings . . . . . . . . . . . . . . . . . . . . . . . . . . . . . . . . . . . . . . . . . . . . . . . . . . . . 3-5
Measurement – CW/Channel Power. . . . . . . . . . . . . . . . . . . . . . . . . . . . . . . . . . . . . . . . . . 3-5
Center freq and Span . . . . . . . . . . . . . . . . . . . . . . . . . . . . . . . . . . . . . . . . . . . . . . . . . . . . . 3-5
Relative . . . . . . . . . . . . . . . . . . . . . . . . . . . . . . . . . . . . . . . . . . . . . . . . . . . . . . . . . . . . . . . . 3-5
Units . . . . . . . . . . . . . . . . . . . . . . . . . . . . . . . . . . . . . . . . . . . . . . . . . . . . . . . . . . . . . . . . . . 3-5
Resolution . . . . . . . . . . . . . . . . . . . . . . . . . . . . . . . . . . . . . . . . . . . . . . . . . . . . . . . . . . . . . . 3-5
Range . . . . . . . . . . . . . . . . . . . . . . . . . . . . . . . . . . . . . . . . . . . . . . . . . . . . . . . . . . . . . . . . . 3-5
Measurement Hold . . . . . . . . . . . . . . . . . . . . . . . . . . . . . . . . . . . . . . . . . . . . . . . . . . . . . . . 3-6
Graticule Display Settings . . . . . . . . . . . . . . . . . . . . . . . . . . . . . . . . . . . . . . . . . . . . . . . . . . 3-6
Continuous Mode Numerical Display Area . . . . . . . . . . . . . . . . . . . . . . . . . . . . . . . . . . . . . 3-7
3-6 Power Hunter Mode . . . . . . . . . . . . . . . . . . . . . . . . . . . . . . . . . . . . . . . . . . . . . . . . . . . . . . . . . 3-8
ООО "Техэнком" Контрольно-измерительные приборы и оборудование www.tehencom.com

Contents-2 PN: 10585-00029 Rev. A MA24507A PowerXpert UG
Table of Contents (Continued)
3-7 Power Hunter Settings . . . . . . . . . . . . . . . . . . . . . . . . . . . . . . . . . . . . . . . . . . . . . . . . . . . . . . . 3-9
Start/Stop Frequency. . . . . . . . . . . . . . . . . . . . . . . . . . . . . . . . . . . . . . . . . . . . . . . . . . . . . . 3-9
Start / Stop Freq Units . . . . . . . . . . . . . . . . . . . . . . . . . . . . . . . . . . . . . . . . . . . . . . . . . . . . . 3-9
Units. . . . . . . . . . . . . . . . . . . . . . . . . . . . . . . . . . . . . . . . . . . . . . . . . . . . . . . . . . . . . . . . . . . 3-9
Resolution . . . . . . . . . . . . . . . . . . . . . . . . . . . . . . . . . . . . . . . . . . . . . . . . . . . . . . . . . . . . . . 3-9
Set Minimum Power. . . . . . . . . . . . . . . . . . . . . . . . . . . . . . . . . . . . . . . . . . . . . . . . . . . . . . . 3-9
Minimum Power. . . . . . . . . . . . . . . . . . . . . . . . . . . . . . . . . . . . . . . . . . . . . . . . . . . . . . . . . . 3-9
Power Hunter Mode Numerical Display Area . . . . . . . . . . . . . . . . . . . . . . . . . . . . . . . . . . 3-10
Power Reading Display . . . . . . . . . . . . . . . . . . . . . . . . . . . . . . . . . . . . . . . . . . . . . . . . . . . 3-11
3-8 Channel Monitor Mode . . . . . . . . . . . . . . . . . . . . . . . . . . . . . . . . . . . . . . . . . . . . . . . . . . . . . . 3-12
3-9 Channel Monitor Mode Settings . . . . . . . . . . . . . . . . . . . . . . . . . . . . . . . . . . . . . . . . . . . . . . . 3-13
Measurement – CW/Channel Mode . . . . . . . . . . . . . . . . . . . . . . . . . . . . . . . . . . . . . . . . . 3-13
Span . . . . . . . . . . . . . . . . . . . . . . . . . . . . . . . . . . . . . . . . . . . . . . . . . . . . . . . . . . . . . . . . . 3-13
Units. . . . . . . . . . . . . . . . . . . . . . . . . . . . . . . . . . . . . . . . . . . . . . . . . . . . . . . . . . . . . . . . . . 3-13
Resolution . . . . . . . . . . . . . . . . . . . . . . . . . . . . . . . . . . . . . . . . . . . . . . . . . . . . . . . . . . . . . 3-13
Measurement Hold . . . . . . . . . . . . . . . . . . . . . . . . . . . . . . . . . . . . . . . . . . . . . . . . . . . . . . 3-13
Channel Monitor Mode Numerical Display Area . . . . . . . . . . . . . . . . . . . . . . . . . . . . . . . . 3-14
Channel Monitor Display . . . . . . . . . . . . . . . . . . . . . . . . . . . . . . . . . . . . . . . . . . . . . . . . . . 3-15
3-10 Graticule Settings and Graphical Display Area. . . . . . . . . . . . . . . . . . . . . . . . . . . . . . . . . . . . 3-16
3-11 Sensor Information Area. . . . . . . . . . . . . . . . . . . . . . . . . . . . . . . . . . . . . . . . . . . . . . . . . . . . . 3-17
Zero Sensor. . . . . . . . . . . . . . . . . . . . . . . . . . . . . . . . . . . . . . . . . . . . . . . . . . . . . . . . . . . . 3-17
Averages . . . . . . . . . . . . . . . . . . . . . . . . . . . . . . . . . . . . . . . . . . . . . . . . . . . . . . . . . . . . . . 3-17
Offset . . . . . . . . . . . . . . . . . . . . . . . . . . . . . . . . . . . . . . . . . . . . . . . . . . . . . . . . . . . . . . . . . 3-17
Apply Above Settings Button. . . . . . . . . . . . . . . . . . . . . . . . . . . . . . . . . . . . . . . . . . . . . . . 3-17
3-12 Tools Menu. . . . . . . . . . . . . . . . . . . . . . . . . . . . . . . . . . . . . . . . . . . . . . . . . . . . . . . . . . . . . . . 3-18
Zero All Sensors . . . . . . . . . . . . . . . . . . . . . . . . . . . . . . . . . . . . . . . . . . . . . . . . . . . . . . . . 3-18
Capture Screen . . . . . . . . . . . . . . . . . . . . . . . . . . . . . . . . . . . . . . . . . . . . . . . . . . . . . . . . . 3-19
Log Data . . . . . . . . . . . . . . . . . . . . . . . . . . . . . . . . . . . . . . . . . . . . . . . . . . . . . . . . . . . . . . 3-19
Show Multiple Sensor Display . . . . . . . . . . . . . . . . . . . . . . . . . . . . . . . . . . . . . . . . . . . . . . 3-21
3-13 Settings Menu. . . . . . . . . . . . . . . . . . . . . . . . . . . . . . . . . . . . . . . . . . . . . . . . . . . . . . . . . . . . . 3-22
Resetting to Factory Settings. . . . . . . . . . . . . . . . . . . . . . . . . . . . . . . . . . . . . . . . . . . . . . . 3-22
No Sensor Display. . . . . . . . . . . . . . . . . . . . . . . . . . . . . . . . . . . . . . . . . . . . . . . . . . . . . . . 3-22
3-14 Help . . . . . . . . . . . . . . . . . . . . . . . . . . . . . . . . . . . . . . . . . . . . . . . . . . . . . . . . . . . . . . . . . . . . 3-23
Chapter 4—Power Analyzer Care
4-1 Introduction. . . . . . . . . . . . . . . . . . . . . . . . . . . . . . . . . . . . . . . . . . . . . . . . . . . . . . . . . . . . . . . . 4-1
4-2 Power Analyzer Precautions. . . . . . . . . . . . . . . . . . . . . . . . . . . . . . . . . . . . . . . . . . . . . . . . . . . 4-1
Avoid Over Torquing Connectors . . . . . . . . . . . . . . . . . . . . . . . . . . . . . . . . . . . . . . . . . . . . 4-1
Avoid Mechanical Shock . . . . . . . . . . . . . . . . . . . . . . . . . . . . . . . . . . . . . . . . . . . . . . . . . . . 4-1
Avoid Applying Excessive Power. . . . . . . . . . . . . . . . . . . . . . . . . . . . . . . . . . . . . . . . . . . . . 4-1
Observe Proper ESD Precautions. . . . . . . . . . . . . . . . . . . . . . . . . . . . . . . . . . . . . . . . . . . . 4-1
Clean the Connectors . . . . . . . . . . . . . . . . . . . . . . . . . . . . . . . . . . . . . . . . . . . . . . . . . . . . . 4-2
Avoid Damage to Communication Connector and Cable . . . . . . . . . . . . . . . . . . . . . . . . . . 4-2
ООО "Техэнком" Контрольно-измерительные приборы и оборудование www.tehencom.com

MA24507A PowerXpert UG PN: 10585-00029 Rev. A Contents-3
Table of Contents (Continued)
4-3 RF Connector Precautions . . . . . . . . . . . . . . . . . . . . . . . . . . . . . . . . . . . . . . . . . . . . . . . . . . . . 4-2
Handle With Care . . . . . . . . . . . . . . . . . . . . . . . . . . . . . . . . . . . . . . . . . . . . . . . . . . . . . . . . 4-2
Keep Connectors Clean . . . . . . . . . . . . . . . . . . . . . . . . . . . . . . . . . . . . . . . . . . . . . . . . . . . 4-2
Check the Pin Depth . . . . . . . . . . . . . . . . . . . . . . . . . . . . . . . . . . . . . . . . . . . . . . . . . . . . . . 4-2
Teflon Tuning Washers . . . . . . . . . . . . . . . . . . . . . . . . . . . . . . . . . . . . . . . . . . . . . . . . . . . . 4-2
Align Before Connecting . . . . . . . . . . . . . . . . . . . . . . . . . . . . . . . . . . . . . . . . . . . . . . . . . . . 4-2
Torque Properly. . . . . . . . . . . . . . . . . . . . . . . . . . . . . . . . . . . . . . . . . . . . . . . . . . . . . . . . . . 4-2
Cover the Connectors . . . . . . . . . . . . . . . . . . . . . . . . . . . . . . . . . . . . . . . . . . . . . . . . . . . . . 4-2
Store Properly . . . . . . . . . . . . . . . . . . . . . . . . . . . . . . . . . . . . . . . . . . . . . . . . . . . . . . . . . . . 4-2
4-4 Connection Techniques . . . . . . . . . . . . . . . . . . . . . . . . . . . . . . . . . . . . . . . . . . . . . . . . . . . . . . 4-3
Connection Procedure. . . . . . . . . . . . . . . . . . . . . . . . . . . . . . . . . . . . . . . . . . . . . . . . . . . . . 4-3
Disconnection Procedure . . . . . . . . . . . . . . . . . . . . . . . . . . . . . . . . . . . . . . . . . . . . . . . . . . 4-4
4-5 RF Connector Preventive Care. . . . . . . . . . . . . . . . . . . . . . . . . . . . . . . . . . . . . . . . . . . . . . . . . 4-4
Visual Inspection . . . . . . . . . . . . . . . . . . . . . . . . . . . . . . . . . . . . . . . . . . . . . . . . . . . . . . . . . 4-4
Pin Depth Measurement . . . . . . . . . . . . . . . . . . . . . . . . . . . . . . . . . . . . . . . . . . . . . . . . . . . 4-5
Pin Depth Dimensions. . . . . . . . . . . . . . . . . . . . . . . . . . . . . . . . . . . . . . . . . . . . . . . . . . . . . 4-6
Pin Depth Gauge. . . . . . . . . . . . . . . . . . . . . . . . . . . . . . . . . . . . . . . . . . . . . . . . . . . . . . . . . 4-7
Pin Depth Tolerances . . . . . . . . . . . . . . . . . . . . . . . . . . . . . . . . . . . . . . . . . . . . . . . . . . . . . 4-7
4-6 Connector Cleaning . . . . . . . . . . . . . . . . . . . . . . . . . . . . . . . . . . . . . . . . . . . . . . . . . . . . . . . . . 4-8
Required Cleaning Items. . . . . . . . . . . . . . . . . . . . . . . . . . . . . . . . . . . . . . . . . . . . . . . . . . . 4-8
Important Cleaning Tips . . . . . . . . . . . . . . . . . . . . . . . . . . . . . . . . . . . . . . . . . . . . . . . . . . . 4-8
Cleaning Procedure. . . . . . . . . . . . . . . . . . . . . . . . . . . . . . . . . . . . . . . . . . . . . . . . . . . . . . . 4-8
Chapter 5—Using the MA24507A Power Master
5-1 Introduction. . . . . . . . . . . . . . . . . . . . . . . . . . . . . . . . . . . . . . . . . . . . . . . . . . . . . . . . . . . . . . . . 5-1
Power Master Overview . . . . . . . . . . . . . . . . . . . . . . . . . . . . . . . . . . . . . . . . . . . . . . . . . . . 5-1
5-2 Basic Power Measurement. . . . . . . . . . . . . . . . . . . . . . . . . . . . . . . . . . . . . . . . . . . . . . . . . . . . 5-2
Connecting the DUT . . . . . . . . . . . . . . . . . . . . . . . . . . . . . . . . . . . . . . . . . . . . . . . . . . . . . . 5-2
Zeroing the Power Analyzer . . . . . . . . . . . . . . . . . . . . . . . . . . . . . . . . . . . . . . . . . . . . . . . . 5-3
5-3 Error States. . . . . . . . . . . . . . . . . . . . . . . . . . . . . . . . . . . . . . . . . . . . . . . . . . . . . . . . . . . . . . . . 5-3
Chapter 6—MA24507A Power Master Operational Testing
6-1 Introduction. . . . . . . . . . . . . . . . . . . . . . . . . . . . . . . . . . . . . . . . . . . . . . . . . . . . . . . . . . . . . . . . 6-1
6-2 Precautions . . . . . . . . . . . . . . . . . . . . . . . . . . . . . . . . . . . . . . . . . . . . . . . . . . . . . . . . . . . . . . . 6-1
6-3 Required Equipment . . . . . . . . . . . . . . . . . . . . . . . . . . . . . . . . . . . . . . . . . . . . . . . . . . . . . . . . 6-2
6-4 VSWR Pretest. . . . . . . . . . . . . . . . . . . . . . . . . . . . . . . . . . . . . . . . . . . . . . . . . . . . . . . . . . . . . . 6-3
6-5 Frequency Response Test . . . . . . . . . . . . . . . . . . . . . . . . . . . . . . . . . . . . . . . . . . . . . . . . . . . . 6-4
Chapter 7—Remote Operation
7-1 Introduction. . . . . . . . . . . . . . . . . . . . . . . . . . . . . . . . . . . . . . . . . . . . . . . . . . . . . . . . . . . . . . . . 7-1
Device Driver for MS Windows . . . . . . . . . . . . . . . . . . . . . . . . . . . . . . . . . . . . . . . . . . . . . . 7-1
Remote Programming Interface . . . . . . . . . . . . . . . . . . . . . . . . . . . . . . . . . . . . . . . . . . . . . 7-2
7-2 IEEE 488.2 Commands . . . . . . . . . . . . . . . . . . . . . . . . . . . . . . . . . . . . . . . . . . . . . . . . . . . . . . 7-2
ООО "Техэнком" Контрольно-измерительные приборы и оборудование www.tehencom.com

Contents-4 PN: 10585-00029 Rev. A MA24507A PowerXpert UG
Table of Contents (Continued)
7-3 Command Requirements . . . . . . . . . . . . . . . . . . . . . . . . . . . . . . . . . . . . . . . . . . . . . . . . . . . . . 7-2
Query Commands . . . . . . . . . . . . . . . . . . . . . . . . . . . . . . . . . . . . . . . . . . . . . . . . . . . . . . . . 7-2
Data Parameters . . . . . . . . . . . . . . . . . . . . . . . . . . . . . . . . . . . . . . . . . . . . . . . . . . . . . . . . . 7-2
Data Parameter Notations. . . . . . . . . . . . . . . . . . . . . . . . . . . . . . . . . . . . . . . . . . . . . . . . . . 7-3
7-4 Notational Conventions. . . . . . . . . . . . . . . . . . . . . . . . . . . . . . . . . . . . . . . . . . . . . . . . . . . . . . . 7-4
7-5 Programming the MA24507A Power Master . . . . . . . . . . . . . . . . . . . . . . . . . . . . . . . . . . . . . . 7-4
Send and Receive Format. . . . . . . . . . . . . . . . . . . . . . . . . . . . . . . . . . . . . . . . . . . . . . . . . . 7-4
Error Responses . . . . . . . . . . . . . . . . . . . . . . . . . . . . . . . . . . . . . . . . . . . . . . . . . . . . . . . . . 7-4
Default Power Analyzer Settings. . . . . . . . . . . . . . . . . . . . . . . . . . . . . . . . . . . . . . . . . . . . . 7-5
7-6 System Common Commands. . . . . . . . . . . . . . . . . . . . . . . . . . . . . . . . . . . . . . . . . . . . . . . . . . 7-6
7-7 System Commands. . . . . . . . . . . . . . . . . . . . . . . . . . . . . . . . . . . . . . . . . . . . . . . . . . . . . . . . . . 7-8
7-8 MA24507A Power Master Commands . . . . . . . . . . . . . . . . . . . . . . . . . . . . . . . . . . . . . . . . . . . 7-9
Alphabetical Index of Programming Commands
ООО "Техэнком" Контрольно-измерительные приборы и оборудование www.tehencom.com

MA24507A PowerXpert UG PN: 10585-00029 Rev. A 1-1
Chapter 1 — General Information
1-1 Scope of Manual
This manual provides general information, installation and operating instruction for the Anritsu MA24507A
USB Power Master power analyzer using the PowerXpert™ application.
1-2 Introduction
This chapter contains general information about Anritsu MA24507A USB Power Master. It includes the
following information:
• General description of the device
• Identification number
• Initial inspection
• Preparation for storage and shipment
1-3 Description
The Anritsu MA24507A Power Master is a frequency selectable mmWave power analyzer that connects and
communicates with a PC via USB. It can accurately measure signals as low as 9 kHz and up to 70 GHz. It is
ideal for testing many mmWave applications, like 802.11ad, wireless backhaul, and other future 5G
applications.
1-4 Software and Documentation
All software and documentation for the MA24507A Power Master is available online.http://www.anritsu.com
Related Documentation
The documents listed below support PowerXpert with the USB power sensors and USB power analyzers:
• Anritsu Power Master Using PowerXpert User Guide – 10585-00029
Supports: MA25407A
• Power Master Frequency Selectable mmWave Power Analyzer Technical Data Sheet – 11410-00948
Supports: MA24507A
• PowerXpert and USB Power Sensor User Guide – 10585-00020
Supports: MA24105A, MA24106A, MA24108A, MA24118A, MA24126A, MA24208A, MA24218A,
MA24330A. MA24340A, and MA24350A
• PowerXpert Product Information, Compliance, and Safety (PICS) – 10100-00066
• For the latest updates on Product Brochures and Technical Data Sheets, visit us at
http://www.anritsu.com.
Note
The MA24507A Power Master uses a USB 3.0 interface for PC and remote communication and
requires USB 3.0 as a power source.
Note
Anritsu follows a practice of regular improvement to our software; we recommend users check
http://www.anritsu.com to ensure you have the latest versions.
ООО "Техэнком" Контрольно-измерительные приборы и оборудование www.tehencom.com

1-5 Initial Inspection General Information
1-2 PN: 10585-00029 Rev. A MA24507A PowerXpert UG
PowerXpert Program
Provides the user interface to the power analyzer via USB connection to a PC.
Microsoft® .NET Framework Version 4.0
Available for installation if .NET Framework does not already exist on your PC. The PowerXpert installation
program will detect whether or not this is already on your PC and will provide a message if it is not installed.
PowerXpert needs .Net Framework 4.0. This framework version is included in both Minimal & Full version of
installers. The difference between minimal & full is that the minimal installer uses a light weight web installer
of .NET 4.0; therefore, PowerXpert requires the internet connection in order to make the installation. Full
installer uses complete .NET 4.0 setup and does not need an internet connection to make the installation.
1-5 Initial Inspection
Inspect the shipping container for damage. If the shipping container is damaged, retain it until the contents of
the shipment have been checked against the packing list and the power analyzer has been checked for
mechanical and electrical operation. The following items are included with every shipment:
• MA24507A USB Power Master mmWave Power Analyzer
• 2000-1859-R 1.0 m USB A to C Port Cable
• Certificate of Calibration
If the shipment is incomplete or if the power analyzer is damaged mechanically or electrically, notify your local
sales representative or Anritsu Customer Service. If the shipping container is damaged or shows signs of
stress, notify the carrier as well as Anritsu. Keep the shipping materials for the carrier's inspection.
1-6 Power Analyzer Identification
All Anritsu power analyzers are assigned a unique seven digit serial number, such as “1601015”. The serial
number is printed on a label that is affixed to the unit. When ordering parts or corresponding with Anritsu
Customer Service, please use the correct serial number with reference to the specific instrument's model
number.
ООО "Техэнком" Контрольно-измерительные приборы и оборудование www.tehencom.com

General Information 1-7 Preparation for Storage/Shipment
MA24507A PowerXpert UG PN: 10585-00029 Rev. A 1-3
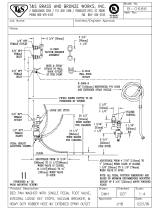
Customer Asset Tag Placement
When affixing an asset tag to the power analyzer, use an area on the cover plate as indicated below to ensure
that the asset tag is retained with the product during service.
1-7 Preparation for Storage/Shipment
Preparing the power analyzer for storage consists of cleaning the unit, packing the inside with
moisture-absorbing desiccant crystals, and storing the unit in the recommended temperature environment.
Please refer to the data sheet for storage temperature recommendations.
To provide maximum protection against damage in transit, the power analyzer should be repackaged in the
original shipping container. If this container is no longer available and the unit is being returned to Anritsu for
repair, please advise Anritsu Customer Service and use the following process to package the USB power
analyzer for shipment:
• Use a Suitable Container: Obtain a corrugated cardboard carton. This carton should have inside
dimensions of no less than 15 cm larger than the unit dimensions to allow for cushioning.
• Protect the Instrument: Surround the unit with polyethylene sheeting to protect the finish.
• Cushion the Instrument: Cushion the instrument on all sides by tightly packing urethane foam
between the carton and the unit. Provide at least three inches of dunnage on all sides.
• Seal the Container: Seal the carton by using either shipping tape or an industrial stapler.
• Address the Container: If the instrument is being returned to Anritsu for service, mark the address of
the appropriate Anritsu service center and your return address on the carton in one or more prominent
locations.
Figure 1-1. Asset Tag Placement Location
Note Disconnect any USB and Trigger cables before packaging the power analyzer.
Place
Asset Tag
Here
ООО "Техэнком" Контрольно-измерительные приборы и оборудование www.tehencom.com

1-8 Contacting Anritsu General Information
1-4 PN: 10585-00029 Rev. A MA24507A PowerXpert UG
1-8 Contacting Anritsu
To contact Anritsu, please visit: http://www.anritsu.com
From here, you can select the latest sales, service and support contact information in your country or region,
provide online feedback, complete a “Talk to Anritsu” form to get your questions answered, or obtain other
services offered by Anritsu.
1-9 Product Update Information
Updated product information can be found via the Anritsu Power Meters and Power Analyzers product page:
http://www.anritsu.com/en-US/test-measurement/rf-microwave/power-meters-and-sensors
Selecting your product model from the product page will lead you to a Library or Downloads tab that contains
links to all of the latest documentation and downloads related to your Anritsu product.
ООО "Техэнком" Контрольно-измерительные приборы и оборудование www.tehencom.com

MA24507A PowerXpert UG PN: 10585-00029 Rev. A 2-1
Chapter 2 — Installation (PC Only)
2-1 Introduction
This chapter provides information on installing the Anritsu PowerXpert
™
application and the
MA24507A Power Master backend software,
• “Hardware and Software Requirements” for the Anritsu PowerXpert application
• “Installing PowerXpert” procedure
2-2 Hardware and Software Requirements
The following are the recommended minimum PC specifications for installing and using the software:
• Equivalent to Quad Core i5 fourth generation or higher CPU, 8 GB RAM, 128 GB Data Storage
• All versions of Microsoft
®
Windows7, Windows 8, Windows 8.1, Windows 10, and Windows Vista
®
,
Windows XP (64 bit OS highly recommended)
• 100 MB hard-disk free space
• Display resolution 1024 × 768
• Super speed USB 3.0
2-3 PowerXpert Application and Power Analyzer Drivers
Both the PowerXpert application and power analyzer drivers must be installed before using the
MA24507A Power Master. Follow the steps below as a guide for proper installation.
ООО "Техэнком" Контрольно-измерительные приборы и оборудование www.tehencom.com

2-4 Installing PowerXpert Installation (PC Only)
2-2 PN: 10585-00029 Rev. A MA24507A PowerXpert UG
2-4 Installing PowerXpert
Microsoft® .NET Framework Version 4.0 Installation
PowerXpert needs .NET. This framework version is included in both Minimal & Full version of installers. The
difference between minimal & full is that the minimal installer uses a light weight web installer of .NET 4.0;
therefore, PowerXpert requires an internet connection in order to complete the installation. Full installer uses
complete .NET 4.0 setup and does not need an internet connection to make the installation.
1. Go to http://www.anritsu.com. and type “PowerXpert” into the search. Find the "PowerXpert Analysis and
Control Software” section and download the zip file.
2. Unzip the downloaded folder and find the PowerXpert_Full.exe.
3. Double click the application file.
Once the file is opened, the Installation begins. You see a Preparing Setup screen with a progress bar
indicating the status of the Preparation Setup.
.
4. Select Next on the Welcome screen.
Figure 2-1. Anritsu Preparing Setup
Figure 2-2. Anritsu Welcome Screen
ООО "Техэнком" Контрольно-измерительные приборы и оборудование www.tehencom.com

Installation (PC Only) 2-4 Installing PowerXpert
MA24507A PowerXpert UG PN: 10585-00029 Rev. A 2-3
5. Read the license agreement and select “I Agree”.
6. Select Next.
7. Select the Complete (Recommended) button.
8. Select Next.
Figure 2-3. PowerXpert License Agreement
Figure 2-4. Select Setup Type
ООО "Техэнком" Контрольно-измерительные приборы и оборудование www.tehencom.com

2-4 Installing PowerXpert Installation (PC Only)
2-4 PN: 10585-00029 Rev. A MA24507A PowerXpert UG
9. Select Install.
The software loads and installs to the selected location.
10. Select Finish to complete the installation.
.
Figure 2-5. Installing Anritsu PowerXpert Application
Figure 2-6. Installing Anritsu PowerXpert Application
Figure 2-7. Anritsu PowerXpert Installation Complete
ООО "Техэнком" Контрольно-измерительные приборы и оборудование www.tehencom.com

Installation (PC Only) 2-5 Setting PowerXpert to Run in Windows XP Compatibility Mode
MA24507A PowerXpert UG PN: 10585-00029 Rev. A 2-5
2-5 Setting PowerXpert to Run in Windows XP Compatibility Mode
The PowerXpert application can be launched from the Windows Start menu from the Anritsu program group.
Select Install the software automatically (Recommended), and then click Next.
Continue through all the instruction screens and then click Finish on the last screen to complete the
installation.
Figure 2-8. Setting PowerXpert to Run in Windows XP Compatibility Mode
Figure 2-9. Found New Hardware Wizard
ООО "Техэнком" Контрольно-измерительные приборы и оборудование www.tehencom.com

2-5 Setting PowerXpert to Run in Windows XP Compatibility Mode Installation (PC Only)
2-6 PN: 10585-00029 Rev. A MA24507A PowerXpert UG
ООО "Техэнком" Контрольно-измерительные приборы и оборудование www.tehencom.com

MA24507A PowerXpert UG PN: 10585-00029 Rev. A 3-1
Chapter 3 — Using MA24507A
Power Master™ with PowerXpert™
3-1 Introduction
This chapter provides instructional information on using the Anritsu MA24507A USB Power Master with
PowerXpert
™
. PowerXpert is a data analysis and control software for use with Anritsu’s USB power sensors
and USB power analyzers. PowerXpert provides a graphical user interface (GUI), making the PC appear like a
traditional power meter. Using PowerXpert, the MA24507A Power Master power analyzer operates in three
modes:
• “Continuous Mode” on page 3-4
• “Power Hunter Mode” on page 3-8
• “Channel Monitor Mode” on page 3-12
Note
When operating the MA24507A Power Master power analyzer, the MA241xxx Series, MA242xxx
and MA243xxx USB sensors USB power sensors can be connected to make separate power
measurements simultaneously in Continuous Mode. For details, see “Show Multiple Sensor Display”
on page 3-21.
There are modes and settings available only to the MA24507A Power Master that are described in
this chapter. For detailed information on the operation of the MA241xxx Series, MA242xxx and
MA243xxx USB power sensors, refer to the latest PowerXpert User Guide – 10585-00020 available
at: http://www.anritsu.com.
ООО "Техэнком" Контрольно-измерительные приборы и оборудование www.tehencom.com

3-2 PowerXpert
™
Overview Using MA24507A Power Master™ with PowerXpert™
3-2 PN: 10585-00029 Rev. A MA24507A PowerXpert UG
3-2 PowerXpert
™
Overview
Using the MA24507A Power Master power analyzer with PowerXpert provides a user interface as illustrated
in Figure 3-1.
Index Description
1
The PowerXpert Tool Bar provides three modes of operation to select from:
• “Continuous Mode” on page 3-4
• “Power Hunter Mode” on page 3-8
• “Channel Monitor Mode” on page 3-12
The tool bar also provides access to:
“Tools Menu” with access to “Zero All Sensors”, “Capture Screen”, “Log Data”, and “Show Multiple
Sensor Display”,
“Settings Menu” with access to “Resetting to Factory Settings”
“Help”.
2 This side panel displays the settings for the mode of operation selected
3
Click Apply above settings to apply the user selected settings changes. Changes to the settings will
not take effect until after clicking this bar.
4
These lower task bar parameter settings are available to select and change manually. Changes to
these settings are applied by pressing the Enter key. (The lower task bar parameter settings are used
in Continuous mode only)
Figure 3-1. Anritsu PowerXpert Application GUI Overview (1 of 2)
1
2
3
6
4 5
7
1
ООО "Техэнком" Контрольно-измерительные приборы и оборудование www.tehencom.com

Using MA24507A Power Master™ with PowerXpert™ 3-3 PowerXpert Settings
MA24507A PowerXpert UG PN: 10585-00029 Rev. A 3-3
3-3 PowerXpert Settings
Connect Power Analyzer
Connect the USB connector side of the Power Analyzer Cable to the PC. Once connected, you see the sensor
model number and serial number appear in the “Sensor Information Area” of the PowerXpert monitor display.
This may take up to 30 seconds for the connection to be recognized and displayed. PowerXpert always starts up
in the default state of the connected sensor. Upon disconnection from PowerXpert, the power analyzer resets
and after reconnection, restarts in the default state.
Power Analyzer Modes of Operation
The USB MA24507A Power Master operates in three modes:
• Continuous Mode
For display settings available and function see Figure 3-2, “Continuous Mode User Interface Screen”
on page 3-4.
• Power Hunter Mode
For display settings available and function see Figure 3-5, “Power Hunter Mode User Interface Screen”
on page 3-8.
• Channel Monitor Mode
For display settings available and function see Figure 3-8, “Channel Monitor Mode User Interface
Screen” on page 3-12.
5
The display graticule provides power versus time representation of the power measurement
waveform,“Graticule Settings and Graphical Display Area”.
6
Displays setup and measurement readout area. The readouts displayed are mode dependent.
“Continuous Mode Numerical Display Area” on page 3-7, “Power Hunter Mode Numerical Display
Area” on page 3-10, “” on page 3-13.
7
Power sensor / analyzer information area showing model and serial number, communications port,
and firmware version,“Sensor Information Area”.
Figure 3-1. Anritsu PowerXpert Application GUI Overview (2 of 2)
ООО "Техэнком" Контрольно-измерительные приборы и оборудование www.tehencom.com

3-4 Continuous Mode Using MA24507A Power Master™ with PowerXpert™
3-4 PN: 10585-00029 Rev. A MA24507A PowerXpert UG
3-4 Continuous Mode
Continuous Mode is the default mode in which the MA24507A Power Master starts and displays the peak or
average power of the input signal. In this mode, the USB power analyzer is “continuously triggered” and
collects data at all times. The Continuous Mode window below contains the following information.
Continuous Mode
Setting Options/Range
Measurement Channel Power / CW Max
Center Frequency 9.5 kHz to (70 GHz – 500 Hz)
Center freq units kHz, MHz, GHz
Span 30 kHz to 2 GHz (Channel power), 1 kHz to Full span (CW max)
Span units kHz, MHz, GHz
Relative Off, On
Units dBm, nW, µW, mW, W
Resolution Low, Medium, High (Available in CW max mode)
Range Upper, Lower
Measurement hold Off, On
General Settings
Averages 1 to 1000
Offset (dB) –100 to +150
Apply Above Settings Select Activates Settings
Figure 3-2. Continuous Mode User Interface Screen
ООО "Техэнком" Контрольно-измерительные приборы и оборудование www.tehencom.com
/