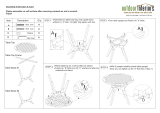
Weber 5500 User manual

Category
Barbecues & grills
Type
User manual

This manual is also suitable for

GENESIS
®
5500 Series
Perma-Mount
Natural Gas Barbecue
Serial Number
Please use this number in registering your warranty
and any correspondence with the factory.
Owner’s Manual
FOR YOUR SAFETY
Do not store or use gasoline or other
flammable vapors and liquids in the
vicinity of this or any other appliance.
NOTICE TO INSTALLER: These
instructions must be left with the owner
and the owner should keep them for
future use.
WARNING: Follow all leak check
procedures carefully in this manual prior
to barbecue operation. Do this even if
barbecue was dealer assembled.
WARNING: Do not try to light this
appliance without reading "Lighting"
instructions section of this manual.
THIS GAS APPLIANCE IS DESIGNED FOR
OUTDOOR USE ONLY.
FOR YOUR SAFETY
If you smell gas:
1. Shut off gas to the appliance.
2. Extinguish any open flame.
3. Open lid.
4. If odor continues, immediately call
your gas supplier or your fire
department.
86033 6/96
®
2
DANGER
Failure to follow the Dangers, Warnings and Cautions contained in this Owner’s
Manual may result in serious bodily injury or death, or in a fire or an explosion causing
damage to property.
WARNINGS
Do not store a spare or disconnected LP tank under or near this barbecue.
Improper assembly may be dangerous. Please carefully follow the assembly instructions in this manual.
After a period of storage, and/or nonuse, the Weber Gas Barbecue should be checked for
gas leaks and burner obstructions before using. See instructions in this manual for correct
procedures.
Do not operate the Weber Gas Barbecue if there is a gas leak present.
Do not use a flame to check for gas leaks.
Combustible materials should never be within 24 inches of the top, bottom, back or sides of your
Weber Gas Barbecue.
Do not put a barbecue cover or anything flammable on or in the storage area under the barbecue.
Your Weber Gas Barbecue should never be used by children.
You should exercise reasonable care when operating your Weber Gas Barbecue. It will be hot during
cooking or cleaning, and should never be left unattended.
Should the burners go out during operation, turn all gas valves off. Open the lid and wait five minutes
before attempting to relight, using the lighting instructions.
Do not use charcoal or lava rock in your Weber Gas Barbecue.
Never lean over open grill or place hands or fingers on the front edge of the cooking box.
Should a grease fire occur, turn off all burners and leave lid closed until fire is out.
Do not enlarge valve orifices or burner ports when cleaning the valves or burners.
The Weber Gas Barbecue should be thoroughly cleaned on a regular basis.
LP gas is not natural gas. The conversion or attempted use of natural gas in an LP unit or LP gas in a
natural gas unit is dangerous and will void your warranty.
Do not attempt to disconnect any gas fitting while your barbecue is in operation.
Use heat-resistant barbecue mitts or gloves when operating barbecue.
LP GAS UNITS ONLY:
Use the regulator that is supplied with your Weber Gas Barbecue.
Do not attempt to disconnect the gas regulator or any gas fitting while your barbecue is in operation.
A dented or rusty LP tank may be hazardous and should be checked by your liquid propane supplier.
Do not use an LP tank with a damaged valve.
Although your LP tank may appear to be empty, gas may still be present, and the tank should be
transported and stored accordingly.
If you see, smell or hear the hiss of escaping gas from the LP tank:
1. Get away from LP tank.
2. Do not attempt to correct the problem yourself.
3. Call your fire department.
3
Weber-Stephen Products Co. (Weber) hereby
warrants to the ORIGINAL PURCHASER of
this Weber Gas Barbecue that it will be free of
defects in material and workmanship from the
date of purchase as follows:
Aluminum Castings, 10 years,
Cooking Grates, 3 years,
Stainless Steel Flavorizer Bars, 5 years,
All Remaining Parts, 5 years,
when assembled and operated in accordance
with the printed instructions accompanying it.
Weber may require reasonable proof of your
date of purchase. THEREFORE, YOU
SHOULD RETAIN YOUR SALES SLIP
OR INVOICE.
This Limited Warranty shall be limited to the
repair or replacement of parts which prove
defective under normal use and service and
which on examination shall indicate, to
Weber's satisfaction, they are defective. Before
returning any parts, contact Weber-Stephen
Products Co. Customer Service Center. If
Weber confirms the defect and approves the
claim, Weber will elect to
replace such parts without charge. If you
are required to return defective parts,
transportation charges must be prepaid.
Weber will return parts to the purchaser,
freight or postage prepaid.
This Limited Warranty does not cover any
failures or operating difficulties due to accident,
abuse, misuse, alteration, misapplication,
vandalism, improper installation or improper
maintenance or service, or failure to perform
normal and routine maintenance, including
but not limited to damage caused by insects
within the burner tubes, as set out in this
owner's manual.
Deterioration or damage due to severe
weather conditions such as hail, hurricanes,
earthquakes or tornadoes, discoloration due to
exposure to chemicals either directly or in the
atmosphere, is not covered by this Limited
There are no other express warrants except as
set forth herein and any applicable implied
warranties of merchantability and fitness are
limited in duration to the period of coverage of
this express written Limited Warranty. Some
states do not allow limitation on how long an
implied warranty lasts, so this limitation may
not apply to you.
Weber is not liable for any special, indirect or
consequential damages. Some states do not
allow the exclusion or limitation of incidental or
consequential damages, so this limitation or
exclusion may not apply to you.
Weber does not authorize any person or
company to assume for it any other obligation
or liability in connection with the sale,
installation, use, removal, return, or
replacement of its equipment; and no such
representations are binding on Weber.
This Warranty applies only to products sold
at retail.
WEBER-STEPHEN PRODUCTS CO.
Customer Service Center
250 South Hicks Road
Palatine, IL 60067-6241
(800) 446-1071
WARRANTY
4
© 1996 Weber. Weber, , Genesis, Flavorizer and Crossover are
registered U.S. trademarks; Perma-Mount, Gas Catcher,
FlameCheck, Steam-N-Chips, Spider Stopper, and Warm-Up are
U.S. trademarks of Weber-Stephen Products Co., 200 East Daniels
Road, Palatine, IL 60067-6266. U.S.A. Genesis Gas Barbecues are
covered under the following patent nos.: U.S.A. #4,677,964;
4,727,853; #4,777,927; #4,829,978; #4,860,724; #4,941,817;
#4,966,125; #5,070,776; #D293,067; #D316,355; Canada: Rd
1987 Reg. #58,034; #1,279,540; #1,283,586; #1,300,994;
#1,300,995. Printed in the U.S.A.
PATENTS AND TRADEMARKS
5
Contents
WARNINGS ................................................................ 2
Warranty & Patents.................................................. 3-4
General Instructions.................................................... 6
Assembly ............................................................... 7-34
Operating Instructions
Lighting........................................................ 35-37
Cooking ............................................................ 37
After a Period of Nonuse ................................. 38
Cleaning ........................................................... 38
Steam-N-Chips Smoker ................................... 39
Troubleshooting and Maintenance
Annual Maintenance ................................... 40-41
General Maintenance.................................. 41-43
Troubleshooting........................................... 44-45
Parts Listing .............................................................. 47
FEATURES:
a) Convenient tables and racks.
b) Heavy gauge porcelain-on-steel lid seals in heat.
c) Rapid read thermometer for precision cooking.
d) Stainless Steel Flavorizer Bars vaporize just the
right amount of drippings for flavoring.
e) Separate burners for temperature control.
f) Crossover Ignition System with Gas Catcher Ignition
Chamber.
g) Weber Warm-Up Basket for additional cooking or
warming space.
h) FlameCheck Safety System automatically shuts off
gas to the burners if the flame goes out.
i) Steam-N-Chips Smoker lets you add American
smokehouse flavor to any food prepared on this grill.
j) Side burner for making sauces, gravies, etc., while
main grill is in use.
k) Enclosed storage area.
a
g
b
c
d
e
a
f
j
h
k
j
6
General Instructions
Your Weber Gas Barbecue is a stationary outdoor
cooking appliance. With the Weber Gas Barbecue you
can grill, barbecue, roast and bake with results that are
difficult to duplicate with indoor kitchen appliances. The
closed lid and Flavorizer Bars produce that "outdoor"
flavor in the food.
The natural gas supply is easy to use and gives you
more cooking control than charcoal fuel.
These instructions will give you the minimum
requirements for assembling your Weber Gas
Barbecue. Please read the instructions carefully
before using your Weber Gas Barbecue. Improper
assembly can be dangerous.
Not for use by children.
If there are local codes that apply to gas grills, you
will have to conform to them. If there are no local
codes, you must conform to the latest edition of the
National Fuel Gas Code: ANSI Z 223.1.
This Weber Gas Barbecue is designed for natural
(piped in city) gas only. Do not use Liquid Propane
(LP) bottled gas. The valves and orifices are for
natural gas only.
Do not use with charcoal fuel.
Check that the area under the control panel and the
bottom tray are free from debris that might obstruct
the flow of combustion or ventilation air.
For Installation in Canada
These instructions, while generally acceptable, do not
necessarily comply with the Canadian Installation
codes, particularly with piping above and below ground.
In Canada the installation of this appliance must comply
with local codes and/or Standard CAN/CGA-B149.1
(Installation Code for Natural Gas Burning Appliances
and Equipment).
Storage
The gas must be turned OFF at the natural gas
supply when the Weber Gas Barbecue is not in use.
Operating area
WARNING: Only use this barbecue outdoors in a
well ventilated area. Do not use in a garage,
building, breezeway or any other enclosed area.
Never use your Weber Gas Barbecue under an
unprotected combustible roof or overhang.
Your Weber Gas Barbecue is not intended to be
installed in or on recreational vehicles and/or boats.
Do not use combustible materials within 24 inches
of the top, bottom, back or sides of the grill.
The entire cooking box gets hot when in use. Do not
leave unattended.
Keep any electrical supply cord away from any
heated surface.
Keep the cooking area clear of flammable vapors
and liquids, such as gasoline, alcohol, etc., and
combustible materials.
Gas supply testing
Disconnect your Weber Gas Barbecue when the
gas supply is being tested at high pressures. This
appliance and its individual shutoff valve must be
disconnected from the gas supply piping system
during any pressure testing of that system at test
pressures in excess of 1/2 psig (3.5 kPa).
Turn off your Weber Gas Barbecue when the gas
supply is being tested at low pressures. This
appliance must be isolated from the gas supply
piping system by closing its individual manual
shutoff valve during any pressure testing of the gas
supply piping system at the pressure equal to or
less than 1/2 psig (3.5 kPa).
7
General Specifications
for Piping
American National Standards Institute (ANSI)
Recommendations for gas supply installations:
Connections:
This barbecue is designed to operate at 7 inches of
water column pressure (.2526 psi).
A manual shut-off valve must be installed outdoors,
immediately ahead of any connections or change in
pipe material.
CAUTION: If young children are in the area, a
locking valve should be considered.
An additional manual shut-off valve indoors should
be installed in the branch fuel line in an accessible
location near the supply line.
The point of tie into the branch line should be
carefully selected to avoid a drip leg or be
downstream of a valve controlling another
appliance.
Pipe compound should be used which is resistant to
action of natural gas when connections are made.
The outdoor connector must be firmly attached to
rigid, permanent construction.
Gas line piping
If the length of line required does not exceed 50
feet, use a 5/8" O.D. tube. One size larger should be
used for lengths greater than 50 feet.
Indoor and above ground piping can be steel
or copper.
Steel
New standard weight (Schedule 40) steel pipe with
malleable iron fittings.
Copper
New copper tubing type K or L.
Copper tubing must meet requirements of ASTM B88
latest edition.
Use flared fittings. Metallic ball sleeve compression
fittings must not be used.
Copper tube joints may be soldered or brazed with
material having a melting point in excess of 1,000°F.
Outside underground piping
Outside underground piping may be copper tubing, type
K or L (ASTM B88) or polyethylene plastic tube PE3306
(Minimum wall thickness .062") meeting ASTM 2513,
latest specifications.
Steel pipe is not recommended for underground use
unless it is protected with an approved coating,
insulated from hose piping and cathodically protected.
It is recommended that copper tubing be corrosion
protected with a satisfactory material such as TC
Mastic.
All buried fittings should be corrosion protected with a
satisfactory material such as TC Mastic.
Underground piping must have a minimum of 10" cover.
Plastic tubing
Plastic tubing is suitable only for outside underground
use.
The transition from metallic pipe to plastic pipe
should be made outside and at least 10"
underground.
When compression or crimp type mechanical joints
are used with plastic pipe, it is advisable to use an
internal rigid stiffener in conjunction with the fitting.
The stiffener should be assembled flush with the
end of the tube and extend at least to the outside
edge of the compression fitting.
Testing connections
You will need a soap and water solution and a rag or
brush to apply it.
All connections and joints must be thoroughly tested for
leaks after gas has been turned into the line.
Wet the fitting with a soap and water solution. Any
bubbles that form or grow indicate a leak. If bubbles
occur shut off gas, tighten the fitting, and retest.
WARNING: If a leak persists after tightening the
fitting, turn gas off at the supply. DO NOT OPERATE
YOUR BARBECUE. Contact your dealer.
Notice Before Installation
Contact your local municipality for any building codes regulating outdoor barbecue installations. In absence of
local codes, you must conform to the latest edition of ANSI Z223.1.
WE RECOMMEND THAT THIS INSTALLATION BE DONE BY A PROFESSIONAL.
DANGER
Do not use an open flame to check for
gas leaks. Be sure there are no sparks or
open flames in the area while you check for
gas leaks. This will result in a fire or
explosion which can cause serious bodily
injury or death, and damage to property.
8
Typical natural gas supply installation to a
concrete patio or pad
View from behind
barbecue
Accessible
Locking Shut off
Outside
Inside
Gas Supply
Indoor Shut off
Figure 1
CAUTION: Follow "General Specifications for
Piping" in this manual.
We recommend that this installation be done by a
professional.
CAUTION: Combustible materials should never be
within 24 inches of the top, bottom, back or sides of
the barbecue. Do not locate under overhead
combustible construction.
Typical natural gas supply installation to a
wood deck
View from behind
barbecue
Gas Supply
Accessible
Locking Shut off
Indoor Shut off
Figure 2
Outside
Inside
CAUTION: Follow "General Specifications for
Piping" in this manual.
We recommend that this installation be done by a
professional.
CAUTION: Combustible materials should never be
within 24 inches of the top, bottom, back or sides of
the barbecue. Do not locate under overhead
combustible construction.
View from behind
barbecue
Outside
Indoor Shut off
Figure 3
Accessible
Locking Shut off
Inside
Gas Supply
Typical natural gas supply installation over
an existing post
WARNING: Turn off the natural gas supply at the
source before working on the post.
Prepare the post so that it will be approximately 2 inches
above the pad or ground. Inspect the gas supply line at
the post for any sign of deterioration or corrosion.
CAUTION: If you are in doubt as to the condition
of an existing natural gas supply line, you should
contact a professional or your local gas utility
before attempting any assembly.
CAUTION: Combustible materials should never be
within 24 inches of the top, bottom, back or sides of
the barbecue. Do not locate under overhead
combustible construction.
9
Recommended concrete pad requirements
We recommend a pad a minimum of 40 inches left to
right, 20 inches front to back and 4 inches deep (1.85
cubic feet). Figure 4.
Note - Cubic feet is determined by multiplying length
times width times depth and dividing by 1728.
20
4
40
Figure 4
If you use a concrete bag mix, use the mix for maximum
strength. An average 80 pound bag of concrete mix will
make approximately 2/3 of a cubic foot of concrete.
Note - Follow the concrete bag mix, manufacturers
recommendations concerning pad preparation, gravel,
sand, etc. Figure 5.
CAUTION: Allow fresh concrete to cure completely
before attempting to anchor the barbecue to the
concrete.
Concrete Pad
Crushed stone,
sand or gravel
Earth
Figure 5
Method 1
A strike anchor, a minimum size of 3/8 inch x 3 1/2 inches
long with a 3/8 inch flat washer and 3/8 inch nut.
Figure 6.
Note - Use a 3/8 inch diameter concrete drill bit for drilling
the hole for the strike anchor.
Strike anchor
3/8 inch nut
3/8 inch flat washer
Mount plate
Drilled hole
Figure 6
Typical installation of the base for an
existing concrete patio or a new pad
After assembling the base (see Steps 2 and 3), position
the base assembly on your concrete patio for mounting.
CAUTION: Combustible materials should never be
within 24 inches of the top, bottom, back or sides of
the barbecue. Do not locate under overhead
combustible construction.
Note - With the lid open the depth of the barbecue is 28
inches, front to back. After positioning, level the base.
(See Step "Level the base.")
After leveling, anchor the base to the concrete patio or
pad. For anchoring, we recommend use of one of the
following methods:
WARNING: Whichever method used, the base
must be bolted down (anchored) at ALL four
anchoring points prior to barbecue assembly.
10
Method 3
A 3/8 inch machine screw anchor, using a
3/8-16 x 1 1/2 inch machine screw and a flat washer.
Figure 8.
Note - Use a 3/4 inch diameter concrete drill bit for drilling
the hole for the screw base. The machine screw anchor
requires a setting tool.
3/8-16 x 1 1/2 machine screw
3/8 inch flat washer
Mount plate
3/8 inch screw anchor
Drilled hole
Figure 8
Method 2
A concrete lag bolt, a minimum of 3/8 inch x 2 1/2 inches
long with a 3/8 inch diameter long lag shield and a
3/8 inch flat washer. Figure 7.
Note - Use a 5/8 inch concrete drill bit for drilling the hole
for the lag shield.
Concrete lag bolt
3/8 inch flat washer
Mount plate
Lag shield
Drilled hole
Figure 7
Typical base installation for a wood deck
After assembling the base according to the assembly
instructions, position the base assembly on your deck for
anchoring.
CAUTION: Combustible materials should never be
within 24 inches of the top, bottom, back or sides of
the barbecue. Do not locate under overhead
combustible construction.
Note - With the lid open, the depth of the barbecue is 28
inches, front to back. After positioning, level the base.
(See Step "Level the base.")
After leveling, anchor the base to the deck. We
recommend using a minimum of a 3/8 inch x 1 1/2 inch
lag bolt with a 3/8 inch flat washer. Figure 9.
Note - Use a 3/16 inch drill bit for drilling a pilot hole for a
3/8 inch lag bolt.
WARNING: The base must be bolted down
(anchored) at ALL four anchoring points prior to
barbecue assembly.
3/8 inch x 1 1/2 inch lag bolt
3/8 inch flat washer
Mount plate
Drilled hole
Figure 9
11
Assembly
Tools needed
Screwdrivers, regular and
Phillips
Hammer
Two 7/16 inch, one 5/8, 11/16, and 3/4 inch open end or
two adjustable wrenches
Pliers
Level
Electric drill
Supplies needed
You will need a soap and water solution to check for gas
leaks. (See Step "Check for gas leaks.")
Note - The hardware size of nuts, bolts, and screws is
given. For example "1/4-20 x 2 inch bolt" means a bolt
1/4 inch in diameter with 20 threads to the inch, 2 inches
long. On a small screw for example, "6-32 x 1/2 inch
screw" means a number 6 screw, with 32 threads to the
inch, 1/2 inch long.
Step 1
Check package contents
Cooking box
(assembly)
Lid
(assembly)
Bottom tray
Front panel
Accessory tray
Accessory tray with notch
Control panel
®
®
®
®
®
®
®
®
While we give much attention to our products,
unfortunately an occasional error may occur.
If a part is missing, do not go back to the store.
Call the Weber Customer Service Center toll free
1-800-446-1071 to receive immediate assistance.
Have your owner’s manual and serial number of the
barbecue available for reference.
12
Left frame
Upright frame
Brace panel
Frame connector with bushings
Frame connector
Two front/back
base panels
Steam-N-Chips Smoker body
Steam-N-Chips Smoker flue
Steam-N-Chips Smoker water pan
Work table
Two swing tables
Left end panel (#1)
Panels and doors are
identified with removable stickers.
Please leave on during assembly.
Three back
panels (#2)
Right end panel (#3)
Left hand glass
door assembly (LH)
Two right hand glass
door assemblies (RH)
Serving tray
Barbecue gas supply line
1
2
3
LH
RH
13
Right hand slide bar assembly
Assembly consists of:
Right hand slide bar
Support rod
Slide
Left hand slide bar assembly
Assembly consists of:
Left hand slide bar
Support rod
Slide
Side burner assembly
Burner grate
Side burner knob
Two side burner locks
Two left/right base panels
Warm-Up Basket
Five long Flavorizer Bars
Seven short Flavorizer Bars
Two cross brace assemblies
Assemblies consist of:
7/16-14 square lock nuts
(actual size)
7/16-14 x 2 1/2 inch hex head bolts
(actual size)
Mount plates
Cross brace
14
Check contents of hardware packs
Three burner control knobs
FlameCheck Button
Three tool holders
Eight tubing plugs
(two are spares)
Manifold bracket
Four 10-24 x 1 3/4 inch machine screws
(actual size)
Four 10-24 hex nuts
(actual size)
Two hinge pins
(hardware size: 1/4 x 1 1/2 inch clevis pin)
(actual size)
Five 1/4-20 x 2 inch bolts
(actual size)
Eleven 1/4-20 x 1/2 inch bolts
(actual size)
1/4-20 wing nut
(actual size)
Right frame
Upright frame
Warming rack
Cooking grate
Narrow cooking grate
Catch pan holder
Catch pan
Two drip pans
Thermometer
15
1/4-20 keps nut
Thirteen 1/4-20 hex nuts
(actual size)
Forty two nylon washers
(actual size)
Nine 1/4-20 x 1 1/2 inch bolts
(actual size)
Two hair pin cotters
(actual size)
Four 1/4 inch fender washers
(actual size)
Gas line bracket
Four plastic buttons
Two swing table end brackets
16
Step 2
Assemble base
You will need: left/right base panels, front/back base
panels, four 1/4-20 x 1/2 inch bolts, eight nylon washers
and four 1/4-20 hex nuts.
Position a left/right base panel with a front/back base
panel (flanges down) with left/right base panel on the
outside. Align the bottom holes. Slip a washer on a 1/4-20
x 1/2 inch bolt, insert the bolt (head on the outside)
through the bottom hole of both panels. Add a washer
and nut and finger tighten. Figure 1. Add the second
front/back base panel using the same procedure.
Then add the second left/right base panel to the
front/back panels, using the same procedure.
Figure 1
Flanges
Step 3
Finish base assembly
You will need: partial base assembly, two cross brace
assemblies, four 1/4-20 x 1 1/2 inch bolts, four nylon
washers, four 1/4 inch fender washers, four 1/4-20 hex
nuts and two 7/16 inch wrenches.
Hold one cross brace assembly inside the partially
assembled base.
Note - The mounting plate should be above the base and
be able to rotate a full 360 degrees.
Slip a nylon washer on a 1/4-20 x 1 1/2 inch bolt. Insert
the bolt through the base and the cross brace assembly.
(Head on the outside.) Figure 2. Add the 1/4 inch fender
washer and 1/4-20 hex nut and tighten using the 7/16
inch wrenches. Use one wrench to hold the head of the
bolt and the other wrench to tighten the nut. Repeat the
procedure to install the second cross brace assembly.
Tighten the lower base bolts using the same tightening
procedure.
Figure 2
Nylon washer
Fender washer
Mount plate
17
Step 4
Level the base
You will need: base assembly, level, 5/8 inch and 3/4 inch
wrenches.
Using the 3/4 inch wrench, loosen the locking nuts
(square nuts). Figure 3.
Locking nut
Mount plate
Figure 3
Turn the base assembly over or right side up. (Flanges
are now up.)
Set the base in position on your deck, concrete pad, or
patio for anchoring. To level, set a level on the top flange
of a front/back base panel. Hold the mounting plate up
and use a 5/8 inch wrench to turn the hex head of the
leveling bolts until level. Figure 4.
Figure 4
Leveling hex
head bolt
FlangesLevel
Repeat procedure on the remaining three sides of the
base until the base is level. Turn the mounting plates to
approximately 20 degrees. Figure 5. Using the 3/4 inch
wrench, tighten the locking nut (square nut).
You are now ready to anchor the base. (See the various
typical mounting methods in the front section of this
manual.)
20°
Figure 5
18
Step 5
Assemble the frame
You will need: left frame, right frame, two nylon
washers, two 1/4-20 x 1/2 inch bolts and a 7/16 inch
wrench.
Note - Work on carpeted area (on grass, or on one of
the boxes) to protect the finish during frame assembly.
Put the frame pieces so the leg tabs are up. Put the right
frame to your right and left frame to your left. Figure 6.
Slip the two frame halves together with the tabs inside
,
until the tabs of the right frame are inside the left frame
and the holes align. Figure 6 (a).
Slip washers over bolts; insert and tighten bolts. (If you
try to insert a bolt and there are no holes, you have the
left frame turned the wrong way. Turn the left frame
around.) Figure 6 (b).
(a)
Left frame
Leg tabs
Frame tabs
Right frame
Figure 6
(b)
Step 6
Continue frame assembly
You will need: frame assembly, two upright frames, front
panel, four 1/4-20 x 1/2 inch bolts, four nylon washers and
a 7/16 inch wrench.
Assemble one upright frame onto the leg tabs of the right
frame, and the second upright frame onto the leg tabs of
the left frame. The tabs must be on the inside
of the
frames when the joints are closed. Add front panel with
the large hole down and to your right. Add front panel
with the hole down and to your right. Add washers and
bolts to the left frame/upright frame joint. Tighten. Add
washers and bolts to the right frame/ upright frame joint.
Only start these bolts.
Only start
this bolt
Dimples to
the inside
Only start
this bolt
Figure 7
(a)
(b)
19
Step 7
Complete frame assembly
You will need: partial frame assembly, one frame
connector with bushings, one frame connector without
bushings, four 1/4-20 x 2 inch bolts, four nylon washers
and a 7/16 inch wrench.
Hold the frame connector with the bushings between the
two upright frames above the front panel. Turn it so the
bushings are facing down. Add a nylon washer to the
bolt, put the bolts through the frame and screw into the
frame connector. Tighten.
The second frame connector has no bushings. Hold it in
place between the two upright frames. Add a nylon
washer to the bolt, put the bolts through the frame and
screw into the frame connector. Tighten. Figure 8.
Figure 8
Holes up
Bushings
down
Step 8
Insert bottom tubing plugs
You will need: frame assembly, four tubing plugs and a
hammer.
Insert the tubing plugs into the ends of the two upright
frames. To fully seat the plugs, you may have to tap them
lightly with a hammer. Figure 9.
Figure 9
Step 9
Check the frame assembly
To avoid having to disassemble your Weber Gas
Barbecue in a later step, check the positioning of both
frame connectors before continuing with the assembly.
Turn the frame assembly over. The bushings in the front
frame connector should correspond with Figure 10.
The back frame connector has two 1/4 inch diameter
holes in the middle. These holes should be facing down.
Figure 10.
Figure 10
Two bushings
at right
Single bushing
at left
20
Step 10
Secure frame assembly to anchored base
You will need: completed frame assembly, four 1/4-20 x 1
1/2 inch bolts, eight nylon washers, four 1/4-20 hex nuts,
four plastic buttons and a 7/16 inch wrench.
CAUTION: The base must be anchored at all four
anchor points prior to mounting the frame to the
base. See base installation instructions.
Set the assembled frame onto the base. Align the holes
of the frame assembly with the holes in the base. Slip a
washer on a 1/4-20 x 1 1/2 inch bolt. Insert the bolt
through the frame and the base assembly, add a washer
and a 1/4-20 hex nut. Figure 11 (a). Install the remaining
bolts. Tighten using a 7/16 inch wrench.
Align the holes in the flanges of the base assembly with
the front and back frame connector holes. Push in the
four plastic buttons. Figure 11 (b).
Figure 11
(a)(b)
Step 11
Install left end panel
You will need: frame assembly and left end panel
(Number 1).
Place the bottom of the left end panel on the upright
frame lower cross piece. Set the end panel upright in
place. Figure 12.
Figure 12
Step 12
Install three back panels
You will need: frame assembly and the three back panels
(Number 2).
Place the bottom of one back panel on the back frame
connector, notches to the top. Set in place to the far right,
butting up against the right upright frame. Figure 13.
Figure 13
  • Page 1 1
  • Page 2 2
  • Page 3 3
  • Page 4 4
  • Page 5 5
  • Page 6 6
  • Page 7 7
  • Page 8 8
  • Page 9 9
  • Page 10 10
  • Page 11 11
  • Page 12 12
  • Page 13 13
  • Page 14 14
  • Page 15 15
  • Page 16 16
  • Page 17 17
  • Page 18 18
  • Page 19 19
  • Page 20 20
  • Page 21 21
  • Page 22 22
  • Page 23 23
  • Page 24 24
  • Page 25 25
  • Page 26 26
  • Page 27 27
  • Page 28 28
  • Page 29 29
  • Page 30 30
  • Page 31 31
  • Page 32 32
  • Page 33 33
  • Page 34 34
  • Page 35 35
  • Page 36 36
  • Page 37 37
  • Page 38 38
  • Page 39 39
  • Page 40 40
  • Page 41 41
  • Page 42 42
  • Page 43 43
  • Page 44 44
  • Page 45 45
  • Page 46 46
  • Page 47 47
  • Page 48 48

Weber 5500 User manual

Category
Barbecues & grills
Type
User manual
This manual is also suitable for

Ask a question and I''ll find the answer in the document

Finding information in a document is now easier with AI