ViaSat HD receiver User manual
- Category
- Networking
- Type
- User manual
This manual is also suitable for

1
ENGLISH
For your safety . . . . . . . . . . . . . . . . . . . . . . . .2
Welcome to digital satellite TV! . . . . . . . . . . .3
Updates to your box . . . . . . . . . . . . . . . . . . . . . . . . 3
Inserting the batteries in your remote control . . . 3
Your remote control . . . . . . . . . . . . . . . . . . . .4
Your Viasat Box . . . . . . . . . . . . . . . . . . . . . . . .5
Front panel . . . . . . . . . . . . . . . . . . . . . . . . . . . . . . . . 5
Rear panel connectors overview . . . . . . . . . . . . . . 6
Installation . . . . . . . . . . . . . . . . . . . . . . . . . . .7
The supplied equipment . . . . . . . . . . . . . . . . . . . . . 7
Where to place your box . . . . . . . . . . . . . . . . . . . . 7
What else do I need? . . . . . . . . . . . . . . . . . . . . . . . . 7
Smart card . . . . . . . . . . . . . . . . . . . . . . . . . . . . . 7
Satellite dish . . . . . . . . . . . . . . . . . . . . . . . . . . . . 8
Optional audio connections . . . . . . . . . . . . . . . . .12
Connecting to the telephone line . . . . . . . . . . . . 12
Connecting a ‘magic eye’ . . . . . . . . . . . . . . . . . . . .13
Connecting to the mains supply . . . . . . . . . . . . . . 13
Switching on for the first time . . . . . . . . . . . . . . . 14
RF Tuning . . . . . . . . . . . . . . . . . . . . . . . . . . . . . . . . . 15
Making the installation settings . . . . . . . . . . . . . . . 15
Switching on and off . . . . . . . . . . . . . . . . . . . . . . . 16
Getting Started . . . . . . . . . . . . . . . . . . . . . . .17
Using the Viasat Guide . . . . . . . . . . . . . . . . . . . . . . 17
Changing channel . . . . . . . . . . . . . . . . . . . . . . . . . . 17
Unlocking a locked channel . . . . . . . . . . . . . . . . . . 17
Changing the volume on your TV . . . . . . . . . . . . 18
Using the channel banner . . . . . . . . . . . . . . . . . . . 18
Displaying the channel banner . . . . . . . . . . . . 18
Watching a programme . . . . . . . . . . . . . . . . . 19
Instantly recording a programme . . . . . . . . .19
Setting a reminder . . . . . . . . . . . . . . . . . . . . . 19
Displaying extra programme information . .19
Symbols in the channel banner and extra
information screens . . . . . . . . . . . . . . . . . . . . 20
Using Live Pause . . . . . . . . . . . . . . . . . . . . . . . . . . . 21
Using Instant Rewind . . . . . . . . . . . . . . . . . . . . . . .22
On-screen symbols . . . . . . . . . . . . . . . . . . . . . . . . 23
Viasat EPG . . . . . . . . . . . . . . . . . . . . . . . . . . .25
Finding a programme . . . . . . . . . . . . . . . . . . . . . . . 25
Choosing a programme to watch or
set a reminder for . . . . . . . . . . . . . . . . . . . . . . 27
Choosing a programme to record . . . . . . . . . . . . 28
Viasat Ticket . . . . . . . . . . . . . . . . . . . . . . . . .28
Purchasing a Ticket programme . . . . . . . . . . . . . . 29
Planner . . . . . . . . . . . . . . . . . . . . . . . . . . . . .30
Your box’s disk space . . . . . . . . . . . . . . . . . . . . . . . 32
Schedule changes . . . . . . . . . . . . . . . . . . . . . . . . . . 32
Using Series Link . . . . . . . . . . . . . . . . . . . . . . . . . . 32
Deleting a programme from your Planner . . . . .32
Contents
Watching a programme when you
see the reminder . . . . . . . . . . . . . . . . . . . . . . 33
Reminder clashes . . . . . . . . . . . . . . . . . . . . . . . . . . 34
Recording Programmes . . . . . . . . . . . . . . . . 34
Recording programmes . . . . . . . . . . . . . . . . . . . . . 34
Using your box while you are recording a
programme . . . . . . . . . . . . . . . . . . . . . . . . . . . 35
Recording clashes . . . . . . . . . . . . . . . . . . . . . .35
Disk space warning . . . . . . . . . . . . . . . . . . . . . 36
Manual recording . . . . . . . . . . . . . . . . . . . . . . . . . . 37
Watching Recordings . . . . . . . . . . . . . . . . . . 38
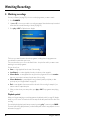
Watching recordings . . . . . . . . . . . . . . . . . . . . . . . 38
Playback symbol . . . . . . . . . . . . . . . . . . . . . . . 38
During playback . . . . . . . . . . . . . . . . . . . . . . . 39
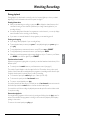
Watching recordings of restricted programmes
or locked channels . . . . . . . . . . . . . . . . . . . . . 40
Using Bookmarks . . . . . . . . . . . . . . . . . . . . . . 40
Active . . . . . . . . . . . . . . . . . . . . . . . . . . . . . . 40
Interactive TV . . . . . . . . . . . . . . . . . . . . . . . . . . . . . 40
Playing games . . . . . . . . . . . . . . . . . . . . . . . . . 40
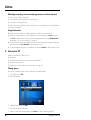
Setup . . . . . . . . . . . . . . . . . . . . . . . . . . . . . . 41
Using the Setup menus . . . . . . . . . . . . . . . . . . . . . 41
Using the Parental Control menu . . . . . . . . . . . . 41
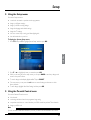
Locking Channels . . . . . . . . . . . . . . . . . . . . . . 42
Setting viewing restrictions . . . . . . . . . . . . . . 43
Setting purchase restrictions . . . . . . . . . . . . . 44
Changing your PIN code . . . . . . . . . . . . . . . . 44
Changing your Planner settings . . . . . . . . . . . . . . . 45
Changing your PVR recording settings . . . . . . . . 46
Using the System Settings . . . . . . . . . . . . . . . . . . . 47
Changing the Picture settings . . . . . . . . . . . . 48
Changing the Sound settings . . . . . . . . . . . . .49
Changing the Language & Subtitles settings .50
Viewing the box information . . . . . . . . . . . . . 51
Viewing the Signal Test screen . . . . . . . . . . . . 51
Installation Setup . . . . . . . . . . . . . . . . . . . . . . . 52
Changing the LNB Setup . . . . . . . . . . . . . . . . 52
Setting the Default Transponder . . . . . . . . . 53
Changing the Modem Settings . . . . . . . . . . . 54
Setting the RF output channel . . . . . . . . . . . . 54
Setting up your remote control for your TV . . . .55
Extra Information . . . . . . . . . . . . . . . . . . . . 57
Recording a digital satellite programme . . . . . . . 57
Switching between digital satellite TV
and terrestrial TV . . . . . . . . . . . . . . . . . . . . . . 57
Error messages . . . . . . . . . . . . . . . . . . . . . . . . . . . . 57
Solving Problems . . . . . . . . . . . . . . . . . . . . . 58
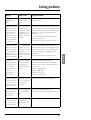
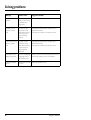
On-screen messages . . . . . . . . . . . . . . . . . . . . . . . 58
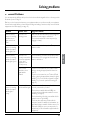
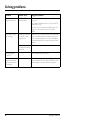
General Problems . . . . . . . . . . . . . . . . . . . . . . . . . 61
Specification . . . . . . . . . . . . . . . . . . . . . . . . . 63
End User Licence Terms . . . . . . . . . . . . . . . . 64

2
Using your Viasat box
Your set-top box has been manufactured to meet international safety standards, but you must take
care if you want to obtain the best results and operate it safely.
It is important that you read this booklet completely, especially the safety instructions below.
If you
have any doubts about the installation, operation or safety of your set-top box, please consult your dealer
.
WARNING!
Remember that contact with 230 V AC mains can be lethal or can cause a severe
electric shock. To avoid this risk:
Never remove the top cover from your set-top box. There are no user-
serviceable parts inside it, but there are some high-voltage live parts.
Make sure that all electrical connections are properly made.
Do not connect any of your equipment (set-top box, TV, video recorder etc.) to
the mains supply until you have properly connected all the other leads.
Disconnect your set-top box from the mains supply (by disconnecting its mains
lead from the mains wall socket) before you disconnect any other equipment
from its rear panel.
Never push anything into the holes, slots or other openings of the set-top box
case (except a smart card into its correct slot).
CAUTION!
✔
In order to ensure a free flow of air around the set-top box, allow at least 5cm of space above
and around the set-top box.
✘
Never stand your set-top box on soft furnishings or carpets. Do not cover any ventilation slots.
✘
Do not place your set-top box in an unventilated cabinet or on top of a unit which emits heat
(e.g. a TV or VCR).
✘
Do not place your set-top box in a cabinet with more than one other piece of audio/video
equipment, for example, VCR or DVD.
✘
Do not use or store your set-top box in hot, cold, damp or dusty places.
✘
Do not put anything on your set-top box which might drip or spill into it. Never stand objects
filled with liquids, such as vases, on top of your set-top box.
✘
Never place naked flame sources, such as lighted candles, on top of your set-top box.
✘
To avoid possible damage to the internal hard disk, do not pick up or otherwise move your set-
top box while it is connected to the mains supply. If you want to move your set-top box, first
disconnect it, then wait at least 30 seconds before continuing.
For your safety

3
ENGLISH
Thank you for choosing the Pace PVR box for viewing your Viasat channel packages. Please follow the
instructions in this User Guide carefully to enjoy all the advantages of digital satellite TV. We advise
following the user instructions and recommendations supplied with your box, especially for first-time
use.
Your box fully complies with international DVB (Digital Video Broadcasting) standards.
❖
Updates to your box
From time to time, your box may be updated. These updates provide enhanced features; new screens
and menus may become available. Although any new screens and menus may look a little different
from those described in this User Guide, you should be able to use the same techniques (e.g. highlight
and select) with them.
Updates will usually happen in the middle of the night. Your box needs to be in standby to receive
updates.
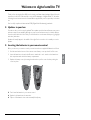
❖
Inserting the batteries in your remote control
Before you can use your remote control, you must insert the two supplied AA batteries as follows:
1. Push the catch at the bottom of the remote control battery cover up, then lift off the cover.
2. Insert the batteries as shown below. Be sure to match the + and – marks on the batteries to
their respective marks inside the battery compartment.
3. Replace the battery cover, by inserting the tab at the top of the cover first, then pushing the
cover into place.
✘
Don’t leave flat batteries in your remote control.
✔
Replace both batteries at the same time.
✔
Dispose of flat batteries in an environmentally-friendly way.
Welcome to digital satellite TV!

4
Using your Viasat box
*
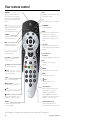
For information on setting up your remote control to operate your TV, see page 55.
VIASAT
Takes you from the EPG to the
last channel you were watching
Takes you back to Normal mode
after you have been using 'TV-only
mode'
TV
Switches to ëTV-o nly mode’, to use
your VCR or other item
connected through your box
TICKET
Displays the Ticket screen to
order movies and events
EPG
Displays the electronic
programme guide (EPG)
i
Displays more information
about a programme
vol + and –
Changes the volume of your
TV up or down*
rewind
Rewinds the programme
pause
Pauses the programme or starts a
‘Live Pause’ recording
play
Plays a recorded programme
fast forward
Fast forwards the programme
stop
Stops playback of the programme
record
Records the programme or sets a
reminder for a future recording
SETUP
Displays the Setup screen to alter
your box‘s settings
iTV
Displays the menu for Viasat’s range
of interactive services
S
Puts your box into or out of standby
PLANNER
Displays your Planner
EXIT
Takes you from the EPG to the last
channel you were watching
Takes you back to Normal mode
after you have been using 'TV-only
mode'
ch + and –
Changes channel and pages up and
down through listings in the EPG and
Planner
arrow buttons
U, D, L, R
Moves the highlight around the screen
OK
Confirms a choice or makes a
selection
BACK
Jumps back to the previous screen
HELP
Displays help information
mute
Turns the sound of your TV
on or off*
colour buttons
Use to select the matching colour
option shown on screen, or as
explained in this User Guide.
Also, the red button launches an
interactive service when you see the
red button on your TV screen
number buttons (0-9)
Use to change channel, enter
numbers and select on-screen options
Your remote control

5
ENGLISH
❖
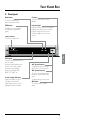
Front panel
indicator light
Lights up red when your box is in standby
Lights up green when your box is active
Lights up orange when your box is
receiving a signal from your remote
control
S button
To switch your box into or out of
standby
Back button
To remove a menu and go
back to the previous screen
U D (arrow buttons)
To highlight the previous or next
item in a list or on-screen menu
L R (arrow buttons)
To move to the left and the right
through on-screen menus, lists or
items
To change settings on the screens
OK button
To confirm a choice or save a
setting
LED display
Shows the current time when your
box is in standby
Shows the channel number when
tuned to a TV or radio channel;
Shows the current playback
function, for example ‘PLAY’,
‘PAUS’, ‘FF 2’, ‘RW 4’ etc.
record and play indicators
Lights up red when your box is
recording to the hard disk
Lights up green when your box is
playing back from the hard disk
EPG button
To display the on-screen Viasat
EPG (electronic programme
guide)
smart card slot
To insert your smart card
record
play
OKBackEPG
PVR Digital Satellite Receiver
Your Viasat Box

6
Using your Viasat box
❖
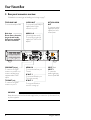
Rear panel connectors overview
Full details about connecting up and installing your box begin on page 7.
WARNING
Always disconnect your box from the mains supply before you connect it to (or disconnect it from)
any other equipment
.
230V 50Hz
K
C
OHS CIRTCELE FO K
S
IR
NE
P
O TON OD
NOI
TUAC
Mains input
Do not connect the mains
plug to the wall socket
until you have made ALL
the other connections
AUDIO L + R
(Left and right stereo audio)
To connect phono leads (not
supplied) to a TV, VCR or hi-fi
amplifier
TV SCART (out)
To connect to the SCART
connector on your TV
TELEPHONE LINE
T
o connect the telephone lead
VCR SCART (in/out)
To connect to the SCART
connector on your VCR or to
connect to another item of
equipment with a SCART
output
OPTICAL AUDIO
OUT
To connect an optical
digital-audio lead (not
supplied) to a home
cinema system
AERIAL IN
To connect the lead from your
TV aerial
RF OUT - 1
To connect an RF lead to your
TV (or video recorder)
RF OUT - 2
To connect an RF lead to a
second TV or ‘magic eye’
INPUT 1 and
INPUT 2
To connect the
satellite signal inputs
from the Quad LNB
S-VIDEO OUT
To connect an S-Video lead (not
supplied) to the S-Video
connector on your TV
Your Viasat Box

7
Installation
ENGLISH
To install your box, follow the instructions from this page up to page 16.
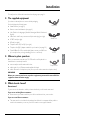
❖
The supplied equipment
If you have not already done so, remove all the packaging.
You should have the following items:
◆
Viasat PVR box (see page 6)
◆
Remote control and batteries (see page 4)
◆
User Guide in five languages (Swedish, Norwegian, Danish, Finnish and
English)
◆
Mains lead - with 2-way connector and 2-pin mains plug (see right)
◆
SCART lead (see right)
◆RF lead (see right)
◆Telephone lead - RJ11 to RJ11 (see right)
◆Telephone line (RJ11) adapter suitable for your location (see page 12)
◆Quad LNB and 2 x 25m coaxial cables (please ensure your LNB is set
up correctly before you begin installing your box - see below)
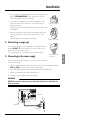
❖Where to place your box
Before you start, make sure that your TV, VCR and box will be placed in a
location that is conveniently located:
◆near an easily-accessible mains wall socket;
◆within reach of your TV-antenna and satellite-dish leads;
◆within 10 metres of a telephone point. (If not, you will need an extension telephone lead.)
❖What else do I need?
Smart card
To get access to the channels to which you have subscribed, you will need a smart card.
If you are an existing Viasat customer...
◆Please remove your smart card from your old box and insert it into your new box.
If you are a new Viasat customer...
◆The smart card is not included in the package, but will arrive in a separate delivery within a
week. In the meantime you can use your box to watch non-encrypted channels.
WARNING
Before you connect your box to any other equipment, you must disconnect ALL the
equipment from the mains supply.
Mains lead
SCART lead
RF lead
Telephone lead

8Using your Viasat box
Installation
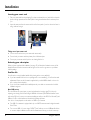
Inserting your smart card
1. Take your smart card from its packaging (if you have not already done so) and hold it so that the
picture is facing upwards, and the ‘smart’ patch is facing downwards and at the end away from
you.
2. Insert the smart card into the smart card slot of the front panel of your box. Insert it as far as it
will go, without forcing it.
Taking care of your smart card
◆Do not remove and re-insert your smart card unnecessarily.
◆Do not bend your smart card; keep it away from children and pets.
◆Do not put your smart card in liquids or use cleaning fluids on it.
Activating your subscription
When you have completed the installation (see page 15), a Subscription Activation screen will be
displayed. Please follow the instructions that are given on the screen to get access to your Viasat
channel package.
Satellite dish
You will need a correctly-installed satellite dish, pointing at the correct satellite(s).
◆If you have a satellite dish but it is not pointing at the correct satellite(s), you will need to make
adjustments. Please see the information supplied with your dish/LNB for details on how to do
this, or seek professional advice.
◆If you do not have a satellite dish installed, please ask your dealer to recommend a local dish-
installation engineer.
Quad LNB set-up
Since the PVR has two tuner inputs you need to duplicate the incoming signal. This is done by
replacing your existing Sirius Universal Single LNB with a Universal Quad LNB and install an extra
cable to the PVR, or, if you are a new customer, installing two cables to the PVR. One Universal Quad
LNB and 2 x 25 m coaxial cables are included in this package by Viasat.
Your choice of setup depends on the number of LNB:s in your antenna:
◆One LNB - Your antenna is equipped with only one LNB. The antenna must be aligned towards
Sirius 5°East
◆Two or more LNBs - If you are using a DiSEqC™ unit* with two or more LNBs/satellite dishes,
to ensure a simpler installation, and for the best Viasat channel line-up, you should connect up
PVR Digital Satellite Receiver

9
Installation
ENGLISH
the LNBs to the DiSEqC™ ports as shown in the LNB positions table below. You must then
connect your DiSEqC™ unit to the satellite input on your box (see also pages 9 to 11).
The Quad LNB setup requires that two DiSEqC™ switches are installed, one for each tuner input.
If you have more than one LNB in your antenna, it is recommended, for full PVR functionality, that
you exchange the LNBs for the other satellites also. Universal Quad LNBs are available at your local
installer.
With a Universal Quad LNB there will be two spare signal outputs, where it is possible to connect
an extra box, for example in your bedroom.
LNB positions table
If you change your satellite dish installation, you may need to change your settings so that your box
can tune to all the satellites available - See “Changing the LNB Setup” on page 52.
Connection method 1: To TV and VCR (without SCART)
If wish to connect your box to a TV (with or without a SCART connector) and a VCR (without
SCART connectors), connect up as shown in the diagram on page 10.
Satellite Position Recommended DiSEqC™ port
(for multiple LNB set-ups)
Thor 1° West 1
Sirius 5° East 2
Hotbird 13° East 3
Astra 19° East 4
Note
Initially, only a two-way LNB set-up is supported, on DiSEqC™ ports 1 and 2. A three- or four-way
LNB set-up using DiSEqC™ ports 3 and 4 (i.e. for Hotbird and Astra) will be supported after your
box has collected an automatic software update from Viasat.
*DiSEqC™ is a trademark of Eutelsat.

10 Using your Viasat box
Installation
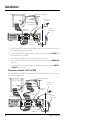
1. If your TV has a SCART connector, use the supplied SCART lead to connect your box to your
TV, for improved quality picture and sound.
2. Use the supplied RF lead to connect from your box’s RF out connector (marked RF OUT - 1)
to the antenna input on your VCR.
3. Use an RF lead (not supplied) to connect your VCR to your TV as shown.
4. Connect the lead from your TV antenna to the antenna input connector (marked AERIAL IN)
on your box.
5. Connect the leads from your satellite dish to the satellite input connectors (marked INPUT 1
and INPUT 2) on your box.
Connection method 2: To TV and VCR
If you have a VCR with a SCART connector and a TV with a SCART connector, you can connect up
as shown in the diagram below.
230V 50Hz
K
C
OHS CIRTCELE FO K
S
IR
NE
P
O TON OD
NOI
TUAC
Supplied
SCART lead
Supplied RF lead
RF lead (not supplied)
Lead from your
TV antenna
TV
ANTENNA
IN
VCR
TV OUT
ANTENNA IN
IN
Supplied
Quad LNB
Leads from your
satellite dish
230V 50Hz
K
C
OHS CIRTCELE FO K
S
IR
NE
P
O TON OD
NOI
TUAC
Supplied SCART lead
Supplied RF lead
SCART lead
(not supplied)
Lead from your
TV antenna
Leads
from your
satellite dish
TV
ANTENNA
IN
VCR
TV OUT
ANTENNA
IN
IN
IN
RF lead (not
supplied)
Supplied
Quad LNB

11
Installation
ENGLISH
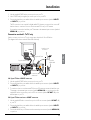
1. Use the supplied SCART lead to connect your box to your TV.
2. Use a SCART lead (not supplied) to connect your box to your VCR.
3. Connect the leads from your satellite dish to the satellite input connectors (marked INPUT 1
and INPUT 2) on your box.
The RF connection is not required for digital satellite TV. However, you may wish to connect RF
leads as shown, to continue to view or record terrestrial TV from your TV antenna.
You must then connect the lead from your TV antenna to the antenna input connector (marked
AERIAL IN) on your box.
Connection method 3: To TV only
If wish to connect your box to a TV only, connect up as described in 3A or 3B below.
(The diagram below shows methods 3A and 3B combined.)
3A: If your TV has a SCART connector
1. Use the supplied SCART lead to connect your box to your TV.
2. Connect the leads from your satellite dish to the satellite input connectors (marked INPUT 1
and INPUT 2) on your box.
3. To continue to view or record terrestrial TV from your TV antenna, connect the lead from your
TV antenna to the antenna input connector (marked AERIAL IN) on your box, and use the
supplied RF lead to connect from your box’s RF out connector (marked RF OUT - 1) to the
antenna input on your TV.
3B: If your TV does not have a SCART connector
1. Use the supplied RF lead to connect from your box’s RF out connector (marked RF OUT - 1)
to your TV.
2. Connect the leads from your satellite dish to the satellite input connectors (marked INPUT 1
and INPUT 2) on your box.
3. Connect the lead from your TV antenna to the antenna input connector (marked AERIAL IN)
on your box.
230V 50Hz
K
C
OHS CIRTCELE FO K
S
IR
NE
P
O TON OD
NOI
TUAC
Lead from your
TV antenna
Leads from your
satellite dish
Supplied SCART lead
Supplied RF lead
TV
ANTENNA
IN
IN
Supplied
Quad LNB

12 Using your Viasat box
Installation
❖Optional audio connections
This diagram shows the optional audio connections you can make to obtain improved quality sound.
You can connect to stereo audio equipment as shown, or alternatively, if your TV and/or video
recorder has the correct input connectors, you can connect to these as required.
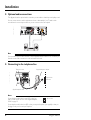
❖Connecting to the telephone line
Note
If you connect to your TV, video recorder or other equipment via the S-VIDEO OUT connector, you
must also use an audio connection, in order to hear/record sound.
Notes
If your telephone wall socket is not an RJ11 socket (see
right), you will need to use one of the supplied adapters,
shown on page 13.
If your telephone wall socket is an RJ11 socket, you may need a splitter (not supplied) so that you
can plug in both your box and your telephone.
230V 50Hz
K
C
OHS CIRTCELE FO K
S
IR
NE
P
O TON OD
NOITUAC
230V 50Hz
K
C
OHS CIRTCELE FO K
S
IR
NE
P
O TON OD
NOI
TUAC
3
2
1
Telephone line
wall-socket
Telephone socket Supplied telephone adapter
Supplied telephone lead
RJ11 socket

13
Installation
ENGLISH
1. Insert one end of the supplied telephone lead into the telephone socket
(marked TELEPHONE LINE) on the rear panel of your box, as
shown in the diagram at the top of the page.
2. If you need to use an adapter, choose the correct adapter for your
location. If you are not sure which one to use, compare with your
telephone connector.
Insert the free end of your supplied telephone lead into the RJ11 socket
on the adapter.
3. Remove your telephone connector from your telephone wall socket.
Insert your telephone connector into the correct socket on your
adapter.
Insert the adapter into your telephone wall socket.
❖Connecting a ‘magic eye’
You can connect a ‘magic eye’ (not supplied) to the secondary RF output
(marked RF OUT - 2) on the rear panel of your box, so that you can
operate your box from a different room.
To connect the ‘magic eye’, consult the instructions that came with it.
❖Connecting to the mains supply
Once you have safely made all the other connections, you can connect your
box to the mains supply.
1. Using the supplied mains lead, insert the box mains connector into the mains input (marked
230V 50Hz) on your box, as shown in the diagram below.
2. Connect the mains plug to the mains wall socket as shown in the diagram below.
3. If there is a switch by the mains wall socket, switch it on.
4. Connect your other equipment to the mains supply.
WARNING
DO NOT connect the mains plug to the wall socket until you have made ALL the
other connections.
Adapter for Sweden
Adapter for Denmark
Adapter for Norway
and Finland
230V 50Hz
K
C
OHS CIRTCELE FO K
S
IR
NE
P
O TON OD
NOI
TUAC
12
Mains plug
Wall socket
Mains
connector
Mains input

14 Using your Viasat box
Installation
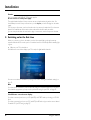
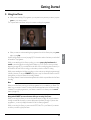
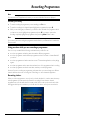
❖Switching on for the first time
When you connect your box to the mains, your box’s front panel lights go through a start-up
sequence. After about 20 seconds, your box is switched on and out of standby, and the standby light
is green.
◆Make sure your TV is switched on.
If the Welcome screen below displays, your TV is ready for digital satellite channels.
You can now continue the installation by turning to the section ‘Making the installation settings’ on
page 15.
If the Welcome screen does not display...
If you have connected your box to your TV (and VCR) via SCART leads, try selecting your TV’s ‘AV
input’.
If you have connected your box to your TV (and VCR) via RF leads only, you need to tune a ‘channel
for satellite TV’ (see ‘RF Tuning’ on page 15).
Caution
Your box operates with 230V AC, 50Hz mains supplies.
Do not connect it to a DC power supply.
The supplied mains lead has a 2-way connector at one end and a mains plug at the other. You
should always insert the 2-way connector into your box before you insert the plug into the mains
supply.
The only way to disconnect your box from the mains is to remove the mains lead. Your box must
therefore be installed near to the mains socket-outlet, which should be easily accessible.
If you are in any doubt about the mains lead, its plug or its connection, consult a competent electrician.
Note
If you have a VCR connected to your box via an RF lead (as in connection method 1), to be able to
record satellite programmes, you may need to perform RF tuning for your VCR - see page 15.

15
Installation
ENGLISH
❖RF Tuning
If you have connected up your equipment via RF leads, you may need to perform RF tuning before
you can watch digital satellite TV.
RF tuning your TV (and VCR) to your box
1. Make sure your box is active (the standby light on the front panel should be green).
2. Consulting your TV’s user guide if necessary, tune the TV until you can see the Welcome screen
(see page 14) on your TV screen.
3. Store your new ‘channel for digital satellite TV’ on a TV channel number of your choice. For
example, if your terrestrial channels are channels 1 to 5, and your ‘VCR channel’ is channel 8,
you may wish to use TV channel 9 as your ‘channel for digital satellite TV’.
4. If you have a VCR, set your TV to its ‘VCR channel’, then tune your VCR until you can again see
the Welcome screen.
If you cannot RF tune your TV (or VCR) to your box...
Your box’s factory preset RF output channel is channel 38. (This is not the same as a TV channel).
If channel 38 is not compatible with your TV, for example if it is already being used as your VCR’s
output channel, or for a terrestrial channel, you may find you cannot tune your TV to your box
because of interference.
Changing the RF output channel is covered in the setup section (see page 54).
RF channels may also be known as UHF channels.
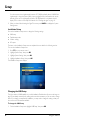
❖Making the installation settings
Choosing your country
If you have completed the installation instructions up to this point, the Welcome screen is displayed
on your TV screen. (See page 14 for a picture of the Welcome screen.)
1. Take your remote control. If you have not already inserted the batteries, do so now (see
page 3).
2. Press U or D until the country you want is highlighted, then press OK.
Note
If you have previously had an analogue satellite receiver connected to your TV (and/or VCR), you
may find that your ‘channel for satellite TV’ still works for your new digital channels. Try it to see - if
it works you do not need to perform RF tuning.

16 Using your Viasat box
Installation
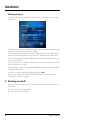
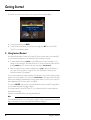
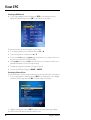
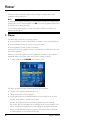
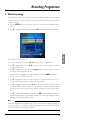
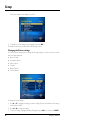
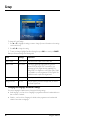
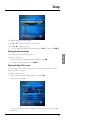
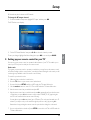
Checking the signal
The Signal Test screen is now displayed. You use this screen to confirm that your box is receiving a
satellite signal.
The details on the screen show the satellite input numbers, together with a bar showing the strength
and quality of the signal being received from the satellite.
Your box must receive a signal strength between 49-79 dBuV, preferably above 64 dBuV. If the signal
strength is lower the picture quality is more easily affected by bad weather, such as rain, thunder
storms, etc. The signal quality should be 1.0E-7BER and the Lock Indicator should display ‘OK’ in order
to successfully find channels.
If there is no signal, check your installation. Check all the connections are properly made. See also the
section ‘Solving problems’ on page 61.
If the signal strength or quality is poor, adjust your dish/LNB as required, referring to the information
provided with the equipment.
◆When you are satisfied that there is an adequate signal, press OK.
When you have completed the installation, a Subscription Activation screen is displayed. See
“Activating your subscription” on page 8.
❖Switching on and off
Whenever you are not using your box you should put it into standby. You should not unplug it at the
mains socket.
◆To put your box into standby, press S.
◆To make your box active, press S.

17
Getting Started
ENGLISH
❖Using the Viasat Guide
Your box has an on-screen digital guide to your digital satellite services. It is designed to help you get
the most out of your box. You use it to:
◆watch programmes and at the same time find out what is showing on other channels, both now
and later on;
◆see on-screen TV programme listings seven days ahead via the EPG;
◆order movies, sports and events using Ticket;
◆set reminders for programmes you want to watch using the Planner;
◆set your box to record programmes on now or showing in the future;
◆watch programmes you have recorded;
◆access a range of interactive services, such as games you can play using your remote control;
◆change settings on your box, including the Parental Control settings, to make sure your box
works how you want it to.
❖Changing channel
You can change channel by using:
◆the number buttons;
◆the ch + and – buttons; or
◆one of the on-screen methods described in the following sections.
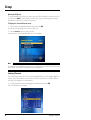
❖Unlocking a locked channel
If you have used Parental Control to lock any channels (see page 42), these channels will not be
available to view without being unlocked first. In addition, if you have used Parental Control to set
viewing restrictions based on age category ratings (see page 43), then programmes broadcast with
an age rating at the same level or above will be locked. If you have used Parental Control to lock any
channels (see page 42), these channels will not be available to view without at first unlocking them.
If you want to watch a locked channel or programme, you will need to enter your PIN code (see
page 41).
If the message ‘Please enter PIN code to unlock channel’ appears when you change channel:
1. Use the number buttons to enter the correct PIN code.
2. If you make a mistake, press BACK to delete the numbers you have entered.
If the PIN code is correct, the programme you want to watch displays.
◆If the PIN code is not correct, you will see a message to tell you. You can either try again, or
change channel to a channel that is not locked.
Note
When you unlock a channel using this method, the channel remains unlocked for as long as you are
viewing it. The channel is relocked when you change to a different channel, put your box into
standby, or turn off your box.

18 Using your Viasat box
Getting Started
❖Changing the volume on your TV
◆To change the volume on your TV set, press vol + or vol -.
◆To turn your TV’s sound on or off, press mute.
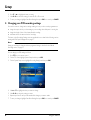
❖Using the channel banner
You can display the channel banner to find out:
◆what is showing on any channel, now and later on;
◆more about a programme you are interested in.
You can then use the channel banner to:
◆tune to a programme you want to watch;
◆record the programme you are watching, or a programme on a different channel;
◆set a reminder for a future programme;
◆set your box to record a future programme.
While the channel banner is displayed, you can continue to watch the current channel.
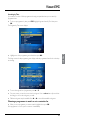
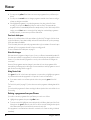
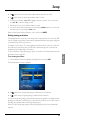
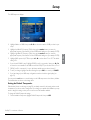
Displaying the channel banner
◆To display the banner, press OK.
Information about the programme on now displays.
◆To display information about the programme on next, press R.
◆To redisplay information about the programme on now, press L.
◆To display extra programme information (see page 19), press i.
◆To change which channel is highlighted by the channel banner, press U or D.
◆To remove the banner, press BACK.
Note
This banner also displays briefly when you change channel. To set the length of time that the channel
banner displays on-screen, see page 49.

19
Getting Started
ENGLISH
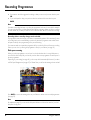
Watching a programme
If you see a programme you want to watch, press OK.
If the programme is on now, your box tunes to it automatically; if it is on at a later time, a reminder
will be set.
Instantly recording a programme
If you see a programme in the channel banner that you want to record, press R to record it.
If the programme is on now, your box starts recording instantly. If it is on at a later time, your box will
record the programme when it starts.
An R symbol (see page 20) displays on the channel banner, next to the programme, to show you the
programme is selected for recording. The programme is also added to your Planner (see page 30).
For more information about recording programmes and using your Planner, see ‘Planner’ on page 30
and ‘Recording Programmes’ on page 34.
Setting a reminder
If you see a programme in the channel banner that you want to watch, but it is on at a later time,
press OK.
Your box sets a reminder for you. This means, the programme is added to your Planner (see page 30)
and a clock symbol (see page 20) displays on the channel banner, next to the programme, to show
you the programme has been added to your Planner.
When the programme is about to start, a reminder message displays to let you know.
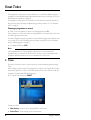
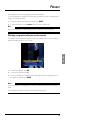
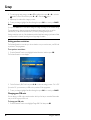
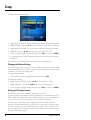
Displaying extra programme information
While the channel banner is on screen, you can display extra information about the programme listed
in the banner.
◆While the channel banner is on screen (see page 18), to display extra programme information,
press i.
Note
If you are using Instant Rewind (see page 22) when you press R, the recording will start from the
earliest point in the programme that you could rewind to. Depending on your settings, this may be
up to 60 minutes before live TV (see ‘Review buffer’ on page 47).

20 Using your Viasat box
Getting Started
The extra information includes a programme summary and codes and symbols which provide you
with additional information about the programme. These are explained below.
◆To remove the extra programme information, press i again.
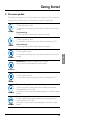
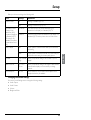
❖Symbols in the channel banner and extra
information screens
The channel banner and extra information screens may include symbols giving particular information
about programmes.
Symbols Explanations
The ‘7 or under’ age category rating for this programme.
The ‘11 or under’ age category rating for this programme.
The ‘15 or under’ age category rating for this programme.
The ‘18 or under’ age category rating for this programme.
The programme is a radio broadcast.
A reminder is set for the programme.
The programme is selected for recording.
7
11
11
15
15
18
18
R
Page is loading ...
Page is loading ...
Page is loading ...
Page is loading ...
Page is loading ...
Page is loading ...
Page is loading ...
Page is loading ...
Page is loading ...
Page is loading ...
Page is loading ...
Page is loading ...
Page is loading ...
Page is loading ...
Page is loading ...
Page is loading ...
Page is loading ...
Page is loading ...
Page is loading ...
Page is loading ...
Page is loading ...
Page is loading ...
Page is loading ...
Page is loading ...
Page is loading ...
Page is loading ...
Page is loading ...
Page is loading ...
Page is loading ...
Page is loading ...
Page is loading ...
Page is loading ...
Page is loading ...
Page is loading ...
Page is loading ...
Page is loading ...
Page is loading ...
Page is loading ...
Page is loading ...
Page is loading ...
Page is loading ...
Page is loading ...
Page is loading ...
Page is loading ...
-
 1
1
-
 2
2
-
 3
3
-
 4
4
-
 5
5
-
 6
6
-
 7
7
-
 8
8
-
 9
9
-
 10
10
-
 11
11
-
 12
12
-
 13
13
-
 14
14
-
 15
15
-
 16
16
-
 17
17
-
 18
18
-
 19
19
-
 20
20
-
 21
21
-
 22
22
-
 23
23
-
 24
24
-
 25
25
-
 26
26
-
 27
27
-
 28
28
-
 29
29
-
 30
30
-
 31
31
-
 32
32
-
 33
33
-
 34
34
-
 35
35
-
 36
36
-
 37
37
-
 38
38
-
 39
39
-
 40
40
-
 41
41
-
 42
42
-
 43
43
-
 44
44
-
 45
45
-
 46
46
-
 47
47
-
 48
48
-
 49
49
-
 50
50
-
 51
51
-
 52
52
-
 53
53
-
 54
54
-
 55
55
-
 56
56
-
 57
57
-
 58
58
-
 59
59
-
 60
60
-
 61
61
-
 62
62
-
 63
63
-
 64
64


ViaSat HD receiver User manual
- Category
- Networking
- Type
- User manual
- This manual is also suitable for
Ask a question and I''ll find the answer in the document
Finding information in a document is now easier with AI
Related papers


Other documents
-
Optibox tscx pvr ready User manual
-
Triax DVB 75SI User manual
-
Samsung DSB-H670 Owner's manual
-
Nokia TV Receiver 9802 S User manual
-
JA Audio 9902S Owner's manual
-
-
-
Cello C19103QUAD User manual
-
DREAM MULTIMEDIA Dreambox DM 8000 HD PVR DVD User manual
-
Enox AIL-2724S2DVD User manual