Page is loading ...

The Clipped Wing Cub Story
The classic Piper J-
3 Cub has been America's favorite light plane for over 40 years. More than 20,000 of them were built between
1937 and 1947 for both civilian and military use. By 1980, the number of still airworthy J-3's in the U.S. had declined to
approximately 3,600. One of these bears registration N32629 and is recognized worldwide as Hazel Sig's Clipped Wing Cub.
N32629 was manufactured in 1941 at the Piper factory in Lock Haven, Pennsylvania as a standard Piper J-3C-65 Cub, serial
number 5498. Not much is known about the first 12 years of its life. The first logged entry was made on February 12, 1953 by a
flier in Frederick, Oklahoma. He said; "The previous owner did not comply with CAR. 43·22 on the maintenance of aircraft
records. The aircraft log, if maintained, has been lost or destroyed. From known information, the aircraft has been estimated to
have approximately 4000 hours total time". With that many hours of flight time accumulated in just 12 years, it's pretty safe to
assume that N32629 was used for flight training during the 1940's. The Cub was sold in 1955 to an A & E mechanic who moved it
to Mount Pleasant, Iowa. It remained in Iowa through the 1960's, being used by several different owners for pleasure flying.
Hazel Sig, president of SIG MFG. CO.,
purchased N32629 in January of 1968. She
flew the J-3 in its standard form through the
spring and summer of that year. The log books
showed that the Cub had been covered with
ceconite and painted with enamel in 1965, just
three years before Hazel bought it. The
ceconite and enamel turned out to be a bad
combination. After the simplest aerobatics, the
enamel had begun to crack and loosen from the
fabric in several places. It was soon obvious
that the Cub was going to need recovering
again in the near future, much sooner than
should have been the case.
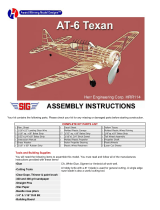
Hazel Sig standing beside her newly acquired standard Piper J-3 Cub at Sig
Field Montezuma, January 1968. At that time, N32629 was painted cub yellow
with red trim and black registration numbers. It was manufactured in 1941.

.
As it turned out, a late
-summer '68 wind storm brought the Cub's covering problems to a head. With the storm fast approaching
and no hangar space available, Hazel quickly tied the Cub down outside. To keep the rudder from slamming from side to side in
the gusty wind, she grabbed a roll of duct tape and taped the rudder to the fin. Needless to say the tape held perfectly during
the storm, but when she tried to take it off later, huge chunks of enamel came off with it. The recovering project couldn't be put
off any longer.
After retaping over the bare fabric spots, Hazel flew the wounded Cub to the Ottumwa, Iowa airport. There the entire airplane
was stripped of its covering and inspected. It turned out to be in worse shape than originally thought. The wooden wing spar had
been damaged by mice and hastily varnished over in '65. The control cables were brittle. The engine needed an overhaul. And
the list kept growing. The Cub needed to be completely rebuilt!
Driving to Ottumwa (50 miles) every night after work, Hazel completely dissassembled the J-3. For better aerobatic
performance, she had 40" clipped off the inboard (cabin) end of both the right and left wing panels. This was done by a licensed
mechanic in accordance with FAA approved modification that were developed by aerobatic pilot Earl C. Reed in 1953 for his
Cub. (Several other J·3 Cubs have also been modified using Earl's plans.) All the steel tubing framework in Hazel's Cub was
cleaned by sandblasting and primed with zinc chromate. The wooden parts were repaired or replaced as needed. The
Continental A65
-
8F engine was completely overhauled and modified to produce 75 h.p. instead of its normal 65.
Hazel, assisted by her husband Glen and
plant superintendent Maxey Hester, then
trucked the Cub parts back to Montezuma
and put them in a basement room of the SIG
factory. Over the winter months they
recovered the airplane with grade "A" cotton.
When it came time for the color painting
Hazel, Glen and Maxey all had different ideas.
They agreed on the sunburst pattern, but
according to Hazel; "Glen wanted it to be red
and white, Maxey like blue and white, and I
thought yellow and white would look best. As
you can see, "Maxey is the one who actually
loaded the spray gun".
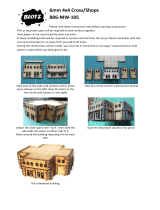
Hazel Sig taxies her rebuilt Clipped Wing Cub out of the hangar for its very first
test flight at the Ottumwa Airport in the summer of 1969. Approximately 3-112
feet was clipped off the root of each wing panel for better aerobatic
performance.
The almost-done Cub took another truck ride
back to Ottumwa in the spring of 1969 for
reassembly.
New cowlings, windshield, side windows, tailwheel, and metal prop were installed. Added touches like chromed cylinder heads
and top shrouds, streamlined bungee covers, a personalized Cub bear emblem, radio gear, and a new interior made Hazel's
Clipped Wing Cub one of a kind.
The first test flight of the reborn Cub was made at the Ottumwa airport in the late summer of 1969 with Hazel at the controls.
Modelers got their first glimpse of the Clipped Wing when she flew it to Doylestown, Pennsylvania for the 1970 RC Aerobatic
World Championships. Since that time, thousands of model versions of the Clipped Wing Cub have been built and flown all over
the world. Over the years, Hazel has graduated to snappier and more powerful aircraft for her aerobatic flying, but none has
captured the attention and affections of modelers as much as the blue and white Cub. It's a very special example of America's
favorite airplane!
Engines
The 1/4-
scale Clipped Wing Cub can be flown with a wide variety of engines. In fact, there is such a vast number of good quality
motors available on the market today for a model of this size and type that it is impossible for us to recommend one particular
motor over all others. The engines shown here are just a few of many that we have tried in the Cub. Generally speaking, we've
found that any glow model engine either a .60 - .90 size 2-stroke, or a .90 - 1.60 size 4-stroke - can be recommended for the
1/4-scale Cub. Any brand glow engine that you choose, within these limits, should provide your Cub with good flight
performance.

.
2
-
Stroke or 4
-
Stroke?
The first choice you must make in selecting an engine for your Cub is to decide whether you want to use a 2-stroke or 4-stroke
motor. From the reports that we have received from our customers, 4-stroke engines have proven to be much more popular for
the Cub than 2-strokes. In fact, a 4-stroke engine seems to bring out the best in a slow flying airplane like the Cub. That's
because a 4-stroke model engine produces its maximum power at a relatively low r.p.m., just like the full-scale Cub's engine. In
other words, it more closely duplicates the power curve of the full-scale motor. While a typical 2-stroke R/C sport engine will
normally run at between 10,000 to 13,000 r.p.m. in high throttle, a 4-stroke model engine runs about 7,000 to 9,000 r.p.m. in
high. That enables the 4-stroke to turn a larger, more scale size propellor than the 2-stroke model engine could. The large, slow
turning prop provides more pulling power for a slow flying airplane like the Cub, giving it an excellent rate of climb without
having excessive airspeed in level flight. A 4-stroke engine is the best choice if you want your Cub to have super realistic flight
performance.
In testing 2-stroke engines in the Cub, we found that a .78 - .90 size 2-stroke provided the best all round performance. Fly it
throttled back for realistic speed in level flight and go to full power for aerobatics. We also tried a schneurle-ported .60 2-stroke
in one of our Cubs. While it provided very realistic airspeed, most modelers would feel it was underpowered. Even though it
would loop out of level flight with no preliminary dive needed, and would cruise in level flight at near scale speed with 3/4
throttle, the climbouts and turns had to be kept very gentle to avoid a stall. A .78 - .90 size 2-stroke provides an extra margin of
safety. In conclusion, while a 2-stroke engine can fly the 1/4-scale Cub very well, they do tend to fly the model faster in level
flight than a 4
-
stroke would. You have to run them fast in level flight in order to have good climb performance.
We do not recommend converted "chain saw type" gas engines for this model. They tend to vibrate more than a precision made
glow engine and are usually too bulky to fit inside the cowling.
Regardless of what size and type of engine you decide to use, strive to keep your Cub as light as possible for best flight
performance.
ENYA .90 4
-
stroke
represents typical
installation of a single-cylinder 4-stroke
engine in the Cub. Motor is sidemounted
for easy starting and dependable Idle.
Uses a J'Tee #JT-64 Aluminum Engine
Mount, J'Tee #JT-ENS Muffler, and 15-6
prop. No dummy engine needed on this
side of the cowling.
O.S. GEMINI 1.20 twin
-
cylinder 4
-
stroke
engine mounted in the Cub. Note 3/8"
thick spacer between back of engine
mount and firewall, to provide correct
firewall-to-prop distance. Cowl is modified
to come apart In two pieces, ala the full-
scale Cub (upper section is removed in
pboto).
Webra .91 2
-
stroke
engine mounted
inverted in the Cub. C.B. Associates
15310 Aluminum Engine Mount, Slimline
#3401 Sport Scale Muffler with homemade
copper tubing exhaust extensions
(plumbing variety copper tubing from
hardware store). Inverted engines can be
difficult to start.
Mounts
No motor mounts are supplied in this kit because of the wide range of engines that can be used. A suitable radial firewall-type
mount (such as Tatone, Fox, CB, Hayes,etc.) should be available for just about any mass produced engine. The distance from
the front of the cowl to the firewall is adequate for most all .60 to .90 glow engines. Less common engines may require some
preplanning and modification in this area.
Mufflers
There is no one type of muffler that is best suited for the Cub. It all depends on the particular engine that you've elected to use.
You will have to figure out your own muffler installation. We have had good luck adapting the "exhaust manifold" type mufflers
(such as made by Tatone and Slimline) to most .60 to .90 glow engines. Usually they can be made to fit with just slight
alterations. Use copper or heat
-
proof rubber tubing to extend the exhaust pipes to the outside of the cowling.

.
Recommended Glues
Sig-Bond (alphatic resin type) glue works best for the majority of the general framework construction. Areas subjected to
unusual strain, or including metal pieces, should be epoxied with Sig Epoxy Glue (slow drying) or Sig Kwik-Set (5-minute)
Epoxy Glue. You will also find that the cyanoacrylate type adhesives (Hot Stuff, Jet, etc.) can be extremely quick and handy for
some applications. Some of the steps in this instruction sequence call out the specific type of glue to use for that particular
assembly. In other areas you can use your own judgement as to which type is best suited to the purpose and your building
schedule.
About The Building Sequence
The quickest and most efficient way to complete a model is to work on several pieces at the same time. While the glue is drying
on one section you can start on or proceed with another part. The numbering sequence used in this book was chosen as the
best way of explaining the building of each major assembly and is not intended to be followed in exact one-two-three fashion. It
may be desirable, for example, to start building the wing or tail while the preliminary parts of the fuselage are drying. It is
suggested that you read the instruction book and study the plan carefully before beginning to build. That will help make it clear
where construction out of the descriptive sequence can be done.
Notes Before Beginning Construction
Any reference to right or left refers to right or left as if you were seated in the cockpit. Building large airplanes requires a large
building board! For this Cub, you will need a board that is at least 18" wide x 72" long. It must be perfectly flat and untwisted. If
you don't have one that big, go to the local lumber yard and purchase a "door core" of at least these dimensions. Door cores are
normally very straight and true (be sure to inspect it before buying), and they are not too expensive.
A piece of thin foam board or celotex
-type wallboard makes a handy top surface for your building board, into which pins can be
easily pushed. Don't be afraid to use plenty of pins while building, particularily when gluing planking on the top curve of the wing
or the round top of the nose. Due to their large size, the full-
size fuselage and wing plans had to be drawn in two pieces. Cut out
the adjoining pieces and carefully tape them together along the break lines. Wax paper should be used to protect the plans
during building.
Be careful where you use a ball point pen for making marks on the model during construction. If not sanded off, these marks
may bleed through many coats of dope and show on the finished model. Cut all long pieces of balsa first, followed by medium
lengths, before cutting up any full length strips into short pieces. Leave the die-cut parts in the sheets until needed in
construction. Remove pieces from the sheets carefully. If difficulty is encountered, do not force the part from the sheet. Use a
modeling knife to cut it free. A jig saw is best for cutting out the printed balsa parts. Cut just outside the lines, leaving all of the
line on the part. When fitting the piece into the structure, use a sanding block to bring the edges to an exact fit.

.
FUSELAGE CONSTRUCTION
1.
Building The Fuselage Formers
Due to their large size, some of the fuselage formers could not be furnished in one-piece, but need to be built up from
several pieces. Take great care in the next few steps to insure that these formers are built accurately. How well you make
them match the plan will determine how well other fuselage parts will fit together later
a.
Refer to Cross-Section F5 of the full size plans. Former F5 consists of one 1/4" ply Top, two 1/4"x1/2" ply Sides, and one
1/4"x1/2" balsa Bottom. Cut the 1/4"x1/2" ply pieces from the 24" long stock provided. Cut the 1/4"x1/2" balsa Bottom from
36" long stock. A piece of 1/4"x2-1/4"x6-1/4" plywood is provided for the former Top. Cut two 1/2"x15/16" notches in the
bottom corners of the top as shown here.
b.
Cover the Cross
-
Section F5 drawing with waxed paper and epoxy the pieces of F5 together directly over the drawing.
c.
Build former F6 directly over plan Cross-Section F6. This former consists simply of four pieces of 1/4"x1/2" balsa, cut from
36" stock.
d.
Former F7 consists of two 1/4"x1/2"
balsa Sides, one 1/4"x1/2" balsa Bottom,
one printed balsa part F7A, and one die-
cut lite-ply Cabin Bulkhead. Cut out
these parts and glue together over the
F7 CrossSection drawing.
e.
The die-cut balsa rear fuselage formers
F8, F9, F10, and F11 each come in two
pieces. Glue the halves together at the
center. F8, F9, and F10 should each be
reinforced with a piece of 1/8"x1/4"
balsa, as shown
2.
Fuselage Frame Assembly
a.
Cut the MF-1, MF-2, MF-3, MF-4 and MF-5 pieces from the 5/16" printed balsa sheets. Cover the Fuselage Main Frame
drawing with wax paper or plastic wrap for protection. Using the printed parts and 5/16" square balsa stick, construct two
identical main frame sides directly over the drawing. When dry, pin both main frame sides together and lightly even up the
edges with a sanding block.
b.
Epoxy the die-cut lite-ply Fuse Side Sheeting onto the main frame sides. Be sure to make a right and leftl And try not to get
excess epoxy in the cutouts in the main frame for the landing gear blocks.
c.
With a sanding block, bevel the inside rear ends of the fuselage sides where they will join together later.
d.
The top structure of the cabin/window area, where the wing will sit, is a lamination of 1/4"x3/8" spruce to 3/16"x3/8" balsa.
From 36" long stock, cut two spruce and two balsa pieces to proper length. Glue the balsa pieces to the spruce pieces in a
manner which will give you a Right and Left Cabin Top piece.
e.
Pin the Right Cabin Top piece in place on the Side View plan (balsa side up). Pin the Right Fuselage Side in place on the
plan (plywood side down). Carefully draw lines on these parts to mark the exact locations of formers F5, F6 and F7.

.
f.
Epoxy formers F5, F6 and F7 to the Right Fuselage Side and Cabin Top piece. Glue them on one at a time with 5-minute
epoxy. Use a triangle to get them on square.
g.
Epoxy the Left Cabin Top piece in place along the top of the formers. When dry, measure at each former from the bottom of
the Right Cabin Top to the top edge of the Right Fuse Side. Then transfer this measurement onto the left side of the
formers, this time measuring down from the bottom of the just-installed Left Cabin Top. These marks will come in handy as
a guide when aligning the Left Fuse Side in the next step.
h.
Epoxy the Left Fuselage Side onto the formers. Accurate positioning during this assembly is very critical for a straight
fuselage! It's best to mark the former locations on the inside of the Fuse Side before gluing them on. We prefer to use slow
drying epoxy and lots of pins so that there is plenty of time for getting an accurate alignment of the fuse sides to each other
before the glue dries. And don't forget to check that the sides will properly line up with each other at the tail end. Let dry.
i.
Epoxy 1/8"x1"x6" plywood Landing Gear Block Doublers to the top side of the Grooved Landing Gear Blocks. When dry,
epoxy the blocks in place in the fuselage. Make sure that the grooves in the blocks are 5-7/8" apart as shown in the side
view fuselage plan.
j.
Epoxy the 1/8"x1"x6" plywood Strut Mount Insert in front of the rear Landing Gear Block
k.
Set the fuselage on the Top View plan, pinning down the area between formers F6 and F7. Pull in the rear ends of the fuse
sides and glue together parts MF-5 where they meet on the center line of the plan. Let dry.
NOTE: With the rear half of the fuselage down against the plan, the length and curve of the sides won't match that drawn on
the plan. This isn't a mistake but simply because the Top View plan shows the fuselage as it would look from above when
the fuselage is sitting level not like it is now with the upswept rear half sitting flat on the plan.
l.
Consequently, to join the remainder of the rear fuselage, first unpin the fuselage from the plan after the MF-5 joint is dry.
Then cut the 5/16" square balsa cross-pieces to length according to the patterns for each that are drawn alongside the Top
View. Glue and pin these in place starting with the F13 cross
-
pieces, and then working forward.

.
3.
Nose Assembly
a.
Epoxy the die-cut plywood firewall parts F1A, F1B and F1C together. Make certain that F1C is centered on the back.
Carefully mark the vertical centerline and the thrust line on the front of the firewall assembly. Position your engine mount on
the front of the firewall, drill holes for mounting, and install blind nuts.
b.
Join the nose main frame sides at the top with the die-cut lite-ply Nose Joiner. Note that the Joiner should not be flush with
the front of the sides, but leaves clearance room for F1C.
c.
Epoxy the nose assembly to the fuselage main frame. Make sure that the nose main frame sides are lined up with the fuse
main frame not flush with the lite
-
ply fuse side sheeting. The nose will have its own lite
-
ply side sheeting added later.
d.
Epoxy the firewall assembly in place. Double check with the Side View plan that you get it correctly located vertically. The
easiest way is to draw the thrust line on the main frame sides and match up the line on the firewall with it.
e.
Refer to the F5 cross-section drawing. Make a 5/32"x5/16" hole in the top of plywood former F5 where the 5/32" Cabin
Wires will pass through.
f.
Cut a groove through the top 5/16" square main frame pieces so the Cabin Wires can enter the slot that is between MF-1
and MF-2.
g.
Trial fit the Cabin Wires in place and rebend them slightly if necessary to get a good fit in your model. Take coarse grit
sandpaper and sand the wires in the areas where they will be glued into the model structure. This will improve glue
adhesion. When satisfied with the fit, epoxy the Cabin Wires into the side slots in the nose main frame. Use the glue
liberally, to completely cover the wire where it imbeds into the structure. Be careful that the wire doesn't stick out past the
surface of the main frame since lite-ply sheeting must still be applied later.
h.
Wrap with copper wire and solder the Cabin Wires together where they meet at the front of former F5. When cool, clean any
excess solder flux off the wires and surrounding plywood with dope thinner and a stiff nylon brush. Let the thinner evaporate
out. Smear a fillet of epoxy around the wire binding and onto the front of F5 where they meet.
SPECIAL NOTE:
It is best to make provisions now for the fuel tank mounting, while you still have easy access through the
bottom of the nose. Refer ahead to "Tips On Tanks" (section 18), for some recommendation on the type of
setup to use. At this time you should drill any necessary fuel line holes in the firewall, and make any
provisions you prefer for securing the tank in position.

.
i. Glue in place balsa formers F2, F3 and
F4, and the 1/4" square balsa stringer
that goes between them. Check the
exact locations of the formers carefully.
When dry, lightly touch up the edges of
the formers by running a sanding block
over all three and the ply firewall at the
same time.
Steerable Tailwheel Unit Assembly
1.
Temporarily bolt the two formed
metal Leaf Springs together using
the 6-32x1/2" Mounting Bolts and
the 6-32 Square Anchor Nuts
provided. Note in the drawing that
the shorter leaf spring goes on top.
2.
Push the bottom end of the long
Leaf Spring in place inside the
Nylon Tailwheel Bearing. Bolt
securely with the 4-40x3/8"
Mounting Bolts & 4-40 Lock Nuts.
3.
Prepare the Formed Tailwheel Wire for installation by first grinding or filing
any burrs from both ends of the wire. Next clamp the entire bottom fork of the
tailwheel wire in a vice and bend the top shaft backward slightly, so that
when installed the tailwheel will be swept back slightly as shown in the full-
size side-view drawing on Plan Plate 1.
4.
Solder a Flat Metal Washer just
above the top bend of the Formed
Tailwheel Wire. The purpose of this
washer is to keep the wire from
riding up too high into the Nylon
Tailwheel Bearing and causing a
bind. A second Flat Metal Washer
is provided to solder onto the axle
portion of the tailwheel wire to keep
the tailwheel itself from binding
against the bend of the wire.
5.
Install a 1-1/2" diameter Tailwheel
(not furnished) on the axle. Use the
3/32" Wheel Collar and Headless
Set Screw provided to hold the
tailwheel in place.
6.
Push the other 3/32" Wheel Collar
provided into the round cavity in
the molded nylon Steering Arm.
Make sure that the set screw hole
in the wheel collar is lined up with
the hole molded into the steering
arm. Thread the 4-40 x 3/16" Set
Screw (round head) into the wheel
collar.
7.
8.
Insert the top of the Formed Tailwheel Wire thru the Nylon
Tailwheel Bearing and secure in place with the Steering
Arm. Be sure to file or grind a small flat spot on the wire
where the 4-40 x 3/16" Set Screw will make contact.
During final assembly of the model, after all covering and
painting is done, link the Steering Arm to the Rudder
Control Horn with the two Steering Springs provided. Use
a needle nose pliers to bend a hook in each end of the
springs to attach in the outermost holes of the steering
arm and the back edge of the control horn (see photo in
section 23)
j.
Sand the sides of the firewall flush with
the main frame. Glue on the die-cut lite-
ply Nose Side Sheeting.
k.
A 1/8"x4"x18" balsa sheet is provided for
planking over the top of the nose
formers. It may be necessary to wet the
outside of the sheeting slightly with
water to get it to bend easily around the
formers.
4.
Cabin Area
a.
Add 3/16"x3/8" balsa fill
-in pieces to
each side of former F7.
b.
Cut out and glue in place the 1/4" printed
balsa Window Outlines. They should be
glued in flush with the outer surface of
the lite-ply Fuse Sides and the spruce
Cabin Tops.
c.
Fill in along both sides of formers F5 and
F6 with 1/4"x1/2" balsa. These will stick
out past the surface of the lite-ply and
spruce slightly, but will be sanded flush
later.
d.
Add 1/4"x1/2" balsa Window Braces to
both sides of the cabin, where shown on
the plan just ahead of former F6. Glue
these in flush with the Fuse Sides and
Cabin Tops.
e.
Install F5G gussets on the back of
former F5, to brace it to the Cabin Top
pieces.

.
f. Cut and glue in place the 5/16" sq. balsa front Windshield Braces. They should also be glued in flush with the lite-
ply Sides
and spruce Cabin Tops. You'll have to hollow out the bottom inside corner of the Windshield Braces slightly so that they
will clear the Cabin Wires.
g.
Block sand all the window area flush with the surface of the fuse sides and cabin tops.
h.
Wood for cabin floor pieces CF-1 and CF-2, that go around the landing gear
blocks, is available on printed sheet #10. The lines drawn there are not exact size
- cut the wood oversize and sand the edges down until the pieces slip into place
between the main frame sides. Then glue in flush with the bottom of the fuselage.
i.
Cut out and glue in the CF-3 Nose Fill-In piece
j.
Add the 5/8" balsa Nose Bottom Block. Note proper grain direction.
5.
Completing The Fuselage
a.
Glue rear formers F8 through F13 in place on the main frame. They must be centered side-to-side. Note in the side view
plan how these formers should be sitting straight up and down when the fuselage is propped up level - not installed 90° to
the main frame itself.
b.
Glue in place the 1/4" sq. balsa Top Corner Stringers and the 1/4" sq. T.E. Cross-piece that goes on top of former F7. It
may be necessary to soak the Corner Stringers in water to get them to bend into shape between formers F7 and F9.
c.
Add the 3/16"x3/8" balsa Top Stringer.
d.
Put scrap balsa gussets on each stringer where they connect to the back of
former F7.
e.
Glue on the 1/8"x1/4" balsa Side Stringers. When dry, use a sanding block to
taper them near the front and the back as shown in the Fuselage Top View.
f.
Glue on the 1/8"x1/4" balsa Bottom Corner Stringers. Notice in the cross-section drawings that these are glued on flat
against the main frame - not on edge as were the Side Stringers. Taper these stringers also, aft of F13, to blend into the
end of the fuselage.
g.
Add 1/8" sheet balsa fill
-in on the sides of former F13.
h.
Cut the Stab Mount Blocks out of the printed balsa sheet. Make sure that these are cut out very accurately and that they
match each other. Glue them in place on the fuselage, allowing them to stick out slightly past the already-tapered Side
Stringers. When dry, shape the sides of the Blocks down to blend into the stringers. Remember to maintain a constant 3/8"
width at the end of the fuse where the rudder will be hinged.
i.
Next you must prepare the die-cut plywood Tailwheel Mount (TWM) for
installation on the bottom of the fuselage. Refer to the instructions on assembly of
the Steerable Tailwheel Unit. Once you have the tailwheel assembled, hold it in
position on plywood TWM and mark the hole locations for the 6-32 Mounting
Bolts. Then epoxy the 6-32 Square Anchor Nuts to the top side of TWM. When
dry, carefully inlet the bottom of the fuselage to accept TWM, and then glue it in
place. Be careful not to get any glue in the threads of the anchor nuts.
j.
Shape the entire fuselage with a knife and sanding block to match the cross-sections. You will need to have the cowl at
hand in order to get the shape of the nose area just right for a good cowl fit. Thus, refer below to the "Cowling" instructions
and complete the cowl through step (6h.) at this time. Then come back and finish shaping the fuselage.

.
6.
Cowling
a.
Lay the left cowl half on the Fuselage Side View plan and scribe a small mark on the outside of it with a knife to indicate the
exact location of the thrust line. This mark won't be needed until after the cowl halves are joined, but it is much easier to
mark it now while the cowl will sit flat on the plan.
b.
Butyrate dope thinner, MEK, or
cyanoacrylate adhesive can be used to
assemble the cowl. Hold the plastic
joiner in place on the inside of one cowl
half. Leave half of the joiner strip
extending over the edge so as to lap
onto the other cowl half when it is
attached. Flow a few drops of adhesive
under the edge of the strip. It will spread
along the seam by capillary action.
Squeeze and hold together any area of
the strip that is not down tight against
the cowl. Be careful not to let the
adhesive get under you finger, it will
leave a finger print that may be hard to
remove.
Soldering Hint
When soldering a flat metal washer
onto a wire part, it is very helpful to
first slip a short piece of Sig Heat-
Proof Silicone Fuel Line Tubing onto
the wire and push it up tight against
the washer to hold it in correct
position for soldering (the following
photo is not actually of the Cub's
tailwheel assembly but does show a
typical example of the method we're describing). The heat-proof tubing will not
melt from the heat of soldering, and it will also keep excess solder from getting
on the wrong side of the washer. After the solder cools, cut the fuel tubing off of
the wire.
c.
After the joiner strip has dried in the first cowl half, hold the second half in place and carefully flow adhesive into the seam.
Squeeze and hold together any areas of the seam that are open. Allow to dry thoroughly.
d.
Even up the back edge of the cowl with a sanding block.
e.
Due to its large size, the cowl needs to be strengthened by lining the inside with fiberglass cloth, stuck down with slow-
drying epoxy glue or polyester glass resin. The first step is to sand the inside of the cowl with 80 grit garnet or similar
grained sandpaper. Remove as much of the gloss from the plastic as possible. Don't worry about scratches in the plastic, a
rough surface on the inside will help the cloth and glue stick better.
CAUTION: Never use.sandpaper coarser than 220 grit on the outside of the cowl! It will cut deep scratches in the plastic
that may open up wider when paint is applied. Refer to section "Sanding and Painting Plastic Parts", in section 20.
f.
Cut a piece of Sig Regular Weight Glass Cloth (SIGGF001, not supplied) that will cover approximately half of the inside of
the cowl. The cloth is stretchy and will flow most of the contours of the cowl easily. Trial fit the piece of cloth inside the cowl
without any glue to see if you can get it to lay down without any bad wrinkles. If you have had no experience in applying
cloth before, you might consider doing the cowl in 3, or even 4, separate pieces of cloth and batches of glue. It will take a
little longer that way, but you'll probably do a better job.
g.
Mix up a batch of glue large enough for the area you've decided to cover in one step. Brush the glue onto the inside of the
cowl, putting on as smooth a coat as you can. Lay the cloth in place and pat down until it's well saturated with the glue.
Smooth out the cloth, pulling out any wrinkles. When satisfied with the job, mix up another small batch of glue and apply the
next piece of cloth. (Note: An alcohol soaked rag is handy for wiping excess epoxy off your hands or off the outside of the
cowL) After the entire inside of the cowl is covered, let dry thoroughly.
h.
When dry, trim off any excess cloth along the back edge of the cowl with a single edge razor blade or sharp X-Acto knife. If
there are any big uneven spots or ridges inside the cowl, sand them down smooth so that they will not interfere with the fit
of the cowl to the fuselage.

.
i. Scrape the seam on the outside of the cowl to take out any rough spots or flaws. Low spots in the seam can be filled with
Sig Epoxolite putty. Don't put on too much Epoxolite and expect to sand away the excess later. Epoxolite dries very hard
and must be worked into its final desired shape before it hardens. Use your finger or a single-edge razor blade, dipped in
water, to smooth the Epoxolite into the low spots along the seam. Let dry overnight, then sand the entire cowl smooth and
scratch free with fine sandpaper.
j.
With a Dremel tool or X-Acto knife, cut an opening in the front of the cowl large enough for the engine's prop shaft and
drive washer to fit through. Locate this hole according to the thrust line mark that you made on the cowl at the start of this
section.
k.
Cut out the two small air intake openings in the front of the cowl. Refer to the
Fuselage Front View plan for the exact size and location.
l.
A piece of 1/2"x1/2"x6" basswood is provided for making six equal 1" long Cowl
Mount Blocks. After cutting them to length, epoxy the blocks in place on the front
of the firewall, letting them stick out past the edge of the nose planking slightly.
Mount the engine on the firewall. Slip the cowl over the engine and up to the
Cowl Mount Blocks. Now you should be able to see where the blocks need to be
taken down in order to fit properly inside the cowl. Use a sanding block to bevel
and reshape the blocks as necessary until the cowl will slide back over the blocks
and onto the fuselage.
m.
Tape the cowl in correct alignment on the fuselage. Drill pilot holes for the Cowl Mount Screws (#4 sheet metal type,
furnished) through the cowl and into the Cowl Mount Blocks at the same time. Take the cowl off and open up the holes in it
large enough to pass the mounting screws. Then put the cowl back on and thread the mounting screws into the blocks.
n.
Trim out the molded plastic Air Cleaner Cover to fit on the chin of the cowl. Leave a small flange around the edges for
gluing. Hold the Cover in position on the cowl and draw around the outside of it with a pencil. Cut out the cowl plastic about
1/8" inside of the lines, so that cooling air will be able to flow through the Air Cleaner Cover and into the engine
compartment. After this is done, glue the Cover in place and then cut open the front of it (within the framed area) with an X-
Acto knife. This opening can be left wide open, or if you want a more scale appearance you can glue in a piece of plastic
window screen (wait until after all painting is done).
o.
Trim out the Right and Left Dummy Engine Cylinder moldings along the lines shown in the photo. Leave a small flange,
about 1/16" to 1/8" wide, along the back of the part where it will match the curvature of the cowl. The best procedure for
trimming is to rough out the part with a heavy-duty scissors or shears, and' then finish the edges with a sanding block or
Dremel tool. Next, carefully position the Right and Left Cylinders on the cowl using the plans and photos as a guide. Mark
their location on the cowl with a pencil. Then carefully bond the cylinder moldings in place with dope thinner, MEK, or
cyanoacrylate adhesive. Again, avoid getting adhesive on your fingers and making finger prints on the plastic.
p.
Trim out the Right and Left Top Shrouds
according to the trim lines molded into
them. The trim lines are not very
prominent. Holding the parts up to a light
will make the lines more visible. You can
trial fit the Top Shrouds onto the
Cylinders at this time in order to fine-
tune the fit of the trimmed edges, but it is
best if they are not glued on permanently
until after the Cylinders and Cowl are
completely painted. The Top Shrouds
can be painted after they are in place.
Engine Cooling Notes
The most important factor in cooling a fully cowled model engine is to keep
a constant stream of fresh, cool air moving through the cowling. Large
volumes of air aren't necessary, just a steady flow of new air. This is
accomplished by having more exit area for the air than incoming area.
Inadequate exit space can cause heated air to be trapped in the cowl, and
this is what causes overheating and engine failure.
Consequently, on our prototype models, we provided for additional exit
space by
1. opening up the bottom of the cowl at the rear, and
2. cutting away the cowl plastic that is inside the dummy engine
cylinders and then opening up the back of the cylinders themselves.
As an extra precaution, we also installed a baffle (made of sheet balsa) in
the bottom of the cowl. It directs all of the air that comes in through the Air
Cleaner Cover upward towards the engine cylinder before it can exit out
the bottom opening in the cowl. With the setup described here, we have
never experienced any overheating problems with glow engines from .60
to .90 cu. in. You may need to use a little ingenuity with some similar tricks
to insure that your engine installation runs cool.

.
q. Make any small openings or other
provisions where necessary to allow
access to the needle valve and for
hooking up the glow plug.
7.
Main Landing Gear
Assembly of the main gear requires the
completed fuselage.
a.
Place the 3/16" Main Gear wire and the 3/16" Rear Brace wire into the grooved L.G. Blocks in the bottom of the fuselage.
Note on the plan that the Main Gear wire should be perpendicular to the bottom of the fuselage while the Rear Brace wire
should be angled forward to meet it near the axle. You will have to trim the groove in the rear L.G. Block slightly to allow
the Rear Brace wire to swing forward.
b.
Using the soft copper wire supplied, bind the ends of the two 3/16" wires together near the axle, along with the 1/8" dia.
Bottom Shock Strut wire that goes between them. Use tape, clamps, or whatever you can come up with to help hold the
three wires in alignment while you wrap them. If the wires don't line up exactly right with each other, rebend as necessary
to get them to fit properly. Make the copper wire wrappings as tight as you can, with each strand of copper wire right next
to the previous one. There should be no gaps between the strands of copper wire. Don't worry about running out of copper
wire, as we have included extra to help insure that you can make these bindings very strong.
c.
When you have the wires bound together in proper alignment, solder them
securely with normal rosin core solder. It is not necessary to have them brased or
welded
- just be sure to use a soldering iron or torch with enough heat output to
get the wires and bindings hot enough for the solder to flow smoothly. Also, use
plenty of soldering paste to help the solder flow completely around and thru the
bindings. Protect the fuselage during the soldering operation with a cloth so that
dripping solder or paste will not fall on the wood. After both axles are soldered
and cooled off, carefully remove the wires from the grooved blocks.
d.
Next bind and solder the 1/8" dia. Top Shock Strut wire in place at the top of the 3/16" Main Gear wire. Position this wire
carefully before soldering - note in the front view on plan plate 4 that the middle bend of this Top Shock Strut wire should
contact the middle bend of the Bottom Shock Strut wire so that they can later be bound together by rubber bands for flying.
The rubber bands will serve as an effective shock absorber.
e.
After all the solder joints are cool, file
and sand them to smooth out any
prominent bulges in the bindings. Clean
all joints with dope thinner or other
suitable solvent.
Bungee Cover Simulations
Factory fresh J-3 Cubs had "leather boots" covering the bungee shock chords
of the landing gear. Some recently restored J-3's have gone to airfoil shaped
fiberglass or metal covers. You can easily simulate either type on your model.
Leather Boots: Cut two pieces of scrap balsa to
approximately 3/4"x1"x2·1/2". Cut a groove halfway
into each and epoxy them in place on the Bottom
Shock Strut wire. Fill the groove with putty or epoxy
glue. Carve and sand the balsa blocks to resemble
the leather boots. Smear a thin coat of epoxy glue
on the blocks. Sand smooth when dry. Finish as you do the rest of the landing
gear.
Airfoil Covers: (See drawing on plan plate 4) Four
molded plastic Bungee Cover halves are provided.
Trim each out leaving a small flange around the
outside. Notch the ends to fit over the L.G. wire.
Groove 1/4"x 1/2"x2·1/2" balsa sticks and epoxy
onto the wire. Shape the balsa pieces as needed to
slip the Cover halves over them. When right. epoxy the Covers together and to
the balsa and wire at the same time.
f.
Cut a 1" long piece of wire, about 1/16"
dia. or so, from left-over scrap pieces
you undoubtedly have in your
workshop. Form it into a shallow "V".
Bind and solder it into the bottom of the
Top Shock Strut. This serves as a hook
for wrapping the rubber bands around
both shock strut wires to as a shock
absorber. You can see this scrap wire
hook in the pictures under "Bungee
Cover Simulations".
g.
A single sheet of 3/16"x6"x7" balsa is
provided for fairing in the sides of the
Main Gear. Cut out a right and a left
fairing to fit between the 3/16" wires.
Note proper grain direction on the plan.
Epoxy the fairings in place and allow to
dry.

.
h. For maximum strength, we recommend that you completely cover the balsa
fairings with regular weight fiberglass cloth and slow-drying epoxy glue (applying
it like you did on the inside of the cowl). Lap the cloth past the edges of the
wood, completely around the 3/16" wires, and onto the back side of the fairings.
Sand smooth when dry.
i.
Set the completed landing gear in place on the fuselage. The wires are to be
held in the grooved blocks with the four Nylon Landing Gear Straps provided.
Notice in the next photo that the straps should be installed all the way to the ends
of the grooved blocks, right up against the wire where it exits the block. This is
done to insure that the landing gear cannot shift sideways in a rough landing.
To install the straps, first mark the hole locations.on the grooved blocks. Then use a 1/16" drill bit to drill a pilot hole in the
blocks. Next screw the straps in place using the #4x1/2" Sheet Metal Screws provided.
8.
Stabilizer And Elevators
Carefully cut all of the stabilizer "S" parts and the elevator "E" parts from the 3/8" printed balsa sheet #9. A jig saw works
best for cutting these out. Cut just outside the lines, leaving all of the line on the parts. When fitting into place in the
structure, use a sanding block to bring the edges of the parts to an exact fit.
Cover the plan with waxed paper or plastic wrap. Pin all of the parts to the plan, gluing them to each other in the following
order:
a.
Pin down the 3/8"x1/2" balsa stabilizer trailing edge.
b.
Add the 3/8"x1/2" balsa elevator leading edges and the 3/8" sq. spruce elevator joiner. Be careful not to glue these parts to
the stab trailing edge while gluing them to each other.
c.
Fit in Sl-A and Sl-B.
d.
Add printed parts S2, S3, S4, S5, S6, S7 and S8.
e.
Fit in E1, E6, and the 3/8" basswood elevator horn insert.
f.
Add printed parts E2, E3, E4, E5, E7, E8, E9 and E10.
g.
Cut to length and glue in all 1/4"x3/8" balsa ribs.
h.
Add 1/8"x1/4" balsa braces where called for on the plan.
i.
When dry, unpin from the plan. Carve and sand all the outside edges round - remember the tail surfaces on the full-size
Cub are constructed out of steel tubing, thus the leading and trailing edges are all perfectly round.
j.
Install the hinges where shown on the plan.
NOTE: Many modelers feel that the tail surfaces are easiest to cover before they are hinged. If you elect to do this, first
test assemble the tail surfaces on their hinges without glue, to insure that a good edge and end match has been obtained
in the sanding operation. Then refer to "Covering and Painting the Framework", section 19, and prepare all the tail
surfaces (except the fin) through the point of covering and applying at least 2 coats of clear dope. After that, epoxy in the
hinges permanently.
9.
Fin And Rudder
The fin and rudder are assembled over the plan in the same manner as the stab and elevators were.
a.
Pin the 3/8"x1/2" balsa Fin Trailing Edge and Rudder Leading Edge to the plan. Do not glue to each other.
b.
Add R1 and R2 printed pieces.
c.
Shape and install the 3/8"x5/8" balsa Fin Leading Edge and Rudder Trailing Edge.

.
d.
Add R3 and R4 printed pieces.
e.
Shape and install the 3/8"x5/8" balsa Rudder Bottom.
f.
Cut to length and glue in all 1/4"x3/8" balsa ribs.
g.
Add RG
-1, RG-2, and the 1/8"x1/4" balsa brace.
h.
When dry, unpin from the plan and sand the outside edges round.
i.
Inlet the bottom of the Rudder to accept the rudder horn. Epoxy the horn in place. Reinforce the installation with glass cloth
and epoxy glue.
j.
Install the hinges where shown on the plan.
Here are two photos of Hazel's full-scale Clipped Wing Cub as it looked when it came out of the restoration shop in 1969.

.
WING CONSTRUCTION
IMPORTANT NOTE: The wing is basically constructed in three separate sections - a flat Center Section, a Right Wing
Panel, and a Left Wing Panel. First you must construct the separate Right and Left Wing Panels by following all the
instructions up the "Center Section" (12). Assemble each panel over its own full size plan.
10.
Wing Panels
a.
Remove carefully all wing ribs from the die
-
cut sheets.
b.
Pin all WA, WI, W2, W3, W4 and W5 ribs together into one group for block
sanding. Put 1/4" sq. sticks in the spar slots to help hold alignment of the stack.
Sand lightly where needed to smooth up the stack. Don't forget to run the sanding
block along the trailing edges, as shown here, to make them all the same length.
Check the overall rib length against the Wing plan.
c.
Unpin all of the ribs except the WA, WI, W2, W3, and W4s. Leave them stacked
together and drill a 3/16" diameter hole vertically through the rib stack in the
location for the 1/16" wire aileron push rod to pass through (refer to the bellcrank
wing cross
-
section drawing).
d.
Pin the two 1/4" sq. Spruce Bottom Spars in place on the plan.
e.
Pin the 1/4" sq. balsa Bottom Rear Spar in place. Note that this spar is doubled in height between ribs WI to W4.
f.
Pin all of the wing ribs securely in place. Use a triangle to make sure that they are perpendicular to the board.
g.
Add the 1/4" square Spruce Top Spars. Glue all joints securely!
h.
Glue in the 1/16" Spar Webbing where indicated on the plan. A single piece of 1/16"x4-1/8"x30" balsa is provided for
making these. Note that the webs should be installed with the grain running vertically.
i.
Four pieces of 3/16"x4"x1-1/2" balsa are provided for making the Spar Webs that go in rib bays W1-W2 and W2-W3. The
grain direction of these webs is also vertical.
j.
Glue on the 1/8" x 7/8" balsa Leading Edge.
k.
When dry, unpin the wing from the
board. Carefully sand the 1/8" Leading
Edge flush with the bottom edges of the
ribs.
l.
Glue on the 3/32"x3" balsa Bottom
Leading Edge Sheeting. Be careful not
to induce a twist or warp into the
structure while pinning the sheeting in
place.
m.
Pin the 3/32"x1
-
1/2" balsa Bottom Trailing Edge Sheeting and 3/32"x1
-
1/2" Bottom Aileron Sheeting in place on the plan.

.
n.
Pin wing panel back in place on the plan, at the same time gluing it to the Bottom Trailing Edge and Aileron Sheeting.
o.
Add small riblet W3A. Be careful about exact location. Extend a line off of the die
-
cut slit in ribs W4 and W5 for alignment.
p.
Add die
-
cut plywood riblet W5A and balsa riblets W4A and W4B. Again be careful of exact positioning.
q.
Cut to length and glue in place the 5/16"x1-1/8" balsa Tapered T.E. stock. Fill-In
between the last two full length W4 ribs at the wingtip. Take down the top surface
with a small sanding block until it's flush with the tops of the ribs.
r.
Glue on the 3/32"x1-1/2" balsa Top Trailing Edge Sheeting. Epoxy glue is
recommended here for two reasons: First, it will have less tendancy to bow or
warp the trailing edge, than would a water
-base glue. Second, it gives you plenty
of time to get the top sheeting pinned down securely, absolutely flat on the board.
s.
Add the 3/32"x1
-1/2" balsa Top Aileron
Sheeting. Check the location carefully
with the aileron cross
-section drawings.
t.
Glue gusset WG-1 in place against rib
W3 and inside the trailing edge sheets.
u.
Carve and sand the 1/8" Leading Edge
flush with the tops of the ribs.
v.
Glue and pin in place the 3/32"x3" balsa
Top Leading Edge Sheeting. Also add
the sheeting that goes over ribs W1 and
W2 (cut from 3/32"x4"x36" stock).
w.
Cut to length and glue on all of the
3/32"x1/4" balsa Capstrips for the top of
the wing.
x.
After the wing has thoroughly dried, unpin it from the board and install the die
-cut plywood strut mounts FSM, RSM,and
JSM on the bottom.
y.
Sheet over the bottom of ribs W1 and W2 with 3/32" x 4" balsa. Leave a gap in
the sheeting where the die-cut ply Rear Dihedral Brace goes. It will be installed
later.
z.
Add all of the bottom Capstrips.
Do not block sand the wing panels yet!
11.
Wing Tips
a.
Glue die
-
cut balsa parts T
-
4, T
-
5, T
-
6 and W6 in place on the die
-
cut ply wingtip plate WTP.

.
b. Study the Wingtip Alignment Drawing carefully in preparation for gluing the Tip
Plate onto the end of the wing panel. Proper positioning of it against the W4 end
rib is important for correct assembly of the rest of the wingtip parts in subsequent
steps. First trial fit the Tip Plate assembly in place, noting that the tops of T-
4 and
T-5 should line up with the top of W4, not with the top of the capstrip. Also note
that the front edge of WTP should be flush with the front of the 1/8" balsa Leading
Edge. Use a straight edge to draw guidelines on the end rib to help line up the
Tip Plate. Then glue it on.
c. Glue die-cut balsa parts T-l and T-2 in
place. Note that they should line up with
the top and bottom edges of W4,
leaving room for the 3/32" balsa top and
bottom sheeting to be added later.
Since W4 was stack sanded with the
rest of the full-length wing ribs, and T-1
and T-2 were not, it may be necessary
to alter the curved sides of T-1 and T-2
to exactly the same curvature as W4,
before gluing them on.
d.
Glue on part T
-
3.
e.
1/16"x3/4"x24" balsa strips are provided for laminating around the edges of the
tip. Thanks to the large radius of the curve, it should not be necessary to soak the
strips in water before laminating - thus Jet, Hot Stuff, or other cyanacrylate
adhesives can be used. Carefully bend and glue the first strip to WTP. Add the
other strips, one at a time, firmly gluing them to each other without gaps.
f.
When the laminated edge is dry, sand flush with the front of the wing panel and
glue on the 3/8"x1" balsa Leading Edge Cap.
g.
Cut a small gusset, from scrap balsa, to go in the corner of the wingtip near the
trailing edge. Glue on the top side of WTP only.
h.
Sheet the top and bottom of the Tip Leading Edge with 3/32" balsa.
i.
Capstrip the top and bottom of rib W6.
j.
Carve and sand the wing Leading Edge
Cap and the tip laminated edge to
shape. Study the photos and drawings
carefully for guidance. Do not sand the
rest of the wing, especially the top and
bottom sheeting or capstrips, at this
time - it's best to wait until the center
section is done!
12.
Center Section
Join the Right Wing Panel plan to the center Section/Left Wing Panel plan, along line X-Y. It is recommended that you
have a building board at least 72" long for constructing the Center Section and joining the Wing Panels to it. Pin the plan to
the board and cover the center section with waxed paper.
a.
Cut 3/32"x4" sheet balsa to cover the bottom of the Center Section. Pin in place on the plan, being careful not to let the
ends of the sheeting extend past the side lines of the Center Section into the Wing Panel areas. Don't forget to cut the
window opening! And leave a small gap in the sheeting where the ply Rear Dihedral Brace will be installed later.

.
b.
Cut to length a 1/4"x3/8" balsa stick and glue it onto the front edge of the bottom sheeting.
c.
Pin all the 1/4" sq. balsa bottom spars, the two center WA ribs, and the WSP pieces in place. After you get these parts
squared up with each other, glue all the joints. When dry, sand the tops of the WSP pieces down flush with the tops of the
ribs.
d.
Glue the 1/4"x7/8"x16" ply Front Dihedral Brace onto the front of the ribs and the 1/4"x3/8" stick. Use 5-
minute epoxy. Make
sure the Brace is centered spanwise so that it will extend an equal distance into the Right and Left Wing Panels.
e.
In preparation for gluing the wing panels to the center section, first trial fit them without glue over the Front Dihedral Brace.
Do this with the center section still pinned to the board. The panels should slide on smoothly until they are snug up against
the center section bottom sheeting. The wingtips should be blocked up 1/2" at the last W4 rib for scale dihedral. Make any
slight alterations where necessary to allow the wing panels to fit properly to the center section. When satisfied that the
panels fit, glue them to the center section one at a time. Use slow-drying epoxy glue to allow yourself plenty of alignment
time. Follow these steps:
1. First coat the back side of the Front Dihedral Brace with glue.
2. Use a wire to thoroughly coat with glue the surface of the 3/16" spar webs that the brace will bond to inside the wing
panel.
3. Run a small bead of glue along the edge of the center section bottom sheeting.
4. Then slide the wing panel in place and pin securely.
5. Coat the adjoining WA rib with glue and pin it tightly against the panel's WI rib.
6.
Attach the opposite wing panel using the same procedure. Then let the entire wing assembly dry before continuing.
f. Glue in all 1/4" sq. balsa top spars.
g.
Add a 1/4"x 3/8" balsa stick on top of the
Front Dihedral Brace, along the front of
the WA ribs. Carve the excess down
flush with the tops of the ribs.
h.
Fill in between the WA ribs, where the
wing bolts will go through, with 5/16"x1
-
1/8" Tapered T.E. Stock. Carve or sand
down flush with the tops of the ribs.
i.
Glue on the 3/32"x2"x6
-
1/4" plywood Center Section T.E. Top Sheet.
j.
Cover the top of the Center Section with 3/32"x4" sheet balsa. When dry, unpin the wing from the plan.
k.
Working through the opening you left in
the bottom wing sheeting, use a razor
saw to slot the WA,WI, and W2 ribs just
in front of the rear spruce spars to
accept the die-cut plywood Rear
Dihedral Brace
l.
Epoxy the Brace to the spars. Glue 3/32"
sheet balsa in the gaps in the bottom
sheeting.

.
m. Carve and sand the trailing edges round. Carefully block sand the entire wing until all joints are smooth and even. Use as
large a block as possible to avoid sanding down anyone area too much.
13.
Cutting Out The Ailerons
a.
Locate the 1/4" sq. balsa Bottom Spar under the Top and Bottom Aileron Sheeting. Draw guidelines on both sheets about
1/32" behind the spar. Use a straight edge and a sharp knife to cut through the Aileron Sheeting along the guidelines. Make
sure you are not cutting into the spar.
b.
Take an X-Acto razor saw and pry the crimped metal backing off of the blade with a screwdriver. Insert the saw blade into
the slits just cut in the Aileron Sheeting and saw through each of the ribs of the aileron.
c.
Saw through the trailing edge and carefully remove the aileron.
d.
Trim and sand the back of the wing cutout until all ribs and planking are flush with the back of the balsa spar.
e.
Trim the aileron front in line with the rib angled die
-
cut slits. Use a sanding block to straighten the aileron front and ends.
f.
Glue 1/4"x1
-
1/2" balsa into the wing cutout and to the front of the aileron. Trim and sand these pieces to wing contour.
g.
With a razor saw, cut the base off one of the long nylon control horns that are supplied. Drill some random glue anchor
holes in the top area of the horn.
h.
Inlet the bottom leading edge of the aileron to allow the nylon horn to be slid in place alongside the plywood riblet W5A.
Refer to the aileron cross-
section drawing to see how far in the horn should be installed. Hold the horn in position and drill a
small pilot hole (for a #2x3/8" sheet metal screw) through one of the glue anchor holes and into the ply rib. Screw and epoxy
the horn securely in place.
i.
Fill in behind the horn, on the bottom of the aileron, with 3/32" sheet balsa. Sand flush. This will give you somewhere to
attach the covering material. If you wish to cover the ailerons before hinging, do it now.
j.
Cut slots in the aileron leading edge and the wing cutout to accept the nylon hinges. Use 4 hinges per aileronl Check the fit
and movement of the aileron by dry fitting it into the wing first without any glue on the hinges. If there is any mismatch or
binding, alter the slots as necessary to correct. Epoxy the hinges in. Repeat these steps to complete the other aileron.
14.
Mating The Wing To The Fuselage
a.
Epoxy the 3/8"x1-1/2"x5-3/8" basswood Wing Bolt Block in place. Brace it to the lite-ply Cabin Bulkhead with 1" triangular
balsa. Let dry.

.
b. Set the wing on the fuselage, sliding it
forward as far as possible. Mark and drill
a 5/32"x5/16" hole in the wing's Front
Dihedral Brace for the Cabin Wires to go
through. The wing should then slide all
the way forward with the trailing edge
dropping down in front of the T.E
Crosspiece. If necessary, adjust the hole
slightly with a rat-tail file to eliminate any
binding that keeps the wing from setting
flat on the cabin.
c.
Tape or pin the wing in correct alignment with the fuselage measure from the wingtip to the back end of the fuselage.
Determine the correct spots on the top of the wing to drill through and hit the Wing Bolt Block in the desired locations for the
nylon bolts. Drill through the wing and Wing Bolt Block at the same time with a No.7 drill. Take the wing off and tap the
Block with a 1/4-20 tap. Enlarge the holes in the wing to 1/4" diameter to pass the nylon bolts.
d.
Mark the locations for the 1/4" Dowels
that go in former F5 (see cross-section
F5). With the wing in place on the
fuselage, drill 1/4" diameter holes
completely through both F5 and the
wing's Front Dihedral Brace at the same
time. Remove the wing and epoxy the
dowels in place in F5. Wipe any excess
glue from the wing side of F5.
e.
1-3/4"x2-1/4"x2-1/2" balsa blocks are supplied for making the Cabin Blocks. Study the Front, Top, and Side views of the
Cabin Blocks on the fuselage plans. Trim the blocks supplied roughly to match these three viewpoints. Leave them slightly
oversize. Then glue them in place on the front of former F5. Sand and trim to match the contour of the wing.
15.
Wing Struts
Assembly of the wing struts requires the completed wing and fuselage.
a.
Locate the two 1/16"x1/2"x2" aluminum strips supplied for the Fuse Strut Fittings. Round all four corners of the strips with a
file or grinder, and drill three holes through each with a #33 drill bit (see plan for exact locations). Draw a line across the
middle of each strip. clamp it in a vise up to the line, and bend it to the angle shown.
b.
Mount the finished Fuse Strut Fittings in place on the bottom of the fuselage with 4-40 x 3/8" mounting bolts and blind nuts.
Epoxy the blind nuts on the inside of the fuselage.
c.
Two pieces of 1/16"x1-
3/16" (tapered) x 2" aluminum are supplied for making the Lower Strut Fittings. On each piece, round
the corners of the narrow end and drill a #33 hole in the location shown on the plan. Also drill several random glue anchor
holes along the sides where the spruce struts will be glued on.
d.
Mark the four notched 1/4"x1/2" spruce struts as to which two are Front and which two are Rear - there is a difference in
length (see plan). Taper the fuselage end of each Rear Strut so it will fit onto the brass Lower Fitting along with the Front
Strut. Epoxy one Front and one Rear Strut onto each of the aluminum Lower Strut Fittings - make two identical assemblies.
Work directly over the Wing Strut plan to insure that the angle between the struts will be correct.
/