Page is loading ...

Read All Instructions Carefully Before Beginning Installation.
BrassCraft’s Sure2Connect 1/4-turn valve features a push connect
inlet with a new patented verification technology. The Sure2Connect
valve is compatible with copper, CPVC and PEX and easy to install.
It requires no special tools, no measuring, marking, soldering or
glue for a watertight seal. Simply PUSH the valve onto the tube.
LOCK the verification clip into place. Once you hear the “click”,
your installation is DONE. It’s the connection you can see, hear
and feel when the valve is properly installed. Manufactured from
advanced engineered polymer, the Sure2Connect valve is corrosion
resistant to harsh chemicals and harsh water conditions. This
product also features 1/4 activation which means with a 90° turn
of the valve handle, you are able to stop or start the flow of water.
Sure2Connect valves are 100% leak tested.
INSTALLATION INSTRUCTIONS
Manufacturer assumes no responsibility for failure due to improper installation.
Be sure to shut off water before starting.
CAUTION: FOR USE WITH WATER IN ACCESSIBLE LOCATIONS ONLY.
CAUTION: DO NOT SWEAT WITHIN 12 INCHES OF A SURE2CONNECT 1/4 TURN
VALVE.
CAUTION: DO NOT USE SURE2CONNECT OR MULTI-TURN VALVES ON
RECIRCULATION SYSTEMS EXCEEDING 115˚ F.
CAUTION: DO NOT USE WITH CONNECTORS HAVING A
SOLID BRASS CONE
OR BULL NOSE DESIGN - FRACTURES CAN DEVELOP.
CAUTION:
VALVE MUST BE USED IN THE FULLY OPENED OR FULLY CLOSED POSITION.
CAUTION: OUTLET MUST BE CAPPED IF VALVE IS BEING USED AS A
TERMINATION POINT.
For Use with Copper, PEX, and CPVC only
1. Make sure that the tubing is cut square
and free from any damage including
dings, dents, and burrs, and free of
paint, putty or any other debris that
may prevent the connection from
sealing properly.
2. You will need a minimum of 2- 5/8 in.
of exposed tubing to accommodate the
valve and shallow escutcheon.
(Notes: 1-5/8 in. for valve, 1/2 IN. for shallow escutcheon, 1/2 in. for removal tool
= total minimum of 2-5/8 in. Adjust length for deeper Escutcheon).
3. Slide the ange onto the tube.
4. Push the valve onto the tubing until you
feel a strong resistance. Valve is properly
seated when you cannot push the valve
any further onto the tubing. A tube
support has been pre-installed for PEX
installations and will self-align with the
tubing. Although the tube support is not
required for copper and CPVC tubing, do
not remove it. The tube support will not
Sure2Connect® Shut-Off Valve
interfere with the installation.
5. Push down on the clip near the valve
inlet until it is ush with the valve body
and you hear it “click” into place. If the
clip does not fully engage, the valve
is not completely installed. Push the
valve farther onto the tube and retry
engaging the clip.
6. Attach the water connector to the
xture according to the manufacturer’s
instructions.
7. Make sure the valve is in the off position. Then, turn the main water supply back
on, and then re-open the valve.
Tools Needed For Installation:
•Tube Cutter •Reamer •Sandpaper •Deburring Tool •Adjustable Wrench
TO REMOVE:
1. Turn water system off and ensure system is depressurized. Remove supply line
and drain remaining water from tube. Rotate the valve until clip openings are
accessible.
2. Position the tips of the needle nose
pliers against the base of the clip and
gently squeeze and push up at the
same time until the clip disengages.
3. Position a 5/8 IN. open-ended wrench
or a removal tool (with the smooth
end against the removal collar) around
the tube. Place removal tool over the
pipe and use the tool to push the
removal collar toward the valve body
at the same time pulling valve body
off of pipe. Pushing the removal tool
toward valve will help release locking
mechanism.
Tools Needed For Removal:
• Needle Nose Pliers
• Removal Tool or 5/8 IN. open end wrench
Manufacturer assumes no responsibility for failure due to improper installation.
©2016 BrassCraft Mfg., Novi, MI 48375-5331 U.S.A. All Rights Reserved. www.brasscraft.com
Designed, Machined and Assembled in the U.S.A.
El fabricante no asume ninguna responsabilidad si la instalación no se hace de acuerdo al instructivo.
Todos los Derechos Reservados. Diseñado, Maquinado y Ensamblado en E.U.A.
425.05 Rev. 02/16
www.brasscraft.com
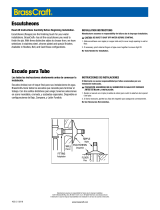
INSTALLATION INSTRUCTIONS (CONTINUED)
REMOVAL TOOL
REMOVAL COLLAR
/