Page is loading ...

22
Table of Contents
Page
1. Introduction ...................................................................................................................................................... 23
2. Explanation of Symbols ................................................................................................................................... 23
3. Intended Use .................................................................................................................................................... 24
4. Product Description .......................................................................................................................................... 24
5. Scope of Delivery ............................................................................................................................................. 25
6. Safety Information ............................................................................................................................................ 26
a) General Information ................................................................................................................................... 26
b) Before Commissioning .............................................................................................................................. 26
c) During Operation ....................................................................................................................................... 27
7. Notes on Batteries and Rechargeable Batteries ............................................................................................. 28
8. Preparations for Commissioning ..................................................................................................................... 29
a) Boat Rack Installation ................................................................................................................................ 29
b) Assembly of the Ballast Keel to the Bottom of the Boat ........................................................................... 29
c) Mounting the Rudder System .................................................................................................................... 30
d) Mounting the Receiver System ................................................................................................................. 32
e) Assembly of the Mast ................................................................................................................................ 33
f) Assembly of the Mast to the Body of the Boat .......................................................................................... 33
g) Assembly of the Head Sail ........................................................................................................................ 34
h) Assembly of Mainsail and Head Sail to the Mast ...................................................................................... 34
i) Tension Mast .............................................................................................................................................. 35
j) Install Steering Wheel ................................................................................................................................ 35
k) Cover of the Upper Deck ........................................................................................................................... 35
9. Operating the Model ........................................................................................................................................ 36
a) Inspecting the Control Functions ............................................................................................................... 36
b) Range Test ................................................................................................................................................. 37
c) The First Trip .............................................................................................................................................. 37
10. Angle of Attack of the Sail to the Wind ............................................................................................................ 38
11. The First Sailing Trip ........................................................................................................................................ 39
12. Maintenance and Care .................................................................................................................................... 40
13. Disposal ........................................................................................................................................................... 40
a) Product ....................................................................................................................................................... 40
b) Batteries and Rechargeable Batteries ...................................................................................................... 40
14. Technical Data ................................................................................................................................................. 41

23
1. Introduction
Dear Customer,
thank you for purchasing this product.
This product complies with the statutory national and European requirements.
To maintain this status and to ensure safe operation, you as the user must observe these operating instructions!
These operating instructions are part of this product. They contain important notes on commissioning
and handling. Also consider this if you pass on the product to any third party.
Therefore, retain these operating instructions for reference!
All company names and product names are trademarks of their respective owners. All rights reserved.
The spare parts list is located on our website www.conrad.com in the download section to the respective product.
Alternatively, you may also request the spare parts list on the phone.
If there are any technical questions, contact:
Germany: Tel. no.: +49 9604 / 40 88 80
Fax. no.: +49 9604 / 40 88 48
E-mail: [email protected]
Mon. to Thur. 8.00am to 4.30pm, Fri. 8.00am to 2.00pm

24
2. Explanation of Symbols
The symbol with the exclamation mark points out particular dangers associated with handling, function or
operation.
The „arrow“ symbol indicates special advice and operating information.
3. Intended Use
This product is a model sailing boat which is radio controlled by a remote control system to be purchased separately.
The model is designed for outdoor use and must only be used in fresh water with slight to moderate wind.
The remote control components must not get damp or wet.
This product is not a toy and not suitable for children under 14 years of age.
Observe all safety information in these operating instructions. They contain important information
on handling of the product.
You alone are responsible for the safe operation of the model!
4. Product Description
The model sailing boat „Triumph“ is a model designed for advanced boat model construction beginners. Completion
and later operation only require a little knowledge on the handling of model boats.
The agile model sailing boat is only partially suitable for model boat beginners!
The boat body has been produced completely in fibreglass-reinforced plastics. The decoration has already been
applied. In addition to the model, a receiver battery, matching charger, spare boat propeller and 2-channel remote
control must be purchased separately.
The user can control: Smooth control of the angle of attack of the sail and driving direction change. The required
control elements, such as sail winch and steering servo, are already installed in the model.
To make these operating instructions as beginner-friendly as possible, we consciously avoided sailing specialist terms
where possible.

25
5. Scope of Delivery
Before you start assembly, check the parts in the scope of delivery of your model.
• Boat body
• Boat rack
• Divisible mast
• Mainsail and head sail
• Ballast keel
• Small parts
• Operating instructions
A receiver battery, matching charger, spare boat propeller and 2-channel remote control must be purchased separately.
The matching batteries or rechargeable batteries are required for operation of the remote control transmitter.
You need tools like screwdrivers, small pliers, hexagon socket wrenches, threadlocker varnish, 5-minute epoxy resin,
silicone sealing mass and sizing grease to set up your model.
See our catalogues at www.conrad.com for tried and tested accessories.

26
6. Safety Information
In case of damage caused by non-compliance with these operating instructions, the warranty/
guarantee will expire. We do not assume any liability for consequential damage!
We do not assume any liability for damage to property or personal injury caused by improper use or
the failure to observe the safety instructions! In such cases the warranty/guarantee will expire.
Normal wear and tear and accident damage to the remote controls with water damage are also excluded
from the guarantee and warranty.
Dear Customer,
this safety information serves not only the safety of the product, but also your own safety and the safety of
other persons and animals in the area of operation. Therefore, read this chapter very carefully before taking
the product into operation!
a) General Information
Caution, important note!
Operating the model may cause damage to property and/or individuals. Therefore, make sure that you are
sufficiently insured when using the model, e.g. by taking out private liability insurance. If you already have
private liability insurance, verify whether or not operation of the model is covered by your insurance before
commissioning your model.
Note: Several EU countries prohibit operation of all model boats on certain bodies of water!
• The unauthorized conversion and/or modification of the product or its components is inadmissible for safety and
approval reasons (CE).
• This product is not a toy and not suitable for children under 14 years of age.
• The remote control components must not get damp or wet.
• The model is only suitable for use in fresh water.
• If you do not have sufficient knowledge on how to operate remote-controlled model boats yet, please contact an
experienced model sportsman or a model construction club.
• Do not leave packaging material unattended. It may become a dangerous toy for children.
• Should questions arise that are not answered by these operating instructions, contact us (for contact information,
see chapter 1) or another expert.
b) Before Commissioning
• Make sure that no other models are operated on the same channel (transmitter frequency) within the range of the
remote control (for remote control systems at 27 or 40 MHz remote control systems). Otherwise, you will lose control
of the remote-controlled models! For 2.4 GHz remote control systems, always check that concurrent operation of
two or more remote control systems in direct proximity is possible without interference.
• Regularly check the functional reliability of your model and the remote control system. Watch out for any visible
damage such as defective plug connections or damaged cables. All moving parts of the model must run smoothly
but should not have any play in their bearings.

27
• Charge the flight battery, which is necessary for operation, as well as the receiver battery that may be inserted in the
remote control according to the manufacturer’s instructions.
• If batteries are used as a transmitter power supply, make sure that they have sufficient remaining capacity (battery
checker). If the batteries are empty, always replace the complete set, never individual cells only.
• Before operation, always check the trim controller settings at the transmitter for the various steering directions and,
if necessary, adjust them.
• Always align the transmitter aerial so that the aerial tip points upwards as vertically as possible in the transmitter
position favoured by you to operate your model. Otherwise, the transmitter may not send its control signals as well
as possible, which may cause considerable reduction of the range.
c) During Operation
• Do not take any risks when operating the product! Your own safety and that of your environment are solely down to
you being responsible when dealing with the model.
• Improper operation may cause serious injury and property damage! Therefore, make sure that there is a sufficient
safety distance from any persons, animals or objects in operation.
• Select a suitable body of water to operate your model in. In doubt, ask the person responsible for the body of water
whether operation of your model is permitted there.
• The selected body of water must be free of climbers (e.g. seaweed) for operation of your model. There also must not
be any objects (e.g. branches) floating in the water.
• Observe currents and other detriment conditions in the selected body of water that may make operation of the model
difficult or even impossible. There is a danger of loss of the model!
• Drive your model only if your ability to respond is unrestricted. The influence of tiredness, alcohol or medication can
cause incorrect responses.
• Never drive right towards any swimming persons or animals.
• Never point the aerial of the transmitter directly at the model. This significantly impairs signal transmission to the
model.
• Never switch off the remote control (transmitter) while the model is in use. After a voyage, always disconnect the
receiver battery first or switch off the model. It is only after this that the remote control may be turned off.
• In case of a defect or a malfunction, remove the problem before using the model again.
• Never expose your model or the remote control to direct sunlight or excessive heat for an extended period of time.

28
7. Notes on Batteries and Rechargeable Batteries
• Keep batteries/rechargeable batteries out of the reach of children.
• Do not leave any batteries/rechargeable batteries lying around openly. There is a risk of batteries being swallowed
by children or pets. In this case, see a doctor immediately!
• Batteries/rechargeable batteries must never be short-circuited, disassembled or thrown into fire. There is a danger
of explosion!
• To charge the receiver battery, remove it from the model and place it on a fire-proof surface. Keep a distance from
flammable objects.
• As the charger as well as the battery heats up during the charging process, it is necessary to ensure sufficient
ventilation. Never cover the charger and the battery!
• Never charge rechargeable batteries unattended.
• Do not expose the charger or battery to high/low temperatures or to direct solar radiation.
• Chargers may only be operated in dry rooms. Chargers and rechargeable batteries must not get damp or wet.
• When dealing with rechargeable batteries, observe the specific safety information of the manufacturer!
• Remove the battery from the charger when it is fully charged.
• Leaking or damaged batteries/rechargeable batteries can cause chemical burns to skin at contact; therefore, use
suitable protective gloves.
Liquids leaking from batteries/rechargeable batteries are chemically highly aggressive. Objects or surfaces that
come into contact with them may take severe damage. Therefore, keep batteries/rechargeable batteries in a suitable
location.
• Do not recharge normal batteries. There is a risk of fire and explosion! Only charge rechargeable batteries intended
for this purpose. Use suitable battery chargers.
• When inserting batteries/rechargeable batteries or when connecting a receiver battery in the sailing boat model,
observe correct polarity (note plus/+ and minus/-).
• If the device is not used for an extended period of time (e.g. storage), remove the inserted batteries (or rechargeable
batteries) from the remote control to avoid damage from leaking batteries/rechargeable batteries. Also remove the
receiver battery from the sailing boat model.
• Recharge the NiMH batteries about every 3 months. Otherwise, so-called deep discharge may result, rendering the
rechargeable batteries useless.
• Always replace the entire set of batteries or rechargeable batteries. Never mix fully charged batteries/rechargeable
batteries with partially discharged ones. Always use batteries or rechargeable batteries of the same type and
manufacturer.
• Never mix batteries and rechargeable batteries!
• Observe the rated voltage of the receiver battery when choosing one. Both the sail winch and the steering servo are
only designed for an operating voltage of 4.8 to 6 V.

29
8. Preparations for Commissioning
The model boat „Triumph“ is delivered almost ready for operation. Only a few steps, such as installation of
the receiver system and assembly of ballast keel, mast and sail, are required for commissioning.
Before completing the model or taking it into operation, read each section carefully. The construction stages
are almost always illustrated for better understanding.
Please note that the numbers in the text always refer to the components in the illustration to the right.
Only carry out the steps described in the different sections once you have completely understood the procedure
and know exactly what to observe.
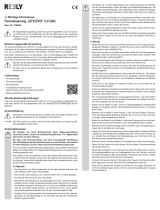
a) Boat Rack Assembly
The scope of delivery includes a boat rack of plastic
parts that has to be assembled before first use.
Assemble the boat rack of the four bases, the two
transverse struts and the two side parts as shown in
figure 1.
b) Assembly of the Ballast Keel to the Bottom of the Boat
Figure 2a shows the keel (1) and the ballast (2) and a
washer plus M3 nut for attachment of the ballast keel
(3).
Push the ballast onto the keel and attach it to the keel
with a washer and M3 nut. The keel can be placed on
the ballast in one position only due to a tab.
Figure 1
Figure 2a

30
Install the keel with installed ballast to the boat body
from below as shown in figure 2b.
Attach the keel to the boat fuselage with a washer and
M4 nut as shown in figure 2c.
Ensure good attachment of keel and ballast. The
attachment nuts must be secured against coming loose
with a drop of threadlocker varnish.
Check before each run if the indicated attachment nuts
fit tightly.
To seal the boat body, the area where the keel is
inserted must be sealed with silicone sealing mass
(figure 2b, dashed line).
c) Mounting the Rudder System
Figure 3a shows symbols for the rudder (1) and the
rudder linkage lever (2), as well as the servo linkage
lever (3).
During the following assembly of the rudder system,
observe the correct, rectangular alignment of the linage
levers to the neutral rudder as shown.
Push the rudder with the rods into the body of the boat
from below as shown in figure 3b. Put a little sizing
grease into the guide tube for sealing.
Figure 2b
Figure 2c
Figure 3a
Figure 3b

31
Attach the „Z“ of the linage rod to the rudder linkage
lever (figure 3c, item 1).
Place the rudder linkage lever on the rudder linkage as
shown in figure 3c.
Figure 3d shows the steering servo (1), linkage rod (2)
and rod connection (3).
Align the rudder, rudder linkage lever and servo linkage
lever (see figure 3d) as shown in figure 3a.
Attach the rudder linage lever to the rudder rods with a
shortened hexagon socket wrench (figure 3c, item 2).
Shorten the linkage rods at the rod connection (figure
3d, item 3) so that the linkage is possible as shown in
figure 3a.
Then close the opening of the rudder linage lever with
the transparent lid so that the writing can be read from
behind. Please also observe figure 12 in these
operating instructions.
Figure 3d
Figure 3c

32
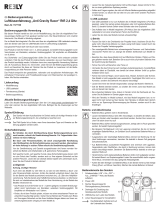
d) Mounting the Receiver System
Figure 4 shows the receiver battery (1), receiver (2),
receiver aerial, the on/off switch and symbolically (since
it is covered by the fuselage) the steering servo.
The scope of delivery already includes a battery box.
You can insert four rechargeable batteries or batteries
of the size AA/mignon here. Then the battery box is
inserted in a prefabricated hole of the plastic plate in
the location shown in figure 4.
Figure 4, item 2 shows a possible installation site for
the remote control receiver. The receiver can be
attached with double-sided adhesive tape (servo tape)
or a cable tie.
The receiver aerial (3) can be attached, e.g. with a small piece of Bowden tube near the receiver of a 2.4 GHz remote
control so that the last three centimetres of the aerial point straight up. The receiver aerials for remote controls with
27 or 40 MHz are much longer. For secure reception, they must be guided outside and attached to the mast.
Important!
The remote control range may be reduced drastically if the receiver aerial is not placed correctly (e.g. if the
aerial is only in the boat’s body). In this case, the model can no longer be controlled. Check that the receiver
aerial is placed correctly before every operation.
Figure 4, item 4 shows the installation site of the on/off switch. This switch switches the receiver system on and off.
Connect the cable of the on/off switch and the connection cable from the steering wheel and sail winch to the battery
connection of the receiver. For notes on correct connection, see the operating instructions of the remote control.
The correct function of the sail winch and steering servo is described in the chapter „Model Commissioning“.
The rubber shown in figure 4 right next to the on/off switch serves to hold the canopy cover on the upper
deck and was removed for taking pictures of the canopy cover.
Figure 4

33
e) Installing the Mast
The mast has two parts and must be assembled before installation on the deck of the boat. You can glue the two parts
together firmly (recommended) or leave them pluggable for transport reasons.
Push the sleeve (1) onto the lower part of the mast (2)
up to about its half.
Now push the upper mast (4) with adapter (3) onto the
lower part of the mast firmly.
For reasons of stability, we recommend reinforcing the
plug connection between the two mast parts by adding
a little 5-minute epoxy resin in this work step.
f) Assembly of the Mast to the Body of the Boat
Install the mast to the upper deck at the middle hole of
the mast holder with an M2 screw and M2 nut as shown
in figure 6, item 1.
The nut must be secured against coming loose with a
drop of threadlocker varnish.
Attach the transverse beam (2) of the mainsail (called
a „boom“ in sailing) to the mast with an M2 screw and
M2 nut (figure 6, item 3).
This nut also must be secured against coming loose
with a drop of threadlocker varnish.
Hook the rope of the „boom“ into the formed part of the
mast base (4) and lock it. Tension the rope with a
tensioner so that the rope pulls the „boom“ down slightly.
To be able to control the angle of attack of the mainsail,
the „boom“ must be connected to the control line of the
sail winch as shown in figure 7, item 1.
Figure 6
Figure 5
Figure 7

34
g) Mounting the Head Sail
Install the head sail to the boat deck with rope and hook
as shown in figure 8, item 2.
Attach the control rope to the „boom“ of the headsail
as shown in figure 8, item 1. This controls the angle of
attack of the sail (as in the mainsail).
h) Assembly of Mainsail and Head Sail to the Mast
Attach the tensioning rope of the mainsail to the „mast
top“ of the mast as shown in figure 9, item 1.
Attach the tensioning rope of the head sail to the „mast
top“ of the mast as shown in figure 9, item 2.
After the mast is tensioned (see the following chapter
„Tensioning the Mast“), the tensioners of the mainsail
(3) and head sail (4) have to pull the sails up tensely.
Figure 8
Figure 9

35
i) Tension Mast
As shown in figure 10, each tension rope is already
applied with a number ex works.
Figure 11 shows where the rope has to be attached
(e.g. rope with number 3 to position 3 at the fuselage).
Once all ropes are attached to the correct position and
closed correctly, all ropes must be tensioned with the
integrated tensioners so that the mast will not bend in
any direction while the sail that catches the wind in
operation cannot tip or twist in one direction.
After the mast is tensioned, the tensioners of the
mainsail and head sail have to pull the sails up tensely.
j) Install Steering Wheel
The scope of delivery includes a double steering wheel
(1). This steering wheel must be pushed into the
prefabricated holes in the boat deck and glued on there
with a little 5-minute epoxy resin.
k) Cover of the Upper Deck
The boat body is open in the cabin area for installation of the receiver system and can be closed with a matching cover
by rubber band.
Attention!
Never drive with the boat deck open. For use with high waves and/or slants, the cover additionally needs to
be sealed with a few strips of transparent adhesive tape.
Figure 10
Figure 11
Figure 12

36
9. Operating the Model
a) Inspecting the Control Functions
After switching on the transmitter and pushing the on/off switch in the model, your model is ready for operation.
The sail winch should not start up or hum at this moment.
Figure 13
Check the rudder linkage.
Operate the steering lever for steering (figure 13, two upper image series). Steering to the left must cause the rudder
(viewed from behind in driving direction) to swivel to the left as well.
If this is not the case, you need to select the steering servo reverse function at the transmitter (see operating instructions
of the remote control).
If the steering wheel for the steering function at the transmitter as well as the trimming for it are in the neutral position,
the rudder must be placed centrally.
Otherwise, the trimming at the transmitter must be adjusted accordingly (see operating instructions of the remote
control).
Alternatively, or if transmitter trimming is no longer sufficient, you need to readjust the linkage with the control wheel in
the neutral position and neutral trimming by loosening the screws at the rudder linkage lever (figure 1, item 3).

37
Check the function of the sail winch.
The control lever of the transmitter (figure 13, two lower image series) can be set used to smoothly adjust the angle of
attack of the sails. If you move the control lever forward (away from the body), the sail winch must turn counterclockwise
(to the left). In this case, the control ropes of the mainsail and head sail are „extended“ and the possible angle of attack
of the sails enlarged.
If the rope is not running counter-clockwise in this test, you need to operate the reverse function for the rope winch at
your transmitter. For this, observe the operating instructions for the remote control system.
If the control lever is pulled backward (towards the body), the rope winch has to turn clockwise and „shorten“ the
control ropes. This shortens the possible angle of attack of the sails.
Attention!
The rope winch, like the steering servo, for example, reacts proportionally to the control signals of the transmitter
but with a much larger control path than conventional servos. The reel is controlled by several turns here.
This may, however, cause the control lines to either block and possibly even tear, or to jump out at the
deflector pulleys. Therefore, we recommend practising sail adjustment on land before first operation.
b) Range Test
Before first use, the receiver battery and any rechargeable batteries used in the transmitter have to be charged
according to the manufacturer’s instructions.
Perform a range test of the remote control system first. Switch on the remote control and then the receiver. Now check
the range of your remote control with a helper, by having the helper hold the operational model ship and you moving
away from the model. Control must work interference-free at least at a distance of 50 metres.
c) The First Trip
Pick a day with slight wind for your first trip. The body of water that you use must be deep enough for the
ballast not to touch the ground anywhere. You should be able to sail as close to the banks as possible.
Check the correct function of the remote control system. All ropes must be inspected for correct seat or tension. The
boat deck must be closed with the cover and additionally sealed with a few strips of transparent adhesive tape at rough
operation (e.g. high waves).
Sailing with model boats requires practise. Be patient. When performing any manoeuvres, observe that you have no
motor and can only return to the banks by wind power.
For more information on sailing manoeuvres, see the corresponding specialist literature or the internet.
Carefully and horizontally put the model on the water. Observe that the ballast keel has no ground contact and the
boat can move freely. The wind should ideally blow into the sails from behind.
Move the control lever for the rope winch carefully so that the sails have a low angle of attack. Give the boat a gentle
push in the direction in which you want it to go. The model starts to drive forward. Turning the remote control steering
wheel to the left or right will cause your model to turn in the respective direction.
For more manoeuvres, see the following chapters „Angle of Attack of the Sails to the Wind“ and „The First Sailing Trip“.

38
At the end of your trip, return to the banks with the corresponding manoeuvres. Open the cabin cover, switch off the
receiver power supply, then switch off the transmitter and check if any water has entered the model. Ingressing water
must be removed at once. Observe that the water does not enter the receiver system during emptying.
Water may enter through the rudder system or the keel attachment. Low water volumes entering (max.
approx. 10 ml per trip) is normal; it must be emptied after every trip.
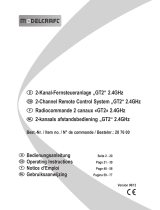
10. Angle of Attack of the Sail to the Wind
The angle of the sails to the longitudinal direction of the boat is adjusted by coiling and uncoiling the control ropes.
Since the sail should be trimmed with the perfect angle of attack to the wind for best, fastest operation, observe figure
14 and the table for orientation.
Example: Wind blows at an angle of about 40° to the longitudinal direction of the boat: The best sail position to the
longitudinal direction of the boat in this case is about 15°.
Wind Angle of attack
40° 15°
60° 25°
100° 50°
40° 70°
180° 90°
Figure 14

39
11. The First Sailing Trip
Figure 15 briefly explains the basics of sailing manoeuvres for a square
trip in a few brief words. The information in chapter 10 is also helpful.
Start in point A at about 45° side wind (for wind direction, see arrow).
The rudder is set to neutral. The angle of attack of the sails is about
20° (figure 15, item 1).
Just before you turn to the left by 90° at turning point B, you need to
slowly „pull“ the sails (reduce the angle to the longitudinal axis of the
boat). The rudder is still set to neutral (figure 15, item 2).
If the sails start fluttering slightly when „pulling in“, the sails must not
be pulled in any further (rope winch stop). Initiate the 90° turn with
the rudder.
Once the longitudinal axis of the boat is aligned in the direction of
point C (figure 15, item 3), set the rudder back to neutral. For best
sailing performance, you can enlarge the angle of attack of the sails
a little again until the next turn (open sails again).
Just before you turn to the left by 90° at turning point C, you need to
slowly „pull“ the sails (reduce the angle to the longitudinal axis of the
boat). The rudder is still set to neutral (figure 15, item 4).
If the sails start fluttering slightly when „pulling in“, the sails must not be pulled in any further (rope winch stop). Initiate
the 90° turn with the rudder.
Once the longitudinal axis of the boat is aligned (laterally offset) in the direction of point A (figure 15, item 5), set the
rudder back to neutral. For best sailing performance, you can enlarge the angle of attack of the sails a little again until
the next turn (open sails again). Make sure that the sails do not break in or flutter.
To return to the starting point A, you need to drive „into the wind“ at a zigzag. It is important that the sails are only
opened enough not to drop or flutter (figure 15, items 6 and 7).
Figure 15

40
12. Maintenance and Care
Regularly check the rudder system and the control functions of the electronics of your model. All moving parts have to
be easily movable but there should not be any clearance in the bearing.
The outside of the model should only be cleaned with a soft, moistened cloth. Never use aggressive cleaning agents
or chemical solvents, since this might damage the surfaces.
Important!
If you have to replace any damaged or worn parts, only use original replacement parts.
Damage to the boat’s body should only be repaired with suitable instant glue that is also suitable for fibreglass-
reinforced plastics but not water-soluble. We recommend 5-minute epoxy glue.
The spare parts list is located on our website www.conrad.com in the download section for the respective product.
You can also order the replacement parts list by phone. For contact information, please refer to chapter „Introduction“
at the beginning of these operating instructions.
13. Disposal
a) Product
Dispose of the product according to the applicable statutory provisions at the end of its service life.
b) Batteries and Rechargeable Batteries
You as the end user are required by law (Battery Ordinance) to return all used batteries/rechargeable batteries. Disposing
of them in the household waste is prohibited!
Batteries/rechargeable batteries that contain any hazardous substances are labelled with the adjacent icon
to indicate that disposal in domestic waste is forbidden. The descriptions for the respective heavy metals
are: Cd=cadmium, Hg=mercury, Pb=lead (the names are indicated on the battery/rechargeable battery e.g.
below the rubbish bin symbol shown on the left).
You may return used batteries/rechargeable batteries free of charge at the official collection points of your community,
in our stores, or wherever batteries/rechargeable batteries are sold.
You thus fulfil your statutory obligations and contribute to the protection of the environment.

41
14. Technical Data
Boat’s body length ............................................... 800 mm
Width.................................................................... 180 mm
Height .................................................................. 1500 mm
Sail area .............................................................. 2500 cm²
Weight ready to run ............................................. as of 1700 g
Control ................................................................. 2 channels (left/right; sail winch)
Operating voltage servo/sail winch ..................... 4.8 to 6.0 V/DC
Low deviations in dimensions and weight are due to production technical reasons.
/