Installation information
17
Climate class
The appliance is designed for use within
a certain climate range (ambient tem-
peratures) and should not be used out-
side this range. The climate range of the
appliance is stated on the data plate in-
side the appliance.
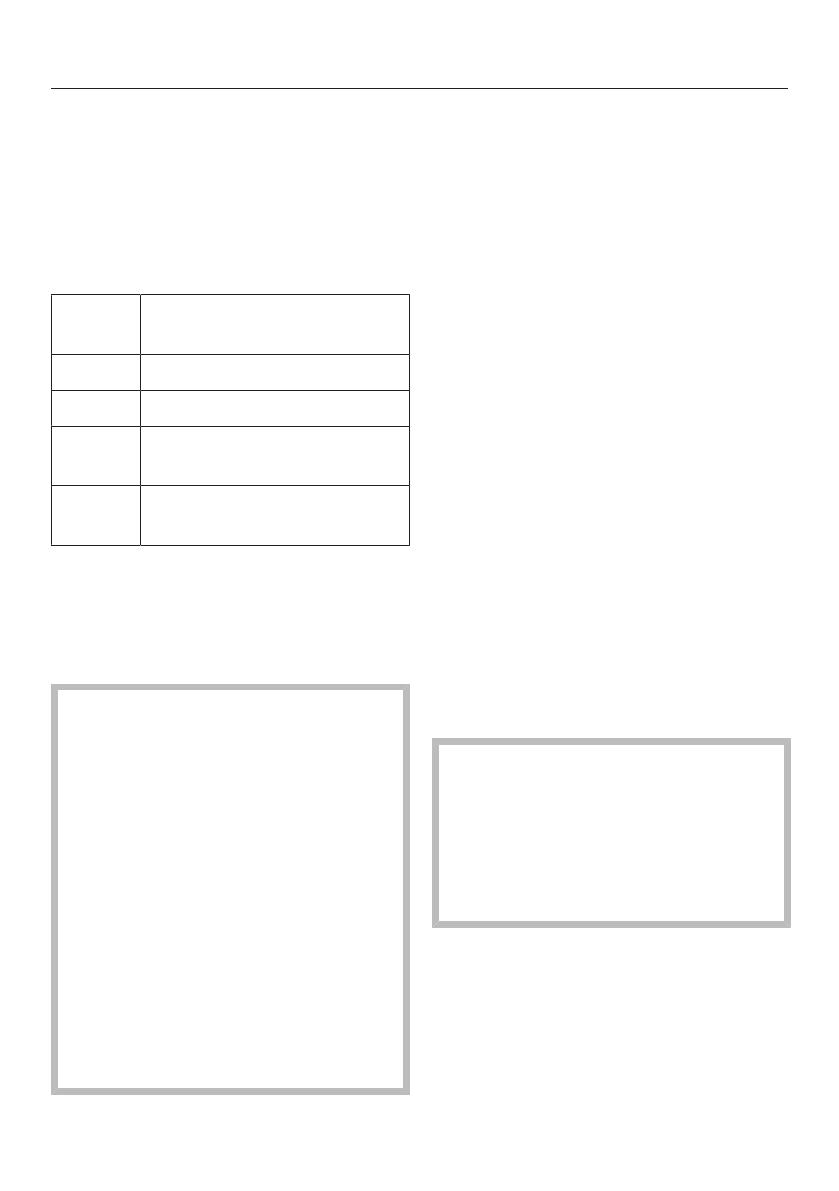
Climate
class
Room temperature
SN 50°F to 90°F / 10°C to 32°C
N 60°F to 90°F / 16°C to 32°C
ST 60°F to 100°F / 16°C to
38°C
T 60°F to 109°F / 16°C to
43°C
Operating in a room which is too cold
will cause the compressor to turn off for
too long, causing the internal tempera-
ture in the appliance to rise, resulting in
damage.
Risk of damage. In environ-
ments with high humidity, conden-
sation may appear on the external
surfaces of the appliance.
This condensate can cause corrosion
on external appliance panels.
To prevent this, it is advisable to in-
stall the appliance with sufficient
ventilation in a dry and/or air-condi-
tioned room.
After installation, make sure that the
appliance door closes properly, the
air vents are not covered and that
the appliance has been installed in
accordance with these installation in-
structions.
Installation notes
Load-bearing capacity of the niche
floor
The floor of the space where the appli-
ance is to be installed must be flat and
level.
It must be made from strong, rigid ma-
terial.
The appliance is extremely heavy when
fully loaded, and the floor it stands on
must be able to bear its weight. If nec-
essary, seek the advice of an architect
or structural engineer.
When fully loaded, the weight of the ap-
pliance is about:
KF 2801 SF, KF 2811 SF 906 lbs
(411 kg)
KF 2901 SF, KF 2911 SF 1069 lbs
(485 kg)
Door hinging
The appliance is supplied with a
fixed hinge. If you need to change
the door hinging to the other side,
please contact the Miele Technical
Service.
On no account should you attempt
to change the door hinging yourself.
Adjoining cabinetry/units
The appliance is screwed to the adjoin-
ing cabinetry/units to the side and
above. For this reason, it is essential
that all cabinets/units are fixed to the
ground and/or wall.


