GTS INSTALLATION INSTRUCTION
PB-9703 Rev0 – 12-1-22
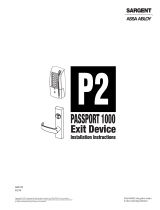
LEFT WIRE
CHASE RIGHT WIRE
CHASE
LH/LHR
LATCH
DIRECTION
LATCH
DIRECTION
RH/RHR
LEFT WIRE
CHASE RIGHT WIRE
CHASE
LH/LHR
LATCH
DIRECTION
LATCH
DIRECTION
RH/RHR
6. INSTALL INSIDE ESCUTCHEON,
BATTERIES, AND COVER
• Install inside escutcheon.
• Secure with (2) pan head screws.
• Install batteries and battery cover with flat head
screw.
▪ Install inside lever and secure with dog point set
screw.
5. INSTALL READER
ASSEMBLY
• Install housing from outside of door
• Route wires through door
• Do not pinch wires
• Secure with (2) flat head screws
• Reinstall LCM on backplate
BATTERY
COVER
INSIDE
LEVER
BATTERY
COVER
INSIDE
LEVER
HANDING INSTRUCTIONS
AS REQUIRED, ROTATE INSIDE ROSE
PLATE AND CHASSIS TO MATCH HAND OF
DOOR.
TO ROTATE CHASSIS:
1. Remove rose plate mounting screws, then
rose plate.
2. Unplug motor connector. Feed motor
connector and
wire back through wire chase slot.
3. Rotate chassis 1/2 turn (180°) maximum.
4. Feed motor connector and wire forward
through wire chase slot on other side.
Re-connect motor connector.
5. Rotate rose plate to index with chassis.
(Arrows point to latch bolt edge of door.)
6. Install rose plate, secure with mounting
screws.
READER
ASSEMBLY
FLAT HEAD
SCREWS
READER
WIRE
READER
ASSEMBLY
FLAT HEAD
SCREWS
READER
WIRE