ABBA LIGHTING UNS04 Installation guide

Type
Installation guide

ABBA LIGHTING UNS04 is a versatile outdoor lighting fixture designed to enhance your outdoor spaces with beautiful illumination. Its low voltage (12V AC/DC) operation ensures safe and energy-efficient use, making it ideal for various outdoor applications. With its durable construction and easy installation process, the UNS04 is perfect for illuminating pathways, gardens, patios, and other outdoor areas. The fixture's adjustable top allows for easy lamp replacement, adding to its user-friendly design.

ABBA LIGHTING UNS04 is a versatile outdoor lighting fixture designed to enhance your outdoor spaces with beautiful illumination. Its low voltage (12V AC/DC) operation ensures safe and energy-efficient use, making it ideal for various outdoor applications. With its durable construction and easy installation process, the UNS04 is perfect for illuminating pathways, gardens, patios, and other outdoor areas. The fixture's adjustable top allows for easy lamp replacement, adding to its user-friendly design.

UNS04
www.ABBALightingUSA.com
INSTALLATION GUIDE
IMPORTANT SAFETY INSTRUCTIONS
LIGHTEN LAMP IS HOT!
WARNING: TO REDUCE THE RISK OF FIRE OR INJURY TO PERSONS:
Please exercise caution when using the lamp, as it tends to HEAT up rapidly.
We recommend taking necessary safety measures to ensure optimal usage.
For your safety, please refrain from touching the HOT lens, guard, or enclosure.
We recommend waiting for the product to cool down before handling it.
To prevent any fire hazards, please ensure that the lamp is kept away from
materials that may easily catch fire. We appreciate your cooperation in
maintaining a safe and secure environment.
RATED VOLTAGE 12V AC/DC
Congratulations on your purchase of this high-quality product! We want to ensure
that you have the best possible experience with it, so we kindly ask that you take a
moment to carefully read and follow all instructions before assembly, installation,
and use. By doing so, you'll not only guarantee correct function and safety, but also
optimize the full potential of this exceptional product. Thank you for choosing us as
your trusted provider of top-notch products - we truly appreciate your business!
WARRANTY
We stand behind the quality of our product and offer a 2-year warranty from the date of purchase.
Please note that the warranty is valid from the date of purchase, not from the date of installation.
Kindly ensure that you keep the proof of purchase as it will be required for any warranty claims.
Warranty will be void if there is any damage due to improper usage or
modification to the fixture.
Failure to comply with the instruction in this manual may increase the risk of
damage or injury and will void warranty.
For safety reasons, we recommend that only a qualified professional install
this electrical product.
Before attempting to install this unit, ensure all power connections are off for
your own safety.
www.ABBALightingUSA.com
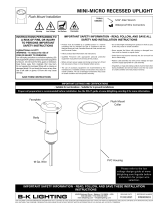
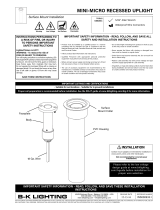
Do not instal within 10 feet of a pool, spa or fountain
CAUTION:
Fixture(s) must be installed in accordance with all local codes and ordinances.
INSTALLATION INSTRUCTION
To ensure optimal performance and safety, it is
important to use our fixtures ONLY with a low voltage
landscape transformer. This transformer reduces the
voltage from 120V to 12V, making it safe and suitable
for outdoor use.
When installing the fixture(s), please follow these
instructions carefully:
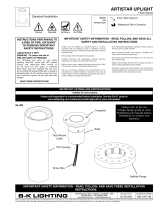
1.Before installation, please ensure that
the power is turned off for your safety.
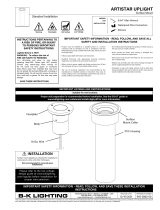
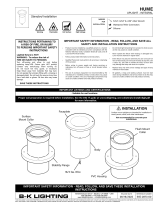
2.Take a moment to examine the fixture and identify
the casing that encloses it. Gently lift the casing
away from the fixture.
3.Observe the upper portion of the fixture. Rotate the
top part in a counter-clockwise direction. Maintain a
steady force while turning, allowing the fasteners to
release.
4.Locate the socket where the lamp will be inserted.
Align the lamp's base or pins with the corresponding
slot in the socket. Gently push the lamp into the
socket, ensuring a secure and snug fit.
5.Carefully position the top part of the fixture above
the lower part aligning the groove. Turn in a clockwise
motion until you feel the top part properly engaging
with the lower part until it is securely fastened.
Gently push or slide the casing onto the fixture,
maintaining even pressure.
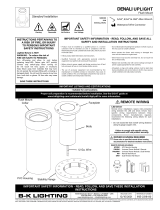
6. Select a suitable spot where you intend to dig the
hole, considering factors such as purpose,
accessibility, and any relevant guidelines or
regulations. Gradually dig deeper, removing the
loosened soil. Calculate the approximate volume of
pea gravel or sand required to fill the cleared space,
taking into account the 3-inch clearance on all sides.
Inspect the hole and surrounding area to ensure that
the depth, width, and clearance meet the specified
requirements.
www.ABBALightingUSA.com
7. Using a suitable main cable connector for direct
burial, attach the fixture(s) wires. We recommend
using WN12 waterproof wire nuts (sold separately)
for optimal connectivity.
8.To install the fixture in the hole and ensure proper
water drainage by filling the extra space with pea
gravel or sand, please follow these instructions:
Step 1: Prepare the fixture for installation:
a. Make sure the fixture is clean and free from any
debris or obstructions.
b. Ensure that any necessary electrical connections
have been made or are ready to be connected.
Step 2: Position the fixture in the hole:
a. Carefully lower the fixture into the hole, aligning it
with the opening and ensuring it sits securely.
b. Adjust the position of the fixture as needed to
ensure proper orientation and alignment with any
mounting or connection points.
Step 3: Fill the extra space with pea gravel or sand:
a. Take the pea gravel or sand that you have prepared
for filling the extra space.
b. Begin pouring or distributing the pea gravel or
sand around the sides of the fixture, allowing it to fill
the space between the fixture and the hole.
c. Use a shovel or similar tool to gently pack the pea
gravel or sand, ensuring it settles evenly and
provides stable support.
Step 4: Verify the completed installation:
a. Inspect the fixture to confirm that it is securely
positioned in the hole.
www.ABBALightingUSA.com
b. Check that the pea gravel or sand fills the extra
space adequately, providing proper drainage around
the fixture.
c. Ensure that the fixture remains level and stable
after the installation.
Step 5: Test the water drainage:
a. Pour a small amount of water near the fixture or
use a hose to simulate water flow.
b. Observe the drainage around the fixture and
ensure that water flows away from the fixture as
intended.
c. Make any necessary adjustments to the pea gravel
or sand to optimize water drainage if needed.
Once the fixture(s) are securely installed, turn on the
power and enjoy the enhanced lighting experience!
We strongly recommend that the main cable from the
transformer be buried underground for safety
reasons. Additionally, please be sure to avoid
exceeding the maximum wattage on the fixture(s) to
prevent any damage or hazards.
3" Gravel
3" Gravel
Both sides
Below
Concrete
Main line
WN12
(Sold separately)
3" Gravel
3" Gravel
Both sides
Below
Soil
Main line
WN12
(Sold separately)
3.43
2.66
5.12
3.47
2.48
3.44
CASING
FIXTURE
  • Page 1 1
  • Page 2 2
  • Page 3 3
  • Page 4 4

ABBA LIGHTING UNS04 Installation guide

Type
Installation guide

ABBA LIGHTING UNS04 is a versatile outdoor lighting fixture designed to enhance your outdoor spaces with beautiful illumination. Its low voltage (12V AC/DC) operation ensures safe and energy-efficient use, making it ideal for various outdoor applications. With its durable construction and easy installation process, the UNS04 is perfect for illuminating pathways, gardens, patios, and other outdoor areas. The fixture's adjustable top allows for easy lamp replacement, adding to its user-friendly design.

Ask a question and I''ll find the answer in the document

Finding information in a document is now easier with AI