Page is loading ...

Cordex Controller
Panel Mount/Rack Mount
125/220Vdc
018-570-B2

Argus Technologies Ltd. Visit www.argus.ca
Burnaby, British Columbia. Telephone: 604 436 5900 Fax: 604 436 1233
Argus Technologies reserves the right to make changes to the products and information contained in this document without notice.
Copyright 2008 Argus Technologies Ltd. Argus
®
is a registered trademark of Argus Technologies Ltd. All Rights Reserved.
Printed in Canada.
This page intentionally left blank.

Argus Technologies Ltd. 018-570-B2 Rev C
Printed in Canada. © 2005 Argus Technologies Ltd. ARGUS and CORDEX are trademarks of Argus Technologies Ltd. All Rights Reserved.
Cordex Controller
Panel Mount/Rack Mount
125/220Vdc
018-570-B2
The following documents and drawings are included in this manual to provide the necessary information required for routine
installation of the unit:
• Specifications: 018-570-B1
• CSA/NRTL Equivalence: 048-554-10
• Important Safety Instructions and Installation: 018-570-C0
• Outline Drawings: 018-570-06
• Customer Connections: 018-570-08
• Warranty and Service Information: 048-700-10
• Service Centers: 048-693-10

This page intentionally left blank.

Specifications for Argus’ Cordex Controller Panel/Rack Mount 125/220Vdc
Argus Technologies Ltd. 018-570-B1 Rev B WC
Printed in Canada. © 2005 Argus Technologies Ltd. ARGUS and CORDEX are trademarks of Argus Technologies Ltd. All Rights Reserved. Page 1 of 3
Basic Unit
Input Voltage: 90 to 300Vdc within rated limits
MTBF: 472,000 @ 25°C (77°F)
EMC: The unit meets requirements of:
ICES-003 Class A
EN 55022 Class A (CISPR 22)
EN 61000-4-2 ESD
EN 61000-4-3 Radiated Immunity
EN 61000-4-4 EFT /Burst
EN 61000-4-6 Conducted Immunity
FCC Part 15 Class A, FCC Part 68
Ground Fault Detection: 0 – 10mA
In accordance with FCC requirements, we provide the following statement as specified in the FCC guidelines for
conformance to Part 15, Class A:
NOTE: This equipment has been tested and found to comply with the limits for a Class A digital
device, pursuant to part 15 of the FCC Rules. These limits are designed to provide reasonable
protection against harmful interference when the equipment is operated in a commercial
environment. This equipment generates, uses, and can radiate radio frequency energy and, if not
installed and used in accordance with the instruction manual, may cause harmful interference to
radio communications. Operation of this equipment in a residential area is likely to cause harmful
interference in which case the user will be required to correct the interference at his own
expense.
Any changes or modifications to this equipment not expressly described in this manual could void the FCC
compliance.
Environmental
Operating Temperature: 0 to 65°C standard @ 3000m derate to 55°C @ 4000m
(32 to 149°F derate to 131°F @ 13124ft)
[Optional -40°C]
Storage Temperature: -20 to 70°C standard
(-4 to 158°F)
-40 to 80°C optional
(-40 to 176°F)
Humidity: 0 to 95% non-condensing
Elevation: -500 to +4000m
(-1640 to 13124 ft)

Specifications for Argus’ Cordex Controller Panel/Rack Mount 125/220Vdc Continued
Argus Technologies Ltd. 018-570-B1 Rev B WC
Printed in Canada. © 2005 Argus Technologies Ltd. ARGUS and CORDEX are trademarks of Argus Technologies Ltd. All Rights Reserved. Page 2 of 3
Hardware Specifications
CPU: Coldfire
RAM: 8MB
Flash: 4MB standard, 4MB optional
Display: 160 x 160 pixel grayscale LCD
Front Panel Controls: Reset button and touch panel (display and input device)
LED’s: System OK (Green)
Power System Minor Alarm (Yellow)
Power System Major Alarm / Controller Fail (Red)
Internal Battery: 3V Lithium CR1616 [Argus part number #185-005-10]
Audio: Built-in speaker for alarm and popup message tones
Mounting: Integrated with power system/distribution panel [List 80]
19" and 23" flush rack mounting, 3RU [Default List 81]
Rack Mount Dimensions: 131mm H x 425mm W x 100mm D
(5.1” x H x 16.7” W x 3.9” D)
Weight: 6.2 kg typical [Default List 81]
(13.8 lb.)
Analog Inputs: 1 DC voltage, 1 DC current, 2 temperature, 4 bi-voltage
[sample configuration – other options available]
Ground Fault Detect Alarms: 1
Digital Inputs: 4
Relay Outputs: 8 Form C, 220VDC 0.4A maximum;
8 optional Form C, 60VDC 1A maximum
Communication Ports: Ethernet Port, 2 x CAN (bus), RS-485, 2 x RS-232,
TNV-1 Telephone Port (with communication expansion board)
Recommended Connection Wire Sizes (as per UL/CSA)
Minimum Wire Size: 0.823 to 0.0507mm
2
(#18 to #30 AWG)
Temperature Range: 0 to 50°C
(32 to 122°F)
CAUTION – TO REDUCE RISK OF FIRE, USE ONLY 0.129mm
2
(#26 AWG) OR LARGER WIRE.

Specifications for Argus’ Cordex Controller Panel/Rack Mount 125/220Vdc Continued
Argus Technologies Ltd. 018-570-B1 Rev B WC
Printed in Canada. © 2005 Argus Technologies Ltd. ARGUS and CORDEX are trademarks of Argus Technologies Ltd. All Rights Reserved. Page 3 of 3
Part Numbers and List Options
This product is available to order under the following part numbers and list options:
Description Part Number/List Option
Cordex Controller.......................................................................................................................................018-570-20
Basic unit............................................................................................................................................................*List 0
125V system software configuration....................................................................................................................List 3
220V system software configuration..................................................................................................................*List 4
19” rack, flush mounting brackets....................................................................................................................*List 21
Door mounting brackets.....................................................................................................................................List 22
23” rack, flush mounting brackets......................................................................................................................List 25
Standard temperature (0 to 65°C)......................................................................................................................List 40
Extended temperature (-40 to 65°C)..................................................................................................................List 42
Gray finish with blue silkscreen..........................................................................................................................List 50
Charcoal finish with white (contrasting) silkscreen............................................................................................List 56
Temp sensor assembly:
1/4” lug, 6’ cable....................................................................................................................................List 71
1/4” lug, 12’ cable..................................................................................................................................List 72
1/4” lug, 24’ cable..................................................................................................................................List 73
3/8” lug, 6’ cable....................................................................................................................................List 74
3/8” lug, 12’ cable..................................................................................................................................List 75
3/8” lug, 24’ cable..................................................................................................................................List 76
3/8” lug, 50’ cable..................................................................................................................................List 77
1/4” lug, 50’ cable..................................................................................................................................List 78
CAN bus port (required for Cordex rectifier communications interface)............................................................List 90
Auxiliary CAN bus port.......................................................................................................................................List 91
RS-485 port (required for Pathfinder rectifier communications interface) .........................................................List 92
Ethernet port ......................................................................................................................................................List 93
Expansion board, communication (Lists 90-93 must be ordered separately)....................................................List 95
Expansion board, output relay, 8 x 1A Form C, internal....................................................................................List 96
Internal modem, global (includes List 95)....................................................................................................... List 101
Expanded Flash memory................................................................................................................................ List 110
Analog input configuration: add one current shunt input ................................................................................ List 128
* Default options
Cable, 9-pin null modem............................................................................................................................877-482-20
Cable, RJ-12 to RJ-12; sorted by length:
1’....................................................................................................................................................877-176-26
1.5’.................................................................................................................................................877-176-21
19”.................................................................................................................................................877-176-27
2’....................................................................................................................................................877-176-22
6’....................................................................................................................................................877-176-23
12’..................................................................................................................................................877-176-24
25’..................................................................................................................................................877-176-25
The above information is valid at the time of publication. Consult factory for up-to-date ordering information.
Specifications are subject to change without notice.

What are the CSA and NRTL?
CSA (Canadian Standards Association also known as CSA International) was established in 1919 as
an independent testing laboratory in Canada. CSA received its recognition as an NRTL (Nationally
Recognized Testing Laboratory) in 1992 from OSHA (Occupational Safety and Health Administration) in
the United States of America (Docket No. NRTL-2-92). This was expanded and renewed in 1997, 1999,
and 2001. The specic notications were posted on OSHA’s ofcial website as follows:
Federal Register #: 59:40602 - 40609 [08/09/1994]
Federal Register #: 64:60240 - 60241 [11/04/1999]
Federal Register #: 66:35271 - 35278 [07/03/2001]
When these marks appear with the indicator “C and US” or “NRTL/C” it means that the product is
certied for both the US and Canadian markets, to the applicable US and Canadian standards. (1)
Argus rectier and power system products, bearing the aforementioned CSA marks, are
certied to CSA C22.2 No. 950 and UL 1950, or CSA/UL 60950.
As part of the reciprocal, US/Canada agreement regarding testing laboratories, the Standards Council
of Canada (Canada’s national accreditation body) granted Underwriters Laboratories (UL) authority to
certify products for sale in Canada. (2)
Only Underwriters Laboratories may grant a licence for the use of this mark, which indicates compliance
with both Canadian and US requirements. (3)
What are NRTLs and what do they do?
NRTLs are third party organizations recognized by OSHA, US Department of Labor, under the NRTL
program.
The testing and certications are based on product safety standards developed by US based standards
developing organizations and are often issued by the American National Standards Institute (ANSI). (4)
The NRTL determines that a product meets the requirements of an appropriate consensus-based
product safety standard either by successfully testing the product itself, or by verifying that a contract
laboratory has done so, and the NRTL certies that the product meets the requirements of the product
safety standard. (4)
When was the NRTL started and who governs it?
In 1983, in a suit brought on by an independent testing laboratory, OSHA was court ordered to remove
specic references to UL (Underwriters Laboratories) and FMRC (Factory Mutual Research Corporation)
from its regulations.
In 1988, OSHA revised its regulations to remove those references and the NRTL program was
established.
The NRTL Program is both national and international in scope with foreign labs permitted.
References:
Information in this document has been developed from the ofcial websites of the respective
organizations.
(1) www.csa-international.org
(2) www.scc.ca
(3) www.ulc.ca
(4) www.osha.gov
CSA/NRTL — MARKS — BACKGROUND
argusdcpower.com
048-554-10-I1 Rev C (2004/02)
The product on which either of these marks appear
has been certied by CSA as meeting applicable
Canada/US standards.
The product on which this mark
appears has been certied by UL
as meeting applicable Canada/US
standards.

IMPORTANT SAFETY INSTRUCTIONS
SAVE THESE INSTRUCTIONS
1. Please read this manual prior to use to become familiar with the product’s numerous features and operating
procedures. To obtain a maximum degree of safety, follow the sequences as outlined.
2. This manual provides warnings and special notes for the user:
a. Points that are vital to the proper operation of the product or the safety of the operator are
indicated by the heading: WARNING.
b. A notation that is in Bold Italic typeface covers points that are important to the performance
or ease of use of the product.
3. Before using the product, read all instructions and cautionary markings on the product and any equipment
connected to the product.
4. Do not expose the product to rain or snow; install only in a clean, dry environment.
5. CAUTION – Unless otherwise noted, use of an attachment not recommended or sold by the product
manufacturer may result in a risk of fire, electric shock, or injury to persons.
6. CAUTION – Do not operate the product if it has received a sharp blow, it has been dropped, or otherwise
damaged in any way – return it to a qualified service center for repair.
7. CAUTION – Do not disassemble the product – call our qualified service centers for servicing. Incorrect
reassembling may result in a risk of electrical shock or fire.
8. CAUTION – Danger of explosion if battery is incorrectly replaced. Replace only with the same or equivalent
type recommended by the manufacturer. Discard used batteries according to the manufacturer’s instructions.
9. WARNING – High voltage hazard. Extreme caution should be maintained when servicing or touching
conductive components connected to the product.
10. WARNING – The telephone line cord is to be disconnected before accessing the inside of the equipment.
i

ii
TABLE OF CONTENTS
1 INTRODUCTION .............................................................................................................................................................1
1.1 Scope of the Manual.....................................................................................................................................1
1.2 Product Overview..........................................................................................................................................1
1.3 Part Numbers and List Options.....................................................................................................................1
2 HARDWARE FEATURES.................................................................................................................................................2
2.1 Operator Interface Devices...........................................................................................................................2
2.2 Serial Ports....................................................................................................................................................3
2.3 Real Time Clock............................................................................................................................................3
2.4 Lithium Battery Backup.................................................................................................................................3
2.5 Analog Input Channels..................................................................................................................................4
2.6 Digital Input Channels...................................................................................................................................4
2.7 Alarm and Control Output Relays.................................................................................................................4
2.8 CXC System Fail Alarm/Relay......................................................................................................................4
3 INSPECTION..................................................................................................................................................................5
3.1 Packing Materials..........................................................................................................................................5
3.2 Check for Damage........................................................................................................................................5
4 INSTALLATION..............................................................................................................................................................6
4.1 Safety Precautions........................................................................................................................................6
4.2 Shelf Preparation/Mounting ..........................................................................................................................6
5 WIRING AND CONNECTIONS ..........................................................................................................................................7
5.1 Safety Precautions........................................................................................................................................7
5.2 Front Access.................................................................................................................................................7
5.3 Tools Required..............................................................................................................................................7
5.4 Power System Chassis Ground and DC Ground Reference........................................................................7
5.5 Power Inputs.................................................................................................................................................7
5.6 Analog Inputs................................................................................................................................................8
5.7 Digital Inputs .................................................................................................................................................8
5.8 Relay Outputs .............................................................................................................................................10
5.9 Rectifier Connections..................................................................................................................................10
5.10 Network Connection and Remote Communications...................................................................................11
6 MAINTENANCE ...........................................................................................................................................................13
6.1 Lithium Battery Replacement......................................................................................................................13
7 ARGUS CONVENTIONS................................................................................................................................................14
7.1 Numbering System......................................................................................................................................14
7.2 Acronyms and Definitions ...........................................................................................................................14

Argus Technologies Ltd. 018-570-C0 Rev B WC
Printed in Canada. © 2005 Argus Technologies Ltd. ARGUS and CORDEX are trademarks of Argus Technologies Ltd. All Rights Reserved. Page 1 of 14
1 Introduction
1.1 Scope of the Manual
This instruction manual explains the installation and interconnection of the Cordex System Controller (CXC)
125/220Vdc panel (CXCP) and rack (CXCR) models from Argus Technologies.
NOTE: To aid the user with installation, frequent reference is made to drawings located at the rear of this manual.
1.2 Product Overview
The CXC 125/220Vdc is an advanced system controller designed by Argus for operation with 125/220Vdc power
systems.
The CXCP and CXCR models each provide four digital and nine analog inputs that may be used to monitor a
wide range of power system components.
The CXCP and CXCR models allow the user to configure, monitor and control the entire DC power system from a
touch screen display similar to that used in a Personal Digital Assistant (PDA). Other features include temperature
compensation, auto equalization, remote access, dial out on alarm, battery diagnostics, as well as Web server
and SNMP support for configuration and monitoring.
NOTE: Separate documentation will be provided detailing the CXC software features, setup and operation.
The CXC offers additional advanced features via add-on “list options.” The customer should include these list
options at the time of ordering.
1.3 Part Numbers and List Options
Refer to the specifications section at the front of this manual for part numbers and ordering options.
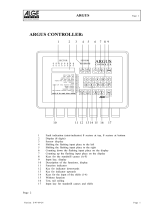
Figure 1–Front view of Cordex controller 19” rack model CXCR
Latch (2PL)
Touch Screen
Reset Button
RS-232 (Craft Port)
LEDs

Argus Technologies Ltd. 018-570-C0 Rev B WC
Printed in Canada. © 2005 Argus Technologies Ltd. ARGUS and CORDEX are trademarks of Argus Technologies Ltd. All Rights Reserved. Page 2 of 14
2 Hardware Features
Behind the CXC’s front panel lies the main controller motherboard, which contains a microprocessor, memory,
removable lithium battery, as well as numerous other electronic components. The input/output (I/O) board houses
a series of terminal connections. Space is also available to add optional output relays or an internal modem.
Connections are oriented for front access.
2.1 Operator Interface Devices
The user interfaces with the CXC by one or more of the following methods:
• Graphical input device, front panel LEDs and audio speaker.
• RS-232 serial port (local “craft” port w/ null modem cable).
• Optional Ethernet connection.
2.1.1 Basic Audio Speaker
A built-in audio speaker confirms activity with short tones; that is, for successful selection of an item or selecting
outside the bounds of a window prompt. The speaker also sounds an intermittent tone during active alarms.
2.1.2 Front Panel Descriptions
The front panel contains a touch screen, a local RS-232 serial (Craft) port, a reset button and LEDs. A brief
description of each is provided below:
2.1.3 Touch Screen
Located on the front panel is a 160 x 160-pixel graphical LCD with touch screen similar to those used in PDAs.
This graphical user interface (GUI) allows the operator to interact with screen selectable items using a fingertip.
Figure 2–Sample screen of CXC graphical user interface
2.1.4 RS-232 Serial (Craft) Port
Local access to the CXC is possible through a front panel RS-232 serial port; using a null modem cable. The
communication protocol supports a web interface (via Microsoft® Internet Explorer 6 or greater). The remote
screen display is an enhanced version of the CXC’s front panel display.
2.1.5 Reset Button
A reset button is located on the front panel for restarting the CXC’s microprocessor. It takes approximately 15
seconds before the display reappears after pressing the reset button.
NOTE: Refer also to the software manual – always select the reset menu item, on the pop-up window of the touch
screen, and follow the prompts before pressing the reset button.

Argus Technologies Ltd. 018-570-C0 Rev B WC
Printed in Canada. © 2005 Argus Technologies Ltd. ARGUS and CORDEX are trademarks of Argus Technologies Ltd. All Rights Reserved. Page 3 of 14
Latch
Touch Screen
LEDs
RS-232 (Craft Port)
Reset Button
Figure 3–Front view of Cordex controller panel model CXCP
2.1.6 Front Panel LEDs
The CXC has three LEDs located on the front panel. These are used to display the alarm status of the power
system, CXC progress and status during startup, file transfers and lamp tests.
2.1.6.1 Alarm Conditions
The CXC illuminates the LED that corresponds to the system alarm status. The following show the corresponding
alarm status for each LED color:
• Green – No alarms present
• Yellow – Minor alarm is present (no major alarms)
• Red – Major alarm is present.
Only one LED is illuminated at a time during alarm conditions.
2.1.6.2 Progress and Status Indication
The LEDs are also used in the following situations:
• Base unit validation – all three LEDs are on at the same time.
• File transfer – when recovering from invalid firmware application – the red LED is illuminated.
• Lamp Test – all three LEDs flash on and off at the same time for 2 seconds.
2.2 Serial Ports
2.2.1 CAN (Option)
Two CAN Serial ports, for communications with Argus’ Cordex rectifiers and other CAN-enabled equipment, are
located next to the RS-485 port on the CXC.
2.2.2 Ethernet (Option)
One 10/100 Base T Ethernet port is provided for CXC communications with a local area network (LAN), e.g. the
Internet.
2.3 Real Time Clock
The CXC contains a real time clock (Y2K compliant), which allows time stamps to be placed on alarm, and
statistical events contained in the historical data files.
2.4 Lithium Battery Backup
A removable lithium battery (see Specifications) is included in the system to retain time and date settings upon
power loss or reset.

Argus Technologies Ltd. 018-570-C0 Rev B WC
Printed in Canada. © 2005 Argus Technologies Ltd. ARGUS and CORDEX are trademarks of Argus Technologies Ltd. All Rights Reserved. Page 4 of 14
2.5 Analog Input Channels
The CXCP and CXCR each have up to nine analog channels, including up to five voltage inputs, two current
inputs, and two temperature inputs.
2.5.1 Voltage Inputs
Voltage-input channel V2 provides monitoring of the charge (battery) voltage. The CXC software is pre-configured
to monitor V2 for battery voltage. V2 is used as the system reference for rectifier float voltage, low voltage
disconnect (LVD), system high voltage alarm, and system low voltage alarm.
2.5.2 Ground Fault Detect (GFD)
V2 is also used for GFD (internally connected circuit). Ground fault is detected when either terminal of V2 (system
voltage that is normally connected to the battery string) shorts to earth ground either directly or through some
conductive means. The GFD circuit will detect a fault current range of ±10mA. The resolution is 1mA.
The GFD will trip an alarm if the fault current exceeds the user configurable Trip Value under Configuration menu
of Alarms/Configure Alarms/Miscellaneous Alarms/GFD. The default setting is ±5mA.
As with any analog input, the GFD can also be calibrated as required. See Analog Calibration menu in the CXC
software manual.
2.5.3 Current Inputs
Up to two current-input channels (I1 and I2) provide monitoring of current; e.g., discharge (load) and charge
(battery). The CXC software is pre-configured to monitor I1 for load current using an external DC current
transformer. The second optional current input is factory configured to monitor an external 50mV current shunt.
2.5.4 Temperature Inputs
Two dedicated temperature probe inputs (T1 and T2) provide monitoring of battery temperature or room/ambient
temperature. They may also be used for temperature compensation (temp comp). A voltage is supplied to these
terminals to power the temperature sensors.
2.5.5 General-Purpose Inputs
The general-purpose (GP) input channels monitor various analog signals depending on how the channels are
configured. The configuration determines whether the signals allowed are to be bipolar (may vary in either polarity
from zero, e.g. +/-150Vdc), unipolar (may vary positive from zero, e.g. 0 to +300Vdc), or temperature.
All four GP inputs are factory configured as unipolar voltage inputs.
2.6 Digital Input Channels
The CXC can accommodate up to four digital input channels.
NOTE: Each channel may be set by closing (shorting) or opening the inputs with a voltage free contact to achieve the
appropriate condition. This is differs from the digital inputs on other Cordex controllers which require a zero or
system voltage potential at the input to activate or deactivate the appropriate condition.
These channels can monitor digital alarm/control signals from rectifiers, converters and many other types of
equipment. Some of these channels are pre-assigned to monitor specific signals. See the Software manual for
more information.
2.7 Alarm and Control Output Relays
Each CXCP or CXCR contains eight standard and eight optional Form C alarm output relays to extend alarms
and control external apparatus. Each internally generated alarm or control signal may be mapped to any one of
the 16 relays, or, several signals may be mapped to just one relay or none at all.
2.8 CXC System Fail Alarm/Relay
The CXC system fail alarm activates because of a major internal failure. During such a condition, the unit will
attempt to reset, but if this fails, an alarm condition will be extended to a relay and the red LED on the front panel
will illuminate. This is a fail-safe signal to the remote monitoring equipment; i.e. alarm will be extended even if
power to the unit is interrupted.

Argus Technologies Ltd. 018-570-C0 Rev B WC
Printed in Canada. © 2005 Argus Technologies Ltd. ARGUS and CORDEX are trademarks of Argus Technologies Ltd. All Rights Reserved. Page 5 of 14
3 Inspection
3.1 Packing Materials
All Argus products are shipped in rugged, double walled boxes and suspended via solid inserts to minimize shock
that may occur during transportation. Packaging assemblies and methods are tested to International Safe Transit
Association standards.
Products are also packaged with Cortex. This plastic wrap contains a corrosive-inhibitor that protects the product
from corrosion for up to two years.
3.1.1 Returns for Service
Save the original shipping container. If the product needs to be returned for service, it should be packaged in its
original shipping container. If the original container is unavailable, make sure the product is packed with at least
three inches of shock-absorbing material to prevent shipping damage.
NOTE: Argus Technologies is not responsible for damage caused by the improper packaging of returned products.
3.2 Check for Damage
Prior to unpacking the product, note any damage to the shipping container. Unpack the product and inspect the
exterior for damage. If any damage is observed contact the carrier immediately.
WARNING
To prevent possible ESD damage, all models of CXC controllers require that when the unit is open
the users not touch the circuitry without a wrist strap properly worn and connected.
Continue the inspection for any internal damage. In the unlikely event of internal damage, please inform the
carrier and contact Argus Technologies for advice on the impact of any damage.
Verify that you have all the necessary parts per your order for proper assembly.

Argus Technologies Ltd. 018-570-C0 Rev B WC
Printed in Canada. © 2005 Argus Technologies Ltd. ARGUS and CORDEX are trademarks of Argus Technologies Ltd. All Rights Reserved. Page 6 of 14
4 Installation
This chapter is provided for qualified personnel to install the product, which shall be mounted in a clean and dry
environment.
NOTE: To aid the user with installation, frequent reference is made to foldout drawings located at the rear of the manual.
4.1 Safety Precautions
WARNING
Hazardous voltages are present at both the input and the output of power systems. The DC output
from the rectifiers and the battery system is at a lethal potential and has a high short circuit
current capacity that may cause electrocution, severe burns and electrical arcing.
Before working with any live battery or power system/distribution center, follow these precautions:
• Remove all metallic jewelry; e.g., watches, rings, metal rimmed glasses, necklaces.
• Wear safety glasses with side shields (and prescription lenses if necessary) at all times during installation.
The installer should follow all applicable local rules and regulations for electrical and battery installations; e.g.,
CSA, UL, CEC, NEC, OSHA, and local fire codes.
Use OSHA approved insulated hand tools.
4.2 Shelf Preparation/Mounting
NOTE: The CXC must be mounted in a clean and dry environment.
4.2.1 Panel Mount
The CXCP panel mount or “door” version mounts inside an Argus integrated distribution center. The preparation
and mounting are done at the factory.
4.2.2 Rack Mount
The CXCR rack mount model fits horizontally in a 19” or 23” rack. The CXCR should be mounted to the rack
using two #12 – 24 x 1/2” screws in each bracket. Philips-type screws and screwdriver should be used to
eliminate the possibility of slippage and scratching of the unit’s exterior. Washers (such as internal tooth) or
special screws that are designed to cut through the painted surface should be used to ensure a good chassis
ground.
Consult the drawings located at the rear of this manual and proceed to the next section for wiring connections.

Argus Technologies Ltd. 018-570-C0 Rev B WC
Printed in Canada. © 2005 Argus Technologies Ltd. ARGUS and CORDEX are trademarks of Argus Technologies Ltd. All Rights Reserved. Page 7 of 14
5 Wiring and Connections
This chapter provides cabling details and notes on cable sizing for DC applications with respect to the product.
NOTE: Refer also to foldout drawings located at the rear of the manual.
5.1 Safety Precautions
WARNING
Hazardous voltages are present at both the input and the output of power systems. Ensure that
input power and output power is removed before attempting work on the CXC’s connections. Use
a voltmeter to verify the absence of voltage. Clearly mark the correct polarity of the battery leads
before commencing work on DC connections.
Refer to the previous (Installation) chapter for additional safety precautions.
5.2 Front Access
All wiring connections are accessible from the front of the panel and rack models. For example, to gain access to
the terminal block connectors for the rack model:
1. Turn the two front panel latches (spring-loaded) counter-clockwise.
2. Tilt the front panel forward and down.
3. Loosen the CXC’s rear screws and remove its rear plate.
Terminal blocks can accommodate wire sizes per the specifications section near the front of this manual. All
cables should be routed through the access holes, bundled together with clips and clamped directly into
applicable terminal blocks.
NOTE: Connections to the CXC should comply with all local electrical codes and ordinances.
5.3 Tools Required
Various insulated tools are essential for product installation. Use this list as a guide:
• Slot head screwdrivers (blade sizes: 1/4”, 1/8”, 1/16”)
• Philips head screwdriver, #2 (tip size 3/16”)
• Digital voltmeter equipped with test leads
• Adjustable 125/220Vdc load (optional)
• Anti-static wrist strap
• Computer (laptop) with Microsoft® Internet Explorer 6 or greater
• Crossover cable RJ-45 (for access using the Ethernet port)
• Null modem cable (for access using the RS-232 port)
• Cutters and wire strippers.
5.4 Power System Chassis Ground and DC Ground Reference
WARNING
For safety reasons, ensure the system is properly bonded to the building’s ground grid.
125/220Vdc systems are typically floating; i.e., not connected to earth ground.
Connect the CXC chassis ground to the site ground to ensure correct operation of the CXC and to prevent drifting
floating analog (especially current) readings. The Ground Fault Detect circuit will not function properly if the CXC
chassis is not connected to the site ground.
5.5 Power Inputs
The system can operate from 125/220Vdc input with no configuration required.
NOTE: The CXC cannot function without DC power to the motherboard.
Power must be connected as follows:
1. Connect system (+) power bus lead to (+) terminals 56 (primary input) and/or 54 (secondary input).
2. Connect system (-) power bus lead to (-) terminals 57 (primary input) and/or 55 (secondary input).

Argus Technologies Ltd. 018-570-C0 Rev B WC
Printed in Canada. © 2005 Argus Technologies Ltd. ARGUS and CORDEX are trademarks of Argus Technologies Ltd. All Rights Reserved. Page 8 of 14
5.6 Analog Inputs
WARNING
Ensure the correct polarity is used for all input cable terminations.
The analog input channels are used to monitor various types of electrical signals. Some of the analog channels
are reserved for specific signals, while others are designated as general-purpose inputs, which accommodate
various types of analog signals.
Bundle the input cables together and route through the entry holes.
NOTE: Default configurations and terminal numbers described below have been summarized in Table A (next page).
Refer also to foldout drawings located at the rear of this manual. Custom configurations may be detailed within
the Argus power system documentation package.
5.6.1 Voltage Input 2 (V2)
CAUTION
If the V2 sense leads are disconnected from the CXC, the following will occur:
• The CXC registers the absence of DC as an invalid condition.
• The LVD will not be de-activated.
• The rectifier voltage may increase slightly, typically 1.8V (5.5V maximum).
5.6.2 Midpoint Monitoring (connection example)
An analog signal configured (at the factory) for voltage can be used for mid-point monitoring. Channel V1 is used
in the example below but any of the available voltage channels can be used.
NOTE: See CXC Software manual for detailed instruction on programming.
Connect as shown ensuring correct polarity:
Figure 4–Connection example for mid-point monitoring
5.7 Digital Inputs
The digital input channels are used to monitor various alarm and control signals. Shorting an input with a voltage-
free relay contact will activate the channel.
Figure 5–Showing connection method

Argus Technologies Ltd. 018-570-C0 Rev B WC
Printed in Canada. © 2005 Argus Technologies Ltd. ARGUS and CORDEX are trademarks of Argus Technologies Ltd. All Rights Reserved. Page 9 of 14
CAUTION: to reduce risk of fire, use only 0.129mm2 (#26 AWG) or larger wire.
Terminal Description Default Name Signal Range
1 and 2; V2 Voltage Input 2 Charge Voltage Pos (+)/Neg (-) 0-300Vdc
3 and 4; GP1* General Input 1 GP1 Pos (+)/Neg (-) 0-300Vdc
5 and 6; GP2* General Input 2 GP2 Pos (+)/Neg (-) 0-300Vdc
7 and 8; GP3* General Input 3 GP3 Pos (+)/Neg (-) 0-300Vdc
9 and 10; GP4* General Input 4 GP4 Pos (+)/Neg (-) 0-300Vdc
11 and 12; T1 Temp Input 1 T1 Pos (+)/Neg (-) 0-20Vdc
13 and 14; T2 Temp Input 2 T2 Pos (+)/Neg (-) 0-20Vdc
15 and 16; I2 Current Input 2 I2 Pos (+)/Neg (-)
±50mV
19 and 20; D1** Digital Input 1 Distribution Fuse (Alarm) N/A Short or open
21 and 22; D2** Digital Input 2 Distribution CB (Alarm) N/A Short or open
23 and 24; D3** Digital Input 3 Battery CB (Alarm) N/A Short or open
25 and 26; D4** Digital Input 4 Battery CB (Alarm) N/A Short or open
27, 28 and 29; K1*** Alarm Output 1 LVD1 NC/COM/NO 220Vdc, 0.4A
30, 31 and 32; K2*** Alarm Output 2 LVD2 NC/COM/NO 220Vdc, 0.4A
33, 34 and 35; K3*** Alarm Output 3 LVD3 NC/COM/NO 220Vdc, 0.4A
36, 37 and 38; K4*** Alarm Output 4 System Minor NC/COM/NO 220Vdc, 0.4A
39, 40 and 41; K5*** Alarm Output 5 System Major NC/COM/NO 220Vdc, 0.4A
42, 43 and 44; K6*** Alarm Output 6 AC Mains Hi-Low NC/COM/NO 220Vdc, 0.4A
45, 46 and 47; K7*** Alarm Output 7 Not assigned NC/COM/NO 220Vdc, 0.4A
48, 49 and 50; K8*** Alarm Output 8 Not assigned NC/COM/NO 220Vdc, 0.4A
51, 52 and 53; K0**** Alarm Output 0 System Fail Output NC/COM/NO 220Vdc, 0.4A
54 and 55; B PWR Secondary Power Secondary Power Pos (+)/Neg (-) 90-300Vdc
56 and 57; A PWR Power Power Pos (+)/Neg (-) 90-300Vdc
DCCT input; P3 Current Input 1 I1 Pos (+)/Neg (-);
Pwr (+)/Pwr (-)
±15Vdc, 100mA max.
Table A–Wiring connections
* Bipolar (Voltage Input) is ±150Vdc, Unipolar Voltage (Input) is 0—300Vdc, Temp Probe is 0—20Vdc with power source.
** See Table B for definitions of impedance levels.
*** Can be configured to de-energize on alarm (DOA) or energize on alarm (EOA).
**** System Fail output relay is fail-safe and will de-energize during an alarm condition.
NOTE: DCCT power output is protected against short circuits and is able to power four DCCTs.
To aid the user with installation, frequent reference is made to drawings located at the rear of this manual.
Custom configurations may be detailed within the Argus power system documentation package.
5.7.1 Programming the Digital Input
The digital input channels (terminals 19 through 26) can be programmed for “active high” or “active low.” Active
high indicates “alarm on the presence of a short circuit” and active low indicates “alarm on the removal of the
short circuit.”
NOTE: See CXC Software manual for detailed instruction on programming.
Impedance Level (Ohms)
Considered As “0” (Off)
Impedance Level (Ohms)
Considered As “1” (On)
> 1M < 1
Table B–Digital input impedance level definitions

Argus Technologies Ltd. 018-570-C0 Rev B WC
Printed in Canada. © 2005 Argus Technologies Ltd. ARGUS and CORDEX are trademarks of Argus Technologies Ltd. All Rights Reserved. Page 10 of 14
5.8 Relay Outputs
WARNING
Relays are rated at 220Vdc 0.4A. Exceeding these limits may damage the relay and other circuitry
in the CXC.
Terminals 27 to 50 provide 8 Form C contacts (NO, COM and NC) for extending various alarm or control signals.
Each relay output can be wired for NO and/or NC operation during an alarm or control condition. See Figure 6.
Figure 6–Showing relay connections in the de-energized state
Relays can be programmed to energize or de-energize during an alarm condition (see Software manual). When
the CXC reset button is pressed or power is lost, all relays de-energize.
Relay contacts 1-8 are high capacity and intended to be used for controlling LVD contactors.
5.8.1 System Fail Relay
Terminals 51 to 53 provide connections for a system (supervisory) fail relay. This fail-safe relay (i.e. it is de-
energized during an alarm condition) can be wired for NO or NC operation.
5.8.2 LVD Control
The LVD control functions can be hardwired directly from the assigned relay output pins to the LVD contactor
panel. See Controls Menu Defaults in the Software manual.
5.8.3 CEMF Cell Control
The CEMF control function can be hardwired directly from the assigned channel in to the CEMF cell controller
panel. See Controls Menu Defaults in the Software manual.
5.8.4 Optional Relays and Outputs
Eight relays and outputs may be added to the CXC (panel and rack models) with the purchase of an optional
expansion board (see List Options at the front of this manual).
5.9 Rectifier Connections
5.9.1 CAN Out Serial Port
A single CAN Out serial port, for communications with Argus’ Cordex rectifiers and other CAN-enabled equipment
(nodes) on the same system, is located next to the rear Ethernet port.
Daisy-chain from node to node (CAN OUT of one node to CAN IN of another) as necessary and ensure that only
the last node is terminated.
/