Page is loading ...

EXIRA SHOWER SET INSTALLATION
GETTING STARTED
BEFORE YOU BEGIN
We recommend consulting a professional if you are
unfamiliar with installing plumbing fixtures. Signature
Hardware accepts no liability for any damage to the
plumbing, floor, walls, tub, or for personal injury during
installation.
Observe all local plumbing and building codes.
Unpack and inspect the items for shipping damage. If
any damage is found, contact our Customer Relations
team at 1-866-855-2284.
Ensure that you have gathered all the required
materials that are needed for the installation.
For the following installation instructions, it is
assumed that the wall has been opened and that the
existing shower set has been removed.
Before you begin, the main water supply to your home
should be shut off.
TOOLS AND MATERIALS:
Plumbers
Tape
Adjustable
Wrench
Phillips
Screwdriver
1Exira Shower Set Installation Instructions
Tape Measure
Drill
Hex Wrench
Wood Blocking
Soldering Kit
(for copper pipe)
½" Test Plug
Level
Pencil or
Marker
SKU(s): 925470

EXIRA SHOWER SET INSTALLATION
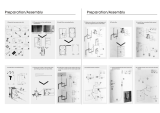
Step 1: Valve Installation
3. Route, assemble, and connect all in-wall piping as
desired to and from the shower valve. Make all connec-
tions appropriately depending upon the type of pipe
that is being used. For copper pipe, soldering will be
required and should be completed by a licensed
plumber. Apply plumber’s tape to any threaded connec-
tions if applicable. Install any wood blocking that is
necessary to support the piping and valve.
Important Notes:
A) The valve has a single function outlet on the bottom,
and a 3-way diverter on the top of the valve.
B) One shower function of your choosing can be routed
to the bottom valve outlet, while the other three
functions will route to the 3-way diverter.
C) The functions routed to the 3-way diverter will not be
able to be used simultaneously, but each can be used in
conjunction with the function routed to the bottom
outlet.
D) Female fittings will need to be placed where the body
jets will be installed. The fittings should sit no more than
1/4” behind the finished wall.
E) A ½” NPT pipe nipple will need to be placed where the
supply elbow for the hand shower will be installed. The
nipple should extend 9/16” beyond the finished wall.
1. To prepare for installation, wood blocking should be
installed between the two studs where the valve will
mount. The wood blocking will need to be installed 2
¼”-2 ¾” behind the finished wall.
Important: Take into consideration the thickness of
the finished wall materials, such as tile, when calculating
measurements.
2. Secure the valve to the prepared wood blocking
using the provided hardware. Ensure that the “cold”
inlet is pointing to the right, and the “hot” inlet is
pointing to the left. Use a level to ensure that the valve
is straight and level. Leave the protective sleeves on
the valve stems until your finished wall is complete,
and you are ready to install the trim pieces.
Important: Handle screws may be located in the small
box containing other hardware. Do not discard.
2Exira Shower Set Installation Instructions
2 ¼”
HOT
COLD
OUT
OUT
OUT
OUT

EXIRA SHOWER SET INSTALLATION
1. Once the finished wall is complete, remove the
protective sleeves from the valve stems. If the test plug
has not yet been removed, remove that as well.
2. Slide the decorative back plate onto the valve. Ensure
that the markings located above each opening on the
back plate are facing up.
4. Once all piping is routed and connections have been
made, use the provided ½” test plug to perform a water
pressure test. Turn on the main water supply to the
home and water test the installed plumbing. Ensure
that there are no leaks, then shut the water off.
Remove the test plug.
Note: Water pressure testing should be performed by
a licensed plumber if you are not familiar with this
procedure.
3Exira Shower Set Installation Instructions
Step 2: Trim Installation
IMPORTANT: COMPLETE THE CONSTRUCTION OF
YOUR WALL, INCLUDING ANY FINISHED WALL
MATERIALS SUCH AS TILE, BEFORE PROCEEDING
WITH THE REMAINDER OF THE INSTALLATION.
STOP

EXIRA SHOWER SET INSTALLATION
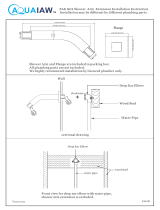
5. To install the hand shower’s water supply elbow,
thread it onto the prepared 1/2” NPT pipe nipple. Apply
thread sealant or plumber’s tape to the threads before
tightening. Be sure to use the decorative escutcheon to
conceal the rough-in.
6. Determine a location to mount the hand shower’s
slide bar. Temporarily install the mounting brackets
onto the bar, and hold the bar against the wall at its
desired mounting location. Use a level to ensure that
the slide bar is straight, then mark the locations of the
mounting brackets by outlining them with a pencil.
Remove the bar, then attach the brackets to the wall
using the provided anchors and screws.
Important: If drilling through tile, you must use a
masonry drill bit and drill carefully.
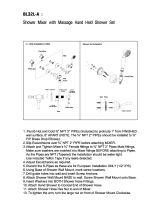
3. Attach the 3-way diverter handle to the top stem by
sliding it onto the spindle and tightening the set screw
underneath, using the provided hex wrench. Repeat
these steps to install the bottom single-function
handle.
4. To install the temperature control handle, loosen
the set screw and remove the handle from the handle
base. Attach the handle base to the center stem using
the provided screw. Tighten with a Phillip’s screwdriver,
then reattach the handle.
4Exira Shower Set Installation Instructions

EXIRA SHOWER SET INSTALLATION
9. Install each of the body jets by threading them into
the prepared female fittings. Be sure to use the decora-
tive escutcheons to conceal the rough-ins. Apply
thread sealant or plumber’s tape to the threads before
tightening.
10. Attach the shower arms by threading each of them
into their prepared female fittings. Be sure to use the
decorative escutcheons to conceal the rough-ins.
Apply thread sealant or plumber’s tape to the threads
before tightening.
7. Once the mounting brackets are attached to the
wall, attach the slide bar by mounting it onto the
brackets. To secure, tighten the set screws located on
the slide bar using the provided hex wrench.
8. Attach the hand shower to the supply elbow using
the hand shower hose. Apply thread sealant or
plumber’s tape to the threads before tightening. Hand
tighten the connections firmly.
5Exira Shower Set Installation Instructions

EXIRA SHOWER SET INSTALLATION
12. Turn the main water supply back on, and test the
completed shower system. Ensure that there are no
leaks and that all functions are working properly.
11. Complete the installation by attaching the shower
heads to the installed shower arms. Apply thread
sealant or plumber’s tape to the threads before
tightening.
6Exira Shower Set Installation Instructions
/