Page is loading ...

PRODUCT SUPPORT | 800.927.2120 | WATERWORKS.COM PAGE 1 OF 1 | UPDATED ON 3.28.2023
INSTALLATION GUIDELINES
SHOWER DOOR PULL
4. Slide the PULL onto the POSTS until it contacts the
ESCUTCHEONS then thread and securely tighten
the SET SCREWS.
NOTE: The PULL should be positioned with the
SET SCREWS towards the bottom.
3. Slide the ESCUTCHEONS onto the THREADED
RODS then thread and securely tighten the POSTS.
NOTE: The POSTS should securely hold the
ESCUTCHEONS against the mounting surface.
2. Pre-assemble the ESCUTCHEONS and RUBBER
SLEEVES onto the THREADED RODS on the PULL
then insert the RUBBER SLEEVES into the pre-
drilled holes.
IMPORTANT:
¾To ensure this product is installed properly, you must read
and follow these guidelines.
¾The owner/user of this product must keep this information
for future reference.
¾This product must be installed by a professional licensed
contractor.
¾Inspect this product to ensure you have all the parts
required for proper installation.
¾To avoid damaging the product, do NOT use power tools
during installation.
¾If further assistance is required, please contact Product
Support at 1-800-927-2120 Monday through Friday, 8am
– 6pm EST.
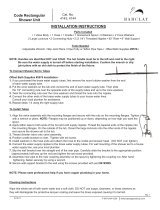
TECHNICAL DETAILS:
DIM VALUE
A 8” [203mm]
HENRY CHRONOS 8” BACK TO BACK SHOWER
DOOR PULL
STYLE
CNHW88
PRE-DRILLED
HOLES
[Ø1/2"]
MOUNTING
SURFACE
"A"
ON-CENTER
SPREAD
ESCUTCHEON
GASKET
SHOWER PULL
POST
THREADED
ROD
MOUNTING
SURFACE
SHOWER PULL
RUBBER
SLEEVE GASKET
THREADED
ROD
ESCUTCHEON
POST
SHOWER PULL
SET
SCREW
[M5-
2.5mm HEX]
1. Drill two 1/2” diameter holes on the mounting
surface at the required on-center spread (DIM A).
NOTE: Ensure the holes are level and verify the
oncenter spread (DIM A).
/