Page is loading ...

INTRODUCTION
The BACKEYE Observation System has been designed to provide
years of trouble-free operation. Please read this manual
thoroughly. This manual contains instructions to ease the
installation of the camera and monitor. The BACKEYE Observation
System is a supplement to standard rear-view mirror systems, and
will provide additional rear-view vision when installed and
maintained properly.
The BACKEYE Observation system is not intended in any way to
be a substitute for careful, cautious, defensive driving or for the
consistent adherence to all applicable traffic laws and motor safety
regulations. This product is not intended to be a substitute for rear
view mirrors or for any other motor vehicle or boat equipment
mandated by law.
FEATURES
BE-900C CAMERA
• Auto White Balance (AWB)
• Back Light Compensation (BLC)
• 320,000 pixel image sensor
• 6 Infra-Red LED
• Min 0.1 Lux sensitivity
• Automatic electronic iris provides a clearer, more consistent
image in low and bright light
• Wide-angle lens (130° Diag.) provides a broad viewing area
• Compact design and lightweight ease installation in most vehicles
• Waterproof Aluminum Die-Casting Housing
• Built-in microphone for audio pick up (See Fig. 6)
• Waterproof cable connection
• Fully Waterproof (IP67)
BE-100C CAMERA - Optional
• Auto White Balance (AWB)
• Back Light Compensation (BLC)
• 290,000 pixel image sensor
• 6 Infra-Red LED
• Min 0.5 Lux sensitivity
• Automatic electronic iris provides a clearer, more consistent
image in low and bright light
• Wide-angle lens (130° Diag.) provides a broad viewing area
• Compact design and lightweight ease installation in most vehicles
• Waterproof Aluminum Die-Casting Housing
• Built-in microphone for audio pick up (See Fig. 6)
• Waterproof cable connection
• Fully Waterproof (IP67)
BE-956M TFT LCD COLOUR 5.6” MONITOR
• FCC / CE / e-marking
• Day/night switch
• Brightness control
• Colour control
• Volume control
• Two camera inputs and Camera Selector Switch
• Power/stand-by switch
• Mirror/Normal selection switch
• Monitor pigtail:
§ Power socket
§ Camera1 and Camera2 input socket
CONTENTS OF 1 COMPLETE SYSTEM
BE-900C CCD CAMERA:
1-Camera
1-Camera bracket
4-Attachment screws with washers (M4 x 15)
1-Wind deflector
BE-956M MONITOR:
1-Monitor
1-Monitor bracket
BEFORE INSTALLATION:
1. This system operates from 10 volts DC to 32 volts DC, negative
ground.
2. Please install this system according to the instructions in this
manual.
3. Do not disassemble the camera or the monitor. This voids the
warranty. Disassembling the camera will compromise the
Waterproof seal.
4. Connect the system to an ignition switched power source.
Connection to a battery source will reduce battery life.
WARNING
1. To prevent electrical shock, DO NOT OPEN THE MONITOR
CASE. There are potentially lethal voltages inside the monitor.
There are no user serviceable parts inside. If evidence of
tampering is detected, the warranty will be considered void.
2. Keep monitor away from leaking water, rain, moisture etc. It is
NOT waterproof. Any moisture inside the monitor could cause
extensive damage.
3. Use the thumbscrews to mount the monitor to bracket.
4. Do not cover air dusts. Monitor needs proper ventilation to
prevent overheating.
INSTALLATION INSTRUCTIONS
BE-900C CAMERA
1. Attach camera bracket (see Fig. 1) to upper portion of vehicle.
Attachment point must be sturdy enough to support camera and
bracket.
2. Attach camera to bracket using M4 bolts provided. Adjust angle
as indicated in Fig. 2. (Use rear bumper and back of vehicle as a
reference point.).
3. Wind deflector may be installled. The deflector is designed to
reduce the build up of dust, dirt and moisture on the camera lens.
(See Fig.3.)
BE-956M MONITOR
1. Attach monitor inside vehicle in a location convenient to the
driver (e.g. center of dash, overhead or in dash).
2. Use a compression plate to attach the monitor bracket to the
dash or overhead.
3. Adjust mounting angle of the monitor to allow driver to easily
view the screen from all seat positions. (See Fig. 4.)
CABLE
1. The camera-to-cable connection and the monitor pigtail are
waterproof. Be sure to orient the cables properly.
2. Do not run the cable over sharp edges or corners. Do not kink
the cable. Keep the cable away from hot and rotating parts.
3. Place all excess cable in convoluted tubing.
4. Wire the cable securely.
WIRING CAMERA AND MONITOR
1. See wiring diagram for connections to ignition, ground and back
up circuit. (See Fig. 5.)
2. Wiring camera: Drill a 22mm - diameter hole into vehicle
body near the camera and bracket. Connect camera connector to
extension cable in vehicle. Push extra cable into vehicle (be careful
not to kink cable) and fit grommet into hole. Apply sealant around
grommet to increase resistance to water penetration.
3. Wiring monitor pigtail: Insert extension cable into camera 1 and
camera 2 position. Bundle excess cable together using a cable tie
or vinyl tape. This will avoid possible damage to cable during
operation. (Fig. 5)
4. Wiring power cable: The red wire is connected to an ignition
power source, the black wire is connected to chassis ground, and
the green wire is connected to the vehicles back up circuit.
FUNCTIONS AND OPERATION
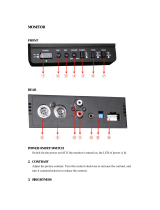
MONITOR
1) STANDBY LED
When the red LED is turned on, it indicates power on.
Putting the gear into the reverse, the view of camera 1 shall be
shown on the monitor.
2) POWER SWITCH
Press the power switch to turn the monitor on or off.
3) CAMERA / AV SELECTOR
Depress the selector to select the camera (CA1, CA2) and press
the selector to select the AV input signal.
4) NIGHT / DAY SWITCH
Normally, this switch should be in the out position. When you view
the picture at night or in a tunnel etc., Depress the switch to reduce
the picture brightness.
5) CAMERA SELECTOR
Depress the camera selector to select the camera connected to
the camera 1. Press the camera selector to select the camera
connected to the camera 2.
6) MONITOR PIGTAIL & EXTENSION CABLE
- POWER SOCKET
Insert the supplied power cable connector firmly until it is
locked. To remove the power connector, press in the clip
and pull out the connector, while holding the clip down.
- CAMERA INPUT SOCKET (CAMERA 1. CAMERA 2)
There are two Mini DIN type connectors for the video camera
inputs.
7) VOLUME CONTROL
Adjust the volume control for the desired sound level.
8) BRIGHT CONTROL
Adjust the Bright control for the best overall picture or display
brightness. Turn clockwise to increase picture brightness and
counterclockwise to decrease it.
9) COLOUR CONTROL
Adjust the colour control for the desired intensity of colour.
Turn clockwise to increase intensity of colour and counterclockwise
to decrease it.
10) TINT CONTROL (NTSC system only)
Adjust the tint control fro the desired image’s colour.
Turn clockwise to increase image’s colour and counterclockwise to
decrease it.
11) AUDIO / VIDEO OUTPUT JACK
Connect audio, video output connector to a second monitor or
VCR input with a RCA phone type connector cable.
12) AUDIO / VIDEO INPUT JACK
For just monitoring on screen, put the plug of A/V signal into this
Jack.
13) MIRROR / NORMAL SELECTION SWITCH
When the switch is in MIR position, the picture will be shown
reverse.
When the switch is in NOR position, the picture will be displayed
normally.
* Camera 1 & Camera 2 are operated individually.
CAUTION
1. DO NOT OPEN THE CAMERA CASE. This will break the
camera’s Waterproof seal. If evidence of tampering is detected, the
warranty Will be considered void.
2. Do not recommend mounting the camera near the lower area of
the vehicle (e.g. bumper). This reduces the view of the camera and
increases the chance of physical damage to the camera.
3. Use only the Inner Hexagonal screw and washers to mount the
camera.
MAINTENANCE
Remove dust and dirt with a damp soft cloth. Heavier dirt
should be removed with a damp soft cloth and mild detergent.
Do not use strong cleaning agents containing gasoline, thinner,
benzene or alcohol. These substances may damage the
exterior surface of the monitor.
CAUTION
1. Before drilling, be sure no cable or wiring is on the other
side. Be sure to drill a 22mm - diameter hole only.
2. Feed as much cable as possible into vehicle and clamp
securely. This reduces the possibility of it being hooked or
snagged.
3. Keep all cables away from HOT, ROTATING and
ELECTRICALLY NOISY components.
4. To increase protection of cable, place all excess wire and
extension cable in convoluted tubing.
5. Do not twist camera cable and do not cut camera pigtail or
cable.
SPECIFICATIONS
BE-900C CAMERA
VIDEO SYSTEM NTSC / PAL
PICK-UP DEVICE CCD
IMAGE SIZE 1/3 inch
SYNCHRONIZATION INTERNAL
REQUIRED ILLUMINATION 0.1 lux MINIMUM
VIDEO OUTPUT 1V (p-p), 75 ohm
OPERATING VOLTAGE 12 Vdc
POWER CONSUMPTION MAX 2.4W
(AT 12 Vdc)
OPERATION TEMPERATURE -30°C TO +50°C
WEIGHT 0.48Kg
DIMENSION (W x H x D) mm 69 ´ 41 ´ 59
BE-100C CAMERA - Optional
VIDEO SYSTEM NTSC / PAL
PICK-UP DEVICE CCD
IMAGE SIZE 1/3 inch
SYNCHRONIZATION INTERNAL
REQUIRED ILLUMINATION 0.5 lux MINIMUM
VIDEO OUTPUT 1V (p-p), 75 ohm
OPERATING VOLTAGE 12 Vdc
POWER CONSUMPTION MAX 2.4W
(AT 12 Vdc)
OPERATION TEMPERTURE -30°C TO +50°C
WEIGHT 0.25Kg
DIMENSION (W x H x D) mm 69 ´ 11 ´ 59
BE-956M MONITOR
VIDEO SYSTEM NTSC / PAL
PICTURE TUBE 5.6 INCH COLOUR
TFT LCD SCREEN
PICTURE RESOLUTION 960(H) X 234(V)
AUDIO OUTPUT 0.5W (8 ohm)
POWER CONSUMPTION MAX 5.4 Watts
OPERATION TEMPERATURE -10'C ~ + 60'C
OPERATION VOLTAGE DC10 V ~ DC32 V
WEIGHT APPROX. 380 g
DIMENSION (W x H x D) mm 181 x 136 x 32
DISCLAIMER:
The use of the BE-956 BACKEYE Observation system does
not guarantee or promise that the user will not be in an accident
or otherwise not collide with an object. The BACKEYE
Observation system is not intended in any way to be a
substitute for careful and cautious driving or for the consistent
adherence to all applicable traffic laws and motor safety
regulations. This product is not intended to be a substitute for
rear-view mirrors or for any other motor vehicle or boat
equipment mandated by law.
BRIGADE ELECTRONICS PLC
TEL: +44 (0) 870 744 1500
FAX: +44 (0) 870 744 1502
Email: sales@brigade-electronics.co.uk
Website: www.brigade-electronics.co.uk
ENGLISH
BE-956 BACKEYE REARVIEW CCTV SYSTEM

/