
Installation Instructions
RainTight Decks
www.raintightdecks.com

Underdeck Installation Instructions
Table of Contents
Page 3
Tools Required
Page 4
Introduction and How the
system works
Page 5
Step 1: Establishing the
Height and Slope
Step 2:Installing the
framing
Step 3: Proper Caulking and
Flashing
Page 6
Step 4: Gutter Install
Step 5: Preparing for the
Panels
Step 6:
Panel Install
Step 7: Trim out the
Perimeter
Page 7
Step 8: Install Downspouts
Step 9:
Finish and Enjoy
Accessories
2

Basic Tools Needed
Hammer
Tape Measure
Caulk Line
Metal Snips
Hand Brake
Caulking Gun
Cordless Drill
4’ or 6’ Level
Safety Glasses
Electric Circular Saw
3
Underdeck Systems Instructions Guide
While we have tried to address each tool
needed, however common sense rules will
apply. Do NOT attempt to use the wrong
tool for the job and avoid the serious
injury. If you have any questions, please
contact us. We are standing by to assist
you everyway we can.

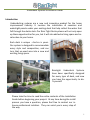
Introduction
Underdecking systems are a new and innovative product for the home
improvement industry. It involves the installation of seamless and
watertight panels under your existing deck that help collect the water that
fall through the decks slats. Our Rain Tight Deck systems will not only open
up these opportunities for you, but it will also add extra living space and re-
sale value to your home.
4
Underdeck Systems Installation Guide
Each deck is unique - And so is yours.
Our system is designed to accommodate
every style and composition, and can
turn that un-used area into a new and
exciting living space.
Raintight Underdeck Systems
have been specifically designed
for every type of deck, and now
you have the opportunity to do-
it-yourself.
Please take the time to read the entire contents of the Installation
Guide before beginning your project. At any time during the install
process you have a question, please feel free to contact our in-
house professional installers. They can assist you in every step of
the way.

STEP 1: ESTABISH THE HEIGHT AND SLOPE OF THE CEILING
Start by determining the drainage and slope. It is normally best to drain
away from the house, however, you can drain towards the house
and tie into existing drain pipes. Once this step is completed, you
will know the direction of the fall and where the downspout will
be located when the panels are fully installed.
1. Begin by installing two (2) 2x2x10” long blocks nailed on the two
high corners against the house, with 2” of the block showing
below the floor joist. Tie a string between these two blocks and
pull it tight. Check that the string is level. If not, adjust to make
level.
2. If you have determined where the downspout is to be placed, go
the opposite low outside end of the deck. Using another 2x2x10”
block, pull a string from the high corner, and with another person
using a 4’ level, make this string drop 1/8 to ¼ of the bubble, so
that the string is lower in that corner. Attach the string and pull it
tight.
3. Move to the last corner (where the downspout will be located)
and again with another person, pull a string from the low corner
to the downspout corner, making the string drop about 1/8 to ¼ of
the bubble. Tie off the string and pull it tight.
4. From the lowest corner (downspout corner) pull another string to
the remaining high corner, forming a complete square. You
should now have string around the entire perimeter of the deck.
The string will drop from high side to low side, and the gutter will
drop to the downspout.
STEP 2: INSTALLATION OF MICROPRO TREATED LUMBER CARRIAGE
SYSTEM
1. This is the designed lumber you will use to install your panels.
You will need to rip 1 ½ by 1 ½ inch boards to be installed as your
carriage system.
2. With the perimeter string still in place, attach the 2x2x10” blocks
between the floor joists until they are level with the strings. The
spacing between the blocks should be every 3 to 4 feet.
3. Once the perimeter blocks have been placed, remove the strings
and pull a new string from side to side, perpendicular to the floor
joists. Again, about every 3 to 4 feet.
4. Attached a long 2x2 to the blocks or “legs” running perpendicular
to the joists. If the 2x2 is not long enough to reach the entire
length, join together two with a sister board of about 2 feet long.
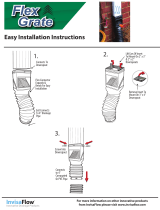
5. When completed, you will have a gradual slope from the house
to the gutter, and the gutter will have a gradual slope to the
downspout. You are now ready to install flashing.
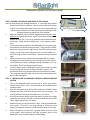
5
Underdeck Systems Instructions Guide
PITCH OF GUTTER TO DOWNSPOUT
Slope from house to gutter

Underdeck Systems Installation Guide
STEP 3: PROPER CAULK AND FLASHING SYSTEM
1. Successful installation of your deck is dependent on proper sealing
and flashing at the surfaces where the deck meets your home or
other structure. Water must be properly diverted to avoid leakage.
2. The trim flashing included will be bent to divert water into the panels
around the entire inside perimeter of your deck. You must remain
above the 2x2 framing already in place to allow the water to be
diverted to the panels.
3. Using the GECEL2300 provided, seal the edges of the flashing for the
entire perimeter. Attach Under Deck flashing on all sides of the deck
that are connected to the structure. Under Deck water diverters or
flashing should be installed at the ledger board between each joist to
ensure water run-off at ledger. Place a bead of GEOCEL2300
waterproof caulk along top edge where water diverter meets the
joist.
4. If you have a cantilever on your deck, you will want to install flashing
that covers the beam, diverting the water to the inside or larger side
of the cantilever.
5. Check to make certain that the proper flashing has been installed on
the deck when it was built. If not, additional flashing will ne
necessary.
STEP 4: GUTTER INSTALLATION
1. The gutter will be mounted against the beam (if there is a cantilever)
or against a treated 2x4 nailed to the inside of the outside posts.
Level from the framing to the beam and snap a line. If using a 2x4,
level to the posts and snap a line. Attach the 2x4 to the posts on the
line.
2. Attach the gutter to this line using the enclosed gutter hangers,
mounted with 1 ¼ galvanized screws. Space the hangers about 4 feet
apart, placing one at each end.
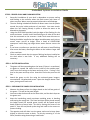
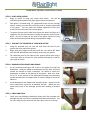
STEP 5: PREPARING THE PANELS FOR INSTALLATION
1. Measure the distance from the ledger board to the half-way point of
the gutter. This will be the panel length.
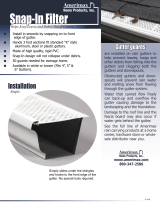
2. You must make the box end on the house side, and the drain slope on
the gutter end.
3. Keep the interlocking panels consistent avoiding errors in bending
and cutting the wrong end. The Panel end that will be placed toward
the ledger board (for outside gutter install) will be boxed and all
bends sealed to prevent leaks. Do this by cutting the frame of the
panel ¾” from the end, bend up the wing and caulk in the corners to
prevent leaking.
4. The opposite end will drain into the gutter and must be bent down
slightly to allow the water to drain. Do this by removing ½” of the
frame, bend the wing down using a hand brake.
6
Panel end at house
Panel end for gutter

Underdeck Systems Installation Guide
STEP 6: PANEL INSTALLATION
1. Begin to install, or hang your under deck panels. You will be
interlocking these panels into place against the previous panel.
2. Each panel is screwed using 1 ¼” galvanized screws into the carriage
system, making sure that the end of the panel is properly positioned
in the gutter. You can make the needed adjustments with your
screws to insure the panel rests on the gutter.
3. To repeat the next panel, make sure to push the panel into place so it
interlocks with the previous panel. Repeat this process until finished.
NOTE: Be sure to open up the ends of the panel channel, as they
make have become pinched during the preparation stage.
STEP 7: TRIM OUT THE PERIMETER OF YOUR NEW SYSTEM
1. Using the provided trim coil, you will now finish the look of your
system with trim around the system.
2. Begin with your ledger board and install the trim with a 90® bend
that will slide behind your panel and zip screw into your panels.
3. The remaining trim for the sides of your system will be bent using a
“stair step” bend to account for your outside deck board, as well as
your slope of panels.
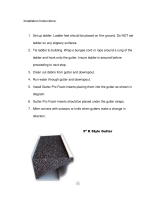
STEP 8: DOWNSPOUTPLACEMENT AND DRAINS
1. At the pre-determined spot, drill a hole in the gutter to install the
downspout. Hold your elbow or downspout over the hole, and mark
around the outside to make a template. Be careful to center the
downspout or elbow on the bottom of the gutter. With your snips,
cut an “X” to the corners of the downspout template you previously
marked and bend the 4 triangles down to create a flange to screw the
elbow to.
2. Install downspout and elbows with provided straps. Always use the
color matched zip screws for all exposed surfaces. Make sure you
attach each piece of the drainage system with caulking to prevent
leaks.
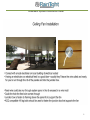
STEP 9: FINISH AND ENJOY
1. Finish your new Raintight Underdeck System with the enclosed trim
package that will cover all the exposed wood beneath the deck. You
are now ready to enjoy that new out door space, even if its raining
7

Underdeck Systems Installation Guide
8

9
Underdeck Systems Installation Guide
Accessories
To further customize your new living space, you
can install fans or LED lighting. Contact your local
electrician for assistance.
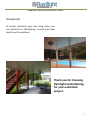
Thank you for choosing
RainTight Underdecking
for your underdeck
project.

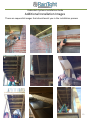
Additional Installation Images
These are sequential images that should assist you in the installation process
10
Underdeck Systems Installation Guide
-
 1
1
-
 2
2
-
 3
3
-
 4
4
-
 5
5
-
 6
6
-
 7
7
-
 8
8
-
 9
9
-
 10
10


RainTight Decks PNL-1-12-16 Installation guide
- Type
- Installation guide
- This manual is also suitable for
Ask a question and I''ll find the answer in the document
Finding information in a document is now easier with AI
Other documents
-
 InvisaFlow 4400 Installation guide
-
 Downspout Safety Cap DSC-23W User guide
-
 Amerimax none User manual
-
Severe Weather 1255878 Installation guide
-
 The Wedge P-210-4-KIT Operating instructions
-
 Gutter Pro 5K Foam Wedge Installation guide
-
TAG TAG208300 Installation guide
-
none 0099 Installation guide
-
 Trex RainEscape 0023 Installation guide
-
GUTTERSTUFF GSP-HR6FR-8box-DS Installation guide


